Installation

Preparing the Machine

  1. Move the machine to level surface.

  2. Shut off the engine, remove the key, and wait for all moving parts to stop.

  3. Disconnect the spark-plug wire.

Installing the Kit

Parts needed for this procedure:

Traction plate1
Traction-cable bracket1
Bolt2
Nut2
Traction rod1

Installing the Traction Plate and Bracket

  1. Remove the 2 screws that are holding the belt cover in place (Figure 1).

  2. Remove the belt cover (Figure 1).

    g260066
  3. Unhook the spring from the existing traction plate (Figure 2).

    g340063
  4. Remove the existing traction plate from the friction wheel plate by removing the bolt holding it in place (Figure 3).

    g340064
  5. Install the new traction plate on the friction wheel plate using the previously removed bolt (Figure 4).

    g340065
  6. In the rear of the machine, unhook the traction cable from the traction-cable bracket (Figure 5).

    g340066
  7. Unhook the traction rod from the traction-cable bracket and slide the rod out the back of the machine.

  8. Remove the existing traction-cable bracket from the crank bracket by removing the bolt and nut holding it in place (Figure 6).

    g340089
  9. Install the new traction-cable bracket on the crank bracket using the previously removed bolt and nut.

  10. Hook the traction cable on the new traction-cable bracket as shown in Figure 7.

    Note: Ensure that the traction cable is oriented as shown in Figure 7.

    g340090

Installing the Traction Rod

  1. Insert the new traction rod through the rear of the machine (Figure 8).

    g340091
  2. Connect the one end of the rod to the new traction-cable bracket using a bolt and nut included with the kit as shown in Figure 9.

    g340092
  3. Connect the other end of the rod to the new traction plate using a bolt and nut included with this kit (Figure 10).

    g340093

Completing the Installation

  1. Hook spring the was removed in Step 3 of Installing the Traction Plate and Bracket on the new traction plate.

  2. Install the belt cover on the machine using the 2 corresponding screws.

  3. Install the spark plug wire.

  4. Check the operation of the traction cable and adjust it if needed; refer to Checking and Adjusting the Traction Cable.

Maintenance

Recommended Maintenance Schedule(s)

Maintenance Service IntervalMaintenance Procedure
After the first 2 hours
  • After the first 2 hours—Inspect the traction cable and adjust it if necessary.
  • Yearly
  • Inspect the traction cable and adjust or replace it if necessary.
  • Controls System Maintenance

    Checking and Adjusting the Traction Cable

    Maintenance Service IntervalMaintenance Procedure
    After the first 2 hours
  • After the first 2 hours—Inspect the traction cable and adjust it if necessary.
  • Yearly
  • Inspect the traction cable and adjust or replace it if necessary.
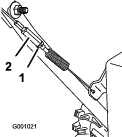
  • If the machine does not drive in the forward or reverse speeds or it drives when you release the traction lever, adjust the traction cable.

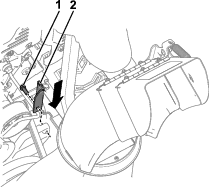
    With the traction lever disengaged, ensure that the bottom of the traction-cable bracket is touching the frame of the machine (Figure 11).

    g259431

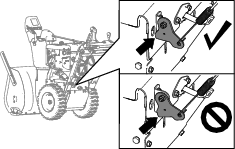
    If the bottom of the traction-cable bracket is not touching the frame of the machine, the left (traction) cable is not properly adjusted.

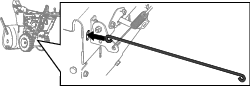
    To adjust the traction cable, do the following:
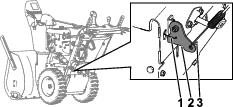
    1. Loosen the jam nut.

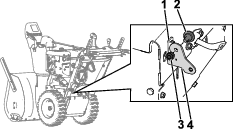
    2. Loosen or tighten the turnbuckle to until the cable is taught and the bottom of the bracket touches the frame of the machine.

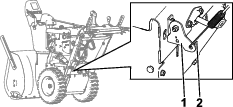
    3. Tighten the jam nut (Figure 12).

      g001021