Warning
CALIFORNIA
Proposition 65 Warning
Use of this product may cause exposure to chemicals known to the State of California to cause cancer, birth defects, or other reproductive harm.
Safety
Warning
This canopy does not protect you from falling objects or during rollovers.
Do not use the canopy as a falling object or rollover protection system.
Installation
Preparing the Machine
-
Park the machine on a level surface.
-
Lower the loader arms.
-
Engage the parking brake.
-
Shut off the engine and remove the key.
Installing the Receiver Tubes
Parts needed for this procedure:
| Front receiver tube | 2 |
| Left, rear receiver tube | 1 |
| Right, rear receiver tube | 1 |
| Windshield bracket | 1 |
| Hose guard | 2 |
| Bolt (1/4 x 1-1/2 inches) | 2 |
| Bolt (5/16 x 1 inch) | 2 |
| Bolt (5/16 x 1-1/4 inches) | 2 |
| Bolt (1/4 x 2 inches) | 2 |
| Locknut (1/4 inch) | 4 |
-
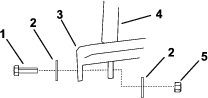
Remove the 2 bolts and locknuts from the fuel tank lock plate to the machine (Figure 1). Retain the locknuts.
-
Install a front receiver tube to the right side of the machine using a bolt (1/4 x 1-1/2 inches) and locknut (1/4 inch) as shown in Figure 2.

-
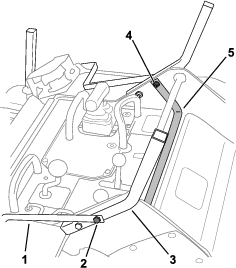
Install the right, rear receiver tube using a bolt (5/16 x 1) and a retained locknut (5/16 inch) as shown in Figure 2.
-
Install the hose guard to the bracket of the rear receiver tube using a bolt (5/16 x 1-1/4 inch) and a retained locknut (5/16 inch) as shown in Figure 2.
-
Repeat steps 2 through 4 for the other side of the machine.
-
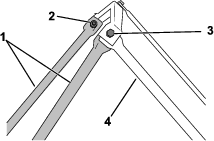
Install the windshield bracket, using the 2 bolts (1/4 x 2 inches) and 2 locknuts (1/4 inch) to also secure the front receiver tubes and the hose guards to the frame (Figure 3 and Figure 4).
Assembling the Frame
Parts needed for this procedure:
| Center brace | 1 |
| Front frame tube | 1 |
| Rear frame tube | 1 |
| Side frame tube | 2 |
| Front post | 2 |
| Rear post | 2 |
| Bolt (1/4 x 3/4 inch) | 4 |
| Bolt (1/4 x 1 inch) | 6 |
| Bolt (1/4 x 1-1/4 inches) | 2 |
| Acorn nut (1/4 inch) | 2 |
| Locknut (1/4 inch) | 10 |
| Fender washer | 4 |
-
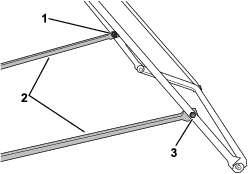
Install the center brace to the front frame tube and rear frame tube using a bolt (1/4 x 1 inch) and acorn nut on each end (Figure 5).
-
Install the 2 side frame tubes to the rear frame tube (Figure 5 and Figure 6).
Note: Install the side frame tubes so that they bend outward and the holes for the rear posts are closer to the rear frame tube, as shown in Figure 5; ensure that the heads of the bolts face outward.
-
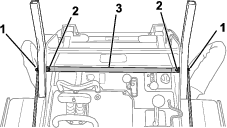
Secure the 2 side frame tubes and 2 front posts to the front frame tube (Figure 7).
Note: The front posts are shorter than the rear posts; ensure that the heads of the bolts face outward.
-
Install the 2 rear posts to the side frame tubes (Figure 8).
Note: Ensure that the heads of the bolts face outward.
-
Install 4 bolts (1/4 x 1 inch) and 4 locknuts (1/4 inch) onto the posts so that the bolt heads face outward. (Figure 9).
-
With the assistance of another person, install the posts into the receiver tubes, using the bolts in the posts as stops (Figure 9).
Installing the Canopy
Parts needed for this procedure:
| Left panel | 1 |
| Right panel | 1 |
| Windshield | 1 |
| Top cover | 1 |
| Bolt (5/16 x 1-1/4 inches) | 2 |
-
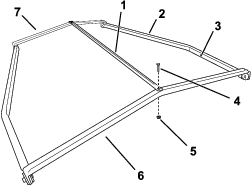
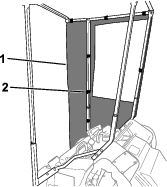
Install the left and right panels, using the hook and loop fasteners to secure them to the frame, as shown in Figure 10 and Figure 11.
-
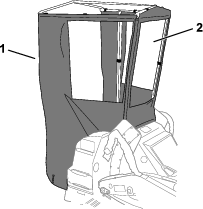
Install the windshield, using the hook and loop fasteners to secure it to the panels, front frame tube, and the windshield bracket (Figure 11).
Note: Secure the windshield to the front frame tube before securing it to the windshield bracket.
-
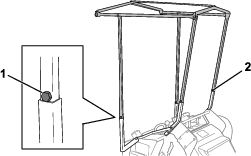
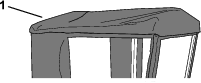
Install the top cover, using the hook and loop fasteners to secure it to the panels and windshield (Figure 12).
-
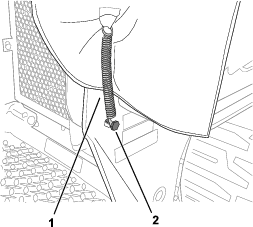
On both sides of the machine, remove the existing bolt and install a bolt (5/16 x 1-1/4 inches) as shown in Figure 13.
-
Hook the springs from the panels on the bolt.
Operation
Transporting the Machine
Before transporting the machine, unhook the springs and lift the canopy frame out of the receiver tubes.
Important: Do not transport the machine with the canopy installed.