
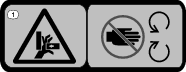
 , which means
Caution, Warning, or Danger—personal safety instruction. Failure
to comply with these instructions may result in personal injury or
death.
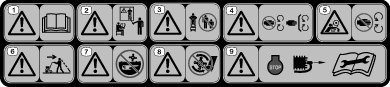
, which means
Caution, Warning, or Danger—personal safety instruction. Failure
to comply with these instructions may result in personal injury or
death.


Maintenance
Maintenance Safety
-
Inspect the machine frequently to ensure that it is in safe working condition and that shear bolts, engine-mounting bolts, and other fasteners are properly tightened.
-
Shut off the machine and wait for all moving parts to stop before you leave the operator’s position. Disconnect the spark-plug wire, keep it away from the plug to prevent accidental starting, and allow the machine to cool before adjusting, fueling, unclogging, servicing, cleaning, or storing the machine.
-
Wear gloves and eye protection when servicing the machine.
-
Never tamper with safety devices. Check their proper operation regularly.
-
To ensure optimum performance of the machine, use only genuine Toro replacement parts and accessories. Replacement parts and accessories made by other manufacturers could be dangerous, and such use could void the product warranty.
-
Replace tines that are bent, damaged, or loose; do not repair or alter them.
-
Keep the machine, attachments, and accessories in safe working condition.
-
Do not attempt to repair the machine unless you have the proper tools and instructions for disassembling, assembling, and repairing the machine.
Recommended Maintenance Schedule(s)
| Maintenance Service Interval | Maintenance Procedure |
|---|---|
| Before each use or daily |
|
| Every 25 hours |
|
| Every 50 hours |
|
| Yearly |
|
Important: Refer to your engine manual for additional maintenance procedures
Pre-Maintenance Procedures
Preparing for Maintenance
-
Move the machine to a level surface, shut off the engine, and wait for all moving parts to stop.
-
Disconnect the spark-plug wire from the spark plug.
-
After performing the maintenance procedure(s), connect the spark-plug wire to the spark plug.
Important: Before tipping the machine, allow the fuel tank to run dry through normal usage. If you must tip the machine prior to running out of fuel, use a hand fuel pump to remove the fuel.
Engine Maintenance
Servicing the Air Filter
| Maintenance Service Interval | Maintenance Procedure |
|---|---|
| Every 25 hours |
|
| Yearly |
|
-
Unclip the top of the air-filter cover.
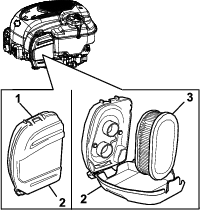
-
Remove the air filter.
-
Inspect the air filter.
Note: If the air filter is excessively dirty, replace it with a new filter. Otherwise, gently tap the air filter on a hard surface to loosen debris.
-
Install the air filter.
-
Use the clip to install the air-filter cover.
Changing the Engine Oil
| Maintenance Service Interval | Maintenance Procedure |
|---|---|
| Before each use or daily |
|
Changing the engine oil is not required, but if you want to change the oil, use the following procedure.
Note: Run the engine a few minutes before changing the oil to warm it. Warm oil flows better and carries more contaminants.
| Engine oil capacity | 0.44 L (15 fl oz)* |
| Oil viscosity | SAE 30 or SAE 10W-30 detergent oil |
| API service classification | SJ or higher |
*There is residual oil in the crankcase after you drain the oil. Do not pour the entire capacity of oil into the crankcase. Fill the crankcase with oil as directed in the following steps.
-
Move the machine to a level surface.
-
Refer to Preparing for Maintenance.
-
Remove the dipstick by rotating the cap counterclockwise and pulling it out.
-
Tip the machine onto its side (so that the air filter is up) to drain the used oil from the oil-fill tube.
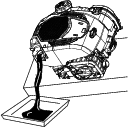
-
After draining the used oil, return the machine to the operating position.
-
Carefully pour about 3/4 of the engine capacity of oil into the oil-fill tube.
-
Wait 3 minutes for the oil to settle in the engine.
-
Wipe the dipstick clean with a clean cloth.
-
Insert the dipstick into the oil-fill tube, then remove the dipstick.
-
Read the oil level on the dipstick.
-
If the oil level on the dipstick is too low, carefully pour a small amount of oil into the oil-fill tube, wait 3 minutes, and repeat steps 8 through 10 until the oil level on the dipstick is correct.
-
If the oil level on the dipstick is too high, drain the excess oil until the oil level on the dipstick is correct.
Important: If the oil level in the engine is too low or too high and you run the engine, you may damage the engine.
-
-
Install the dipstick into the oil-fill tube securely.
-
Recycle the used oil properly.
Servicing the Spark Plug
| Maintenance Service Interval | Maintenance Procedure |
|---|
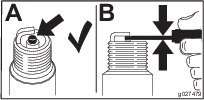
Ensure that the air gap between the center and side electrodes is correct before installing the spark plug.
Use a spark plug wrench for removing and installing the spark plug(s) and a gapping tool/feeler gauge to check and adjust the air gap. Install a new spark plug(s) if necessary.
Type: Champion RN9YC or equivalent
Air gap: 0.75 mm (0.03 inch)
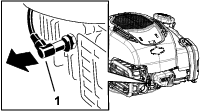
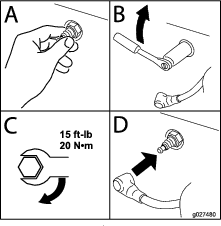
Removing the Spark Plug
-
Disconnect the spark-plug wire from the spark plug.
-
Clean around the spark plugs to prevent dirt from entering the engine and potentially causing damage.
-
Remove the spark plug.
Checking the Spark Plug
Important: Do not clean the spark plug(s). Always replace the spark plug(s) when it has a black coating, worn electrodes, an oily film, or cracks.
If you see light brown or gray on the insulator, the engine is operating properly. A black coating on the insulator usually means the air cleaner is dirty.
Set the gap to 0.75 mm (0.03 inch).
Installing the Spark Plug
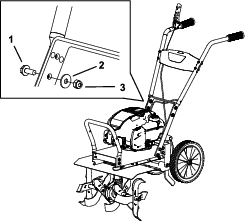
Belt Maintenance
Checking and Adjusting the Belt Tension
| Maintenance Service Interval | Maintenance Procedure |
|---|---|
| Before each use or daily |
|
The belt tension may decrease over time. You may need to adjust the belt within the first half hour of operation.
Important: Check the belt tension regularly. Improper belt tension may cause premature belt wear.
The belt may need adjustment if there is a constant buzzing sound while the tines are engaged or if there is a squealing sound when the tines are engaged and under load.
Note: You may hear a short buzzing sound after releasing the drive-control lever while using the machine. This is normal and is caused by the teeth of the cogged belt contacting the wire belt guide to stop rotation. You do not need to adjust the belt tension for this.
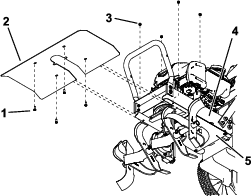
-
Remove the dirt shield.
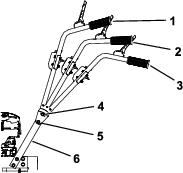
-
With the drive-control lever in the neutral position, measure the length of the relaxed cable spring.
-
Pull down the drive-control lever and measure the length of the extended cable spring. The difference should be 0.6 cm (1/4 inch).
-
If the belt needs adjustment, hold the lower jam nut on the adjustable cable in place and adjust the upper jam nut in 0.32 cm (1/8 inch) increments. Check the tension again, and repeat as necessary.
Note: If the tension is incorrect and you cannot adjust the jam nuts further, move the Z-bend end of the cable to the next hole in the drive-control lever as shown in Figure 26. If the tension is still incorrect, replace the belt.

-
Install the dirt shield.
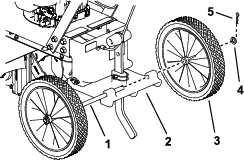
Replacing the Drive Belt
| Maintenance Service Interval | Maintenance Procedure |
|---|---|
| Every 50 hours |
|
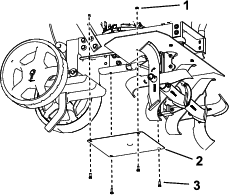
Removing the Belt
-
Remove the dirt shield.
-
Remove the drive belt cover.
-
Gently pull the engine recoil rope to rotate the pulley.
-
While the pulley turns, force the belt off the V-groove.
-
Slide the belt off the engine pulley.
-
Pull the belt down and out of the way.
-
Push the belt forward and out the front of the machine.
Installing the Belt
-
Place belt in the transmission pulley groove.
-
Gently pull the engine recoil rope to rotate the engine pulley while forcing the belt into the V-groove.
-
Install the drive belt cover.
-
Install the dirt shield plate.
-
Check the belt tension; adjust it as necessary.
Cleaning
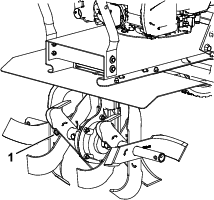
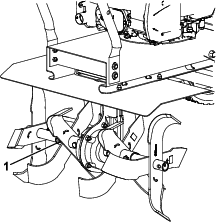
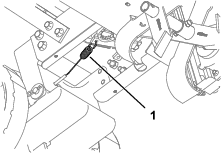
Cleaning the Tine Axle Shaft
| Maintenance Service Interval | Maintenance Procedure |
|---|
Remove all vegetation, string, wire, and other material that may have accumulated on the axle between the inner tines and the transmission housing.