Introduction

This machine is a tow-behind attachment intended to be used by professional, hired operators in commercial applications. It is designed to brush sand into aeration holes and redistribute infill in synthetic turf. Using this product for purposes other than its intended use could prove dangerous to you and bystanders.

Read this information carefully to learn how to operate and maintain your product properly and to avoid injury and product damage. You are responsible for operating the product properly and safely.

Visit www.Toro.com/Bullseye for product safety and operation training materials, accessory information, help finding a dealer, or to register your product.

Whenever you need service, genuine Bullseye parts, or additional information, contact an Authorized Service Dealer or Bullseye Customer Service and have the model and serial numbers of your product ready. Figure 1 identifies the location of the model and serial numbers on the product. Write the numbers in the space provided.

g346742

This manual identifies potential hazards and has safety messages identified by the safety-alert symbol (Figure 2), which signals a hazard that may cause serious injury or death if you do not follow the recommended precautions.

g000502

This manual uses 2 words to highlight information. Important calls attention to special mechanical information and Note emphasizes general information worthy of special attention.

Warning

CALIFORNIA

Proposition 65 Warning

Use of this product may cause exposure to chemicals known to the State of California to cause cancer, birth defects, or other reproductive harm.

Safety

General Safety

This product is capable of causing personal injury. Always follow all safety instructions to avoid serious personal injury.

  • Read and understand the contents of both this Operator’s Manual and the operator’s manual of the traction unit before using this machine. Ensure that everyone using this product knows how to use this machine and the traction unit and understands the warnings.

  • Use your full attention while operating the machine. Do not engage in any activity that causes distractions; otherwise, injury or property damage may occur.

  • Do not put your hands or feet near moving components of the machine.

  • Do not operate the machine without all guards and other safety protective devices in place and working on the machine.

  • Keep the machine away from bystanders while it is moving.

  • Keep children out of the operating area. Never allow children to operate the machine.

  • Stop the machine, shut off the engine, engage the parking brake of the traction unit, remove the key, and wait for all moving parts to stop before servicing, fueling, or unclogging the machine.

Improperly using or maintaining this machine can result in injury. To reduce the potential for injury, comply with these safety instructions and always pay attention to the safety-alert symbol Graphic, which means Caution, Warning, or Danger—personal safety instruction. Failure to comply with these instructions may result in personal injury or death.

Safety and Instructional Decals

Graphic

Safety decals and instructions are easily visible to the operator and are located near any area of potential danger. Replace any decal that is damaged or missing.

decal105-0698
decal133-8061
decal144-7905

Setup

Removing the Attachment from the Pallet

  1. Place the pallet on level ground.

  2. Attach lifting cables to the lifting eyes on both sides of the machine.

  3. Lift the attachment and pallet off the ground 50 mm (2 inches).

  4. Gently lower the attachment in a controlled way as shown in Figure 3 until it is on the ground.

    g348804
  5. Remove the 4 bolts securing the attachment to the pallet and remove the pallet.

    g340343
  6. Install the tow bar. Torque the bolts to 80 to 99 N∙m (59 to 73 ft-lb).

    g340342

Inspecting the Machine

Checking the Traction Unit Requirements

Use the following list as a reference:

  • Refer to Specifications for the minimum horse power and minimum lifting capacity for the traction unit.

  • The traction unit must have a drawbar hitch.

  • Adequate front-end weight (ballast) to offset the weight of the machine.

  • Check the tire air pressure of the traction unit.

    Adjust the tire air pressure as needed.

    Important: Do not exceed the maximum or minimum tire inflation pressures as recommended by the tire manufacturer.

Checking the Ballast Requirements

Warning

Mounting the machine to the rear of the traction unit decreases the weight on its front axle.

Failure to add required ballast may result in an accident and severe injury or death.

  • To ensure adequate steering control and stability you may need to add ballast to the front of the traction unit.

  • Refer to the traction unit operator's manual for ballast requirements.

Product Overview

Brush switch

Use the switch to raise and lower the brushes.

Important: Remove the hairpin cotter and pin from both ends of each brush before raising and lowering the brushes (see Figure 10). Install them to the highest position beneath the brushes.

g347549

Specifications and design are subject to change without notice.

Traction Unit Specifications

Electrical connection12 V
Tow systemDrawbar and pin

Attachment Specifications

Working width140 cm (55 inches)
Width177 cm (70 inches)
Length without tow bar164 cm (65 inches)
Length including tow bar269 cm (106 inches)
Height62 cm (24 inches)
Maximum working and transport speed15 km/h (9.3 mph)
Maximum capacity (theoretical at maximum transport speed)21,000 m2/h (226,042 ft2/h)
Weight181 kg (399 lb)

Attachments/Accessories

A selection of Bullseye approved attachments and accessories may be available for use with the machine to enhance and expand its capabilities. Contact your Authorized Service Dealer or authorized Bullseye distributor or go to www.Toro.com/Bullseye for a list of all approved attachments and accessories.

To ensure optimum performance and continued safety certification of the machine, use only genuine Bullseye replacement parts and accessories. Replacement parts and accessories made by other manufacturers could be dangerous, and such use could void the product warranty.

Operation

Before Operation

Before Operation Safety

  • Never allow children or untrained people to operate or service the machine. Local regulations may restrict the age of the operator. The owner is responsible for training all operators and mechanics.

  • Become familiar with the safe operation of the equipment, operator controls, and safety signs.

  • Know how to stop the machine and shut off the engine of the traction unit quickly.

  • Ensure that the guards and shields are properly installed and maintained. Replace missing, damaged, or worn guards and shields before using the machine.

  • Inspect the area where you will use the machine and remove all objects that the machine could strike.

  • Ensure that your traction unit is suitable for use with an implement of this weight by checking with your traction unit supplier or manufacturer.

  • Shut off the machine, shut off the engine and remove the key of the traction unit, and wait for all moving parts to stop before making any adjustments to the machine.

Understanding the Traction Unit Controls

Familiarize yourself with the operation of the following traction unit controls before operating the machine:

  • Clutch

  • Throttle

  • Gear selection

  • Parking brake

    Important: Refer to the traction unit operator's manual for operating instructions.

Connecting the Attachment to a Traction Unit

  1. Position the attachment and traction unit on a level surface.

  2. Carefully drive the traction unit in reverse until the draw bar is near the attachment.

  3. Engage the parking brake, shut off the engine, and remove the key from the traction unit.

  4. Secure the attachment to the draw bar using a clevis pin and ensure that it cannot detach from it.

  5. Remove the 2 bolts and adjust the attachment so that it is horizontal. Install the bolts.

    g340367
  6. Route the cables from the switch box, along the drawbar and tow vehicle, to the battery of the traction unit.

  7. Connect the positive cable (red clamp) to the positive (+) battery post of the traction unit.

    Warning

    Incorrect battery cable routing could damage the machine and cables, causing sparks. Sparks can cause the battery gasses to explode, resulting in personal injury.

    • Always connect the positive (red) cable before connecting the negative (black) cable.

    • Always disconnect the negative (black) cable before disconnecting the positive (red) cable.

    g347265
  8. Connect the negative cable (black clamp) to the negative (-) battery post of the traction unit.

  9. Use cable ties to secure the cables to the drawbar and tow vehicle away from moving parts as required.

    Important: Ensure that there is sufficient slack and avoid pinch points, abrasion, and taut routing.

  10. Remove the 2 storage stands from the rear of the attachment.

    g349524

Adjusting the Working Depth

  1. Raise the brushes to the highest position using the electrical switch box.

  2. Engage the parking brake, shut off the engine, and remove the key from the traction unit.

  3. Remove the hairpin cotter and pin from both ends from each brush.

    g340431
  4. Raise or lower the brushes to the desired working height and install the pins and hairpin cotters to the highest position beneath the brushes.

  5. Adjust the other 3 pin locations to the same height.

    Important: Do not adjust the attachment in a way that could damage the topsoil.

  6. Verify the working depth while the attachment is stationary.

Adjusting the Brush Angles

You can adjust the brush angles so that any accumulated material (e.g., sand, rubber, etc.) collects on 1 side of the attachment. Drive in a circular pattern to brush in the material.

  1. Park the machine on a level surface.

  2. Raise the brushes.

  3. Engage the parking brake, shut off the engine, and remove the key from the traction unit.

  4. Secure the attachment from movement.

  5. Loosen the nuts on the bearings for the brushes.

    g346073
  6. Slide the brush to the desired position and tighten the nuts. Torque to 202 to 248 N∙m (149 to 183 ft-lb).

Transporting the Attachment

To begin transport operation, raise the brushes. To avoid loss of control, traverse steep inclines slowly, approach rough areas at reduced speed and cross severe undulations carefully.

Important: Do not exceed transport speeds of 15 km/h (9.3 mph).

During Operation

During Operation Safety

General Safety

  • The owner/operator can prevent and is responsible for accidents that may cause personal injury or property damage.

  • Wear appropriate clothing, including eye protection; long pants; substantial, slip-resistant footwear; and hearing protection. Tie back long hair and do not wear loose clothing or loose jewelry.

  • Use your full attention while operating the machine. Do not engage in any activity that causes distractions; otherwise, injury or property damage may occur.

  • Do not operate the machine when tired, ill, or under the influence of alcohol or drugs.

  • Never carry passengers on the machine and keep bystanders and pets away from the machine during operation.

  • Operate the machine only in good visibility to avoid holes or hidden hazards.

  • Keep your hands and feet away from moving parts.

  • Look behind and down before backing up to be sure of a clear path.

  • Use care when approaching blind corners, shrubs, trees, or other objects that may obscure your vision.

  • Disengage the attachment (if applicable) whenever you are not using it.

  • Stop the machine, shut off the engine, remove the key, wait for all moving parts to stop, and inspect the machine after striking an object or if there is an abnormal vibration in the machine. Make all necessary repairs before resuming operation.

  • Slow down and use caution when making turns and crossing roads and sidewalks with the machine. Always yield the right-of-way.

  • Reduce speed on rough roads and surfaces.

  • When the attachment is connected to a traction unit and in the raised position, the weight of it affects stability, braking, and steering. Exercise caution when transporting between working areas.

  • Never leave a running machine unattended.

  • Before leaving the operating position, do the following:

    • Park the machine on a level surface.

    • Engage the parking brake.

    • Lower the attachment.

    • Shut off the engine and remove the key.

    • Wait for all moving parts to stop before leaving the machine.

  • Do not operate the machine when there is the risk of lightning.

  • Use Bullseye accessories, attachments, and replacement parts only.

Slope Safety

  • Review the traction unit specifications to ensure that you do not exceed its slope capabilities.

  • Slopes are a major factor related to loss of control and rollover accidents, which can result in severe injury or death. You are responsible for safe slope operation. Operating the machine on any slope requires extra caution.

  • Review and understand the slope instructions in the manual and on the traction unit.

  • Evaluate the site conditions to determine if the slope is safe for machine operation, including surveying the site. Always use common sense and good judgment when performing this survey.

  • Review the slope instructions listed below for operating the machine on slopes and to determine whether you can operate the machine in the conditions on that day and at that site. Changes in the terrain can result in a change in slope operation for the machine.

  • Avoid starting, stopping, or turning the machine on slopes. Avoid making sudden changes in speed or direction. Make turns slowly and gradually.

  • Do not operate a machine under any conditions where traction, steering, or stability are in question.

  • Remove or mark obstructions such as ditches, holes, ruts, bumps, rocks, or other hidden hazards. Tall grass can hide obstructions. Uneven terrain could overturn the machine.

  • Be aware that operating the machine on wet grass, across slopes, or downhill may cause the machine to lose traction. Loss of traction to the drive wheels may result in sliding and a loss of braking and steering.

  • Use extreme caution when operating the machine near drop-offs, ditches, embankments, water hazards, or other hazards. The machine could suddenly roll over if a wheel goes over the edge or the edge caves in. Establish a safety area between the machine and any hazard.

  • Identify hazards at the base of the slope. If there are hazards, mow the slope with a power walk-behind mower.

  • If possible, keep the attachment lowered to the ground while operating on slopes. Raising the attachment while operating on slopes can cause the machine to become unstable.

  • Use extreme caution with other attachments. These can change the stability of the machine and cause a loss of control. Always keep the machine in gear when going down slopes. Do not coast downhill (applicable only to gear-drive units).

Operating the Attachment

  1. Drive to the location where you will use the attachment and park the machine on a level surface.

  2. Adjust the working depth; refer to Adjusting the Working Depth.

  3. Drive the traction unit forward slowly, lower the brushes, then increase speed.

  4. After operating the attachment, brake slightly and raise the brushes to the top position while driving slowly.

  5. Drive to the next location as needed.

Important: Disconnect the battery clamps after operation; refer to Disconnecting the Battery Clamps.

Operating Tips

  • Make very gradual turns. Never make sharp turns with the attachment.

  • Do not use the attachment if the ground is too wet.

  • Look backward frequently to ensure that the machine is operating properly, and alignment is maintained with previous passes.

  • To optimize performance and life of the product, operate the attachment only when grooming the intended application area.

  • Make multiple passes over the field either in the same or in different directions for improved grooming.

After Operation

After Operation Safety

  • Park the traction unit on a level surface; engage the parking brake of the traction unit; shut off the engine; remove the key; and wait for all movement to stop before leaving the operator’s position.

  • Allow the machine to cool before storing the machine in any enclosure.

  • Keep all parts of the machine in good working condition and all hardware tightened.

  • Replace all worn, damaged, or missing decals.

Disconnecting the Battery Clamps

Important: Disconnect the battery clamps after operation.

  1. Park the machine on a level surface.

  2. Engage the parking brake, shut off the engine, and remove the key from the traction unit.

  3. Disconnect the negative (black clamp) cable from the traction unit battery.

  4. Disconnect the positive (red clamp) cable from the traction unit battery.

    Warning

    Incorrect battery cable routing could damage the machine and cables, causing sparks. Sparks can cause the battery gasses to explode, resulting in personal injury.

    • Always connect the positive (red) cable before connecting the negative (black) cable.

    • Always disconnect the negative (black) cable before disconnecting the positive (red) cable.

Removing the Attachment

  1. Park the machine on a level surface.

  2. Raise the brushes.

  3. Engage the parking brake, shut off the engine, and remove the key from the traction unit.

  4. Disconnect the battery clamps; refer to Disconnecting the Battery Clamps

  5. Remove the attachment from the traction unit draw bar.

  6. Chock or block the wheels of the attachment to prevent movement.

  7. Start the traction unit and drive it away from the attachment.

  8. Install the 2 storage stands to the rear of the attachment.

    g349524

Note: To conserve space in storage, remove the tow bar, tilt the attachment, and store it vertically on the storage stands.

Important: When storing the attachment, do not allow the brush to touch the ground or other objects to avoid bending the bristles.

Maintenance

Recommended Maintenance Schedule(s)

Maintenance Service IntervalMaintenance Procedure
Every 50 hours
  • Check the roller bearings and driveline.
  • Grease the attachment.
  • Check the condition of the chains; replace the chains or chain wheels if worn.
  • Check the chain tension.
  • Caution

    If you leave the key in the switch, someone could accidently start the engine and seriously injure you or bystanders.

    Remove the key from the traction unit switch before you perform any maintenance.

    Maintenance Safety

    • Before adjusting, cleaning, servicing, or leaving the machine, do the following:

      • Position the machine on a level surface.

      • Move the throttle switch to the low-idle position.

      • Disengage the PTO (if applicable).

      • Ensure that the traction is in neutral.

      • Engage the parking brake.

      • Shut off the engine of the traction unit and remove the key.

      • Wait for all moving parts to stop.

      • Allow machine components to cool before performing maintenance.

    • Perform only those maintenance instructions described in this manual. If major repairs are ever needed or assistance is desired, contact an authorized Bullseye distributor.

    • Ensure that the machine is in safe operating condition by keeping nuts, bolts, and screws tight.

    • If possible, do not perform maintenance while the engine is running. Keep away from moving parts.

    • Carefully release pressure from components with stored energy.

    • Support the machine with blocks or storage stands when working beneath it. Never rely on the hydraulic system to support the machine.

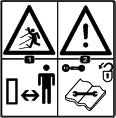
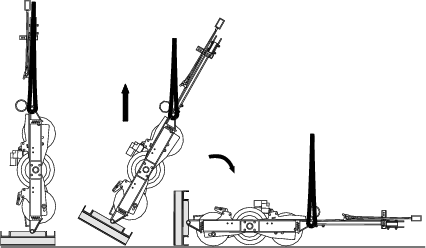
    • Never crawl under the attachment. If necessary, tilt the attachment.

    • Ensure that all guards are installed and secured after maintaining or adjusting the machine.

    • To ensure safe, optimal performance of the machine, use only genuine Bullseye replacement parts. Replacement parts made by other manufacturers could be dangerous, and such use could void the product warranty.

    Greasing the Attachment

    Maintenance Service IntervalMaintenance Procedure
    Every 50 hours
  • Check the roller bearings and driveline.
  • Grease the attachment.
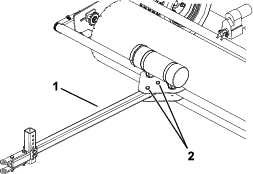
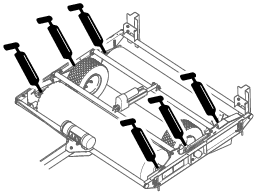
  • The attachment has grease fittings that you must lubricate regularly with No. 2 lithium grease. Also, lubricate the attachment immediately after every washing and after long periods without use.

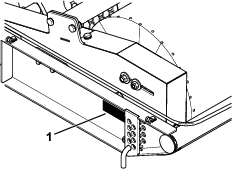
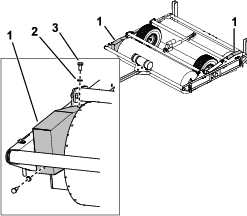
    1. Remove the chain guards.

      g346258
    2. Grease the 4 roller bearings and the 2 wheel bearings.

      g347146
    3. Wipe up any excess grease.

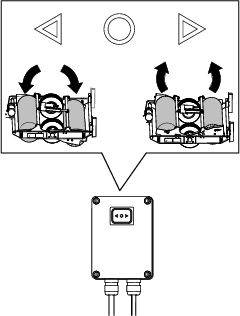
    4. Lubricate the 2 chains using chain lubricant.

      g347145
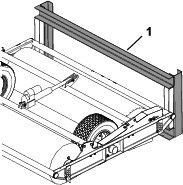
    5. Install the chain guards as shown in Figure 13.

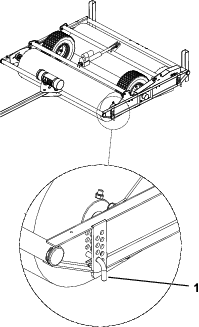
    Tensioning the Chains

    Maintenance Service IntervalMaintenance Procedure
    Every 50 hours
  • Check the condition of the chains; replace the chains or chain wheels if worn.
  • Check the chain tension.
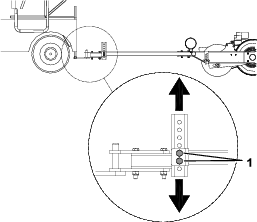
  • Wear on the drivelines can cause the chains to loosen. Adjust the chain wheels to keep the chains taut.

    1. Park the machine on a level surface.

    2. Engage the parking brake, shut off the engine, and remove the key from the traction unit.

    3. Secure the attachment from movement.

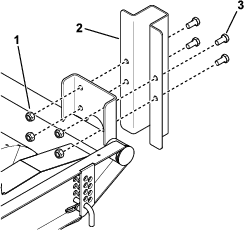
    4. Remove the chain guard.

      g346258
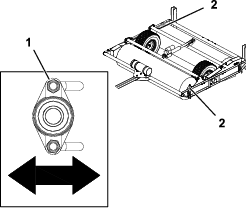
    5. Loosen the nuts on the chain wheel and adjust the wheel in the slot until the chain is taut.
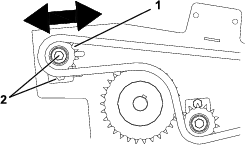
      g346259
    6. Tighten the nuts.

    7. Install the chain guards as shown in Figure 16.

    Storage

    Storage Safety

    • Before adjusting, cleaning, storing, or repairing the machine, park the it on a level surface; engage the parking brake of the traction unit; shut off the engine; remove the key; and wait for all movement to stop before leaving the traction unit.

    • Store the machine on the storage stands positioned on a firm, level surface so that it does not sink or tip over.

    • Store the machine away from areas of human activity.

    • Do not allow children to play on or around the stored machine.

    Preparing the Machine for Storage

    Important: Do not use brackish or reclaimed water to clean the machine.

    When the machine is stored for a long period, do out the following procedure:

    1. Clean off any dirt or grease that may have accumulated on the machine or any of the moving parts.

    2. Lubricate all grease fittings.

    3. Touch up any scratches on the painted surfaces.

    4. Replace any missing or damaged decals.

    5. Store the machine inside a dry, secure building. Inside storage reduces maintenance, gives a longer working life, and increases the residual value of the machine. If inside storage is not available, cover the machine with a heavy sheet or tarpaulin and secure it tightly.

    Note: To conserve space in storage, remove the tow bar, tilt the attachment, and store it vertically on the storage stands.

    Important: When storing the attachment, do not allow the brush to touch the ground or other objects to avoid bending the bristles.

    Troubleshooting

    ProblemPossible CauseCorrective Action
    The attachment kicks up too much material.
    1. The working depth is too deep.
    2. The driving speed is too fast.
    1. Use a more shallow working depth.
    2. Use a slower driving speed.
    The attachment kicks up too little material.
    1. The working depth is too shallow.
    2. The driving speed is too slow.
    3. The brush is worn.
    1. Use a deeper working depth.
    2. Increase the driving speed.
    3. Replace the brush.
    The appearance of the field is poor.
    1. The working depth is too deep.
    1. Use a more shallow working depth.
    There are squeaking noises during operation.
    1. The bearings need greasing or are worn out.
    1. Grease the bearings using EP2 grease or replace them.
    The chains slip over the chain wheels.
    1. The chains tension is incorrect.
    2. The chains or chain wheels are worn.
    1. Adjust the chain tension.
    2. Replace the chains or chain wheels.