Installation
Preparing the Machine
-
Park the machine on a level surface.
-
Engage the parking brake.
-
Lower the cutting units.
-
Shut off the machine and remove the key.
-
Disconnect the main-power connectors; refer to your machine Operator’s Manual.
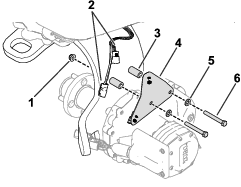
Installing the Harness Bracket
Parts needed for this procedure:
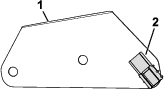
| Harness bracket | 1 |
| Clip connector | 1 |
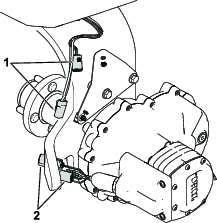
Removing the Existing Harness Bracket

Connecting the Kit Wire Harness
Parts needed for this procedure:
| Wire harness | 1 |
| Cable tie | 1 |
-
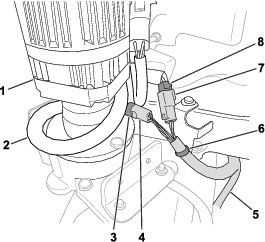
Connect the 2-pin connector of the motor gearbox to the clip connector on the harness bracket (Figure 5).
-
Connect the motor connectors to the kit-wire-harness connectors (Figure 5):
-
2-pin connector of the motor gearbox to the 2-socket connector of the kit wire harness
-
4-pin connector of the motor gearbox to the 4-socket connector of the kit wire harness
-
-
Raise the hood.
-
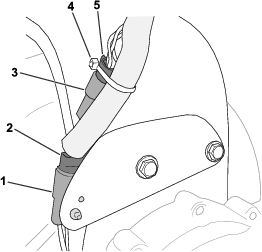
Route the remaining kit-wire-harness connectors towards the steering motor (Figure 6)
-
Connect the push-mount fastener on the kit wire harness to the bracket as shown in Figure 6.
-
Connect the kit-wire-harness connectors to the machine-wire-harness connectors (Figure 6):
-
2-socket connector of the kit wire harness to the 2-pin connector of the motor gearbox
-
4-socket connector of the kit wire harness to the 4-pin connector of the motor gearbox
-
-
Use a cable tie to secure the connectors shown in Figure 5 to the kit wire harness.
-
Wrap the extra machine wire harness slack around the steering motor as shown in Figure 6.
-
Close the hood.
Engaging 3-Wheel-Drive Mode
3-wheel-drive mode should automatically enable when you install the gearbox-wire-harness connections to the machine wire harness.
To ensure that 3-wheel-drive mode is activated, navigate to
the 3WD KIT option in the SETTINGS menu of your InfoCenter. The item selected/active
icon  indicates
that 3-wheel-drive mode is activated.
indicates
that 3-wheel-drive mode is activated.
Completing the Installation
Connect the main-power connectors; refer to your machine Operator’s Manual.