Note: Determine the left and right sides of the machine from the normal operating position.
This kit is for models 31900, 31901, 31902, 31903, 31907, and 31909.
Installation
Preparing the Machine
Preparing the Machine
-
Park the machine on a level surface.
-
Shift to the NEUTRAL position.
-
Lower all attachments (if equipped).
-
Engage the parking brake.
-
Shut off the engine and remove the key.
-
Disconnect the battery; refer to your machine Operator’s Manual.
-
Allow the machine components to cool before installing this kit.
Installing the New Exhaust Pipe for 37hp Engines with a DPF Filter
Parts needed for this procedure:
| Exhaust pipe | 1 |
| Clamp | 1 |
| Support assembly | 1 |
-
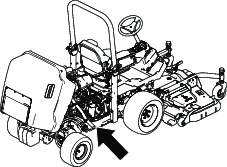
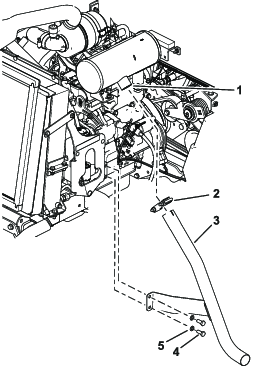
Raise the hood (Figure 1).
-
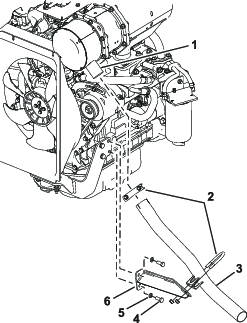
Loosen the clamp at the muffler (Figure 2).
-
Remove the engine bolts and washers from the existing exhaust pipe support (Figure 2) and remove the exhaust pipe.
Note: Retain the hardware and clamp.

-
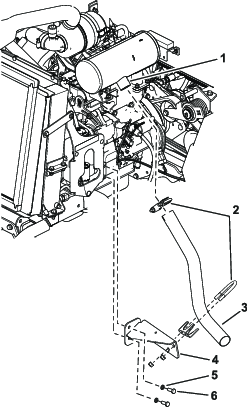
Install the new support assembly to the side of the engine with the previously removed washers and engine bolts (Figure 3).
Note: Do not fully tighten the bolts.
-
Slide the existing clamp over the new exhaust pipe and install the new exhaust pipe onto the DPF outlet (Figure 3).
Note: Do not fully tighten the bolts.
-
Install the new clamp around the new exhaust pipe and to the support assembly with the clamp hardware (Figure 3).
-
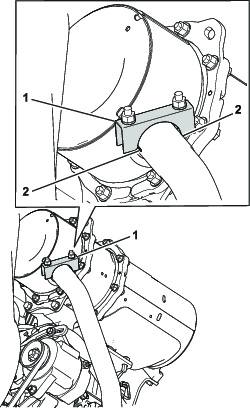
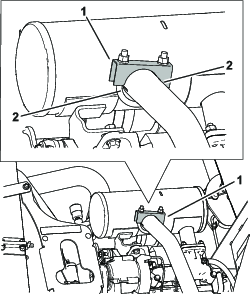
Align the clamp flush with the end of the exhaust pipe and rotate it as shown in Figure 4.
Note: Ensure the clamping surface is parallel to the slots in the pipe (Figure 4).
-
Torque the engine bolts to 54 N∙m (40 ft-lb) and then tighten all of the clamps (Figure 3).
Installing the New Exhaust Pipe for 24hp Engines
Parts needed for this procedure:
| Exhaust pipe | 1 |
| Clamp | 1 |
| Support assembly | 1 |
-
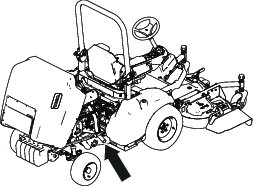
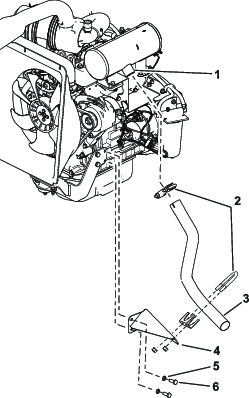
Raise the hood (Figure 5).
-
Loosen the clamp at the muffler (Figure 6).
-
Remove the engine bolts and washers from the existing exhaust pipe support (Figure 6) and remove the exhaust pipe.
Note: Retain the hardware and clamp.
-
Install the new support assembly to the side of the engine with the previously removed washers and engine bolts (Figure 7).
Note: Do not fully tighten the bolts.
-
Slide the existing clamp over the new exhaust pipe and install the new exhaust pipe onto the muffler outlet (Figure 7).
Note: Do not fully tighten the bolts.
-
Install the new clamp around the new exhaust pipe and to the support assembly with the clamp hardware (Figure 7).
-
Align the clamp flush with the end of the exhaust pipe and rotate it as shown in Figure 8.
Note: Ensure the clamping surface is parallel to the slots in the pipe (Figure 8).
-
Torque the engine bolts to 54 N∙m (40 ft-lb) and then tighten all of the clamps (Figure 7).
Installing the New Exhaust Pipe for 37hp Engines without a DPF Filter
Parts needed for this procedure:
| Exhaust pipe | 1 |
| Clamp | 1 |
| Support assembly | 1 |
-
Raise the hood (Figure 9).
-
Loosen the clamp at the muffler (Figure 10).
-
Remove the engine bolts and washers from the existing exhaust pipe support (Figure 10) and remove the exhaust pipe.
Note: Retain the hardware and clamp.

-
Install the new support assembly to the side of the engine with the previously removed washers and engine bolts (Figure 11).
Note: Do not fully tighten the bolts.
-
Slide the existing clamp over the new exhaust pipe and install the new exhaust pipe onto the muffler outlet (Figure 11).
Note: Do not fully tighten the bolts.
-
Install the new clamp around the new exhaust pipe and to the support assembly with the clamp hardware (Figure 11).
-
Align the clamp flush with the end of the exhaust pipe and rotate it as shown in Figure 12.
Note: Ensure the clamping surface is parallel to the slots in the pipe (Figure 12).

-
Torque the engine bolts to 54 N∙m (40 ft-lb) and then tighten all of the clamps (Figure 11).