Read this information carefully to learn how to operate and maintain your product properly and to avoid injury and product damage. You are responsible for operating the product properly and safely. Read your Operator’s Manual for more information.
Screen Icons
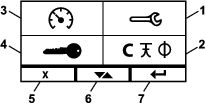
The information screen uses the following icons:
 Gauge and Meters |  Low Engine Speed |  Processing |
 Advanced Settings |  Transmission-Oil Maintenance |  Battery Voltage |
 Maintenance and Service |  Engine-Oil Temperature |  Engine Hours |
 Fuel Level |  Engine-Oil Maintenance |  Cancel/Exit |
 PTO |  No *Located on bottom row of some menu screens |  Toggle Between Screens |
 Parking Brake |  Yes |  Enter/Return |
 Neutral-Lock *Located in top row of Information Screen |  Decrease |  Previous |
 Operator Presence Control (OPC) |  Increase |  Next |
 Max Engine Speed |  Play/Start |  Reset |
 Efficient Engine Speed |  Pause/Stop |  Error Warning |
 Hydraulic-Fluid Temperature |  Engine Glow Plugs Active |  Engine Diesel Particulate Filter (DPF) |
 Engine DPF Regeneration Inactive/Failed/Interrupted |  Engine DPF Soot Percentage |  Gearbox-Oil Maintenance |
 Recommended Engine Cooldown Time |  Shut Off the Engine |  Language |
 Attention Safety Alert |  Transmission Low Speed |  Transmission High Speed |
Product Overview
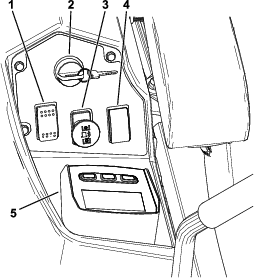
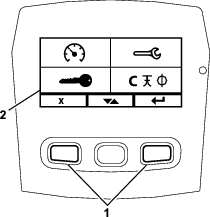
Screen
The screen displays icons and information relative to machine operation and is backlit for viewing in low light situations. The screen is located above the buttons.
Refer to the Screen section for icon descriptions.
LED Status Light
The LED status light is multi-colored to indicate the system status and is located on the right side of the panel. During startup, the LED illuminates red to orange to green to verify functionality.
-
Solid Green: indicates normal operating activity
-
Blinking Red: indicates that a fault is active
-
Blinking Green and Orange: indicates that a clutch reset is required
Buttons
The multi-functional buttons are located at the bottom of the panel. The icons displayed on the information screen above the buttons indicate the current function. The buttons allow you to select the engine speed and navigate through system menus.
Alarm
If an error occurs, an error message displays, the LED turns red, and the alarm sounds audibly as follows:
-
A fast chirp sound indicates critical errors.
-
A slow chirping sound indicates less critical errors, such as required maintenance or service intervals.
Note: During startup, the alarm sounds briefly to verify functionality.
Information Screens
The main information screens are as follows:
Startup Screen
During startup, the screen displays a startup graphic for 1 second, sounds the alarm, and illuminates the LED, changing from red to orange to green.
Engine Screens
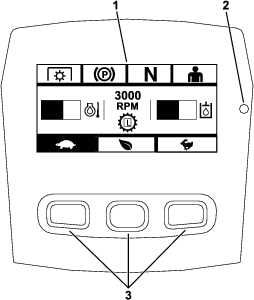
Engine-Off Screen
When the key is on without the engine running, the Engine-Off screen displays (Figure 3).
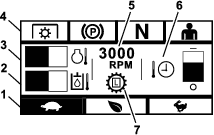
Engine-On Screen
When the engine is running, the Engine-On screen displays (Figure 4).
Engine Speed Mode
3 modes are available: LOW, EFFICIENT, and MAXIMUM.
-
LOW: Low transport speed/Low idle for reducing deck packing in wet mowing conditions.
-
EFFICIENT: Medium transport speed and maximum fuel economy and normal mowing conditions.
-
MAXIMUM: Maximum transport speed/High idle for extreme mowing conditions.
The panel illuminates showing the current engine speed mode (Low is selected in Figure 4).
Safety Interlock Status Indicators
These illuminate when each control is in the starting position (i.e., PTO disengaged, parking brake engaged, motion-control levers in the NEUTRAL-LOCK position, and the operator is present).
-
The PTO must be disengaged, brake engaged, and motion-control levers out (NEUTRAL-LOCK position) to start the engine. (You do not need to be in the seat to start the engine.)
Note: The starter cranks with the PTO switch in the ON (pulled up) position; however, the system disengages the PTO and a PTO reset error occurs. Engaging the PTO requires you to reset the PTO switch by turning it OFF (pushed down) and ON.
-
You must be in the seat while the PTO is engaged, the parking brake must be disengaged, or the motion-control levers must be moved inward; otherwise, the engine shuts off.
-
The engine shuts off if either the left, the right, or both levers are moved from NEUTRAL-LOCK position while the parking brake is engaged.
Note: Refer to the machine Operator’s Manual to check the safety interlock system.
Engine Temperature
A bar graph displays the engine temperature. When the temperature is high and approaching an overheat condition, the bar graph flashes. When the engine has overheated, the bar graph fills completely.
Engine Speed
Displays the speed of the engine.
Fuel Level (if fuel sender is available)
The fuel level is shown on a bar display. An error appears when the fuel level drops to approximately 3.8 L (1 US gallon) remaining in the tank.
Recommended Engine Cooldown Time
The recommended time to idle the engine before it shuts down is shown on a bar display. The level moves toward the bottom of the display as the engine cools and is empty when it is safe to shut off the engine. If you shut off the engine before the cooldown period has expired, a fault is logged in the historical fault log.
Transmission Speed
The transmission has 2 speeds. Low speed allows transport and mow speeds of 0 to 16 km/h (0 to 10 mph). High speed allows transport speeds of 0 to 27 km/h (0 to 17 mph). You can configure the machine to enable mowing in high speed in the Advanced Settings Menu.
The gear icon in the center of the screen (Figure 4) has L in the center of the gear to indication low transmission speed or H to indicate high transmission speed.
Important: The machine needs to come to a complete stop before switching speed ranges.
Engine Diesel Particulate Filter (DPF) Regeneration Screens
Caution
During regeneration, the diesel particulate filter becomes extremely hot and can cause serious burns.
Keep your body and hands away from the engine during regeneration.
The diesel particulate filter (DPF) removes particulate matter from the exhaust and prevents it from being discharged into the air. As the particulates collect in the filter, the engine performs a regeneration to prevent clogging and decreased engine performance. Most regenerations are performed in the background and do not impact operation. There are 4 modes for maintenance: passive regeneration, auto regeneration, stationary regeneration, and recovery regeneration.
-
Passive Regeneration
This is the primary mode regeneration that occurs automatically during normal operation. When the engine is running at normal loads, the exhaust temperature keeps the DPF above the minimum temperature for regeneration so that normal particulate matter (PM) accumulation in the DPF is expected.
-
Auto Regeneration
If the engine ECU senses that the DPF backpressure has increased past an acceptable threshold, an auto regeneration will occur. During the auto regeneration, the intake throttle valve limits the air flow into the engine while the injectors add additional fuel. This process increases the DPF temperature, which allows accumulated particulate to burn off. The auto regeneration is completed when needed. The machine can continue to be used during an auto regeneration.
The following figures show the screens of the auto regeneration process.
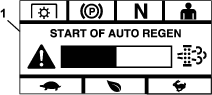
When the engine ECU determines that an auto regeneration is needed, the alarm chirps and the module displays the Start of Auto Regen screen with a 60-second bar graph timer (Figure 5). Once the timer expires, the auto regeneration process begins.
Note: No action is required and you can continue to use the machine during the auto regeneration process.
Caution
During the auto regeneration process, the exhaust temperatures rise and could ignite flammable materials.
Use caution if you operate the machine around flammable materials.
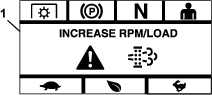
If an auto regeneration is needed but operating conditions do not allow the process to begin, the module prompts you to increase the engine speed and/or load.
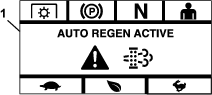
When the process begins, the screen changes to indicate that the auto regeneration process is active.
If the regeneration is interrupted, the following screen displays:
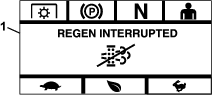
Note: If you shut off the engine during the regeneration process, the process resumes when you start the engine and it reaches the required temperature level.
-
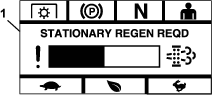
Stationary Regeneration
Over time, soot accumulates in the DPF and a passive or auto regeneration is not sufficient to unclog the filter. During the stationary regeneration, the engine ECU controls engine speed, load, and air/fuel mixture to perform a controlled burn of the particulate collected in the DPF.
If a stationary regeneration is required, it may indicate that the engine has been idling excessively or not run under a sufficient load. If multiple successive regenerations are required, it may indicate that the DPF will require service soon, that an engine problem exists (e.g., incorrect engine fuel or oil) or that a DPF pressure sensor is failing.
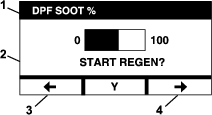
Important: A stationary regeneration can be initiated by the engine ECU or by you, the user. You can monitor the DPF soot percentage on the Engine-Off Screen or in the Maintenance and Service Menu. If the DPF Soot percentage is high, you may elect to initiate a manual stationary regeneration on the DPF Soot Percentage screen in the Maintenance and Service Menu by selecting Yes at the prompt.
Important: During a stationary regeneration, ensure that the machine is parked on a hard, level surface in a well-ventilated area. This process runs the machine at a higher exhaust temperature for approximately 30 minutes to burn off collected particulate in the DPF.
Note: You cannot use the machine during a stationary regeneration.
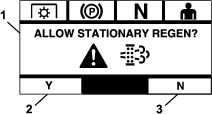
When the engine ECU determines that a stationary regeneration is required, the module displays the Allow Stationary Regen? prompt screen. Select Y (yes) to start the stationary regeneration process or N (no) to delay the process.
Ensure that the machine has at least 1/4 tank of fuel. Disengage the blades, move the motion-control levers to the NEUTRAL-LOCK position, and engage the parking brake.
-
If you select N (no), the module displays a 120-minute countdown bar graph screen.
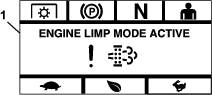
If you do not perform a stationary regeneration before the timer expires, the engine enters a limp mode and the engine ECU will require a recovery regeneration to be performed. When the module indicates that the engine has entered limp mode, the engine speed and/or power is reduced and it prevents clutch engagement.
-
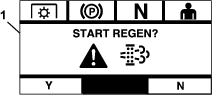
If you select Y (yes), the module prompts you to start the regeneration process (Figure 13).
-
Shut off the engine and wait for all moving parts to stop. Ensure that the machine is on a level surface.
-
Move the control levers to the neutral lock position and engage the parking brake.
Note: Disengaging the parking brake or moving the motion-control levers from the NEUTRAL-LOCK position at any time cancels the process and prompts you to engage the parking brake and move the motion-control levers to the NEUTRAL-LOCK position (Figure 14).

-
Ensure that the blades are disengaged.
-
Ensure that the machine has at least 1/4 tank of fuel.
-
Select Y (yes) from the Start Regen screen to confirm the regeneration process (Figure 15).
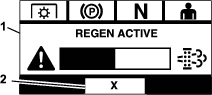
The regeneration process begins and the module displays the Regen Active screen (Figure 16). Pressing the cancel button cancels the process.
One of 3 outcomes result:
-
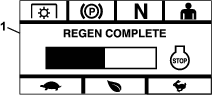
Complete—if the process completes successfully, the module displays the Regen Complete screen (Figure 17). It includes a 5-minute countdown bar graph.
Note: If you take no action and the 5-minute countdown timer on the screen expires, the engine shuts off.
-
Interrupted—if you interrupt the process, the module displays the Regen Interrupted screen (Figure 18).
If you initiated the process, the module exits the process. If the process was initiated by the engine ECU, the ECU places the engine in limp mode and requests a recovery regeneration.
-
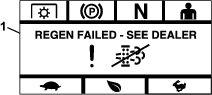
Failed—if the engine ECU determines that a recovery regeneration cannot be completed, the module displays the Regen Failed—See Dealer screen (Figure 19). Take the machine to an Authorized Service Dealer.
-
-
Menu Selection Screen
The Menu Selection Screen displays when you place the motion-control levers in the NEUTRAL-LOCK position and press and hold the 2 outside LDU buttons.
The Menu Selection Screen allows you to cycle through the different menu options by pressing the toggle button. When the desired menu option is highlighted, press the enter button to select it.
Note: All menu options are locked if the motion-control levers are not in the NEUTRAL-LOCK position.
Press and hold the 2 outside buttons to return to the default screen.
The menu selection screen allows you to cycle through the following screens.
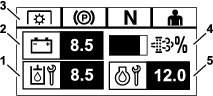
Maintenance and Service Menu
You can scroll between the following screens in the Maintenance and Service menu:
Status of Inputs
This screen lists all of the inputs to the system and highlights which is currently active. Inputs with numerical values display the current value.
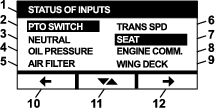
The following are a list of items available in the Status of Inputs screen:
-
System voltage
-
Engine communication (highlights if the module is communicating with the engine ECU)
-
PTO switch (highlights if on)
-
Neutral switch (highlights if on)
-
Brake switch (highlights if on)
-
Seat switch (highlights if on)
-
Oil-pressure switch (highlights if on)
-
Engine temperature (shows temperature)
-
Transmission temperature (shows temperature)
-
Fuel-rail pressure (shows pressure, if applicable)
-
Diesel-Oxidation Catalyst (DOC) inlet and outlet temperature (shows temperature, if applicable)
-
Air-filter switch (highlight if on)
-
Wing Deck (highlights if the wing decks are down/ready to mow)
-
Transmission speed
-
Fan voltage
Status of Outputs
This screen lists all of the outputs from the system and highlights which one is currently active. Outputs with numerical values display the current value.
You can toggle through all the outputs by pushing the pushing the button.
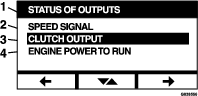
The following are a list of items available in the Status of Outputs screen:
-
PTO output (highlights if on)
-
Engine shutdown output (highlights if on)
-
Module communication (highlights if LDU and MCU are communicating)
-
Alarm (highlights if on)
-
Starter (highlights if on)
-
Fuel pump power (highlights if on)
-
Engine power to run (highlights if on)
-
Fan speed percentage
-
Fan reverse delay
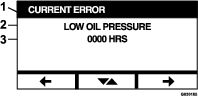
Current Error Messages
This screen displays the current error as text with the engine hours at which the error occurred. The toggle button allows you to scroll between screens if multiple errors are active. If only 1 error occurs, the toggle button does not change screens.
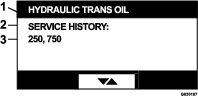
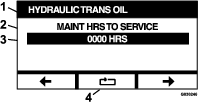
Hydraulic Transmission Oil
This service reminder screen displays the hours until the hydraulic transmission oil maintenance is due.
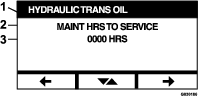
Press the toggle button to also display the engine hours at which every service reminder reset was performed.
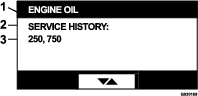
Engine Oil
This service reminder screen displays the hours until the engine oil maintenance is due.
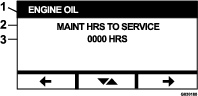
Press the toggle button to also display the engine hours at which every service reminder reset was performed.
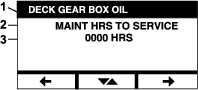
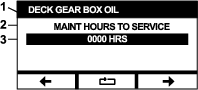
Deck Gearbox Oil
This screen displays the hours until the Deck Gear Box Oil maintenance is due.
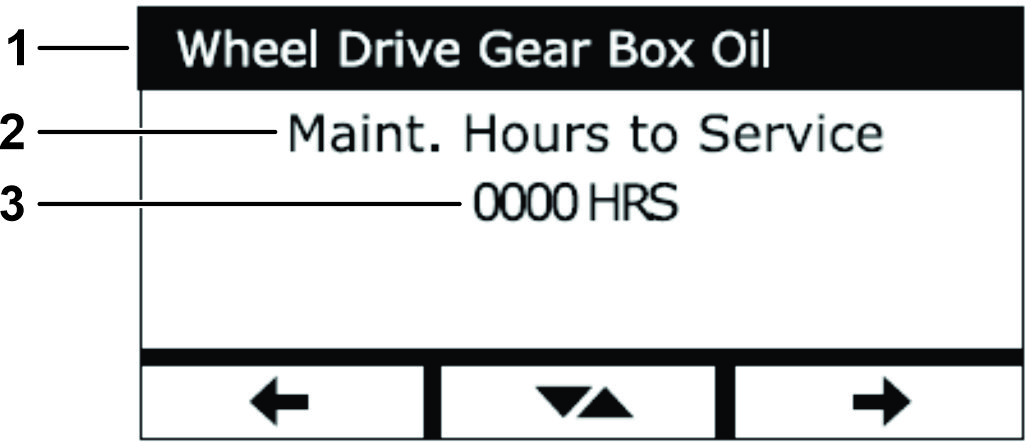
Wheel Drive Gear Box Oil
This screen displays the hours until the Wheel Drive Gear Box Oil maintenance is due.
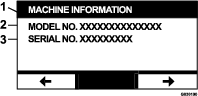
Machine Information
The screen displays the serial number and model number of the machine.
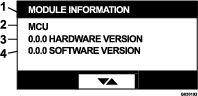
Module Information
The screen displays the current installed version of software and hardware for both the LDU (Logic Display Unit) and the MCU (Master Control Unit). Select the toggle button to see the MCU screen.
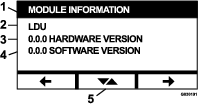
To exit the screen, press the previous or next arrow keys. Pressing the enter button takes you back to the Menu Selection screen.
Gauges and Meters Menu
You can scroll between the following screens in the Gauges and Meters menu:
Engine Hours
This screen displays a non-resettable, total engine hour counter and resettable trip counter.
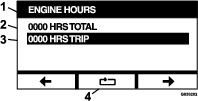
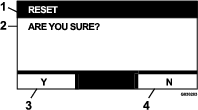
To reset the Trip hour meter, highlight the Trip hour meter and press the Reset button; to confirm the reset, press Y (yes) or N (no) to cancel (Figure 36).
PTO Hours
This screen displays a non-resettable, total PTO hour counter and a resettable trip PTO counter.
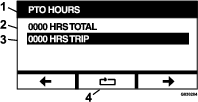
To reset the Trip hour meter, highlight the Trip hour meter and press the Reset button; to confirm the reset, press Y (yes) or N (no) to cancel (Figure 36).
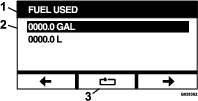
Fuel Used
This screen displays the total US gallons/liters of fuel used from the last time it was reset. Press the reset button to reset the fuel used counter.
Fuel Economy
This screen displays the US gallons/liters of fuel used per engine hour.

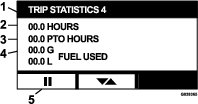
Trip Statistics
There are 5 trip statistics screens to scroll though and view.
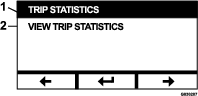
Each screen features resettable counters for the following parameters: Engine Hours, PTO Hours, and total US gallons/liters of fuel used.
You can pause or stop the collection of statistics and play or start the collection of trip statistics. For example, when Trip Statistics 1 is paused, the statistics are highlighted and the reset button is available. Pressing the reset button resets all 3 parameters. Pressing the play button starts data collection.
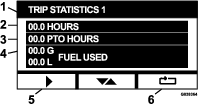
When a trip statistic is playing, the statistics are not highlighted and the reset button is blacked out and not available. Pressing the pause button stops the collection of data.
Press the toggle button on the Trip Statistics 5 screen to go back to the main Trip Statistics screen.
Advanced Settings Menu
When the advanced settings menu is selected, the module prompts you for a 4-digit passcode. The default digits on the display screen are 0 0 0 0.
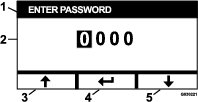
The passcode is 1 9 8 2. When the active digit is highlighted, press the increase or decrease buttons to scroll through digits from 0 to 9. Press enter to select the highlighted digit.
If you enter the incorrect password, the module takes you back to the menu select screen. When the correct password is entered, you can scroll between the following screens:
Engine Oil
After performing the necessary maintenance, this screen allows you to reset the number of hours until the engine oil service is due.
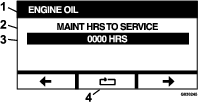
Pressing the reset button brings up a screen asking to confirm the reset reminder.
Hydraulic Transmission Oil
After performing the necessary maintenance, this screen allows you to reset the number of hours until the hydraulic transmission oil service is due.
Pressing the reset button brings up a screen asking to confirm the reset reminder.
Every time you reset the hydraulic transmission oil service reminder, the module prompts you to select whether the machine was serviced with Toro Premium Hydraulic Oil. Pressing Y (yes) or N (no) determines the correct maintenance schedule.
Deck Gear Box Oil
This reminder screen allows you to reset the number of hours until the deck gear box oil service is due.
Pressing the reset button brings up a screen asking to confirm the reset reminder.
To confirm the reset, press Y (yes). To cancel the reset, press N (no).

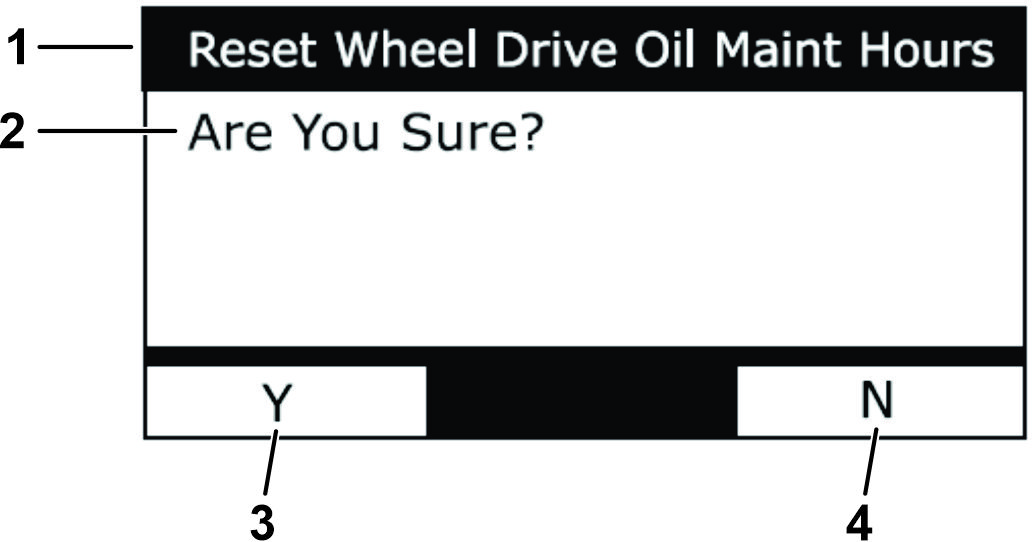
Wheel Drive Gear Box Oil
This reminder screen allows you to reset the number of hours until the wheel drive gear box oil service is due.
Pressing the reset button brings up a screen asking to confirm the reset reminder.
To confirm the reset, press Y (yes). To cancel the reset, press N (no).
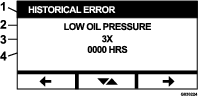
Historical Error
This screen displays errors that are no longer active. The log keeps a running count of the number of times the error has occurred during the life of the machine and the engine hour at which the last occurred. The log displays the errors starting with the most recent occurrence.
Alarms
The alarms screen allows you to activate and deactivate the audible alarm for individual errors. Press the Enter button to access individual error alarm settings.
Note: Not all audible alarms can be deactivated.
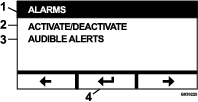
The highlighted error name indicates that the audible alarm is active. Pressing enter modifies the status of the audible alarm to On or Off.
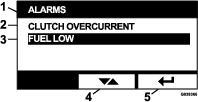
You can deactivate the audible warning for the following errors:
-
Service Air Filter
-
Service Engine Oil
-
Service Transmission Oil
-
Transmission Over Temperature
-
Service Gear Box Oil (as applicable)
-
Fuel Low
-
Clutch Overcurrent
-
Clutch Reset Required
-
Engine Error Codes
-
System Overvoltage>16VDC
-
System Undervoltage<9VDC
-
System Voltage Low
-
Anti-Stall
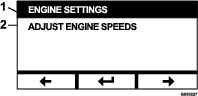
Engine Settings
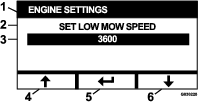
This screen allows you to adjust the engine speed at the Maximum, Efficient, and Low set points for both transport (clutch disengaged) and mow (clutch engaged) modes in 50 rpm increments.
Pressing the up arrow increases the engine speed while pressing the down arrow decreases the engine speed. Pressing the Enter button confirms the speed and automatically moves you to the next screen/engine speed set point.
The system does not allow the following to occur:
-
The efficient speed cannot be set higher than the maximum speed.
-
The low speed cannot be set higher than the efficient speed.
Note: You can set the maximum speed equal to the efficient mow speed to use the efficient mode while mowing.
You can enable mowing in high ground speed (Figure 55).
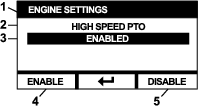
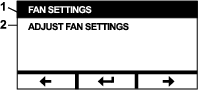
Adjust the Fan Settings
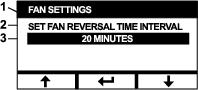
These screens are used to adjust how often the fan reverses (Figure 56).
To change the fan reversal time interval, press the down arrow to decrease the minutes or pressing the up arrow to increase the minutes (5 to 60 minutes). After completing the change, press enter (Figure 57).
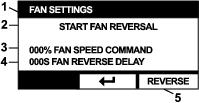
This screen allows you to monitor the outputs and initiate a manual reversal.
Note: The delay is converted to seconds as shown in Figure 58.
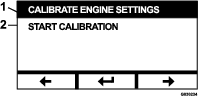
Calibrate Engine Settings
This screen allows the calibration of the actual engine speed to match the commanded engine speed. The enter button blacks out if the blades are not disengaged, the parking brake is not engaged, and the motion-control levers are not in the NEUTRAL-LOCK position. Once they are, press the Enter button to start the calibration process.
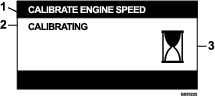
An animated hourglass appears indicating the calibration is in process.
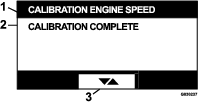
Once the calibration is complete, you can toggle back to the primary Calibrate Engine Speed screen.
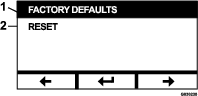
Factory Defaults
This screen allows you to reset system settings back to the factory default settings. Pressing the Enter button brings up confirmation screen; press Y (yes) to reset or N (no) to cancel.
Note: Resetting the system returns the engine speed settings and alarm settings back to the factory default settings.
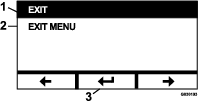
When the exit screen appears, press the enter button to go back to the Menu Selection screen.
Returning to the Default Screen (Engine-On or Engine-Off)
There are 3 ways to return to the default screen:
-
Press the previous or next arrow keys until the Exit screen appears then press the Enter button to return to the Menu Selection screen.
-
Turn the ignition key to the OFF position and either restart the engine or turn the key to the ON position.
-
Press and hold the 2 outside buttons.
Setting Engine Speeds
At startup, the system defaults to the Low engine speed. The icon on the information screen is highlighted.
-
Press the button below the Efficient Speed Mode icon to increase the engine speed to the Efficient engine speed.
The Efficient Speed Mode icon is highlighted.
-
Press the button below the Maximum Speed Mode icon to increase the engine speed to the maximum engine speed.
The Maximum Speed Mode icon is highlighted.
Note: If you engage the PTO switch at any speed setting, the engine speed ncreases to the mow speed.
Adjusting the Electronically-Controlled Low Mode Speed Adjustment
When operating in low mow mode, press and hold the Low Speed Mode button reduce the engine speed (minimum of 2,250 rpm). Press the Low Speed Mode button again to return the engine to the default setting.
Auto Idle Down Mode
If the operator leaves the seat and the safety interlocks allow the engine to remain running, the system enters the auto idle mode and automatically set the engine speed to the low transport speed. When you return to the seat, the system automatically returns to the previously selected engine speed mode. If you select another engine speed setting, the system exits the auto idle mode and the engine runs at the selected speed.
Error Messages
If an error occurs, a message displays in place of the engine temperature, engine speed, and fuel level. In addition to displaying the fault as text, the system turns the LED red and sounds the audible alarm.
-
The system is capable of displaying the following errors:
-
Service Air Filter: An air filter is required.
-
Service Engine Oil: Engine oil maintenance is required.
-
Service Transmission Oil: Transmission oil maintenance is required.
-
Service Deck Gearbox Oil: Deck gearbox oil maintenance required.
-
Service Wheel Drive Gearbox Oil: Wheel drive gearbox maintenance required.
-
Low Oil Pressure: Low engine-oil pressure is detected.
-
Fuel Low: The fuel level is low.
-
Engine Over Temperature: The engine over temperature is detected.
-
System Overvoltage>16VDC: The system voltage is too high (greater than 16 V).
-
System Undervoltage<9VDC: The system voltage is too low (less than 9 V).
-
Clutch Overcurrent: The cutting clutch current is too high.
-
Clutch Reset Required: The PTO switch must be turned off to activate the PTO.
-
Engine Error Codes: The system displays engine error codes provided by the engine manufacturer.
-
Clutch Output Failure: The clutch output is open or shorted.
-
System Voltage Low: The voltage is too low (less than 12.3 V).
-
Engine Communication Error: The communication between engine and module was lost.
-
Module Communication Error: The communication between the LDU and MCU modules was lost.
-
Anti-Stall Active: The mower deck has been disengaged in order to prevent the engine from stalling.
-
Engine Limp Mode Active: The engine ECU has placed the engine into limp mode, which may limit the engine speed and/or decrease the engine power. As a result, the module disengages the clutch.
-
-
You can acknowledge and silence some of the errors listed above. Move the motion-control levers to the NEUTRAL-LOCK position and press and hold the middle button.
Acknowledging an error removes the error message from the engine temperature, engine speed, or fuel level icon area and silence the audible alarm. However, the error continues to display on the active error screen in the Maintenance and Service Menu and the status LED continues to be illuminated red.
-
The following errors emit a slow chirping sound that you can acknowledge and silence:
-
Service Engine Oil
-
Service Transmission Oil
-
Fuel Low
-
Clutch Overcurrent
-
Clutch Reset Required
-
Engine Error Codes
-
Anti-Stall Active
-
Service Air Filter
-
Service Deck Gear Box
-
-
The following errors emit a fast chirping sound and can be acknowledged and silenced:
-
System Overvoltage>16VDC
-
System Undervoltage<9VDC
-
-
The following error codes emit a fast chirping sound and cannot be acknowledged or silenced.
-
Low Oil Pressure
-
Engine Over Temperature
-
Engine Communication Error
-
Module Communication Error
-
Clutch Output Failure
-
Engine Limp Mode Active
-
-
-
In order to protect the system components from exceeding threshold limits, the system limits the engine speed and/or disengages the clutch, which allows you to drive the machine onto a trailer or return to a service area.
These are the following errors that may occur:
-
Clutch Overcurrent
If an overcurrent event occurs, the system limits the engine speed to the Efficient Transport Mode speed and places the machine in Safe Transport Mode. Safe Transport Mode limits the engine speed, locks out the PTO, and disengages the clutch; a Clutch Overcurrent error message will display. Cycling the key switch to the OFF and then to the ON position clears the fault.
-
System Overvoltage>16VDC
If the voltage exceeds 16 V, the system will disengage the clutch and displays a System Overvoltage>16VDC error message.
-
System Undervoltage<9VDC
If the voltage is less than 9 V, the system will not allow clutch engagement and display the error System Undervoltage<9VDC. If the clutch was engaged before the error occurred, the system allows the clutch to remain engaged; however, low voltage may cause the clutch to disengage itself.
-
Low Oil Pressure
If low engine-oil pressure is detected, the system limits engine speed to the Efficient Transport Mode speed and places the machine in Safe Transport Mode. Safe Transport Mode limits the engine speed, locks out the PTO, and disengages the clutch; a Low Oil Pressure message will display. Cycling the key switch to the OFF and then to the ON position clears the fault.
-
Engine Over Temperature
When the engine begins to overheat, the system flashes the engine temperature bar graph and chirps the audible alarm. If the temperature rises above the upper limit, the system limits the engine speed to the Efficient Transport Mode speed and places the machine in Safe Transport Mode. Safe Transport Mode limits the engine speed, locks out the PTO, and disengages the clutch; an Engine Over Temperature message displays. The fault clears once the temperature falls below a safe limit.
-
Transmission Over Temperature
When the transmission begins to overheat, the system flashes the transmission temperature bar graph and chirps the audible alarm. If the temperature rises above the upper limit, the system limits the engine speed to the Efficient Transport Mode speed and places the machine in Safe Transport Mode. Safe Transport Mode limits the engine speed, locks out the PTO, and disengages the clutch; a Transmission Over Temperature message displays. The fault clears once the temperature falls below a safe limit.
-
Engine Limp Mode Active
If the engine ECU determines that a significant engine issue has occurred or that the DPF requires a Recovery Regeneration, it places the engine in a limp or backup mode where engine speed and/or decrease engine power. In order to protect the system components, the module locks out the PTO and display the Engine Limp Mode Active message.
-
Troubleshooting
| System Error Message | Status LED | System Actions | Issue Description | Recommended Corrective Action |
|---|---|---|---|---|
| Service the Engine Oil | Blink Red | The engine oil service is due. | Replace the engine oil and filter. Follow the reset procedure; refer to Engine Oil. | |
| Service the Transmission Oil | Blink Red | The transmission oil service is due. | Replace the transmission oil and filter(s). Follow the reset procedure; refer to Hydraulic Transmission Oil. | |
| Low Oil Pressure | Blink Red | Safe Transport Mode—engine limited to Efficient mode and the PTO is disengaged. | The engine-oil pressure is below limit. | Cycle the key switch to clear the fault. Check the oil level. Contact an Authorized Service Dealer. |
| Green | Single alarm chirp and engine temperature display flashes. | The engine temperature is high. | Check the oil level. Clean debris from the engine. Inspect the engine fan. Contact an Authorized Service Dealer. | |
| Engine Over Temperature | Blink Red | Safe Transport Mode—engine limited to Efficient mode and the PTO is disengaged. | The engine temperature is above limit. | Check the oil level. Clean debris from the engine. Inspect the engine fan. Contact an Authorized Service Dealer. |
| Fuel Low | Blink Red | The fuel level is low. | Check the fuel level and add fuel as necessary. | |
| System Overvoltage >16VDC | Blink Red | Disallow clutch engagement/ Disengage the clutch. | The system voltage is excessive (above 16 V). | Check the battery and engine charging system. Contact an Authorized Service Dealer. |
| System Voltage Low | Blink Red | System voltage below 12.3 V. | Check the battery and engine charging system. Contact an Authorized Service Dealer. | |
| System Under voltage<9VDC | Blink Red | Disallow clutch engagement/ Disengage clutch. | The system voltage is below the lower limit of 9 V. | Check the battery and engine charging system. Contact an Authorized Service Dealer. |
| Clutch Overcurrent | Blink Red | Safe Transport Mode—engine limited to Efficient mode and the PTO is disengaged. | The clutch current is above the limit. | Cycle the key switch to clear the fault. Check the PTO clutch condition and the related wiring. Contact an Authorized Service Dealer. |
| Clutch Reset Required | Alternating green/orange | The PTO switch is engaged and the module has latched the clutch output Off. | Cycle the PTO switch to the OFF position and back to the ON position to engage the clutch. | |
| Clutch Output Fault | Blink Red | The clutch output has a short or is open. | If the clutch is stuck in the ON position, discontinue use and contact an Authorized Service Dealer. Check the clutch connection and associated wiring for an open circuit. | |
| Engine MIL Errors | Blink Red | The ECU has detected a fault. | See the engine owner’s manual for the error description and troubleshooting information. | |
| Engine Communication Error | Blink Red | The communication between the module and the engine ECU has been lost. | Check the electrical connections at the module, interconnect between the engine wire harness, and chassis harness. Check the connections at the engine ECU. Contact an Authorized Service Dealer. | |
| Module Communication Error | Blink Red | Safe Transport Mode—engine limited to Efficient mode and the PTO is disengaged. | The communication between the LDU module and MCU module has been lost. | Check the electrical connections at the LDU and MCU module. |
| Wing Deck Interlock Fault | Blink Red | Disallow the clutch engagement/disengage the clutch | Wing deck not fully deployed. | Deploy the wing deck, then cycle the PTO switch off then on to re-engage the clutch. Contact your Authorized Service Dealer. |
| Clutch Reset Required | Blink Red | Disallow clutch engagement/ Disengage clutch. | Mowing while in high ground speed is not allowed. | If the deck does not start, place the machine in low ground speed. Disengage the PTO, then engage it. |