| Maintenance Service Interval | Maintenance Procedure |
|---|---|
| Before each use or daily |
|
Introduction
The broom attachment is used to sweep walkways and driveways of dirt or snow. Read this information carefully to learn how to operate and maintain your product properly and to avoid injury and product damage. You are responsible for operating the product properly and safely.
You may contact Toro directly at www.Toro.com for product safety and operation training materials, accessory information, help finding a dealer, or to register your product.
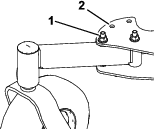
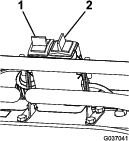
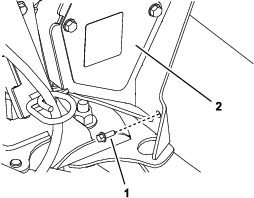
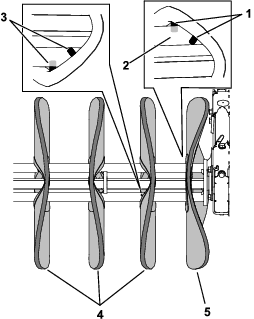
Whenever you need service, genuine Toro parts, or additional information, contact an Authorized Service Dealer or Toro Customer Service and have the model and serial numbers of your product ready. Figure 1 identifies the location of the model and serial numbers on the product. Write the numbers in the space provided.
Write the product model and serial numbers in the space below:
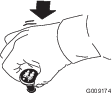
This manual identifies potential hazards and has safety messages identified by the safety-alert symbol (Figure 2), which signals a hazard that may cause serious injury or death if you do not follow the recommended precautions.

This manual uses 2 words to highlight information. Important calls attention to special mechanical information and Note emphasizes general information worthy of special attention.
Warning
CALIFORNIA
Proposition 65 Warning
Use of this product may cause exposure to chemicals known to the State of California to cause cancer, birth defects, or other reproductive harm.
Safety
Read and understand the contents of this manual before the engine is first started.
Improperly using or maintaining this machine could result in injury or death. To reduce this potential, comply with the following safety instructions.
Training
-
Read the operating and service instruction manual carefully. Be thoroughly familiar with the controls and the proper use of the machine. Know how to stop the machine and disengage the controls quickly.
-
Do not allow adults to operate the machine without proper instruction.
Preparation
Caution
Operating a powered machine can result in foreign objects being thrown into your eyes.
Always wear safety glasses or eye shields during operation or while performing an adjustment or repair.
-
Keep the area of operation clear of all persons, particularly small children, and pets.
-
Thoroughly inspect the area where you will use the machine and remove all doormats, sleds, boards, wires, and other foreign objects.
-
Do not operate the machine without wearing appropriate personal protective equipment such as hearing protection, safety glasses or goggles, dust mask, and long pants. Tuck in scarf ends. Wear substantial, slip-resistant footwear. Tie back long hair. Do not wear jewelry.
-
Let the engine and machine adjust to outdoor temperatures before starting to clear snow.
Operation
-
Never allow children to operate the machine.
-
Do not put hands or feet near or under rotating parts. Keep clear of the discharge opening at all times.
-
Never direct discharge at bystanders or allow anyone in front of the machine.
-
Take all possible precautions when leaving the machine unattended. Release the broom-drive lever, traction-drive lever, shut off the engine, and remove the key.
-
Always be sure of your footing, and keep a firm hold on the handles. Walk; never run.
-
Never operate the machine without good visibility or light.
-
Do not operate the machine while ill, tired, or under the influence of alcohol or drugs.
-
Exercise caution to avoid slipping or falling, especially when operating the machine in the reverse travel direction.
-
Shut off the engine whenever you leave the operating position, before unclogging the broom housing, and when making any repairs, adjustments, or inspections.
-
Exercise extreme caution when operating on or crossing gravel drives, walks, or roads. Stay alert for hidden hazards or traffic.
-
Never operate the machine at high transport speeds on slippery surfaces. Use care when reversing.
-
Do not clear snow, dirt, or thatch across the face of slopes. Exercise extreme caution when changing direction on slopes. Do not attempt to clear steep slopes.
-
Never operate the machine near glass enclosures, automobiles, window wells, drop offs, etc. without proper adjustment of the discharge angle. Keep children and pets away.
-
Do not overload the machine capacity by attempting to clear snow, dirt, or thatch at too fast of a rate.
-
Do not run the engine indoors, except when starting it and when moving the machine in or out of the building. Open the outside doors; exhaust fumes are dangerous.
-
When cleaning, repairing, or inspecting, shut off the engine and remove the key. Ensure that the rotary broom and all moving parts have stopped.
-
Disengage the power to the rotary broom when the machine is transported or not in use.
-
After striking a foreign object, shut off the engine, remove the key, thoroughly inspect the machine for any damage, and repair the damage before starting and operating the machine.
-
If the machine should start to vibrate abnormally, shut off the engine and check immediately for the cause. Vibration is generally a warning of trouble.
-
Never operate the machine without proper guards, plates, or other safety protective devices in place.
-
Use only attachments and accessories approved by the manufacturer of the machine (such as wheel weights, counterweights, cabs, etc.).
Maintenance and Storage
-
Never attempt to make any adjustments while the engine is running (except where specifically recommended by the manufacturer).
-
Check all of the fasteners at frequent intervals for proper tightness to ensure that the machine is in safe, working condition.
-
Never store the machine with fuel in the fuel tank inside a building where ignition sources are present, such as hot water and space heaters, clothing dryers, etc. Allow the engine to cool before storing the machine in any enclosure.
-
Always refer to the instructions in the Operator’s Manual for important details if the machine is to be stored for an extended period.
-
Maintain or replace the safety and instruction decals, as necessary.
-
When operating in snow conditions, run the machine for a few minutes after sweeping snow to prevent freeze up of the broom and housing.
Safety and Instructional Decals
 |
Safety decals and instructions are easily visible to the operator and are located near any area of potential danger. Replace any decal that is damaged or missing. |


Setup
Install the following on your machine before you install the broom:
-
Float Kit (optional)
-
High Flow Hydraulic Kit (required)
-
Low Flow Hydraulic Kit (required)
-
Pneumatic casters (recommended)
-
Quick-Attach Kit (required)
-
Snow Tires (required for winter application)
-
Wheel Weight Kit (recommended)
A Lift Cylinder Lock Kit (Toro part no. 137-4106) is available to secure the A-frame when you raise it for setup or maintenance; contact your Authorized Toro Dealer.
Preparing the Machine
-
Park the machine on a level surface.
-
Disengage the PTO, engage the parking brake, and move the motion-control levers outward to the NEUTRAL-LOCK position.
-
Raise the A-frame and support it using blocks or a cylinder lock.
-
Shut off the engine and remove the key.
Positioning the Casters
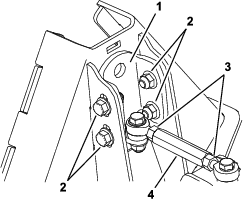
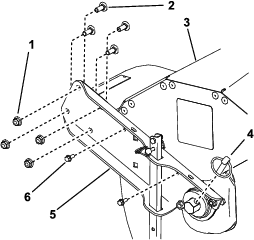
Remove the nut and bolt from each caster, move the caster to the middle position, and install the nut and bolt (Figure 3). Torque to 91 to 113 N∙m (67 to 83 ft-lb).
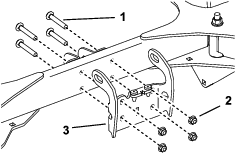
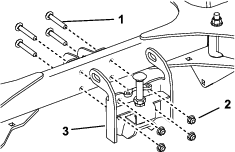
Installing the Broom Lock Bracket
Installing the Broom to the Machine
-
Place the broom on a level floor with the kick stands in the down position; refer to Using the Kickstands.
-
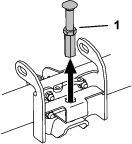
Remove the stop assembly from the broom lock bracket (Figure 6).
-
Ensure that the hydraulic hoses are out of the way from the broom quick-attach triangle.
-
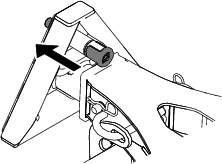
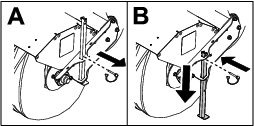
Engage the quick pin on the machine quick-attach assembly (Figure 7).
Note: The pin will protrude from the quick-attach triangle.
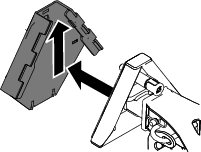
-
Slowly move the machine up to the broom so that the quick-attach triangle of the machine enters the broom quick-attach triangle and presses the engagement pin (Figure 8).
-
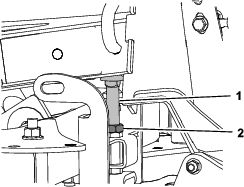
If necessary, adjust the coupler channel as follows:
-
Loosen the fasteners on the channel, slide the channel up or down, and tighten the fasteners (Figure 9).
-
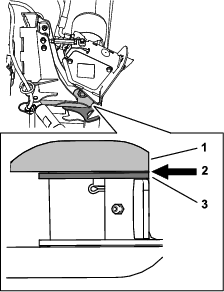
Loosen the hex nuts to adjust the length of the turnbuckle as needed (Figure 9). As you adjust the turnbuckle, ensure that there is enough space between the upper plate and upper channel that you can slide a sheet of paper between them (Figure 10).
-
-
Install the stop assembly (Figure 6).
-
Use the A-frame switch from the low flow kit to raise the quick-attach triangle until the pin snaps into place on the broom quick-attach triangle.
Note: Ensure that the quick pin is fully seated; lower and raise the machine quick-attach triangle to assist the engagement.
-
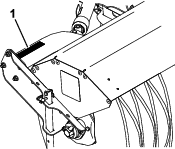
Route the hoses though the hose guides on the left and right sides of the broom quick-attach triangle (Figure 11).
-
Connect the hoses from the broom motor to the high flow assembly.
Note: Do not engage the high flow pump without the broom hydraulic hoses attached.
-
Connect the hoses from the broom cylinders to the quick connects on the left side of the machine A-frame.
-
Set the bristle engagement; refer to Checking the Sweeping Path.
Operation
Operating the Broom
Danger
When the machine is in operation, contact with a rotating broom can result in serious personal injury to you or bystanders.
-
Before adjusting, cleaning, inspecting, troubleshooting, or repairing the machine, shut off the engine and wait for all moving parts to stop. Remove the key to prevent someone from accidentally starting the engine.
-
Stay behind the handles and away from the broom while operating the machine.
-
Keep your face, hands, feet, and any other part of your body or clothing away from concealed, moving, or rotating parts.
Warning
The rotating broom can throw stones and other foreign objects, causing serious personal injury to you or bystanders.
-
Keep the working area clear and free of all objects that the broom could pick up and throw.
-
Keep all children and pets away from the area of operation.
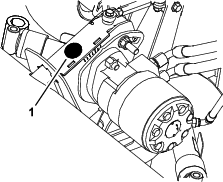
Engage the PTO switch to start the broom (Figure 12).
Use the switches from the Low Flow Hydraulic kit to operate the broom (Figure 13).
-
Move the left switch up or down to raise or lower the broom.
-
Move the right switch left or right to angle the broom.
Disengage the PTO to stop the broom (Figure 14).
If the machine has an optional Float Kit installed, move the switch to the FLOAT position to allow the broom to follow the contour of the ground (Figure 15). Move the switch to the normal operating position to control the broom using hydraulics.
Check the sweeping path of the bristles when you move the switch to the FLOAT position so that you limit the engagement of the bristles with the ground; refer to Checking the Sweeping Path.
Checking the Sweeping Path
A broom sweeps with the tips of its bristles. When you apply too much downward pressure, the broom no longer uses its tips; the broom is now working with the sides of the bristles. This limits the flicking action of the bristles and sweeping effectiveness, decreasing the service life of the broom.
-
Drive to a flat, dusty or snowy area and stop the machine.
-
Engage the broom, lower it to the ground to sweep away some snow or debris, and then raise it.
-
Disengage the broom and shut off the machine.
-
Wait for all moving parts to stop before leaving the operating position.
-
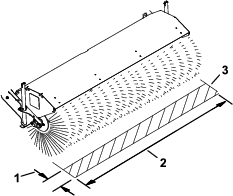
Make sure that the area swept equals the length of the broom and a maximum width of 51 to 102 mm (2 to 4 inches) as shown in Figure 16.
Note: If you are using a Float Kit with the broom, the maximum width should be approximately 102 mm (4 inches).
-
If the width of the area swept is incorrect, adjust the machine A-frame stop as follows:
-
Support the A-frame using blocks or a cylinder lock.
-
Loosen the jam nut.
-
Adjust the stop bolt until it holds the A-frame at the correct height above the machine frame (Figure 17).
-
Tighten the jam nut to lock the bolt in position.
-
Remove the blocks or cylinder lock and repeat the procedure to verify the correct sweeping path.
-
Using the Kickstands
Use the kickstands to raise the broom off the ground when you are not using the machine, performing maintenance, or storing the broom. This eliminates unnecessary pressure on the bristles.
Important: Do not operate the machine with the kickstands down.
-
Park the machine on a level surface, disengage the PTO, move the motion-control levers to the NEUTRAL-LOCK position, and engage the parking brake.
-
Shut off the engine, remove the key, and wait for all moving parts to stop before leaving the operating position.
-
Raise the A-frame and support it using blocks or a cylinder lock.
-
Lower the left, right, and rear kickstands (Figure 18).
Clearing a Clogged Broom
Warning
The rotating broom could cause serious injury.
Shut off the machine and allow all rotating parts to stop before cleaning the broom.
-
Stay in the operating position and release the left traction-drive lever.
-
While engaging the broom, raise the broom above the ground.
If you cannot unclog the broom by lifting it into the air, clear the broom as follows:
-
Park the machine on a level surface, disengage the PTO, move the motion-control levers to the NEUTRAL-LOCK position, and engage the parking brake.
-
Shut off the engine, remove the key, and wait for all moving parts to stop before leaving the operating position.
-
While wearing thickly-padded gloves, use caution to manually clear foreign objects out of the broom.
Caution
Sharp objects can become entangled in the bristles and can cause personal injury.
Wear gloves and use caution when cleaning foreign objects out of the broom; never use your bare hands.
Removing the Broom
-
Park the machine on a level surface, disengage the PTO, move the motion-control levers to the NEUTRAL-LOCK position, and engage the parking brake.
-
Raise the A-frame and support it using blocks or a cylinder lock.
-
Shut off the engine, remove the key, and wait for all moving parts to stop before leaving the operating position.
-
Lower the kickstands on the broom; refer to Using the Kickstands.
-
Remove the stop assembly.
-
Remove the blocks or cylinder lock.
-
Disconnect the hoses from the low-flow assembly and plug them together.
-
Disconnect the hoses from the high-flow assembly and plug them together.
-
Plug the rubber caps into the quick-disconnect fittings on the machine.
-
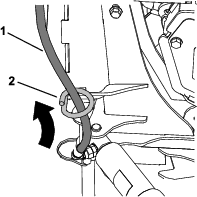
Disengage the quick pin on the machine quick-attach assembly (Figure 7).
-
Use the machine hydraulics to lower the broom so that there is no weight on the machine quick-attach triangle.
-
Move the broom hoses away from the machine and back the machine out of the broom triangle.
-
Install the stop assembly as shown in Figure 19 or store it in a safe location.
Operating Tips
-
If the ground speed is too fast, debris will pile up in front of the broom, causing it to bulldoze instead of sweep. This can damage the broom.
-
More pressure does not give a better sweep, but it will wear out the broom faster.
-
A level broom lasts longer.
Maintenance
Recommended Maintenance Schedule(s)
| Maintenance Service Interval | Maintenance Procedure |
|---|---|
| Before each use or daily |
|
| Every 40 hours |
|
| Before storage |
|
Oiling the Chain
| Maintenance Service Interval | Maintenance Procedure |
|---|---|
| Before each use or daily |
|
| Before storage |
|
Use Toro Premium All Season Hydraulic Oil or SAE 20 oil.
-
Raise the broom all the way up using the hydraulic controls.
-
Lower the kickstands; refer to Using the Kickstands.
-
Remove the rubber plug on the chain housing and insert it into the housing with the cup side up (Figure 20).
-
Fill the rubber plug with oil.
-
Start the machine and run it at low idle.
-
Engage the PTO and run the broom at low idle until the plug is out of oil.
-
Remove the plug and install it with the flat face up to prevent it from filling with debris during operation.
Tensioning the Chain
| Maintenance Service Interval | Maintenance Procedure |
|---|---|
| Every 40 hours |
|
-
Loosen, but do not remove, the 3 mounting bolts on the broom motor until you can rotate the motor around the lower bolt (Figure 21).
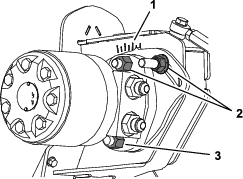
-
Rotate the motor clockwise until the chain is tight, then rotate it counterclockwise 6 mm (1/4 inch) or 1 notch to allow some slack in the chain.
-
Torque the mounting bolts to 102 N∙m (75 ft-lb).
Replacing the Bristles
Replace the bristles when they are worn to a 33 cm (13 inch) diameter from the original 51 cm (20 inch) diameter. Check the condition of the wear plate when you replace the bristles (see Figure 25); if the wear plate is worn through, replace it.
Note: Replace all bristles at the same time; otherwise, a mix of old and new bristles will reduce performance.
-
Park the machine on a level surface, disengage the PTO, engage the parking brake, and move the motion-control levers outward to the NEUTRAL-LOCK position.
-
Raise the A-frame and support it using a block or cylinder lock.
-
Shut off the engine and remove the key.
-
Lower the kickstands; refer to Using the Kickstands.
-
Remove the 2 bolts (1/4 x 3/4 inch) on the left and right sides of the broom (Figure 22).
-
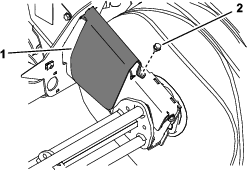
Remove a rear bolt from both sides of the drive assembly and remove the hood (Figure 23).
-
Remove the 4 carriage bolts (3/8 x 1 inch), 4 nuts (3/8 inch), and the lynch pin on the left and right sides of the broom to separate the broom from the assembly (Figure 22).
-
On 1 side of the broom, remove the washer, slide the broom out of the bracket, and remove the spacer (Figure 24).
-
Remove the 3 bolts (3/8 x 1-1/2 inches) and the cover plate (Figure 24).
-
Slide the brushes off the broom.
-
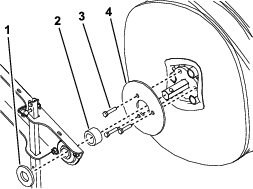
If you are replacing the wear plate, remove the bolt and wear plate, and use the bolt to install the new wear plate (Figure 25).
-
With the bristles curved toward the center of the broom, slide the new center brush onto the axle so that the prongs straddle 1 of the rods (Figure 26).
Note: The middle ring of the center brush is flatter than the ring on the other brushes.
-
Slide a brush onto the axle so that the prongs straddle an adjacent rod and curve away from the center brush (Figure 26).
-
Slide the next brush onto the axle, with the brush rotated so that the pins straddle the third rod and the curves are opposite to the previous brush (Figure 26).
-
Continue sliding the brushes onto the axle, rotating the prongs around the axle and alternating the curve of the brushes, until all the brushes are installed (Figure 27).
Note: If you do not rotate the prongs around the axle or alternate the direction of the brush curves, it may be difficult to secure the cover plate. The prongs on the last brush need to curve inward.
-
Install the cover plate as shown in Figure 24 until it is flush against the axle face.
-
Install the spacer, slide the broom onto the bracket, and install the washer (Figure 24).
-
Install the lynch pin (Figure 22).
-
Repeat steps 8 through 19 for the other side of the broom.
-
Install the hood using 2 bolts (1/4 x 3/4 inch) on the rear of the broom (Figure 23) and the 2 bolts on each side of the broom (Figure 22) . Torque the bolts to 11 N∙m (100 in-lb).
Checking the Hydraulic Fluid Level
| Maintenance Service Interval | Maintenance Procedure |
|---|---|
| Before each use or daily |
|
Refer to the Operator’s Manual for the machine and the Installation Instructions for the High Flow Hydraulics Kit.
Storage
-
Park the machine on a level surface, disengage the PTO, engage the parking brake, and move the motion-control levers outward to the NEUTRAL-LOCK position.
-
Raise the A-frame and support it with a block or cylinder lock.
-
Shut off the engine and remove the key.
-
Lower the kickstands so that the bristles are not touching the ground; refer to Using the Kickstands.
Note: The bristles will become deformed and the broom will be out of alignment if the bristles are touching the ground for an extended period of time.
-
Remove the broom from the machine, if desired; refer to Removing the Broom.
-
Disconnect the hoses from the low-flow assembly and plug them together.
-
Disconnect the hoses from the high-flow assembly and plug them together.
-
Cover the couplers of the high-flow and low-flow assemblies using caps or a bag.
-
Oil the chain; refer to Oiling the Chain.
-
Thoroughly clean the broom and ensure that it is free of all caustic chemicals and/or residue.
-
Check and tighten all bolts, nuts, and screws. Repair or replace any part that is damaged or defective.
-
Paint all scratched or bare metal surfaces. Paint is available from your Authorized Service Dealer.
-
Store the broom in a clean, dry garage or storage area. Cover it to protect it and keep it clean.
Troubleshooting
| Problem | Possible Cause | Corrective Action |
|---|---|---|
| The broom does not clean the surface. |
|
|
| The broom does not rotate. |
|
|
| The broom wears out prematurely. |
|
|