


Maintenance
Note: Determine the left and right sides of the machine from the normal operating position.
Maintenance Safety
-
Park machine on level ground, set parking brake (if equipped), stop engine, and disconnect spark plug wire. Wait for all moving parts to stop before leaving the operator’s position. Allow the machine to cool before servicing, adjusting, fueling, cleaning, or storing.
Warning
Tipping the lawn mower may cause the fuel to leak from the carburetor or the fuel tank. Gasoline is extremely flammable, highly explosive, and under certain conditions, can cause personal injury or property damage.
Avoid fuel spills by running the engine dry or by removing the gasoline with a hand pump; never siphon.
-
If you leave the wire on the spark plug, someone could accidently start the engine and seriously injure you or other bystanders. Disconnect the wire from the spark plug before you perform any maintenance.
-
Never allow untrained personnel to service machine.
-
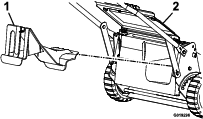
Disconnect battery or remove spark plug wire before making any repairs. Disconnect the negative terminal first and the positive last. Reconnect positive first and negative last.
-
Keep all guards, shields, switches, and all safety devices in place and in proper working condition. Frequently check for worn or deteriorating components and replace them with genuine Exmark parts when necessary.
Warning
Removal or modification of original equipment, parts and/or accessories may alter the warranty, controllability, and safety of the machine. Unauthorized modifications to the original equipment or failure to use original Exmark parts could lead to serious injury or death. Unauthorized changes to the machine, engine, fuel or venting system, may violate applicable safety standards such as: ANSI, OSHA and NFPA and/or government regulations such as EPA and CARB.
-
Keep hands and feet away from moving parts. If possible, Do Not make adjustments with the engine running. If the maintenance or adjustment procedure requires the engine to be running and components moving, use extreme caution.
Warning
Contact with moving parts or hot surfaces may cause personal injury.
Keep your fingers, hands, and clothing clear of rotating components and hot surfaces.
-
Check all bolts frequently to maintain proper tightness.
Recommended Maintenance Schedule(s)
| Maintenance Service Interval | Maintenance Procedure |
|---|---|
| After the first 5 hours |
|
| Before each use or daily |
|
| Every 25 hours |
|
| Every 50 hours |
|
| Every 100 hours |
|
| Every 250 hours |
|
| Every 300 hours |
|
| Yearly or before storage |
|
Periodic Maintenance
Engine Maintenance
Important: Refer to the Engine Owner’s Manual for additional maintenance procedures.
Engine Safety
Warning
The engine can become very hot, especially the muffler and exhaust components. Touching a hot engine can cause severe burns.
Allow the engine to cool completely before service or making repairs around the engine area.
Do Not change the engine governor setting or overspeed the engine.
Check Engine Oil Level
| Maintenance Service Interval | Maintenance Procedure |
|---|---|
| Before each use or daily |
|
-
Stop engine and wait for all moving parts to stop. Make sure the machine is on a level surface.
-
Check with engine cold.
-
Clean area around dipstick. Remove dipstick and wipe oil off. Reinsert the dipstick and push it all the way down into the tube. Do Not screw into place. Remove the dipstick and read the oil level.
-
If the oil level is low, wipe off the area around the oil fill cap, remove cap and fill to the “FULL” mark on the dipstick. Exmark 4-Cycle Premium Engine Oil is recommended; refer to the Engine Owner's manual for appropriate API rating and viscosity. Do Not overfill.
Important: Do Not operate the engine with the oil level below the “LOW” (or “ADD”) mark on the dipstick, or over the “FULL” mark.
Check the Mower Blade
| Maintenance Service Interval | Maintenance Procedure |
|---|---|
| Before each use or daily |
|
Always mow with a sharp blade. A sharp blade cuts cleanly and without tearing or shredding the grass blade.
-
Stop the engine and wait for all moving parts to stop.
-
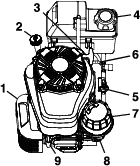
Disconnect the wire from the spark plug (Figure 9).
-
Drain the gasoline from the fuel tank. Refer to Emptying the Fuel Tank and Cleaning the Fuel Filter section.
-
Remove the bagger from the machine. Tip the machine backwards until the upper handle rests on the ground and place a jack stand under the machine.
Caution
Raising the mower for service or maintenance relying solely on mechanical or hydraulic jacks could be dangerous. The mechanical or hydraulic jacks may not be enough support or may malfunction allowing the unit to fall, which could cause injury.
Do Not rely solely on mechanical or hydraulic jacks for support. Use adequate jack stands or equivalent support.
-
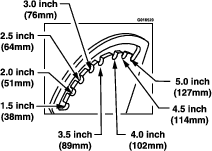
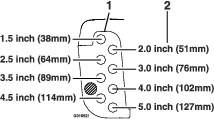
Inspect the blades for sharpness and wear, especially where the flat and the curved parts meet (see Figure 21). Because sand and abrasive material can wear away the metal that connects the flat and curved parts of the blade, check the blade before using the lawn mower. If you notice a slot or wear (Figure 21B and Figure 21C), replace the blade.
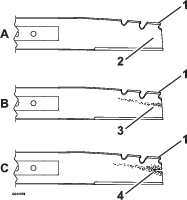
Danger
A worn or damaged blade can break. A piece of the blade could be thrown into the operator’s or bystander’s area, resulting in serious personal injury or death.
-
Inspect the blade periodically for wear or damage.
-
Replace a worn or damaged blade.
-
Removing Mower Blades:
-
To remove the blade, use a block of wood to hold the blade steady. Make sure to grasp the end of the blade using a rag or thickly padded glove.
-
Remove the blade bolt, blade driver, and blade.
-
Inspect blades and sharpen or replace as required.
-
Inspect the pins on the blade driver for wear and damage or replace as required.
-
-
Installing Mower Blades:
-
Install the blade driver by inserting the raised area into the recess on the cutter housing.
-
Make sure to grasp the end of the blade using a rag or a thickly padded glove. Align the two holes on the blade with the two holes on the blade driver and install a sharp, balanced Exmark blade and blade bolt as shown in Figure 22. The sail of the blade must point toward the top of the lawn mower housing for proper installation.
-
Torque the blade bolt to 60 ft-lb (82 N-m).
-
Make sure the installed blade is vertical before installing the second blade. The second blade must be installed perpendicular to the first using steps 1 through 3. The two blades will form a sideways “T” as shown in Figure 23.
-
Rotate the blades by hand a full 360 degree turn to ensure they Do Not touch.
Warning
Incorrect installation of the blade or components used to retain the blade can be dangerous. Failure to use all original components and assembled as shown could allow a blade or blade component to be thrown out from under the deck resulting in serious personal injury or death.
Always install the original Exmark blades, blade drivers, and blade bolts as shown.
-
If they touch, the blades are not mounted correctly. Repeat steps 1 through 5. If the blades still touch after repeating the steps, contact an Authorized Service Dealer.
-
-
-
Return the lawn mower to its upright position.
-
Connect the wire to the spark plug.
Check the Blade Brake Clutch
| Maintenance Service Interval | Maintenance Procedure |
|---|---|
| Before each use or daily |
|
Refer to Checking the Blade Brake Clutch in Operation.
Check for Loose Hardware
| Maintenance Service Interval | Maintenance Procedure |
|---|---|
| Before each use or daily |
|
-
Stop engine, wait for all moving parts to stop.
-
Visually inspect machine for any loose hardware or any other possible problem. Tighten hardware or correct the problem before operating.
Check Air Filter
| Maintenance Service Interval | Maintenance Procedure |
|---|---|
| Before each use or daily |
|
-
Stop engine, wait for all moving parts to stop.
-
Disconnect the wire from the spark plug (Figure 9).
-
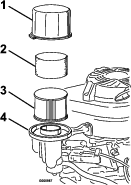
Remove the cover and clean it thoroughly.
-
Check the paper element and foam cleaner. If cleaning is required, see Service Air Filter.
-
Reinstall the cover.
Service Air Filter
| Maintenance Service Interval | Maintenance Procedure |
|---|---|
| Every 25 hours |
|
| Every 300 hours |
|
Note: Do Not operate the engine without the air filter assembly; extreme engine damage will occur.
-
Stop engine, wait for all moving parts to stop.
-
Disconnect the wire from the spark plug (Figure 9).
-
Remove the cover and clean it thoroughly.
-
Remove the paper air filter and discard it as required.
Note: Do Not try to clean a paper air filter.
-
Remove the foam element and wash it with a mild detergent and water, then blot it dry.
-
Saturate the element with clean engine oil, then squeeze it (Do Not twist) to remove the excess oil.
-
Install the foam element.
-
Install the new paper air filter.
-
Reinstall the cover.
Change Engine Oil
| Maintenance Service Interval | Maintenance Procedure |
|---|---|
| After the first 5 hours |
|
| Every 50 hours |
|
-
Run the engine to warm the engine oil.
Note: Warm oil flows better and carries more contaminates.
Warning
Oil may be hot after engine has been run. Contact with hot oil can cause severe personal injury.
Avoid contacting the hot engine oil when you drain it.
-
Stop engine, wait for all moving parts to stop.
-
Disconnect the wire from the spark plug.
-
Drain the gasoline from the fuel tank. Refer to Emptying the Fuel Tank and Cleaning the Fuel Filter section.
-
Place a suitable drain pan under the dipstick/oil drain.
-
Clean around the dipstick.
-
Remove the dipstick by rotating the cap counterclockwise and pulling it out.
-
Raise the left side of the lawn mower to drain the oil from the dipstick fill tube into the drain pan.
-
After draining the oil, return the lawn mower to the operating position.
-
Fill the crankcase with fresh oil to the upper limit mark on the dipstick. Use oil recommended in the Check Engine Oil Level section. Do Not overfill
-
Insert the dipstick into the filler neck and rotate the cap clockwise until it is tight.
-
Wipe up any spilled oil.
-
Connect the wire to the spark plug.
-
Recycle the used oil according to local codes.
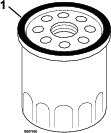
Change Oil Filter
| Maintenance Service Interval | Maintenance Procedure |
|---|---|
| Every 100 hours |
|
-
Run the engine to warm the oil.
-
Stop the engine and wait for all moving parts to stop.
-
Disconnect the wire from the spark plug.
-
Drain the engine oil.
-
Place a rag under the oil filter to catch any oil that may leak out as you remove the filter.
-
Remove the oil filter.
-
Use your finger to coat the gasket on the new filter with clean Exmark 4–Cycle Premium Engine oil (see Figure 25).
-
Install the new filter and hand tighten it 2/3 turn only.
-
Fill the crankcase as stated in Check Engine Oil Level section. Exmark 4–Cycle Premium Engine oil is recommended. Refer to the Engine Owner's Manual for an acceptable alternative.
-
Connect the wire to the spark plug.
-
Run the engine for about 3 minutes.
-
Stop the engine, wait for all moving parts to stop, and check for oil leakage around the filter.
-
Add oil to compensate for the oil in the oil filter.
-
Recycle the used oil filter according to local codes.
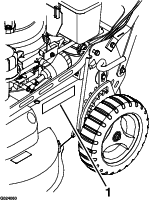
Check Condition Of Belts
| Maintenance Service Interval | Maintenance Procedure |
|---|---|
| Every 50 hours |
|
-
Stop engine, wait for all moving parts to stop.
-
Remove the belt cover to the lawn mower housing.
-
Check the belt for cracks, frayed edges, burn marks or any other damage.
-
Replace the damaged belt(s).
If the blade drive belt is replaced or needs adjustment, see Adjusting the Blade Drive Belt in Adjustments.
Check the Blade Drive System
| Maintenance Service Interval | Maintenance Procedure |
|---|---|
| After the first 5 hours |
|
| Every 50 hours |
|
-
Stop the engine and wait for all moving parts to stop.
-
Disconnect the wire from the spark plug.
-
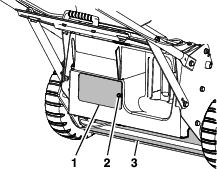
Remove and retain the belt access panel by rotating the screws a quarter-turn.
-
Brush out all the debris around the belt area.
-
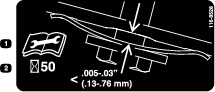
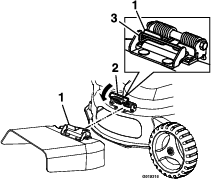
Use a feeler gauge, a piece of paper, or a note card against the frame and slide it down behind the belt tension spring.
Note: The gap between the gauge and the spring should be .005-.030 inch (.13-.76 mm), tighten the adjusting bolt and nut until the paper barely slides freely in and out of the gap.
Important: Do Not overtighten the adjusting bolt. This could damage the blade drive belt.
-
Reinstall the belt access panel and rotate the screws a quarter-turn to lock into place.
-
Connect the wire to the spark plug.
Change Blade Brake Clutch (BBC) Belt
| Maintenance Service Interval | Maintenance Procedure |
|---|---|
| Every 250 hours |
|
-
Stop the engine and wait for all moving parts to stop.
-
Disconnect the wire from the spark plug.
-
Remove and retain the front belt cover and its four bolts. Remove any debris under the cover.
-
Remove and retain the BBC bracket and its mounting hardware.
-
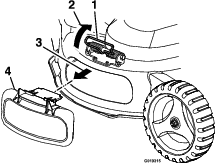
Loosen the cable clamp screw on the BBC cable and remove the old belt (refer to Figure 36).
-
Install the new belt.
-
Reinstall the BBC bracket.
-
Adjust the BBC cable as described in Adjusting the Blade Brake Cable in the Adjustments section.
-
Reinstall the front belt cover.
Change Blade Drive Belt
-
Stop the engine and wait for all moving parts to stop.
-
Disconnect the wire from the spark plug.
-
Remove and retain the front belt cover and its four bolts. Remove any debris under the cover.
-
Remove and retain the BBC bracket and its mounting hardware. Remove the BBC belt from the front LH pulley.
-
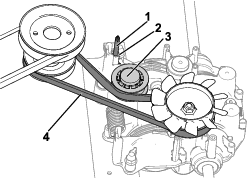
Loosen the blade drive adjusting bolt (refer to Figure 27).
-
Remove and retain the fixed idler pulley and its hardware (see Figure 28).
-
Remove the blade drive belt.
-
Align the holes in the RH and LH sprockets with the holes in the deck as shown in Figure 28. Hold the sprockets in place with a rod or screwdriver.
-
Once the sprockets are locked into place, reinstall the blade drive belt and the fixed idler pulley.
Note: Make sure the teeth are engaged in the sprockets.
-
Tighten the belt tension to the recommended settings; refer to Check the Blade Drive System.
-
Remove the rod or screwdrivers from the sprockets.
-
Check the blades under the deck to make sure they are properly aligned; refer to Check the Mower Blade section.
-
Reinstall the BBC belt and the BBC bracket.
-
Reinstall the belt cover using the four bolts.
-
Connect the wire to the spark plug.
-
Check the operation of the blade control lever and the blade brake clutch.
Change Transmission Belt
| Maintenance Service Interval | Maintenance Procedure |
|---|---|
| Every 250 hours |
|
-
Shut off the engine and wait for all moving parts to stop.
-
Disconnect the wire from the spark plug.
-
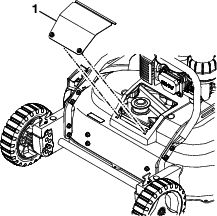
Remove the four bolts that hold the belt cover to the machine housing.
Note: Save the bolts for installing the belt cover to the machine housing.
-
Remove the belt cover.
-
Remove any debris from under the belt cover.
-
If the grass bag is on the machine, remove and retain it.
-
Raise and hold up the rear door.
-
Remove and retain the rear panel and its mounting hardware (machines with a Kohler engine).
-
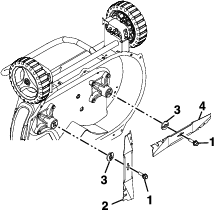
Remove and retain the dust shield and its mounting hardware (machines with a Kawasaki engine).
-
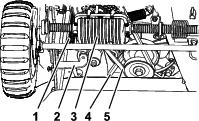
Remove the transmission belt.
-
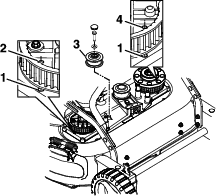
For machines with Kawasaki engines:
-
Loosen the bracket and allow the bracket to drop (Figure 30).
Note: The bracket prevents the transmission from tipping to the point where the transmission belt comes off.
-
Remove the transmission tension spring.
-
Remove the transmission belt from the transmission pulley.
-
Remove the transmission belt.
-
To install a new transmission belt, reverse the steps above.
-
-
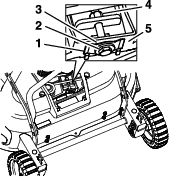
For machines with Kohler engines:
-
Rotate the idler pulley over the access hole on the transmission by using a socket wrench to turn the idler pulley nut.
-
While you are holding the idler pulley over the access hole on the transmission, insert a screwdriver through the access hole to catch a rib on the idler pulley.
-
Use the screwdriver to hold the idler pulley out of the way until you are done installing the new transmission belt.
-
From the front of the machine, remove the belt from the engine pulley and then remove from the transmission pulley.
-
While the idler pulley is pulled out of the way, install the new transmission belt placing the belt over the transmission pulley first and then over the engine pulley.
-
Using a socket wrench to hold the idler pulley in position, remove the screwdriver from the access hole in the transmission and return the idler pulley to its tensioned position.
-
-
-
Ensure that the new transmission belt is positioned correctly.
-
Reinstall the dust shield using the hardware retained in step 9 (machines with a Kawasaki engine).
-
Reinstall the rear panel and secure with its mounting hardware retained in step 8 (machines with a Kohler engine).
-
Adjust the bracket to contact the transmission (see Adjusting the Transmission section).
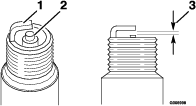
Check Spark Plugs
| Maintenance Service Interval | Maintenance Procedure |
|---|---|
| Every 100 hours |
|
-
Stop the engine and wait for all moving parts to stop.
-
Disconnect the wire from the spark plug (see Figure 9).
-
Clean around the spark plug.
-
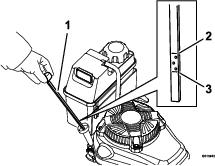
Remove the spark plug from the cylinder head.
Note: Replace a cracked, fouled, or dirty spark plug. Do Not clean the electrodes because grit entering the cylinder can damage the engine.
-
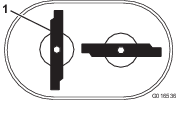
Set the gap on the plug to 0.030 inch (0.76 mm) (Figure 33).
-
Install the spark plug and the gasket seal.
-
Torque the plug to 17 ft-lb (23 N-m).
-
Connect the wire to the spark plug.
Emptying the Fuel Tank and Cleaning the Fuel Filter
| Maintenance Service Interval | Maintenance Procedure |
|---|---|
| Every 50 hours |
|
| Every 100 hours |
|
The fuel filter (screen) element is located inside the fuel tank (if applicable).
-
Stop the engine and wait for it to cool down.
Note: Drain gasoline for a cold engine only.
-
Disconnect the wire from the spark plug.
-
Close the fuel valve.
-
Disconnect the fuel line by loosening the tube clamp at the carburetor.
-
Open the fuel valve by turning the lever to the open position.
-
Drain the gasoline completely from the tank and fuel line into an approved fuel container.
-
Remove the fuel tank from the mower.
-
Close the fuel valve.
-
Pour a small amount of fuel in the fuel tank, move the fuel around in the tank, and pour it out into an approved fuel container.
-
Install the fuel tank and fuel line.
Change Fuel Filter
A fuel filter is installed between the fuel tank and the engine. Replace when necessary.
Adjustments
Note: Wait for all moving parts to stop and remove spark plug wire before servicing, cleaning, or making any adjustments to the unit.
Adjusting the Self-Propel Drive
If the lawn mower does not self-propel or has a tendency to creep forward when the control bail is released, adjust the drive cable.
-
Stop the engine and wait for all moving parts to stop.
-
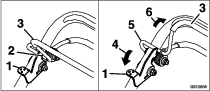
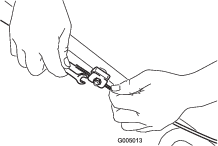
Loosen the cable support nut (Figure 34).
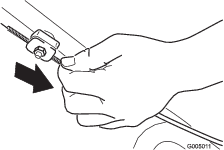
-
Pull down the cable jacket (toward the mower) until there is no slack in the cable (Figure 35).
-
Tighten the nut on the cable support.
-
Check the operation for desired drive control.
Note: If the unit creeps forward without the bail engaged or if the wheels spin when you lift the rear wheels off the ground, the cable is too tight; repeat steps 1 and 2.
Note: Adjustment to obtain desired ground speed at full bail travel may be made in order to accommodate slower speeds.
Adjusting the Blade Brake Cable
Adjust whenever a new blade brake cable assembly is installed or if the blade control lock lever does not operate properly or the BBC belt is replaced.
-
Stop the engine and wait for all moving parts to stop.
-
Disconnect the wire from the spark plug.
-
Remove and retain the front belt cover and its four bolts. Remove any debris under the cover.
-
Pull the cable until there is approximately 1/8 inch in slack. Do Not put tension on the spring.
-
Tighten the screw to lock the adjustment in place.
-
Reinstall the belt cover using the four bolts.
-
Connect the wire to the spark plug.
-
Check the operation of the blade control lock lever (see Figure 10). The lever must reset itself to lock out the blade control bail. If it does not, repeat steps 4 through 7.
-
Perform the Checking the Blade Brake Clutch procedure in Operation.
Adjusting the Transmission–
If the machine starts to lose traction, check and adjust the transmission.
-
Shut off the engine and wait for all moving parts to stop.
-
Disconnect the wire from the spark plug.
-
Loosen the bolt and nut holding the bracket into place (see Figure 30).
-
Adjust the bracket so that it is in contact with the transmission.
Note: The bracket prevents the transmission from tipping to the point where the transmission belt comes off.
-
Tighten the bolt and nut to secure the bracket into place.
Adjusting the Parking-Brake Cable
| Maintenance Service Interval | Maintenance Procedure |
|---|---|
| Before each use or daily |
|
Whenever you install a new parking-brake cable or if the parking brake is out of adjustment, adjust the parking-brake cable.
-
Disengage the parking brake.
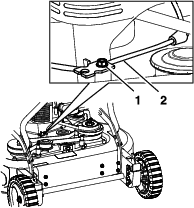
-
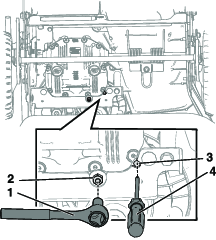
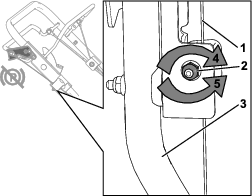
Turn the adjustment nut counterclockwise to loosen the cable adjustment (Figure 37).
-
Adjust the tension on the cable (Figure 37) by pulling or pushing the cable jacket and holding that position.
Note: Pull the cable jacket toward the engine to increase tension (also increases brake clamp load); push the cable jacket away from the engine to decrease tension (also decreases brake clamp load).
Important: Adjust the cable jacket in small increments to avoid over tensioning. Over tensioning may cause the machine to not roll free even when the parking brake is disengaged. Correct tensioning allows the machine to roll free when the parking brake is disengaged and to hold position when the parking brake is engaged.
-
Turn the adjustment nut clockwise to tighten the cable adjustment.
Note: Tighten the nut firmly with a socket or wrench.
Cleaning
Cleaning and Storing Safety
-
Park machine on level ground, set parking brake (if equipped), stop engine, and disconnect spark plug wire. Wait for all moving parts to stop before leaving the operator’s position. Allow the machine to cool before servicing, adjusting, fueling, cleaning, or storing.
-
Clean grass and debris from the cutting unit, muffler, drives, grass catcher, and engine compartment to prevent fires.
-
Allow the machine to cool before storing the machine in any enclosure. Do not store the machine or fuel container, or refuel, where there is an open flame, spark, or pilot light such as on a water heater or other appliance.
Clean Engine and Exhaust System Area
| Maintenance Service Interval | Maintenance Procedure |
|---|---|
| Before each use or daily |
|
Caution
Excessive debris around engine cooling air intake and exhaust system area can cause engine and exhaust system area to overheat which can create a fire hazard.
Clean all debris from engine and exhaust system area.
-
Stop engine, wait for all moving parts to stop, and remove spark plug wire.
-
Clean all debris from rotating engine air intake screen, around engine shrouding, and exhaust system area.
-
Wipe up any excessive grease or oil around the engine and exhaust system area.
Clean Grass Build-Up Under Deck
| Maintenance Service Interval | Maintenance Procedure |
|---|---|
| Before each use or daily |
|
-
Stop engine, wait for all moving parts to stop, and remove spark plug wire.
-
To ensure the best performance, keep the underside of the lawn mower housing clean.
Caution
The mower may dislodge material from under the mower housing.
-
Wear eye protection.
-
Stay in the operating position (behind the handle).
-
Do Not allow bystanders in the area.
-
Washing Method
-
Position the lawn mower on a flat concrete or asphalt surface near a garden hose.
-
Start the engine.
-
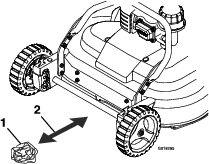
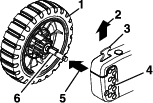
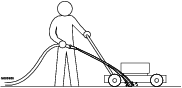
Hold the running garden hose at handle level and direct the water to flow on the ground just in front of the right rear tire (Figure 38).
-
Engage the blade.
Note: The blade will draw in water and wash out clippings. Let the water run until you no longer see clippings being washed out from under the housing.
-
Disengage the blade, stop the engine and wait for all moving parts to stop.
-
Turn off the water.
-
Start the lawn mower, engage the blade, and let the lawn mower run for a few minutes to dry out its components.
Scraping Method
If washing does not remove all debris from under the lawn mower, scrape it clean.
-
Disconnect the wire from the spark plug.
-
Drain the fuel from the fuel tank. Refer to Emptying the Fuel Tank and Cleaning the Fuel Filter section.
-
Tip the lawn mower onto its right side.
-
Remove the dirt and grass clippings with a hardwood scraper. Avoid burrs and sharp edges.
-
Turn the lawn mower upright.
-
Fill the fuel tank.
-
Connect the wire to the spark plug.
Cleaning the Discharge Tunnel and Plug
| Maintenance Service Interval | Maintenance Procedure |
|---|---|
| Before each use or daily |
|
Always be sure that the discharge tunnel door closes securely when you release the handle. If the debris prevents the discharge door from closing securely, clean the inside of the discharge tunnel and the door thoroughly.
Warning
Grass clippings and other objects can be thrown from an open discharge tunnel. Thrown objects can cause serious injury or kill the operator or bystanders.
Never start or operate the lawn mower unless one of the following is true:
-
Mulch Mode:
-
Discharge tunnel plug is locked securely in the discharge tunnel.
-
Side discharge cover is locked in place.
-
Discharge tunnel door is closed against frame.
-
-
Bag Mode:
-
Discharge tunnel plug is removed.
-
Grass bag is locked in place.
-
Discharge tunnel door is closed against bag.
-
Side discharge cover is locked in place.
-
-
Side Discharge Mode:
-
Discharge tunnel plug is locked securely in the discharge tunnel.
-
Discharge tunnel door is closed against frame.
-
Side discharge deflector is locked in place.
-
Cleaning Under the Belt Access Panel
| Maintenance Service Interval | Maintenance Procedure |
|---|---|
| Every 50 hours |
|
-
Stop the engine and wait for all moving parts to stop.
-
Disconnect the wire from the spark plug.
-
Remove and retain the belt access panel by rotating the screws a quarter-turn.
-
Brush out all the debris around the belt area.
-
Reinstall the belt access panel and rotate the screws a quarter-turn to lock into place.
-
Connect the wire to the spark plug.
Clean Debris From Machine
| Maintenance Service Interval | Maintenance Procedure |
|---|---|
| Before each use or daily |
|
-
Stop the engine and wait for all moving parts to stop.
-
Clean off any oil, debris, or grass build-up on the machine and cutting deck, especially under deck belt shields, around the fuel tank, around engine and exhaust area.
Waste Disposal
Motor Oil Disposal
Engine oil is a pollutant to the environment. Dispose of used oil at a certified recycling center or according to your state and local regulations.