Note: An additional decal (Part No. 127-6126) and fuse blade (15 A) are included in this kit. These parts are not used for the eTriFlex machines; you may discard them.
Safety
Safety and Instructional Decals
 |
Safety decals and instructions are easily visible to the operator and are located near any area of potential danger. Replace any decal that is damaged or missing. |
Installation
Preparing the Machine
-
Park the machine on a level surface.
-
Engage the parking brake.
-
Lower the cutting units.
-
Shut off the machine and remove the key.
-
Disconnect the main-power connectors; refer to your machine Operator’s Manual.
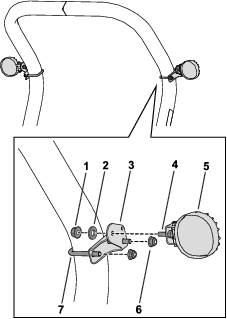
Installing the Lights
Parts needed for this procedure:
| Light assembly | 2 |
| Left bracket | 1 |
| Right bracket | 1 |
| U-bolt | 2 |
| Nut (3/8 inch) | 4 |
Installing the Wire Harness and Switch
Parts needed for this procedure:
| Wire harness | 1 |
| Cable tie (14-1/2 inches) | 10 |
| Cable tie (7-1/4 inches) | 2 |
| Switch | 1 |
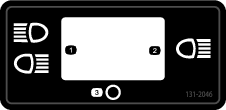
| Decal (Part No. 131-2046) | 1 |
Routing the Wire Harness
Ensure that the wire harness is routed away from any hot, sharp, or moving parts.
-
Raise the seat.
-
Locate the wire-harness connector labeled LEFT FRONT WORK LIGHTS and connect it with the left light.
-
Locate the wire-harness connector labeled RIGHT FRONT WORK LIGHTS and connect it with the right light.
-
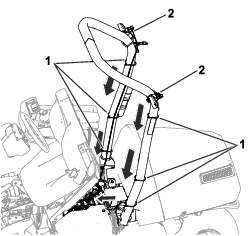
Route the wire harness down the roll bar and under the seat (Figure 2).
Note: If you are not using the rear light kit, the branch of the harness with the rear light connector (labeled "Rear Work Light") can be curled up and tied down near the seat.
-
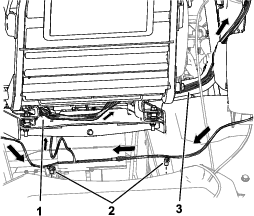
Locate the 2 push-in fasteners on the wire harness and install the fasteners into the frame tube (Figure 3).
Note: There are 2 holes provided in the frame tube for these fasteners.
-
Route the remaining wire-harness leg up through the bottom of the seat plate and following the machine wire harness towards the console (Figure 3).
-
In the console, connect the wire-harness connector labeled TO MAIN HARNESS with the machine-wire-harness connector labeled OPTIONAL WORKLIGHT KIT.
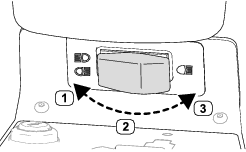
Installing the Switch and Decal
-
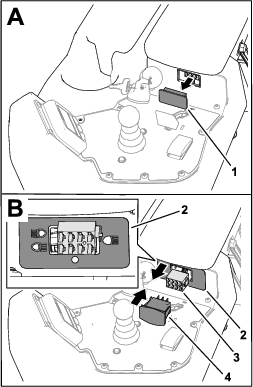
Remove the plug from the console (Figure 4).
-
Apply the decal (Part No. 131-2046) as shown in Figure 4.
Observe the correct orientation of the decal as shown in Figure 4.
-
Connect the wire-harness connector labeled WORK LIGHT SWITCH to the switch (Figure 4) and install the switch.
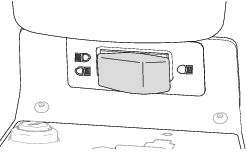
Observe the correct orientation of the switch as shown in Figure 5.
Installing the Cable Ties
Refer to the wire-harness-routing figures in Routing the Wire Harness for this procedure.
-
Use 2 cable ties (7-1/4 inches) to secure the wire harness to the left and right brackets; refer to Figure 2.
-
Use 6 cable ties (14-1/2 inches) to secure the wire harness to the roll bar; refer to Figure 2.
-
Use 2 cable ties (14-1/2 inches) to secure the wire harness to the machine wire harness under the seat.
Completing the Installation
-
Connect the main-power connectors; refer to your machine Operator’s Manual.
-
Use the switch to test if the lights are functioning; refer to Operating the Lights.
Operation
Operating the Lights
Note: To adjust the lights, loosen the mounting hardware, aim the lights as desired, and tighten the hardware.
Refer to Figure 6 for this procedure.
-
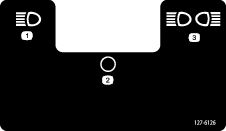
Moving the switch to the RIGHT position activates the headlights and rear light (if equipped).
-
Moving the switch to the MIDDLE position turns off the lights.
-
Moving the switch to the LEFT position activates the headlights only.