Introduction

This attachment is used to move mulch or debris on residential or commercial properties. Using this product for purposes other than its intended use could prove dangerous to you and bystanders.

Read this information carefully to learn how to operate and maintain your product properly and to avoid injury and product damage. You are responsible for operating the product properly and safely.

Visit www.Toro.com for product safety and operation training materials, accessory information, help finding a dealer, or to register your product.

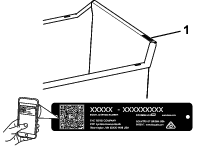
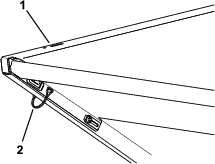
Whenever you need service, genuine Toro parts, or additional information, contact an Authorized Service Dealer or Toro Customer Service and have the model and serial numbers of your product ready. Figure 1 identifies the location of the model and serial numbers on the product. Write the numbers in the space provided.

Important: With your mobile device, you can scan the QR code on the serial number decal (if equipped) to access warranty, parts, and other product information.

g344348

Write the product model and serial numbers in the space below:

This manual identifies potential hazards and has safety messages identified by the safety-alert symbol (Figure 2), which signals a hazard that may cause serious injury or death if you do not follow the recommended precautions.

g000502

This manual uses 2 words to highlight information. Important calls attention to special mechanical information and Note emphasizes general information worthy of special attention.

Warning

CALIFORNIA

Proposition 65 Warning

Use of this product may cause exposure to chemicals known to the State of California to cause cancer, birth defects, or other reproductive harm.

Safety

General Safety

Always follow all safety instructions to avoid serious personal injury.

  • Read and understand the contents of this Operator’s Manual before starting the engine.

  • Do not put your hands or feet near moving components of the machine.

  • Do not operate the machine without all guards and other safety protective devices in place and functioning properly on the machine.

  • Keep bystanders and children out of the operating area. Do not allow children to operate the machine. Allow only people who are responsible, trained, familiar with the instructions, and physically capable to operate the machine.

  • Stop the machine, lower the bucket, shut off the engine, and remove the ignition key before servicing or fueling the machine.

Improperly using or maintaining this machine can result in injury. To reduce the potential for injury, comply with these safety instructions and always pay attention to the safety-alert symbol Graphic, which means Caution, Warning, or Danger—personal safety instruction. Failure to comply with these instructions may result in personal injury or death.

Safety and Instructional Decals

Graphic

Safety decals and instructions are easily visible to the operator and are located near any area of potential danger. Replace any decal that is damaged or missing.

decal93-6674
decal120-0625
decal133-8061
decal144-1450

Setup

Install the following (sold separately) on your machine before installing the attachment:

  • Low Flow Hydraulic Kit (required)

  • Pneumatic casters (recommended)

Preparing the Machine

  1. Park the machine on a level surface.

  2. Lower the A-frame.

  3. Disengage the PTO, engage the parking brake, and move the motion-control levers outward to the NEUTRAL-LOCK position.

  4. Shut off the engine and remove the key.

Installing the Bucket

Note: Installing this attachment requires 2 people. Retain all removed hardware; they will be installed when the bucket is removed later.

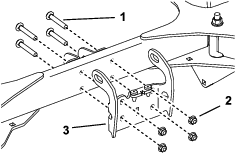
  1. Remove the existing carriage bolts and nuts from the lock bracket at the front of the machine.

    g210329
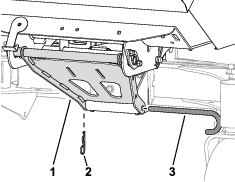
  2. Use 4 carriage bolts and 4 nuts (3/8 inch) to secure the lower mount bracket to the lock bracket

    g321097
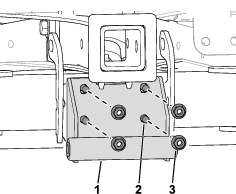
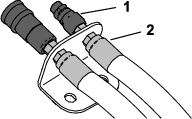
  3. Remove the existing fasteners from the disconnect-fitting bracket.

    g245631
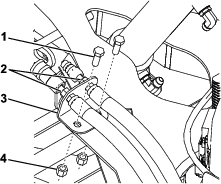
  4. Loosen or disconnect the hydraulic fittings from the hoses.

    g358469
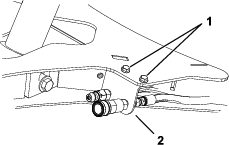
  5. Use the fasteners to secure the bracket under the A-frame.

    Important: Ensure that the hoses cannot be pinched between the A-frame and the machine frame.

    g337983
  6. Install the fittings to the hoses, if removed; ensure that the hoses are not under tension. Tighten the fittings to 18 to 19 N∙m (13 to 14 ft-lb).

  7. Ensure that the quick couplers are tightened 2 to 3 turns past finger-tight.

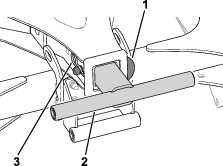
  8. Use a hitch pin and a cotter pin to install the T-bar into the A-frame receiver.

    g321098
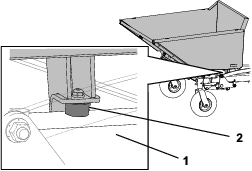
  9. Have an assistant help you to set the bucket on the machine. Ensure that the bumpers sit on the frame tube.

    Important: Do not lift the bucket using the door.

    g343520
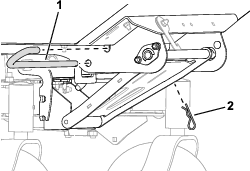
  10. Use the large pin and a cotter pin to secure the bucket to the T-bar.

    g321100
  11. Use the small pin and a cotter pin to secure the strut.

    g321099

To remove the bucket, refer to Removing the Bucket.

Operation

Operation Safety

  • Stop the machine on level ground, lower the bucket, shut off the engine, and remove the key before leaving the operator's position for any reason.

  • Do not exceed the rated operating capacity, as the machine may become unstable which may result in loss of control.

  • Raising the bucket on a slope affects the stability of the machine. Keep the bucket in the lowered position when on slopes.

  • Locate the pinch point areas marked on the machine and keep hands and feet away from these areas.

  • Do not overload the bucket and always keep the load level when operating the machine.

  • Operate the machine up and down slopes with the heavy end of the machine uphill. Weight distribution changes with attachments. An empty bucket makes the rear of the machine the heavy end, and a full bucket makes the front of the machine the heavy end.

  • Clean debris from drives, mufflers, and the engine to help prevent fires. Clean up oil or fuel spills.

Loading the Bucket

  1. Fill the bucket.

    Important: The weight capacity of the bucket is 113 kg (250 lb).

  2. Remove any loose debris from the machine.

Lowering and Raising the Bucket

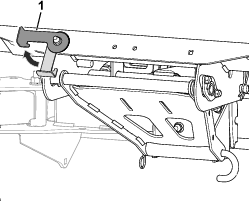
  1. Rotate the latch up.

    g321388
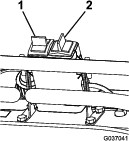
  2. Use the switch from the Low Flow Hydraulic kit to lower or raise the bucket

    Important: Do not raise or lower the bucket while the machine is moving.

    g037041

Opening the Bucket Door

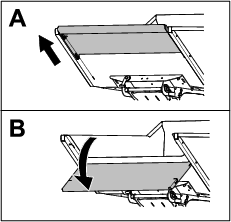
  1. Remove the lynch pin on each side of the door and store it using the holes on the rail.

    g346830
  2. Slide the door up and lower it.

    g344347
  3. Close the door and secure it using the lynch pins.

Transporting the Machine

Use a heavy-duty trailer or truck to transport the machine. Use a full-width ramp. Ensure that the trailer or truck has all the necessary brakes, lighting, and marking as required by law. Please carefully read all the safety instructions. Knowing this information could help you or bystanders avoid injury. Refer to your local ordinances for trailer and tie-down requirements.

Warning

Driving on the street or roadway without turn signals, lights, reflective markings, or a slow-moving-vehicle emblem is dangerous and can lead to accidents, causing personal injury.

Do not drive the machine on a public street or roadway.

Selecting a Trailer

Warning

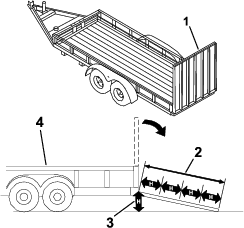
Loading a machine onto a trailer or truck increases the possibility of tip-over and could cause serious injury or death (Figure 16).

  • Use only a full-width ramp; do not use individual ramps for each side of the machine.

  • Ensure that the length of ramp is at least 4 times as long as the height of the trailer or truck bed to the ground.

g229507

Loading the Machine

Warning

Loading a machine onto a trailer or truck increases the possibility of tip-over and could cause serious injury or death.

  • Use extreme caution when operating a machine on a ramp.

  • Avoid sudden acceleration or deceleration while driving the machine on a ramp as this could cause a loss of control or a tip-over situation.

  1. If using a trailer, connect it to the towing vehicle and connect the safety chains.

  2. If applicable, connect the trailer brakes and lights.

  3. Lower the ramp (Figure 16).

  4. Ensure that the bucket is empty.

  5. Load the machine onto the trailer.

  6. Shut off the engine, remove the key, and engage the parking brake.

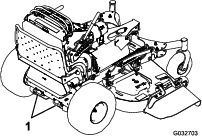
  7. Tie down the machine near the front caster wheels and the rear bumper with straps, chains, cable, or ropes (Figure 17). Refer to local regulations for tie-down requirements.

    g032703

Removing the Bucket

Note: Removing this attachment requires 2 people.

  1. Empty the bucket.

  2. Park the machine on a level surface, lower the bucket, and engage the parking brake.

  3. Shut off the engine, remove the key, and wait for all moving parts to stop before leaving the operating position.

  4. Remove the small pin and cotter pin from the strut.

    g321099
  5. Remove the cotter pin and large pin.

    g321100
  6. With the assistance of another person, lift the bucket off the machine.

  7. Remove the hitch pin, cotter pin, and T-bar.

    g321098
  8. Remove the fasteners from the disconnect-fitting bracket.

    g337983
  9. Loosen or disconnect the hydraulic fittings from the hoses.

    g358469
  10. Use the fasteners to install the bracket over the A-frame.

    g245631
  11. Install the fittings to the hoses, if removed; ensure that the hoses are not under tension. Tighten the fittings to 18 to 19 N∙m (13 to 14 ft-lb).

  12. Ensure that the quick couplers are tightened 2 to 3 turns past finger-tight.

  13. Remove the lower mount bracket.

    g321097
  14. Install the lock bracket.

    g210329

Maintenance

Caution

If you leave the key in the switch, someone could accidently start the engine and seriously injure you or other bystanders.

Remove the key from the switch before you perform any maintenance.

Checking the Hydraulic Hoses

Maintenance Service IntervalMaintenance Procedure
Every 100 hours
  • Check the hydraulic hoses for leaks, loose fittings, kinked lines, loose mounting supports, wear, weather, and chemical deterioration.
  • Check the hydraulic hoses for leaks, loose fittings, kinked lines, loose mounting supports, wear, weather, and chemical deterioration.

    Warning

    Hydraulic fluid escaping under pressure can penetrate skin and cause injury. Fluid injected into the skin must be surgically removed within a few hours by a doctor familiar with this form of injury; otherwise, gangrene may result.

    • Ensure that all hydraulic-fluid hoses and lines are in good condition and all hydraulic connections and fittings are tight before applying pressure to the hydraulic system.

    • Keep your body and hands away from pinhole leaks or nozzles that eject high-pressure hydraulic fluid.

    • Use cardboard or paper to find hydraulic leaks; never use your hands.

    Removing Debris from the Machine

    Maintenance Service IntervalMaintenance Procedure
    After each use
  • Remove debris from the machine.
    1. Park the machine on a level surface, lower the bucket, and engage the parking brake.

    2. Shut off the engine, remove the key, and wait for all moving parts to stop before leaving the operating position.

    3. Clean debris from the drives, muffler, and engine after each use.