Installation
Preparing the Machine
-
Park the machine on a level surface.
-
Engage the parking brake.
-
Shut off the engine and remove the key.
Removing an Existing Motor Mount
Important: Remove and install a single motor mount at a time (e.g., remove and install the left motor mount, then remove and install the right motor mount).If both mounts are simultaneously removed, then installed, the engine frame assembly becomes unstable.
-
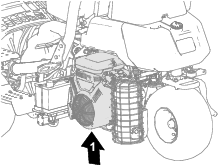
Place a jack under the engine (Figure 1).
Note: This removes the engine weight from the parts that you remove in the next step.
-
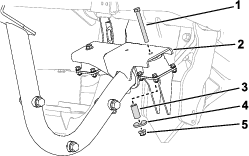
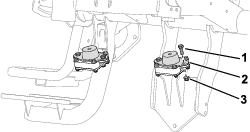
Remove the existing bolts, spacers, and nuts from one of the motor mounts on the engine frame (Figure 2).
Note: The engine frame is adjacent to the engine, under the generator.
-
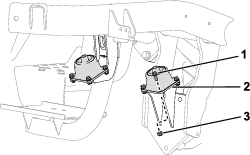
Remove the existing bolt, nut, and motor mount from the frame (Figure 3).
Installing a Motor Mount
Parts needed for this procedure:
| Motor adapter | 1 |
| Motor mount | 1 |
| Hex-head bolt (5/16 inch) | 2 |
| Nut (5/16 inch) | 2 |
| Hex-head bolt (3/8 inch) | 1 |
| Nut (3/8 inch) | 1 |
| Hex-head bolt (1/4 inch) | 4 |
| Nut (1/4 inch) | 4 |
| Cylinder spacer | 1 |
| Spacer | 1 |
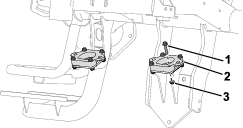
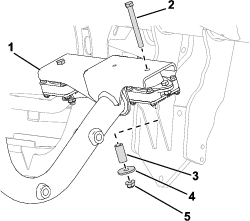
Note: The engine frame is removed from Figure 4 and Figure 5 for clarity. The frame is shown in Figure 6.
-
Use 4 hex-head bolts (1/4 inch) and 4 nuts (1/4 inch) to secure a motor adapter to the frame (Figure 4).
-
Use 2 hex-head bolts (5/16 inch) and 2 nuts (5/16 inch) to secure a motor mount to the motor adapter (Figure 5).
-
Use 1 hex-head bolt (3/8 inch), 1 cylinder spacers, 1 spacer, and 1 nut (3/8 inch) to secure the engine frame to the motor mount (Figure 6).
Removing and Installing the Remaining Motor Mount
Parts needed for this procedure:
| Motor adapter | 1 |
| Motor mount | 1 |
| Hex-head bolt (5/16 inch) | 2 |
| Nut (5/16 inch) | 2 |
| Hex-head bolt (3/8 inch) | 1 |
| Nut (3/8 inch) | 1 |
| Hex-head bolt (1/4 inch) | 4 |
| Nut (1/4 inch) | 4 |
| Cylinder spacer | 1 |
| Spacer | 1 |
-
Remove and install the remaining motor mount; refer to the steps listed in Removing an Existing Motor Mount and Installing a Motor Mount.
-
Remove the jack from the engine.