Important: This kit does not come with the recycler blades.
Installation
Raising the Mower for Access
You can raise the front of the mower and support to access under the machine for maintenance.
Warning
The machine could fall onto someone and cause serious injury or death.
-
Always shut off the engine, engage the parking brake, and remove the key before performing any maintenance on the mower.
-
Use extreme caution when the machine is raised and supported on its back. The blades and moving parts are exposed and could cause injury.
-
Use this position only for cleaning, removing blades or baffles, and maintenance.
-
Park the machine on a level surface, disengage the PTO, and engage the parking brake.
-
Shut off the engine, remove the key, and wait for all moving parts to stop before leaving the operating position.
-
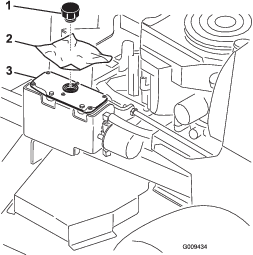
Remove the battery from the machine; refer to the Operator’s Manual.
-
Raise the mower deck to the highest position.
-
Drain the fuel from the fuel tank; refer to Draining the Fuel Tank in the Operator’s Manual.
-
Remove the hydraulic-tank cap and place a piece of plastic over the opening and install the cap.
This seals the hydraulic tank and prevents fluid from leaking.
-
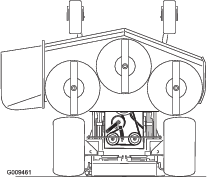
With 2 people, raise the front of the mower so that it rests on the drive tires and with the platform in the upright position.
Preparing the Machine
-
Disengage the PTO, move the motion-control levers to the NEUTRAL-LOCK position, and engage the parking brake.
-
Shut off the engine, remove the key, and wait for all moving parts to stop before leaving the operating position.
-
Repair all bent or damaged areas of mower deck and replace any missing parts.
-
Clean the machine of any debris on the deck to ease installation.
-
Remove the existing blades; refer to the Operator’s Manual.
Removing the Existing Baffles
Note: Remove the nuts first before removing the bolts.
-
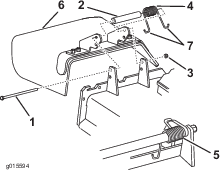
Remove the flange nuts holding the baffles in place (Figure 3).
-
Remove the cam lock and washer by unscrewing it from the adjustable flow baffle (Figure 3).
Note: For certain models of mower decks, remove the nut, knob, and washer if a cam lock is not present.
-
Remove the bolts holding the baffles in place (Figure 3).
Note: Save the baffles and hardware.
-
After removing the discharge baffle, install the nuts and bolts back into the mower deck (Figure 3).
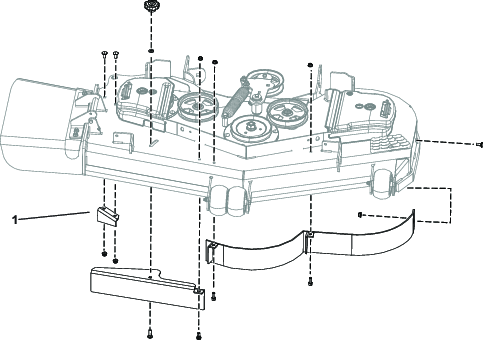
Removing the Deck Fasteners and Discharge Baffle
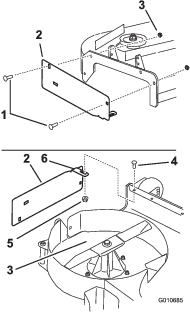
Remove the 6 carriage bolts (3/8 x 7/8 inch), 6 locknuts (3/8 inch), and discharge baffle from the mower deck (Figure 4).
After removing the discharge baffle, install the 2 carriage bolts (3/8 x 7/8 inch) and 2 locknuts (3/8 inch) back into the mower deck (Figure 4).
Retain the fasteners and discharge baffle for converting back to side discharge.
Removing the Existing Discharge Chute
Drilling Holes
-
Check the hole diameters in the locations shown in Figure 6.
-
If there are no holes in the side discharge mounting bracket, use the discharge plate as a template and mark the location of the holes.
Note: For the upper rear hole, use the upper part of the slot to mark the location of the hole. This will allow for clearance of the nut when the discharge plate is installed.
-
Drill the holes to the specified diameter in the locations shown in Figure 6.

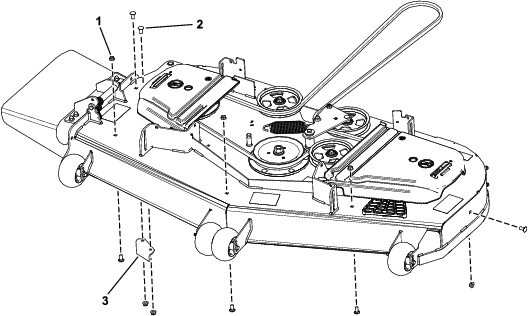
Installing the Discharge Plate
Parts needed for this procedure:
| Discharge plate | 1 |
| Carriage bolt (3/8 x 1-1/4 inches) | 2 |
| Carriage bolt (5/16 x 7/8 inch) | 1 |
| Flange nut (small flange) (3/8 inch) | 2 |
| Flange nut (5/16 inch) | 1 |
-
Install the discharge plate to the outside of the mounting bracket with 2 carriage bolts (3/8 x 1-1/4 inches) and 2 flange nuts (small flange) (3/8 inch) as shown in Figure 7.
-
Install the tab to the inside of the mower deck with 1 carriage bolt (5/16 x 7/8 inch) and 1 flange nut (5/16 inch) (small flange) as shown in Figure 7.
Installing the Baffles
Parts needed for this procedure:
| Left baffle | 1 |
| Center baffle | 1 |
| Right baffle | 1 |
| Small flange nut (3/8 inch) | 7 |
| Carriage bolt (3/8 x 1 inch) | 7 |
| Bolt (3/8 x 1 inch) | 2 |
| Large flange nut (3/8 inch) | 2 |
Note: Loosely install the baffles to align the baffles with all holes in the mower (Figure 8).
-
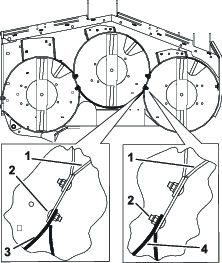
Position the right baffle into the mower.
-
Loosely install the right baffle to the discharge plate with 1 carriage bolt (3/8 x 1 inch) and a small flange nut (3/8 inch) as shown in Figure 8.
-
Loosely install the right baffle to the top of the mower deck with 1 carriage bolt (3/8 x 1 inch) and 1 large flange nut (3/8 inch) as shown in Figure 8.
Refer to Figure 9 for the position of the baffles.
-
Loosely install the right baffle to the mower deck with 1 carriage bolt (3/8 x 1 inch) and 1 small flange nut (3/8 inch) as shown in Figure 8.
-
Position the left baffle into the mower.
-
Loosely install the left baffle to the top of the mower deck with 1 bolt (3/8 x 1 inch) and 1 small flange nut (3/8 inch) as shown in Figure 8.
Refer to Figure 9 for the position of the baffles.
-
Loosely install the left baffle to the mower deck with 1 carriage bolt (3/8 x 1 inch) and 1 small flange nut (3/8 inch) as shown in Figure 8.
-
Loosely install the left baffle to the side of the mower deck with 1 carriage bolt (3/8 x 1 inch) and 1 large flange nut (3/8 inch) as shown in Figure 8.

-
Position the center baffle into the mower.
-
Loosely install the center baffle to the left baffle with 1 carriage bolt (3/8 x 1 inch) and 1 flange nut (small flange) (3/8 inch) as shown in Figure 10.
Refer to Figure 9 for the position of the baffles.
-
Loosely install the center baffle to the right baffle with 1 carriage bolt (3/8 x 1 inch) and 1 flange nut (small flange) (3/8 inch) as shown in Figure 10.
-
Loosely install the center baffle to the top of the mower deck with 1 bolt (3/8 x 1 inch) and 1 flange nut (small flange) (3/8 inch) as shown in Figure 10.

Installing the Baffles
Parts needed for this procedure:
| Left baffle | 1 |
| Center baffle | 1 |
| Right baffle | 1 |
| Flange nut (small flange) (3/8 inch) | 8 |
| Carriage bolt (3/8 x 1 inch) | 7 |
| Bolt (3/8 x 1 inch) | 2 |
| Flange nut (large flange) (3/8 inch) | 1 |
Note: Loosely install the baffles to align the baffles with all holes in the mower (Figure 8).
-
Position the right baffle into the mower.
-
Loosely install the right baffle to the discharge plate with 1 carriage bolt (3/8 x 1 inch) and a flange nut (small flange) (3/8 inch) as shown in Figure 11.
-
Loosely install the right baffle to the top of the mower deck with 1 carriage bolt (3/8 x 1 inch) and 1 flange nut (large flange), (3/8 inch) as shown in Figure 11.
-
Loosely install the right baffle to the mower deck with 1 carriage bolt (3/8 x 1 inch) and 1 flange nut (small flange) (3/8 inch) as shown in Figure 11.
-
Position the left baffle into the mower.
-
Loosely install the left baffle to the top of the mower deck with 1 bolt (3/8 x 1 inch) and 1 flange nut (small flange) (3/8 inch) as shown in Figure 11.
-
Loosely install the left baffle to the mower deck with 1 carriage bolt (3/8 x 1 inch) and 1 flange nut (small flange) (3/8 inch) as shown in Figure 11.
-
Loosely install the left baffle to the side of the mower deck with 1 carriage bolt (3/8 x 1 inch) and 1 flange nut (small flange) (3/8 inch) as shown in Figure 11.

-
Position the center baffle into the mower.
-
Loosely install the center baffle to the left baffle with 1 carriage bolt (3/8 x 1 inch) and 1 flange nut (small flange) (3/8 inch) as shown in Figure 12.
-
Loosely install the center baffle to the right baffle with 1 carriage bolt (3/8 x 1 inch) and 1 flange nut (small flange) (3/8 inch) as shown in Figure 12.
-
Loosely install the center baffle to the top of the mower deck with 1 bolt (3/8 x 1 inch) and 1 flange nut (small flange) (3/8 inch) as shown in Figure 12.
Tightening all the Fasteners
-
Tighten all nuts and bolts for the baffles; refer to the Installing the Baffles sections.
-
For GrandStand mowers, lower the machine, remove the plastic from the hydraulic tank, and connect the battery.
-
For GrandStand mowers, place the battery onto the machine.
-
Secure the battery with the hold-down plate, J-bolts, and locknuts.
-
Install the positive (red) battery cable to positive (+) battery terminal with a nut, washer, and bolt.
Slide the rubber cover over the post.
-
Install the negative battery cable and ground wire to the negative (-) battery terminal with a nut, washer, and bolt.
Slide the rubber cover over the post.
Installing the Recycler Blades
Parts needed for this procedure:
| Recycler blade (sold separately) | 3 |
-
Install the 3 recycler blades; refer to the Operator’s Manual.
-
Rotate the blades and ensure that there is clearance between the blades and baffles.
If there is interference, loosen the baffle and reposition it.