Setup
Adjusting the Track Tension
Parts needed for this procedure:
| Tensioning tool | 1 |
Note: Check and adjust the tension prior to operating the machine.
-
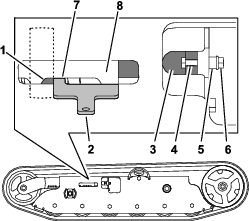
Place the tab of the tensioning tool along the rear edge of the tension nut. Verify that the other end of the tensioning tool aligns with the edge of the tension arm. If necessary, continue the procedure to adjust the tension.

-
Remove the bolt (1/4 x 1-5/8 inch), spacer, and nut (Figure 1).
-
Turn the tensioning bolt to adjust the tension nut until the edges of the tensioning tool align with the edges of the tension nut and tension arm (Figure 1)
-
Align the closest notch in the tensioning bolt to the bolt hole and secure the tensioning bolt with the bolt (1/4 x 1-5/8 inch), spacer, and nut (Figure 1).
-
Repeat the procedure for the other track.