Installation
Preparing the Machine
-
Park the machine on a level surface.
-
Move the motion-control levers to the NEUTRAL-LOCK position.
-
Engage the parking brake.
-
Shut off the engine and remove the key.

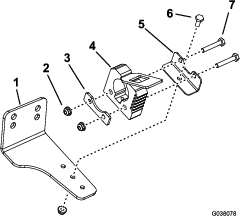
Assembling the Kit
Parts needed for this procedure:
| Rear bracket | 1 |
| Nut (1/4 inch) | 6 |
| Large backer plate | 1 |
| Large fist clamp | 1 |
| Large fist-clamp bracket | 1 |
| Bolt (1/4 x 5/8 inch) | 2 |
| Bolt (1/4 x 1-1/2 inches) | 2 |
| Bolt (1/4 x 1-1/4 inches) | 2 |
| Small fist clamp | 1 |
| Small backer plate | 1 |
| Carriage bolt (5/16 x 7/8 inch) | 3 |
| Small fist-clamp bracket | 1 |
| Trimmer plate | 1 |
| Nut (5/16 inch) | 2 |
| Channel bracket | 1 |
| Mount plate | 1 |
| Knob | 1 |
Mounting the Kit to the Machine
Parts needed for this procedure:
| Bolt (3/8 x 7/8 inch) | 2 |
| Nut (3/8 inch) | 2 |
| Carriage bolt (3/8 x 3 inches) | 1 |
| Wide-flange nut (3/8 inch) | 1 |
| Right pod support bracket—2021 and newer machines only | 1 |
| Thread-forming screw (3/8 x 1 inch)—2021 and newer machines only | 2 |
-
For 2021 and newer machines only, do the following:
-
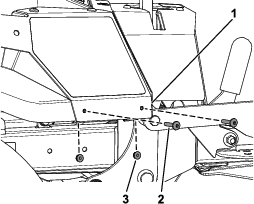
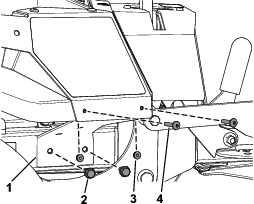
Remove the 2 torx-head screws (1/4 x 1-5/16 inches) and 2 locknuts (1/4 inch) from the right pod (Figure 5).
Retain the 2 torx-head screws (1/4 x 1-5/16 inches) and 2 locknuts (1/4 inch).
-
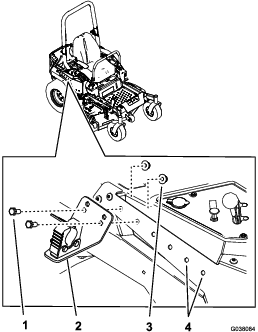
Secure the right pod support bracket using the 2 new thread-forming screws (3/8 x 1 inch) and the previously removed 2 torx-head screws (1/4 x 1-5/16 inches) and 2 locknuts (1/4 inch) as shown in Figure 6.
-
-
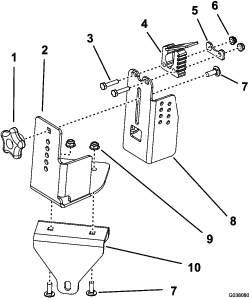
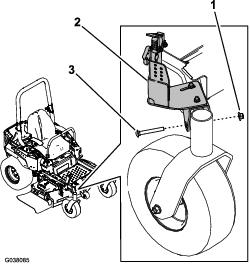
Install the rear mount assembly to the right side panel on the machine using 2 bolts (3/8 x 7/8 inch) and 2 nuts (3/8 inch) as shown in Figure 7.
Note: Use the 2 front holes if you are mounting a curved trimmer.
-
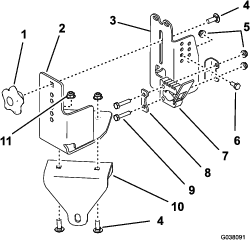
Install the front mount assembly over the frame, near the right caster wheel, using the wide-flange nut (3/8 inch) and carriage bolt (3/8 x 3 inches) as shown in Figure 8.
Securing a Trimmer to the Mount Assemblies
-
Secure the rear end of the trimmer to the rear mount assembly using the large fist clamp.
-
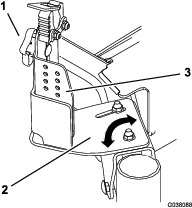
Loosen the bolts securing the mount plate to the channel bracket in the front mount assembly (Figure 9).
-
Pivot the plate so that the small fist clamp lines up with the trimmer. Tighten the bolts.
-
Loosen the knob and raise or lower the trimmer plate as necessary (Figure 9). Tighten the knob.
-
Secure the front end of the trimmer to the front mount assembly using the fist clamp.