
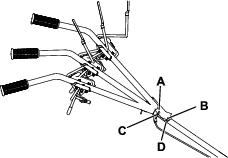
 , which means
Caution, Warning, or Danger—personal safety instruction. Failure
to comply with these instructions may result in personal injury or
death.
, which means
Caution, Warning, or Danger—personal safety instruction. Failure
to comply with these instructions may result in personal injury or
death.


Maintenance
Maintenance Safety
-
Inspect the machine frequently to ensure that it is in safe working condition and that shear bolts, engine-mounting bolts, and other fasteners are properly tightened.
-
Shut off the machine and wait for all moving parts to stop before you leave the operator’s position. Disconnect the spark-plug wire, keep it away from the plug to prevent accidental starting, and allow the machine to cool before adjusting, fueling, unclogging, servicing, cleaning, or storing the machine.
-
Wear gloves and eye protection when servicing the machine.
-
Never tamper with safety devices. Check their proper operation regularly.
-
To ensure optimum performance of the machine, use only genuine Toro replacement parts and accessories. Replacement parts and accessories made by other manufacturers could be dangerous, and such use could void the product warranty.
-
Replace tines that are bent, damaged, or loose; do not repair or alter them.
-
Keep the machine, attachments, and accessories in safe working condition.
-
Do not attempt to repair the machine unless you have the proper tools and instructions for disassembling, assembling, and repairing the machine.
Recommended Maintenance Schedule(s)
| Maintenance Service Interval | Maintenance Procedure |
|---|---|
| After the first 5 hours |
|
| Before each use or daily |
|
| Every 25 hours |
|
| Every 50 hours |
|
| Yearly |
|
Important: Refer to your engine manual for additional maintenance procedures
Pre-Maintenance Procedures
Preparing for Maintenance
-
Move the machine to a level surface, shut off the engine, and wait for all moving parts to stop.
-
Disconnect the spark-plug wire from the spark plug.

-
After performing the maintenance procedure(s), connect the spark-plug wire to the spark plug.
Important: Before tipping the machine, allow the fuel tank to run dry through normal usage. If you must tip the machine prior to running out of fuel, use a hand fuel pump to remove the fuel.
Lubrication
Greasing the Machine
| Maintenance Service Interval | Maintenance Procedure |
|---|
Grease type: White lithium grease
Grease the machine at the following locations:
-
Forward and reverse arm assemblies
-
Forward and reverse engagement levers
-
Forward and reverse cables.
Engine Maintenance
Servicing the Air Cleaner
| Maintenance Service Interval | Maintenance Procedure |
|---|---|
| Every 25 hours |
|
| Yearly |
|
Removing the Air Cleaner Elements
-
Clean around the air-cleaner cover to prevent dirt from getting into the engine and causing damage.
-
Loosen the fastener on the cover.
-
Remove the cover.
-
Remove the fastener on the elements.
-
Carefully remove the foam pre-cleaner and paper element from the base.
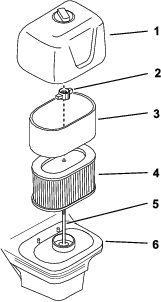
Servicing the Foam Element
-
Remove the foam pre-cleaner from the paper element.
-
Wash the pre-cleaner with warm water and a mild detergent.
-
Rinse the pre-cleaner and allow it to air dry.
Important: Replace the foam pre-cleaner if it is torn or worn. Do not oil the pre-cleaner.
Servicing the Paper Element
-
Clean the paper element by tapping it gently to remove dust.
Note: If it is very dirty, replace the paper element with a new one.
-
Inspect the element for tears, an oily film, or damage to the rubber seal.
-
Replace the element if it is damaged.
Important: Do not clean the paper element.
Installing the Air Cleaner Elements
-
Install the foam pre-cleaner element over the paper element.
Note: Ensure that you do not damage the elements.
-
Install the air-cleaner elements onto the air-cleaner base and onto the stud.
-
Secure the elements using the fastener.
-
Install the cover and secure it with the fastener.
Servicing the Engine Oil
| Maintenance Service Interval | Maintenance Procedure |
|---|---|
| Yearly |
|
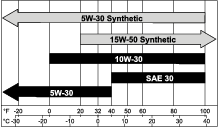
Engine-Oil Specifications
| Engine oil capacity | 0.54 to 0.59 L (18 to 20 fl oz) |
| Oil viscosity | Refer to the chart below. |
| API service classification | SJ or higher |
Checking the Engine-Oil Level
| Maintenance Service Interval | Maintenance Procedure |
|---|---|
| Before each use or daily |
|
-
Move the machine to a level surface.
-
Remove the dipstick and wipe the end clean.
-
Insert the dipstick fully into the oil-fill tube, but do not turn or tighten it.
-
Remove the dipstick and check the engine-oil level. Ensure that the oil is at the top of the Full indicator on the dipstick..
-
If the oil level is low, slowly add oil into the filler tube until it is overflowing.
-
Install the dipstick and tighten it.
Changing the Engine Oil
| Maintenance Service Interval | Maintenance Procedure |
|---|---|
| After the first 5 hours |
|
| Every 50 hours |
|
Note: Run the engine a few minutes before changing the oil to warm it. Warm oil flows better and carries more contaminants.
-
Move the machine to a level surface.
-
Refer to Preparing for Maintenance.
-
Place a pan under the drain plug to catch the oil.
-
Remove the oil-fill plug and allow the oil to drain.
Note: Dispose of the used oil at a certified recycling center.
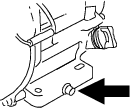
-
Install the oil-fill plug.
-
Slowly pour oil into the oil-fill hole until the oil is at the correct level; refer to Engine-Oil Specifications.
-
Ensure that the oil is at the correct level on the dipstick; refer to Checking the Engine-Oil Level.
-
Wipe up any spilled oil.
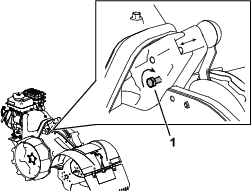
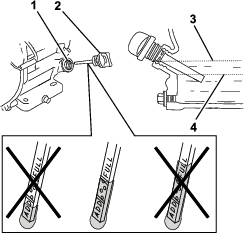
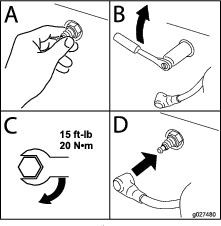
Servicing the Spark Plug
| Maintenance Service Interval | Maintenance Procedure |
|---|---|
| Yearly |
|
Ensure that the air gap between the center and side electrodes is correct before installing the spark plug.
Use a spark plug wrench for removing and installing the spark plug(s) and a gapping tool/feeler gauge to check and adjust the air gap. Install a new spark plug(s) if necessary.
Type: Briggs and Stratton 797235
Air gap: 0.75 mm (0.03 inch)
Removing the Spark Plug
-
Disconnect the spark-plug wire from the spark plug.
-
Clean around the spark plugs to prevent dirt from entering the engine and potentially causing damage.
-
Remove the spark plug.
Checking the Spark Plug
Important: Do not clean the spark plug(s). Always replace the spark plug(s) when it has a black coating, worn electrodes, an oily film, or cracks.
If you see light brown or gray on the insulator, the engine is operating properly. A black coating on the insulator usually means the air cleaner is dirty.
Set the gap to 0.75 mm (0.03 inch).
Installing the Spark Plug
Belt Maintenance
Checking and Adjusting the Drive Belts
| Maintenance Service Interval | Maintenance Procedure |
|---|---|
| Yearly |
|
The belt tension may decrease over time. You may need to adjust the belt within the first half hour of operation due to initial belt stretch.
Important: Check the belt tension regularly. Improper belt tension may cause premature belt wear.
The belt may need adjustment if there is a constant squealing sound while the tines are engaged or if the belt slips and the wheels and tines do not turn.
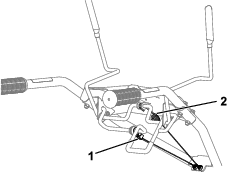
Checking and Adjusting the Forward Drive Belt Tension
-
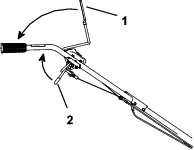
With the forward drive-control lever in the neutral position, measure the length of the spring on the forward drive cable.
-
Pull down the forward lever and measure the length of the extended spring. The difference should be 5 mm (3/16 inch).
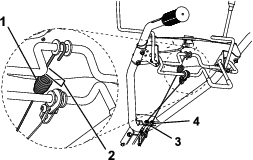
-
If the belt needs adjustment, loosen the upper jam nut, then tighten the lower jam nut in 0.32 cm (1/8 inch) increments. Check the tension again, and repeat as necessary
Note: If the tension is incorrect and you cannot adjust the jam nuts further, replace the belt.
Adjusting the Reverse Drive Belt Tension
If the machine does not operate in reverse when the reverse drive-control lever is engaged, adjust the jam nuts on the reverse drive cable 1 turn at a time until the reverse drive control functions properly.
Note: If the machine does not operate in reverse and you cannot adjust the jam nuts further, replace the belt.
Replacing the Belts
| Maintenance Service Interval | Maintenance Procedure |
|---|---|
| Every 50 hours |
|
Removing the Belts
-
Park the machine on a level surface, shut off the engine, and wait for all moving parts to stop before leaving the operating position.
-
Remove the spark plug wire.
-
Shift the drive-mode lever to the NEUTRAL position.
-
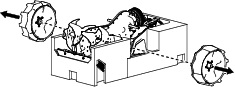
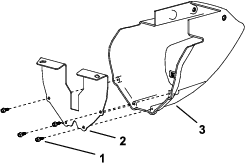
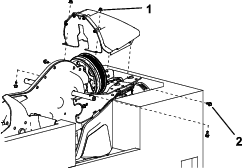
Remove the wheels, upper pulley shrouds, and lower pulley guards.
-
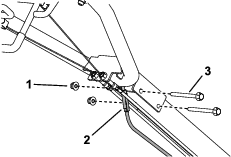
Detach the forward and reverse drive cables from the drive control levers.
-
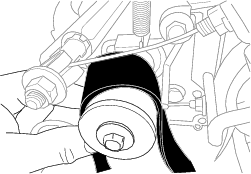
Pull the reverse arm away from the engine pulley. Use 2 wrenches (13 mm) to loosen the idler pulley on the arm so that you can remove the reverse drive belt.
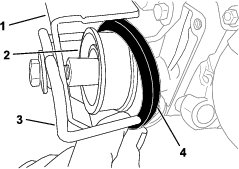
-
Gently rotate the transmission pulley and force the forward drive belt out of the groove and away from the pulley.
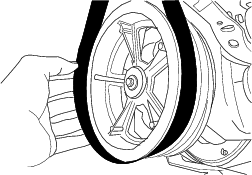
-
Push up on the belt, and pull it off and away from the pulley.
-
Remove the reverse drive belt from the transmission pulley.
Installing the Belts
-
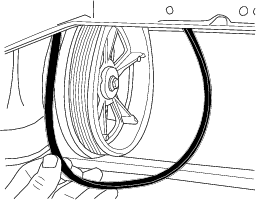
Place the reverse drive belt in the transmission pulley groove.
-
Place the forward drive belt in the engine pulley groove, between the wire guides.
-
Gently rotate the transmission pulley and force the forward drive belt into the groove.
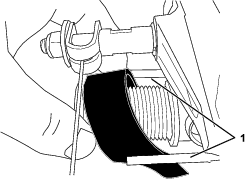
-
Slide the reverse drive belt onto the reverse arm idler pulley, between the wire belt guides, and into the groove.
-
Tighten the idler pulley so that the wire belt guides do not contact the belt when the reverse drive lever is engaged.
-
Connect the forward and reverse drive cables to the drive control levers.
-
Install the upper shrouds and lower pulley guards.
-
Install the wheels.
-
Install the spark plug wire.
Cleaning
Cleaning the Machine
| Maintenance Service Interval | Maintenance Procedure |
|---|---|
| Before each use or daily |
|
| Yearly |
|
-
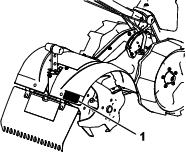
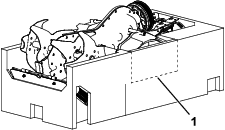
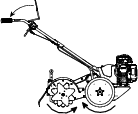
Tip the tiller toward the engine and block it into position so that it rests on the lower pulley guard and the tines are exposed.
-
Remove all debris on the axle between the tines and transmission housing.
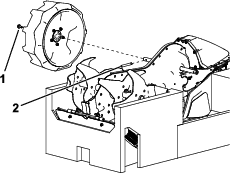
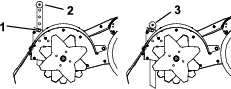
Note: To assist cleaning, remove the tines; loosen and remove the bolt and nut on the tine shaft and slide the tines off the shaft.
-
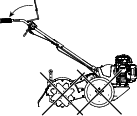
Tip the tiller to a level position.
-
Remove all debris on the axles between the wheels and transmission housing.
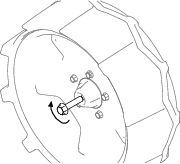
To assist cleaning, remove the wheels as follows:
-
Raise the machine so that the wheels do not support the weight of the machine.
-
Loosen the bolt on the wheel shaft.
-
Slide the wheels off, ensuring to not lose the wheel pin on the shaft.
Note: If the wheels are difficult to remove, thread a bolt (M10 x 25 mm, or longer) into the wheel hub and rotate it clockwise until the wheel releases from the shaft.
-
-
Tip the tiller to a level position.