
 , which means
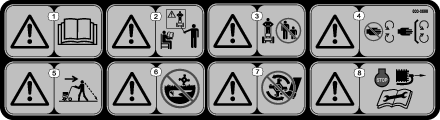
Caution, Warning, or Danger—personal safety instruction. Failure
to comply with these instructions may result in personal injury or
death.
, which means
Caution, Warning, or Danger—personal safety instruction. Failure
to comply with these instructions may result in personal injury or
death.


Maintenance
Maintenance Safety
-
Inspect the machine frequently to ensure that it is in safe working condition and that shear bolts, engine-mounting bolts, and other fasteners are properly tightened.
-
Shut off the machine and wait for all moving parts to stop before you leave the operator’s position. Disconnect the spark-plug wire, keep it away from the plug to prevent accidental starting, and allow the machine to cool before adjusting, fueling, unclogging, servicing, cleaning, or storing the machine.
-
Wear gloves and eye protection when servicing the machine.
-
Never tamper with safety devices. Check their proper operation regularly.
-
To ensure optimum performance of the machine, use only genuine Toro replacement parts and accessories. Replacement parts and accessories made by other manufacturers could be dangerous, and such use could void the product warranty.
-
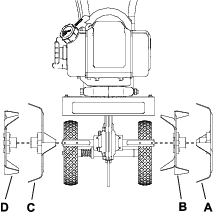
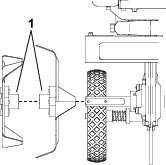
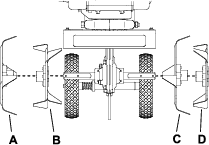
Replace tines that are bent, damaged, or loose; do not repair or alter them.
-
Keep the machine, attachments, and accessories in safe working condition.
-
Do not attempt to repair the machine unless you have the proper tools and instructions for disassembling, assembling, and repairing the machine.
Recommended Maintenance Schedule(s)
| Maintenance Service Interval | Maintenance Procedure |
|---|---|
| Before each use or daily |
|
| Every 20 hours |
|
| Yearly |
|
Pre-Maintenance Procedures
Preparing for Maintenance
-
Move the machine to a level surface, shut off the engine, and wait for all moving parts to stop.
-
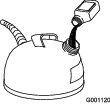
Disconnect the spark-plug wire from the spark plug.
-
After performing the maintenance procedure(s), connect the spark-plug wire to the spark plug.
Important: Before tipping the machine to replace the blade, allow the fuel tank to run dry through normal usage. If you must tip the machine prior to running out of fuel, use a hand fuel pump to remove the fuel.
Engine Maintenance
Servicing the Air Filter
| Maintenance Service Interval | Maintenance Procedure |
|---|---|
| Before each use or daily |
|
| Every 20 hours |
|
| Yearly |
|
-
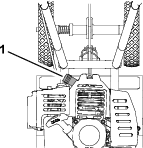
Move the choke lever to the CHOKE position.
-
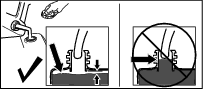
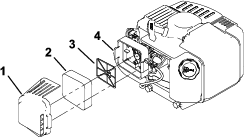
Squeeze the latch tabs and rotate the air filter cover off the machine.
-
Remove and inspect the foam filter element.
Important: Replace the foam element if it is torn or worn.
-
Wash the foam element in liquid soap and warm water. When the element is clean, rinse it thoroughly.
Important: Do not twist the foam element while cleaning it.
-
Dry the element by squeezing it in a clean cloth.
-
Dip the foam element in clean engine oil (30 or 40 weight), then squeeze out the excess oil.
-
Install the filter over the filter-reinforcement plate. Press the foam filter evenly over the plate to ensure it is fully seated into its sealed position.
-
Install the air filter cover. Ensure that it snaps into place and is secured by the latch tabs.
Servicing the Spark Plug
| Maintenance Service Interval | Maintenance Procedure |
|---|---|
| Every 20 hours |
|
| Yearly |
|
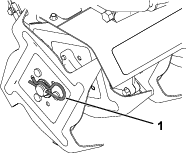
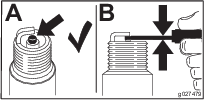
Ensure that the air gap between the center and side electrodes is correct before installing the spark plug.
Use a spark plug wrench for removing and installing the spark plug(s) and a gapping tool/feeler gauge to check and adjust the air gap. Install a new spark plug(s) if necessary.
Type: Torch L7RTC, Champion RCJ8Y, or equivalent
Air gap: 0.71 mm (0.028 inch)
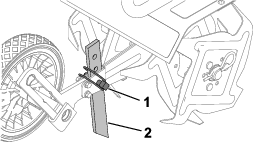
Removing the Spark Plug
-
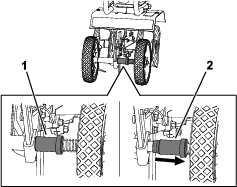
Disconnect the spark-plug wire from the spark plug.
-
Clean around the spark plugs to prevent dirt from entering the engine and potentially causing damage.
-
Remove the spark plug.
Checking the Spark Plug
Important: Do not clean the spark plug(s). Always replace the spark plug(s) when it has a black coating, worn electrodes, an oily film, or cracks.
If you see light brown or gray on the insulator, the engine is operating properly. A black coating on the insulator usually means the air cleaner is dirty.
Set the gap to 0.71 mm (0.028 inch).
Installing the Spark Plug
-
Thread the spark plug clockwise into the spark-plug hole by hand.
-
Rotate the spark plug clockwise using a spark-plug wrench until the plug and sealing washer are seated.
-
Tighten the spark plug as follows:
-
When installing the original spark plug, tighten the plug an additional 1/2 turn.
-
When installing a new spark plug, tighten the plug an additional 1/8 to 1/4 turn.
Important: A loose spark plug may cause the cylinder to overheat. An over-tight spark plug may damage the threads in the cylinder head.
-
-
Connect the spark-plug wire to the spark plug.