Introduction
This machine is a tow-behind attachment intended to be used by professional, hired operators in commercial applications. It is designed primarily to brush and incorporate topdressing materials on natural grass and synthetic turf. With optional accessories, it can also be used to decompact synthetic turf and remove metallic objects. Using this product for purposes other than its intended use could prove dangerous to you and bystanders.
Read this information carefully to learn how to operate and maintain your product properly and to avoid injury and product damage. You are responsible for operating the product properly and safely.
Visit www.Toro.com/Bullseye for product safety and operation training materials, accessory information, help finding a dealer, or to register your product.
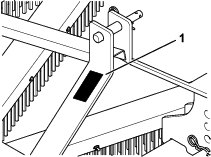
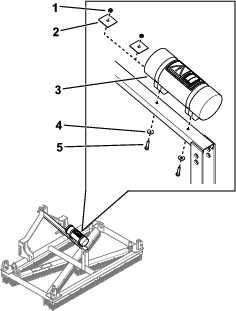
Whenever you need service, genuine Bullseye parts, or additional information, contact an Authorized Service Dealer or Bullseye Customer Service and have the model and serial numbers of your product ready. Figure 1 identifies the location of the model and serial numbers on the product. Write the numbers in the space provided.
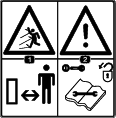
This manual identifies potential hazards and has safety messages identified by the safety-alert symbol (Figure 2), which signals a hazard that may cause serious injury or death if you do not follow the recommended precautions.

This manual uses 2 words to highlight information. Important calls attention to special mechanical information and Note emphasizes general information worthy of special attention.
Warning
CALIFORNIA
Proposition 65 Warning
Use of this product may cause exposure to chemicals known to the State of California to cause cancer, birth defects, or other reproductive harm.
Safety
General Safety
This product is capable of causing personal injury. Always follow all safety instructions to avoid serious personal injury.
-
Read and understand the contents of both this Operator’s Manual and the operator’s manual of the traction unit before using this machine. Ensure that everyone using this product knows how to use this machine and the traction unit and understands the warnings.
-
Use your full attention while operating the machine. Do not engage in any activity that causes distractions; otherwise, injury or property damage may occur.
-
Do not put your hands or feet near moving components of the machine.
-
Do not operate the machine without all guards and other safety protective devices in place and working on the machine.
-
Keep the machine away from bystanders while it is moving.
-
Keep children out of the operating area. Never allow children to operate the machine.
-
Stop the machine, shut off the engine, engage the parking brake of the traction unit, remove the key, and wait for all moving parts to stop before servicing, fueling, or unclogging the machine.
Improperly using or maintaining this machine can result in injury.
To reduce the potential for injury, comply with these safety instructions
and always pay attention to the safety-alert symbol  , which means
Caution, Warning, or Danger—personal safety instruction. Failure
to comply with these instructions may result in personal injury or
death.
, which means
Caution, Warning, or Danger—personal safety instruction. Failure
to comply with these instructions may result in personal injury or
death.
Safety and Instructional Decals
|
Safety decals and instructions are easily visible to the operator and are located near any area of potential danger. Replace any decal that is damaged or missing. |


Setup
Removing the Machine from the Pallet
The machine is shipped vertically on the pallet. Use the following instructions to remove it from the pallet.
Danger
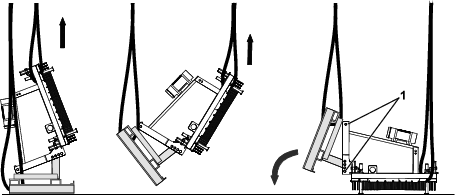
The attachment is unstable and could swing when lifted, injuring anyone beneath it or around it.
-
Refer to the lifting machine operator’s manual to ensure that it is rated to lift the attachment.
-
Ensure the lift height is kept to a minimum and only high enough to remove the shipping material.
-
Do not crawl under the attachment.
-
Place the pallet on level ground.
-
Attach lifting cables to the crossbar and pallet.
-
Lift the attachment and pallet off the ground 50 mm (2 inches).
Important: Ensure that the lifting cable does not slide on the pallet.
-
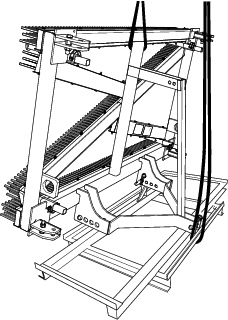
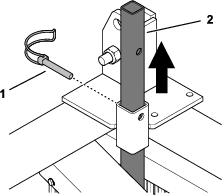
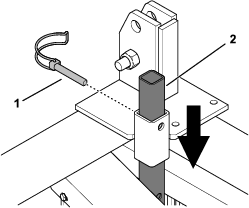
Gently lower the attachment in a controlled way as shown in Figure 4 until it is on the ground.
-
Remove the upper 3-point hitch pins and carefully rotate the pallet around the lower 3-point hitch pins.
-
Remove the lower 3-point hitch pins and remove the pallet.
-
Install the hitch pins.
Installing the
Parts needed for this procedure:
| Operator’s Manual tube | 1 |
| Plate | 2 |
| Bolt (M8) | 2 |
| Washer | 2 |
| Locknut (M8) | 2 |
-
Cut the cable ties securing the Operator’s Manual tube to the attachment.
-
Remove the cap from the tube.
-
Install the tube to the frame as shown.
Inspecting the Machine
Checking the Traction Unit Requirements
Use the following list as a reference:
-
Refer to Specifications for the minimum horse power and minimum lifting capacity for the traction unit.
-
The traction unit must have a category I or II 3-point hitch.
-
Adequate front-end weight (ballast) to offset the weight of the machine.
-
Check the tire air pressure of the traction unit.
Adjust the tire air pressure as needed.
Important: Do not exceed the maximum or minimum tire inflation pressures as recommended by the tire manufacturer.
Checking the Ballast Requirements
Warning
Mounting the machine to the rear of the traction unit decreases the weight on its front axle. Failure to add required ballast may result in an accident and severe injury or death.
-
To ensure adequate steering control and stability, you may need to add ballast to the front of the traction unit.
-
Refer to the traction unit operator's manual for ballast requirements.
Product Overview
Specifications and design are subject to change without notice.
| Lifting capacity | 500 kg (1,103 lb) |
| Minimum output-power rating | 22 Kw (30 hp) |
| Tow system | 3-point hitch, category 1 or 2 |
| Width | 1.8 m (71 inches) |
| Length | 77.5 cm (31 inches) |
| Height | 150 cm (59 inches) |
| Maximum transport and working speed | 12 km/h (7.5 mph) |
| Maximum capacity | 21,600 m2/h (232,500 ft2/h) |
| Weight | 150 kg (331 lb) |
Attachments/Accessories
A selection of Bullseye approved attachments and accessories may be available for use with the machine to enhance and expand its capabilities. Contact your Authorized Service Dealer or authorized Bullseye distributor or go to www.Toro.com/Bullseye for a list of all approved attachments and accessories.
To ensure optimum performance and continued safety certification of the machine, use only genuine Bullseye replacement parts and accessories. Replacement parts and accessories made by other manufacturers could be dangerous, and such use could void the product warranty.
Note: The Wing Kit and Towable Lift Kit are not compatible together.
Operation
Before Operation
Before Operation Safety
-
Never allow children or untrained people to operate or service the machine. Local regulations may restrict the age of the operator. The owner is responsible for training all operators and mechanics.
-
Become familiar with the safe operation of the equipment, operator controls, and safety signs.
-
Know how to stop the machine and shut off the engine of the traction unit quickly.
-
Ensure that the guards and shields are properly installed and maintained. Replace missing, damaged, or worn guards and shields before using the machine.
-
Inspect the area where you will use the machine and remove all objects that the machine could strike.
-
Ensure that your traction unit is suitable for use with an implement of this weight by checking with your traction unit supplier or manufacturer.
-
Shut off the machine, shut off the engine and remove the key of the traction unit, and wait for all moving parts to stop before making any adjustments to the machine.
Understanding the Traction Unit Controls
Familiarize yourself with the operation of the following traction unit controls before operating the machine:
-
3-point hitch (raise/lower)
-
Clutch
-
Throttle
-
Gear selection
-
Parking brake
Important: Refer to the traction unit operator's manual for operating instructions.
Connecting to a 3-Point Hitch
Connecting the Lower Link Arms
-
Ensure that the attachment is positioned on a level surface.
-
Remove the hairpin cotters and hitch pins from the attachment.
-
Back the traction unit squarely up to the attachment so that you can attach the lower connecting arms to the frame.
-
Engage the parking brake, shut off the engine, and remove the key from the ignition. Wait for the engine and all moving parts to stop before leaving the operator's seat.
-
Secure the right and left lower link arms to the frame using the hitch pins.
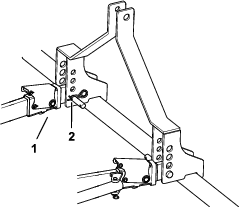
-
Secure the lower link arms to the hitch pins using the hairpin cotters.
Note: For maximum ground clearance, install the hitch pins in the lower mounting holes of the hitch plate for the attachment.
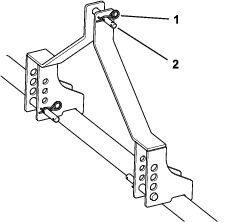
Connecting the Upper Link
-
Connect the upper link to the lower hole in the bracket frame secure it with the link pin and the hairpin cotter.
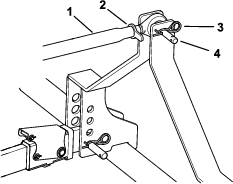
-
Grease the threaded steel upper link tubes.
-
Rotate the upper link to tighten the link. Adjust it until the attachment is flat on the ground.
-
Tighten the jam nut to secure the upper link into position.
-
Start the traction unit and lift the attachment off the ground.
-
Raise the 4 storage legs.
Transporting the Attachment
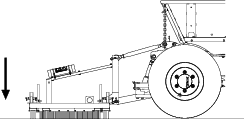
To begin transport operation, raise the machine. To avoid loss of control, traverse steep inclines slowly, approach rough areas at reduced speed and cross severe undulations carefully.
Important: Do not exceed transport speeds of 12 km/h (7.5 mph).
During Operation
During Operation Safety
-
The owner/operator can prevent and is responsible for accidents that may cause personal injury or property damage.
-
Wear appropriate clothing, including eye protection; long pants; substantial, slip-resistant footwear; and hearing protection. Tie back long hair and do not wear loose clothing or loose jewelry.
-
Use your full attention while operating the machine. Do not engage in any activity that causes distractions; otherwise, injury or property damage may occur.
-
Do not operate the machine when tired, ill, or under the influence of alcohol or drugs.
-
Never carry passengers on the machine and keep bystanders and pets away from the machine during operation.
-
Operate the machine only in good visibility to avoid holes or hidden hazards.
-
Keep your hands and feet away from moving parts.
-
Look behind and down before backing up to be sure of a clear path.
-
Use care when approaching blind corners, shrubs, trees, or other objects that may obscure your vision.
-
Stop the attachment whenever you are not using it.
-
Stop the machine, shut off the engine, remove the key, wait for all moving parts to stop, and inspect the machine after striking an object or if there is an abnormal vibration in the machine. Make all necessary repairs before resuming operation.
-
Slow down and use caution when making turns and crossing roads and sidewalks with the machine. Always yield the right-of-way.
-
Reduce speed on rough roads and surfaces.
-
When the attachment is connected to a traction unit and in the raised position, the weight of it affects stability, braking, and steering. Exercise caution when transporting between working areas.
-
Never leave a running machine unattended.
-
Before leaving the operating position, do the following:
-
Park the machine on a level surface.
-
Engage the parking brake.
-
Lower the attachment.
-
Shut off the engine and remove the key.
-
Wait for all moving parts to stop before leaving the machine.
-
-
Do not operate the machine when there is the risk of lightning.
-
Use Bullseye accessories, attachments, and replacement parts only.
Slope Safety
-
Review the traction unit specifications to ensure that you do not exceed its slope capabilities.
-
Slopes are a major factor related to loss of control and rollover accidents, which can result in severe injury or death. You are responsible for safe slope operation. Operating the machine on any slope requires extra caution.
-
Review and understand the slope instructions in the manual and on the traction unit.
-
Evaluate the site conditions to determine if the slope is safe for machine operation, including surveying the site. Always use common sense and good judgment when performing this survey.
-
Review the slope instructions listed below for operating the machine on slopes and to determine whether you can operate the machine in the conditions on that day and at that site. Changes in the terrain can result in a change in slope operation for the machine.
-
Avoid starting, stopping, or turning the machine on slopes. Avoid making sudden changes in speed or direction. Make turns slowly and gradually.
-
Do not operate a machine under any conditions where traction, steering, or stability are in question.
-
Remove or mark obstructions such as ditches, holes, ruts, bumps, rocks, or other hidden hazards. Tall grass can hide obstructions. Uneven terrain could overturn the machine.
-
Be aware that operating the machine on wet grass, across slopes, or downhill may cause the machine to lose traction. Loss of traction to the drive wheels may result in sliding and a loss of braking and steering.
-
Use extreme caution when operating the machine near drop-offs, ditches, embankments, water hazards, or other hazards. The machine could suddenly roll over if a wheel goes over the edge or the edge caves in. Establish a safety area between the machine and any hazard.
-
Identify hazards at the base of the slope. If there are hazards, mow the slope with a power walk-behind mower.
-
If possible, keep the attachment lowered to the ground while operating on slopes. Raising the attachment while operating on slopes can cause the machine to become unstable.
-
Use extreme caution with other attachments. These can change the stability of the machine and cause a loss of control. Always keep the machine in gear when going down slopes. Do not coast downhill (applicable only to gear-drive units).
Operating the Attachment
Important: Do not exceed 12 km/h (7.5 mph) while transporting or operating the attachment.
-
Raise the attachment and drive to the location where you will use the attachment and park the machine on a level surface.
-
Lower the attachment to the ground.
-
Engage the parking brake, shut off the engine, and remove the key from the traction unit.
-
Adjust the 3-point upper link until the attachment stands completely flat on the ground.
-
Drive the traction unit forward.
-
After operation, raise the attachment and drive to the next location as needed; refer to Transporting the Attachment.
Operating Tips
-
Make very gradual turns. Never make sharp turns with the attachment.
-
Do not use the attachment if the ground is too wet.
-
Look backward frequently to ensure that the machine is operating properly, and alignment is maintained with previous passes.
-
To optimize performance and life of the product, operate the attachment only when grooming the intended application area.
-
Make multiple passes over the field either in the same or in different directions for improved grooming.
After Operation
After Operation Safety
-
Park the tow vehicle on a level surface; engage the parking brake of the tow vehicle; shut off the engine; remove the key; and wait for all movement to stop before leaving the operator’s position.
-
Allow the machine to cool before storing the machine in any enclosure.
-
Keep all parts of the machine in good working condition and all hardware tightened.
-
Replace all worn, damaged, or missing decals.
Removing the Attachment
-
Park the machine on a level surface, engage the parking brake, shut off the engine, and remove the key from the traction unit.
-
Lower the 4 storage legs.
-
Lower the attachment to the ground.
-
Secure the attachment from movement.
-
Loosen the upper link jam nut and rotate the upper link.
-
Remove the upper link.
-
Remove the lower link arms.
Important: Ensure that the attachment does not slide off the traction unit and cannot roll away.
-
Start the traction unit and drive it away from the attachment.
-
Install the hitch pins to the attachment and secure them with the hairpin cotters.
Important: When storing the attachment, do not allow the brush to touch the ground or other objects to avoid bending the bristles.
Storage
Storage Safety
-
Before adjusting, cleaning, storing, or repairing the machine, park the it on a level surface; engage the parking brake of the traction unit; shut off the engine; remove the key; and wait for all movement to stop before leaving the traction unit.
-
Store the machine on the storage stands positioned on a firm, level surface so that it does not sink or tip over.
-
Store the machine away from areas of human activity.
-
Do not allow children to play on or around the stored machine.
Preparing the Machine for Storage
Important: Do not use brackish or reclaimed water to clean the machine.
When the machine is stored for a long period, do out the following procedure:
-
Clean off any dirt or grease that may have accumulated on the machine or any of the moving parts.
-
Lubricate all grease fittings.
-
Touch up any scratches on the painted surfaces.
-
Replace any missing or damaged decals.
-
Store the machine inside a dry, secure building. Inside storage reduces maintenance, gives a longer working life, and increases the residual value of the machine. If inside storage is not available, cover the machine with a heavy sheet or tarpaulin and secure it tightly.
Note: To conserve space in storage, remove the tow bar, tilt the attachment, and store it vertically on the storage stands.
Important: When storing the attachment, do not allow the brush to touch the ground or other objects to avoid bending the bristles.
Troubleshooting
| Problem | Possible Cause | Corrective Action |
|---|---|---|
| The attachment loosened too little material. |
|
|
| The appearance of the field is poor. |
|
|