Visit www.Toro.com for product safety and operation training materials, accessory information, help finding a dealer, or to register your product.
Introduction
Access myTurf at http://myturf.toro.com.
myTurf is an asset management system designed to increase the efficiency of your team by utilizing automated processes, which remove manual tasks from your day-to-day work.
myTurf allows you to easily perform the following tasks:
-
Order parts online anytime from your Toro Distributor
-
Track all assets
-
Access the latest Operator’s Manual for each Toro machine in your fleet
-
Access the latest Service Bulletins and product training for each Toro machine
-
Create and manage work orders
-
View cost reports
Operation
Getting Started
Enrolling in myTurf
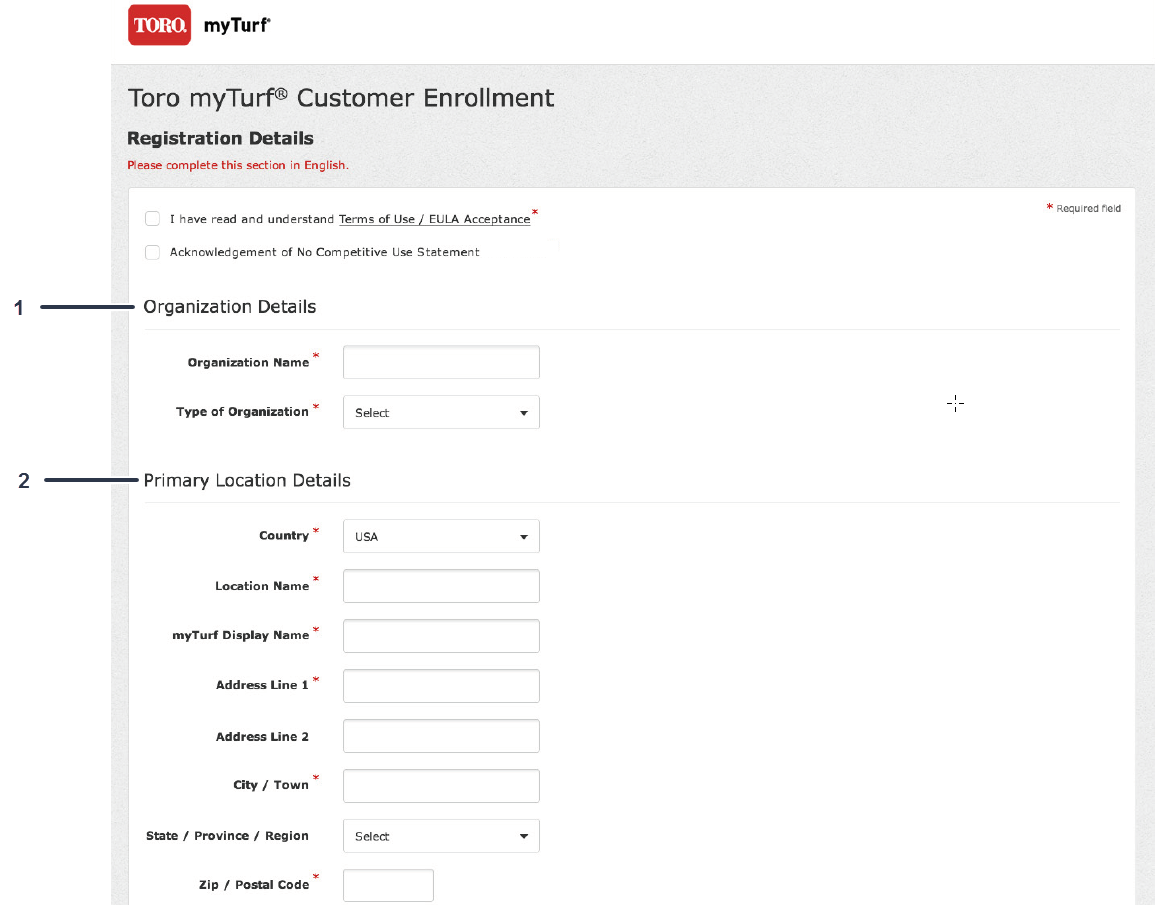
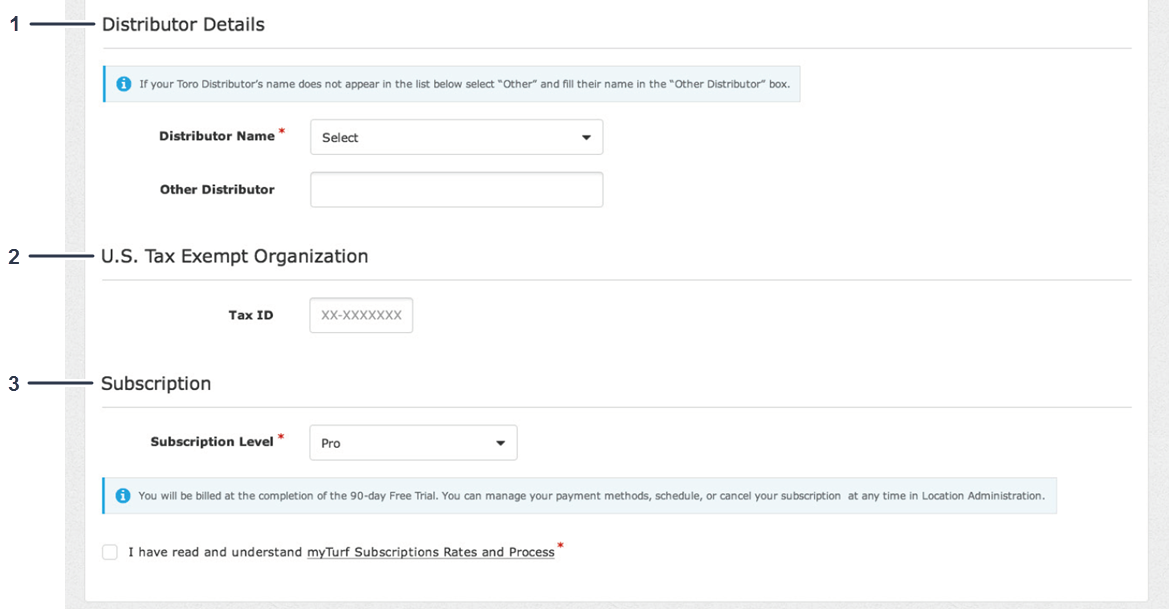
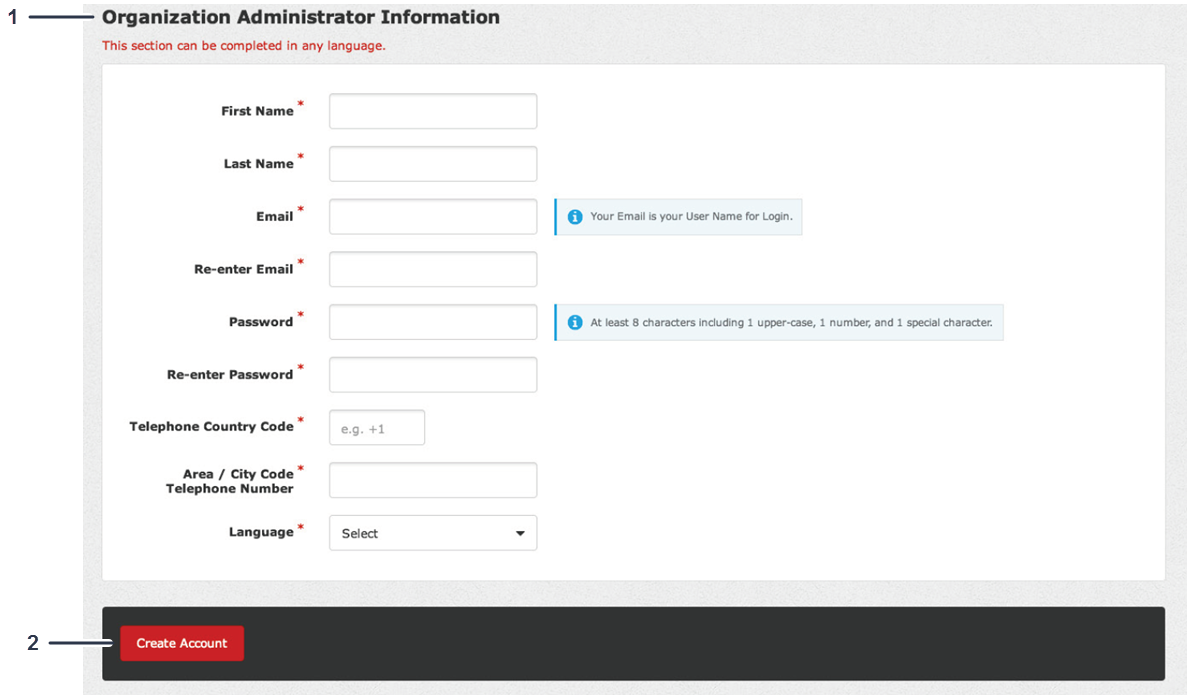
Before you can utilize myTurf, you must complete the Toro myTurf Customer Enrollment.
Fill out the following Toro myTurf Customer Enrollment form before using myTurf.
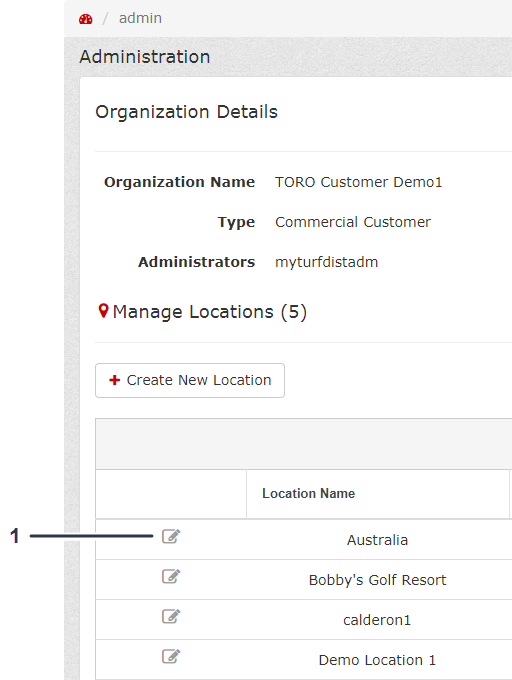
Administering Locations
-
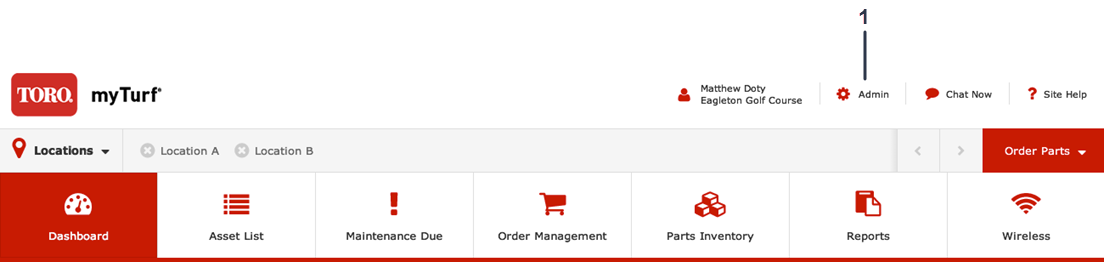
From the Dashboard, click Admin, located in the upper, right corner of the screen (Figure 4).
-
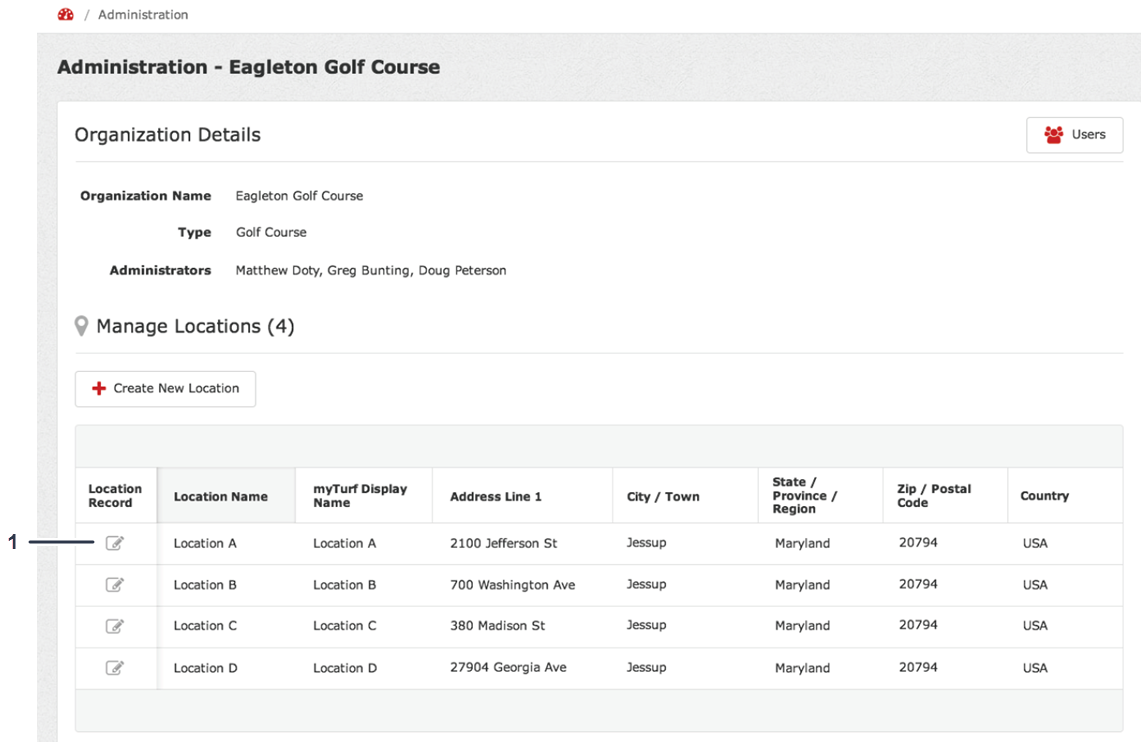
Click the Location Record icon to administer a specific location (Figure 5).
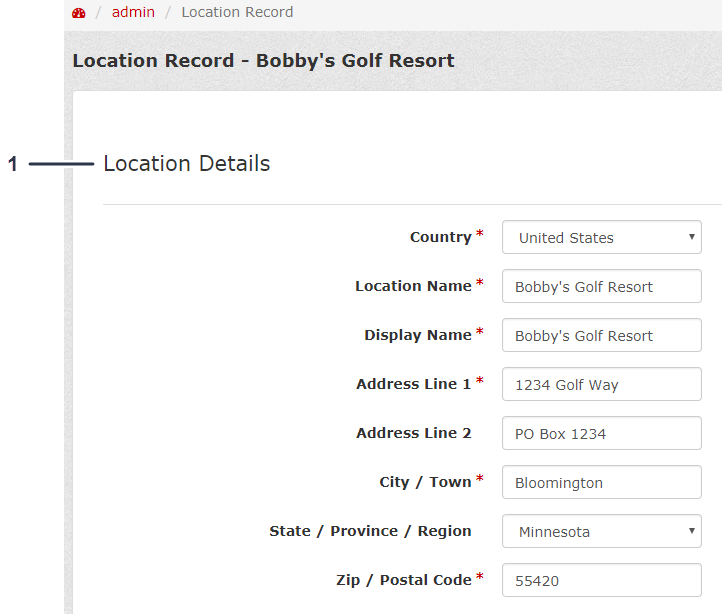
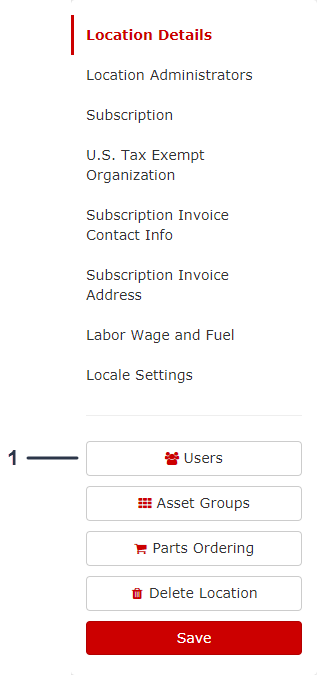
From the Location Record screen (Figure 6), you can view and update the following information:
-
Location details and contact information (Figure 6)
-
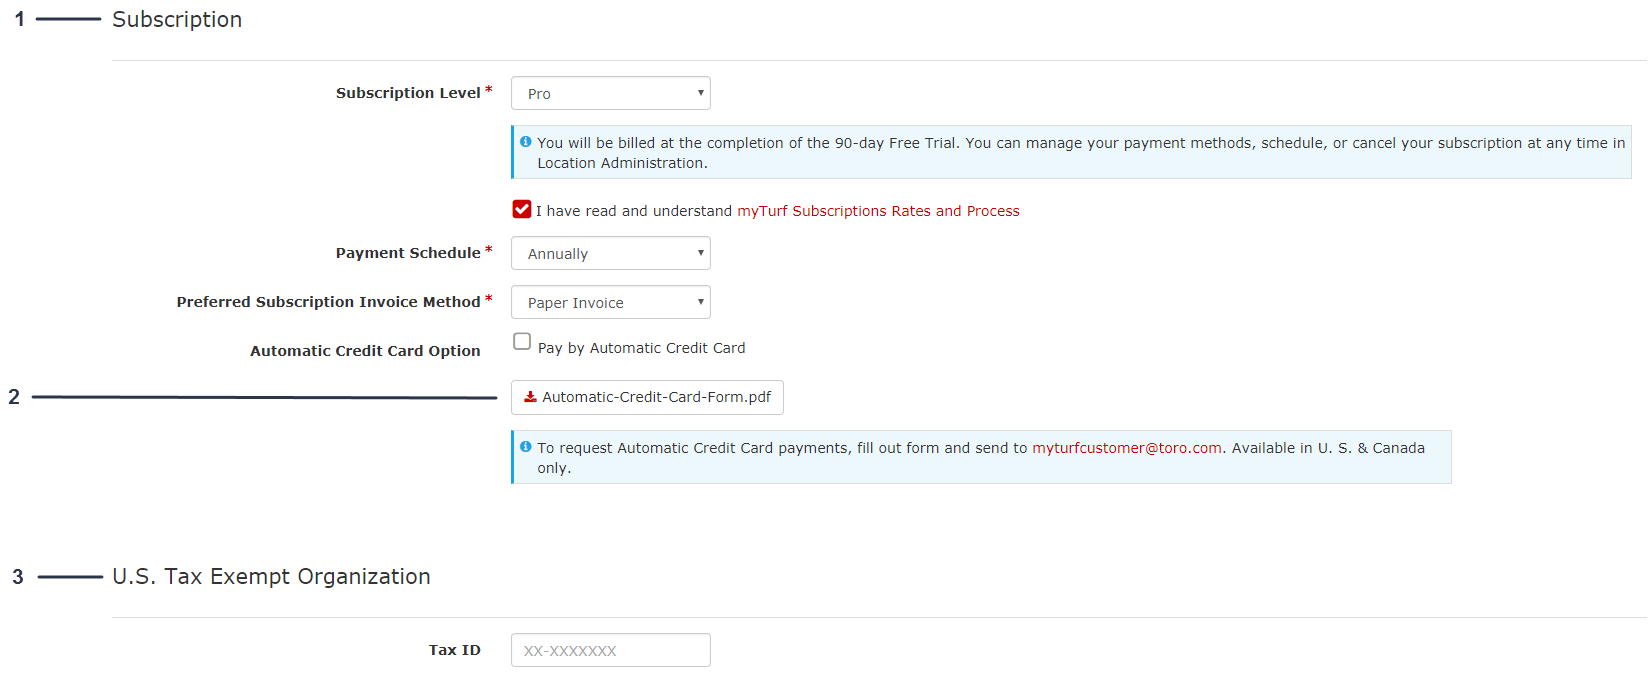
Subscription and payment details (Figure 7)
Note: If you are a United States tax exempt organization, enter those details (Figure 7).
-
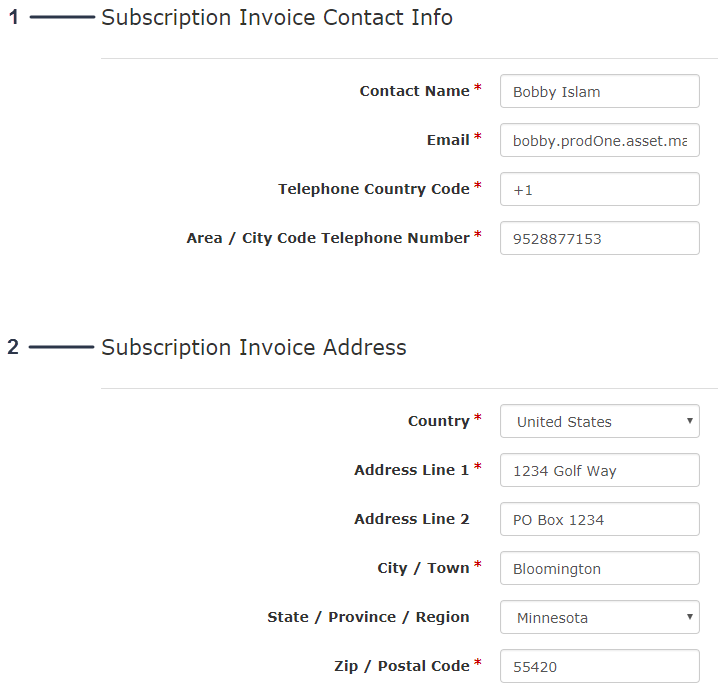
Subscription invoice contact information and subscription invoice address (Figure 8)
-
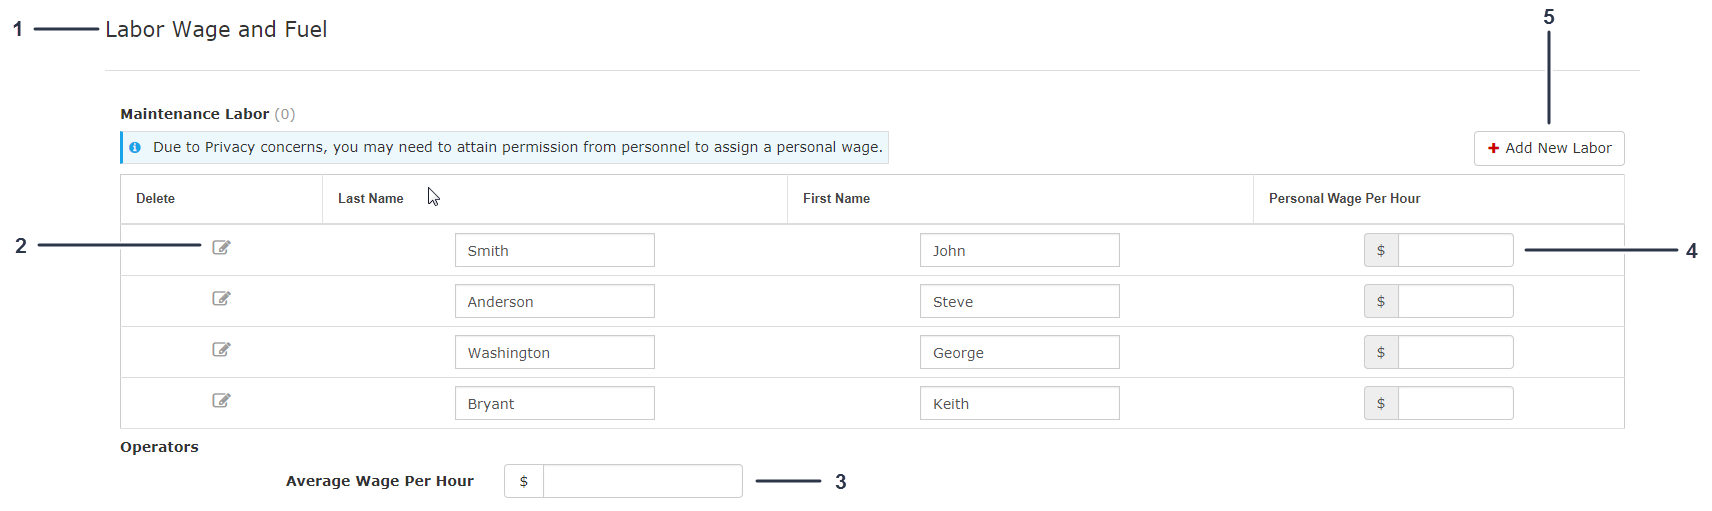
Labor wage and fuel (maintenance labor wage rates); refer to Figure 9
-
For operators, average wage rate (Figure 9)
-
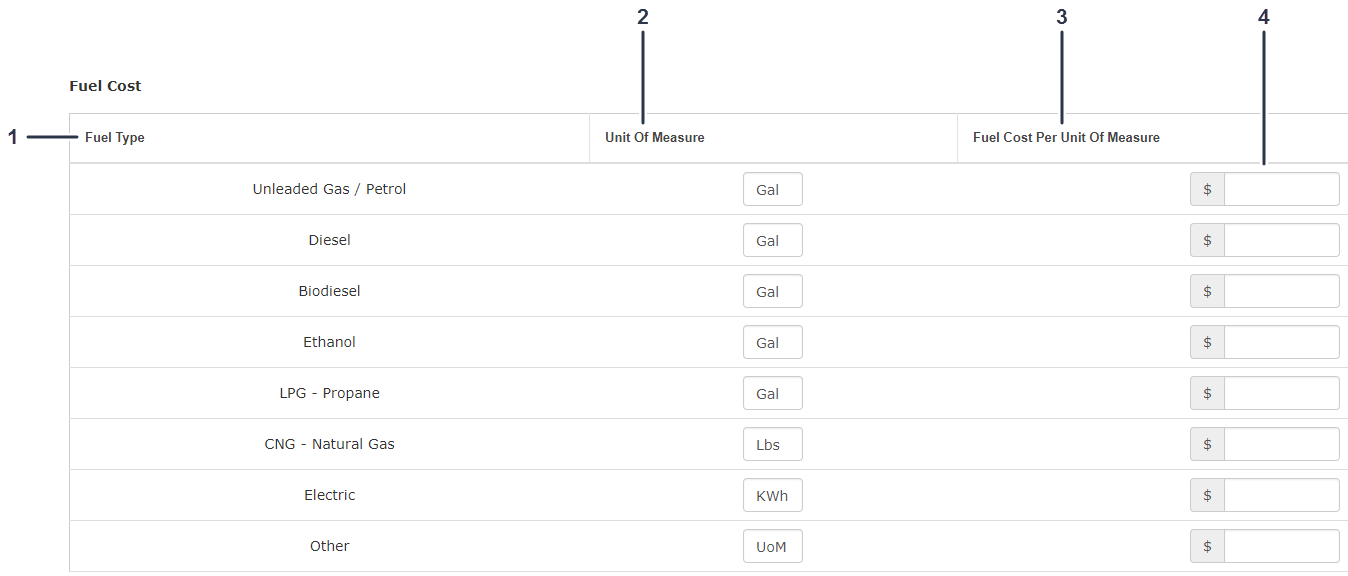
Fuel cost (Figure 10)
-
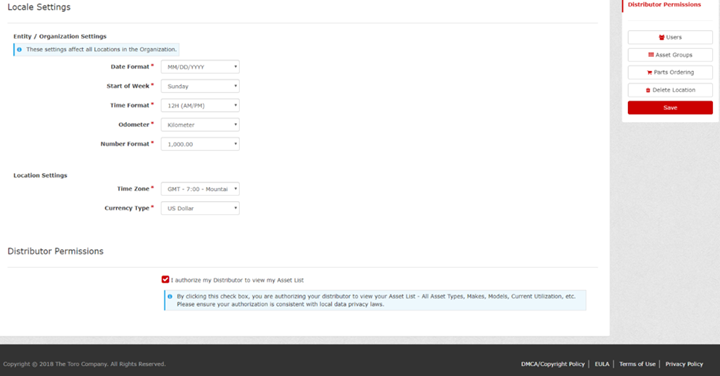
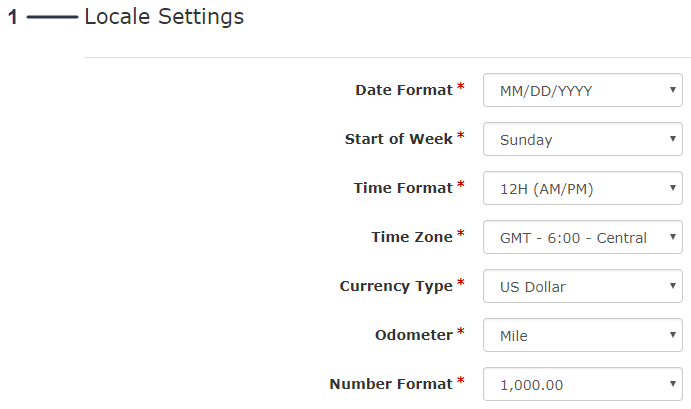
Locale settings (Figure 11)
-
Creating a New User
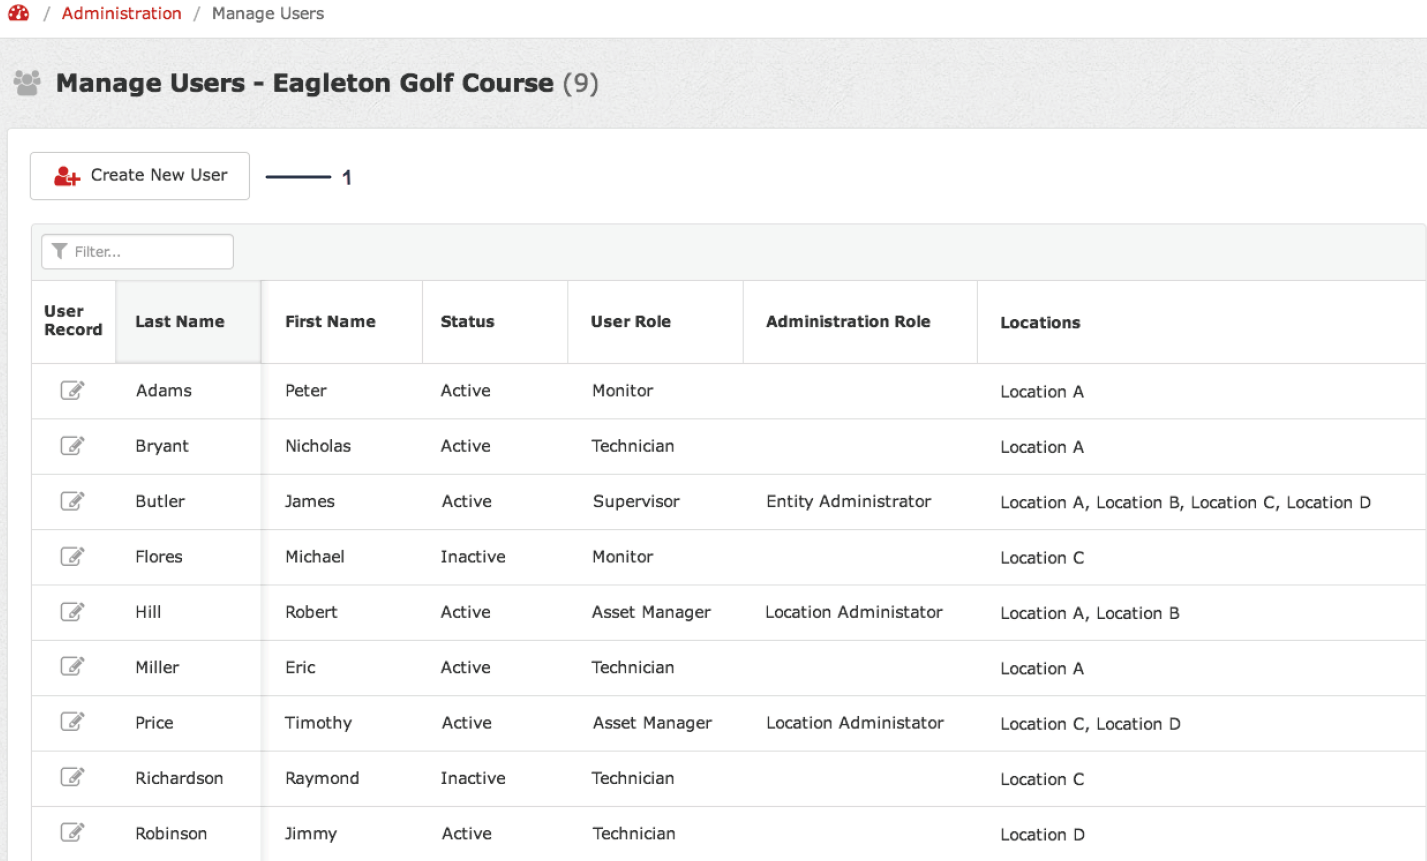
This feature allows you to manage the users in your myTurf.
-
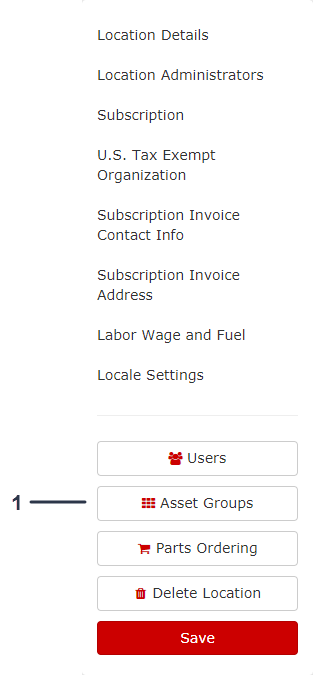
From the Location Record screen, click Users (Figure 12).
-
Click Create New User (Figure 13).
-
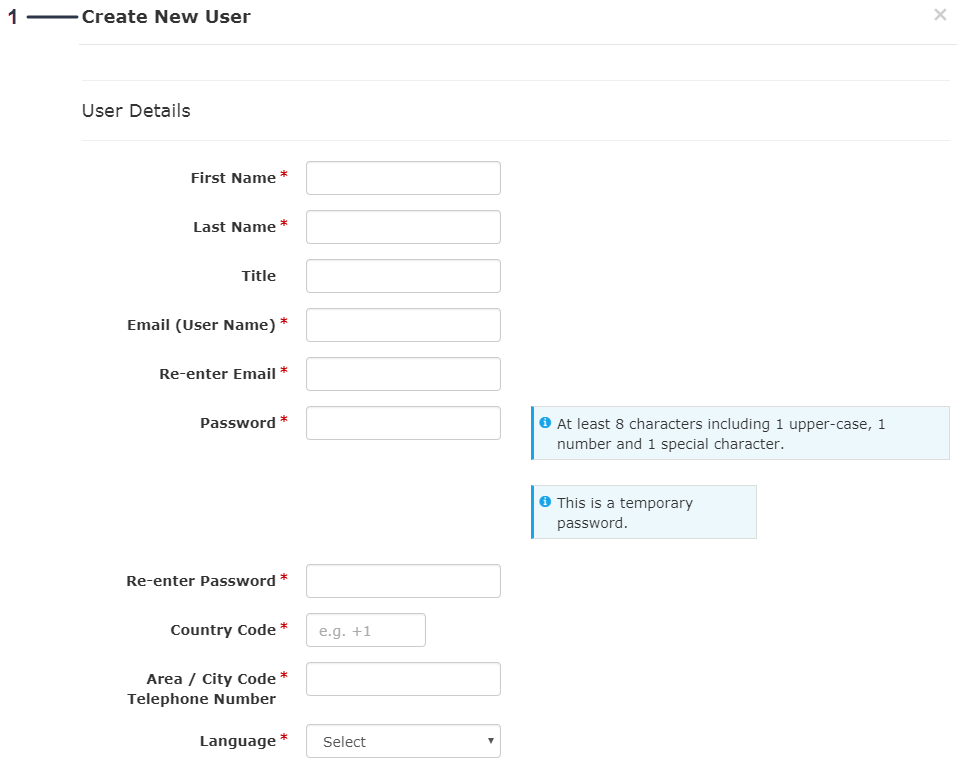
Fill out the Create New User form (Figure 14).
Note: The password that you enter is a temporary password. The user will create their new password.
-
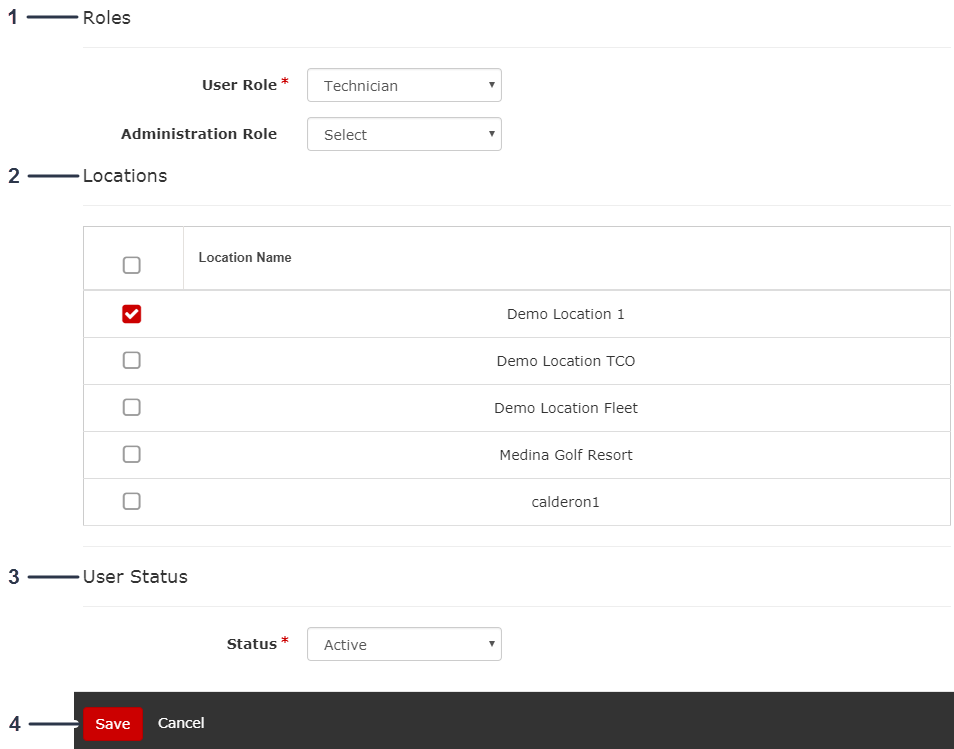
Assign the User Role and Administration Role for the new user (Figure 15).
-
If you have multiple location, assign the locations that the new user can work in and view (Figure 15).
-
Assign the User Status to Active (Figure 15).
-
Click Save to add the new user (Figure 15).
Managing Asset Groups
Managing asset groups allows you to label and set up for groups for your assets.
Setting up Parts Ordering
This feature allows you to set up who your order your parts from (e.g., distributor), as well as your shipping sold to and bill to information.
Deleting a Location
If you want to remove a location from your myTurf, click Delete Location.
Creating Asset Groups
-
From the Dashboard, click Admin (Figure 16).
-
Click the Edit Location Icon (Figure 17).
-
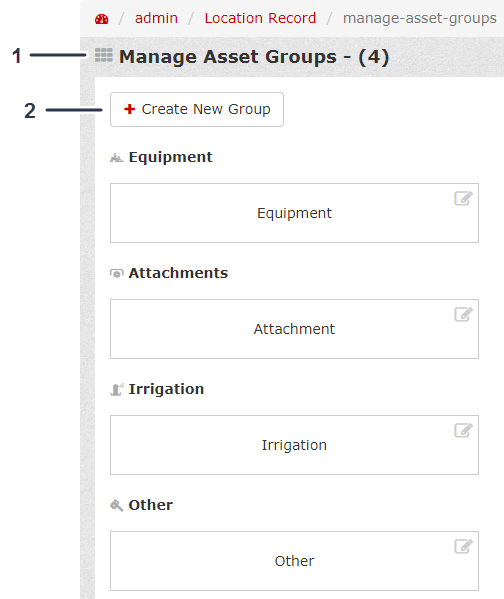
From the Location Record, click Asset Groups (Figure 18).
-
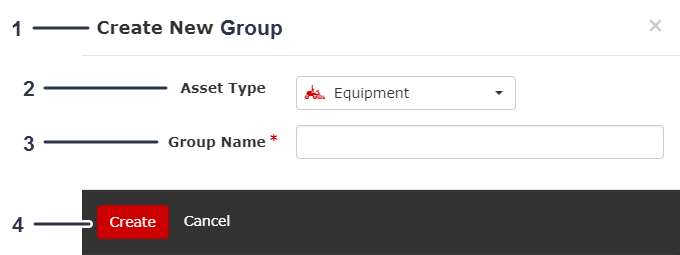
From Manage Asset Groups, click Create New Group (Figure 19).
-
Select the Asset Type and enter the Group Name that you want assigned to the new group (Figure 20).
-
Click Create to create the new asset group (Figure 20).
Adding Assets and Attachments
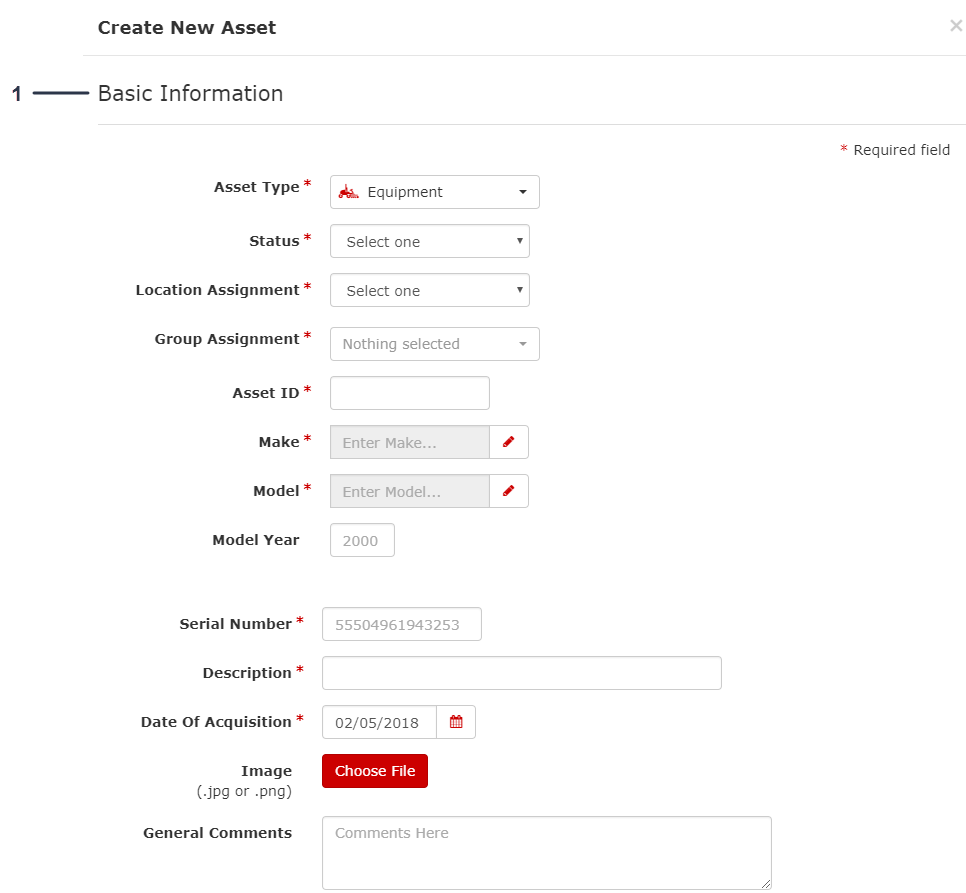
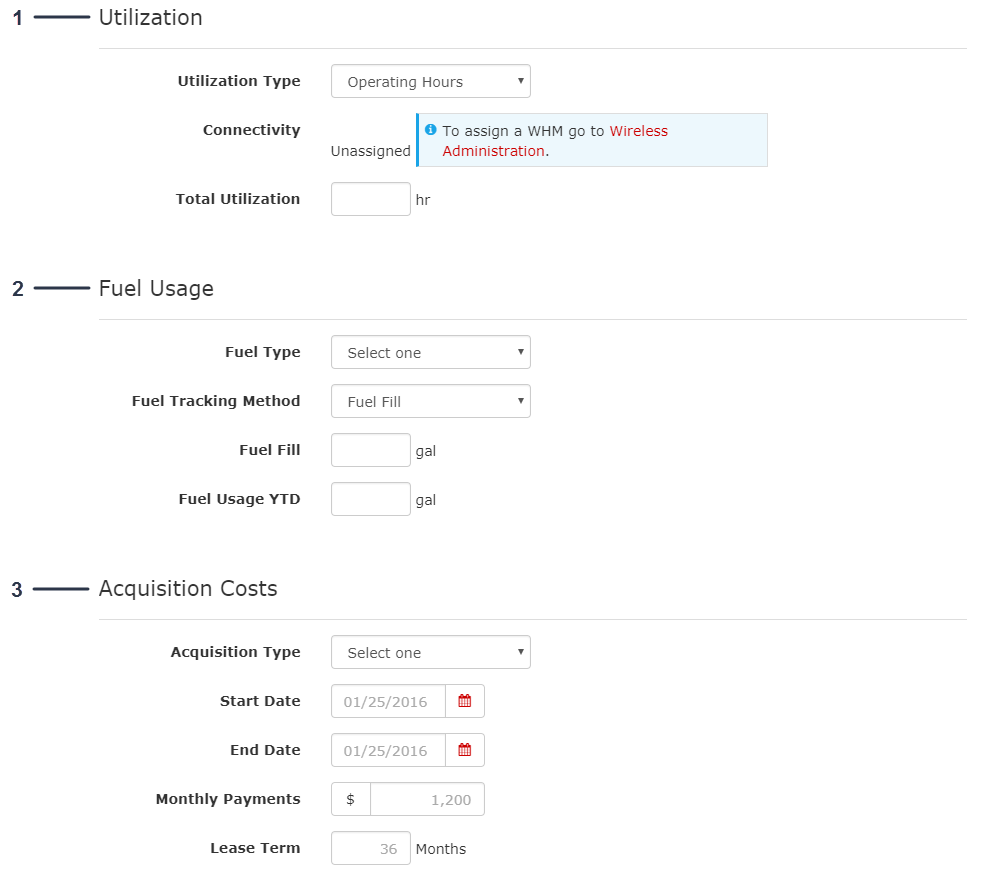
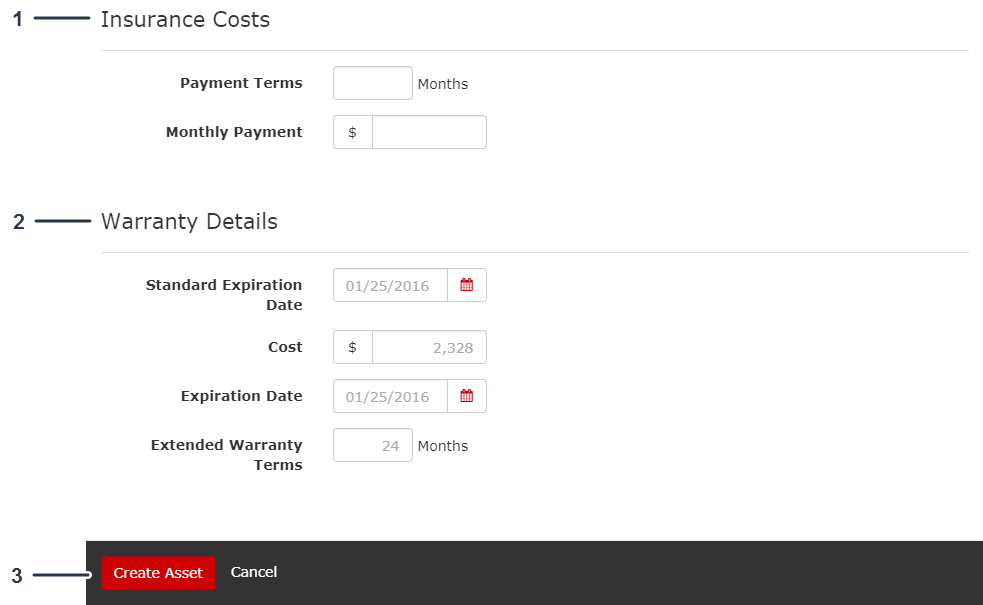
Adding a Single Asset
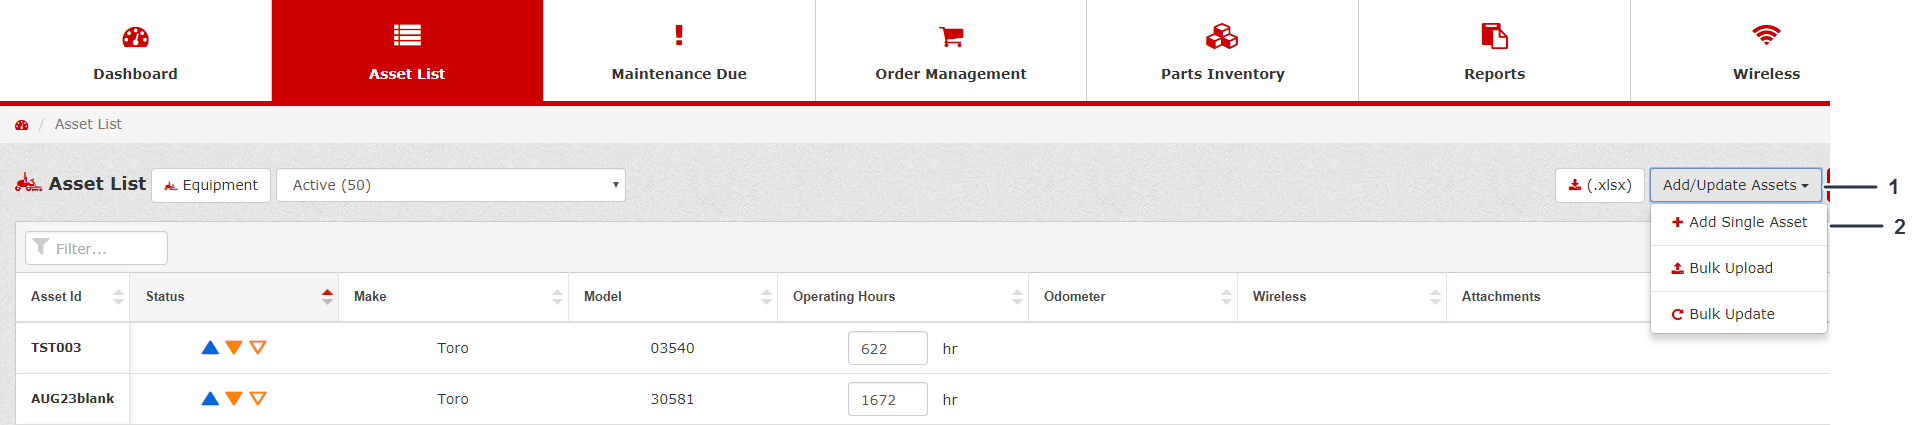
Adding Multiple Assets
-
From the Asset List, click the Add/Update Assets drop-down (Figure 25).
-
Click Bulk Upload from the drop-down (Figure 25).
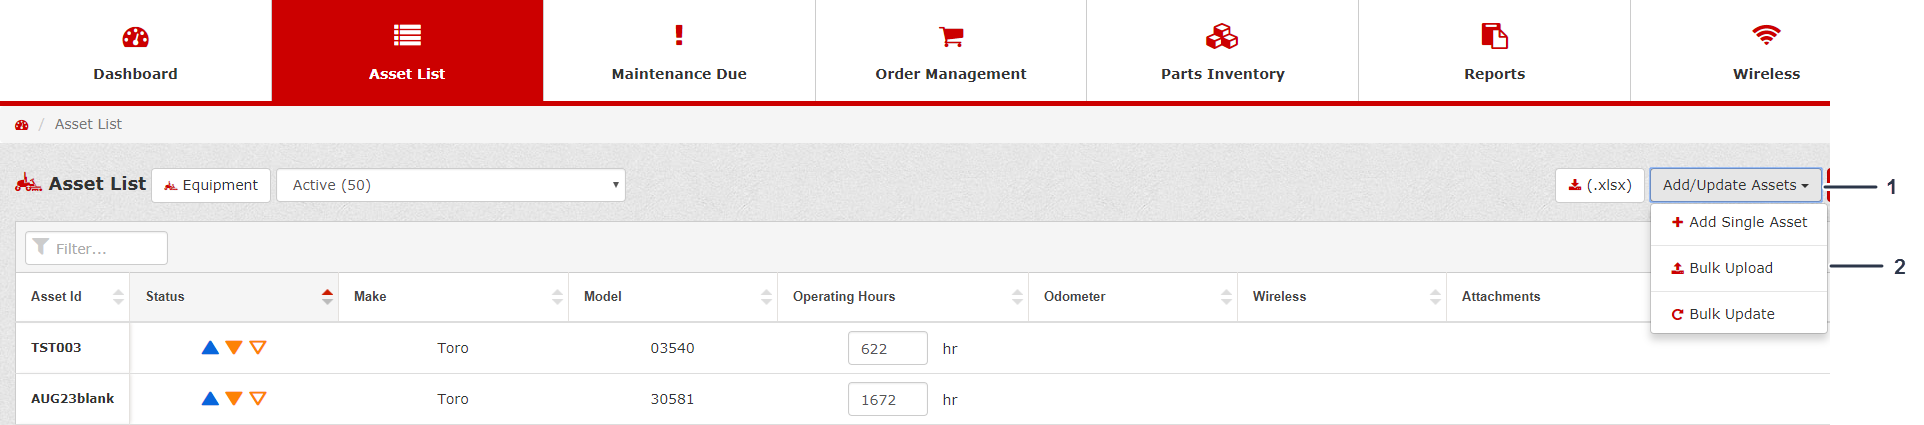
-
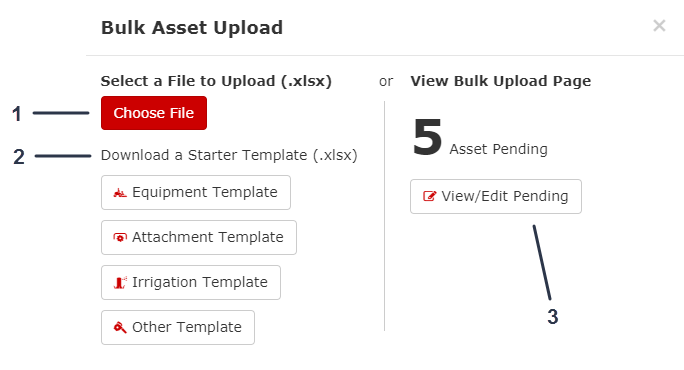
Click Choose File and select the file to upload multiple assets or download a starter template to upload bulk assets (Figure 26).
Note: You can also view or edit pending asset uploads.
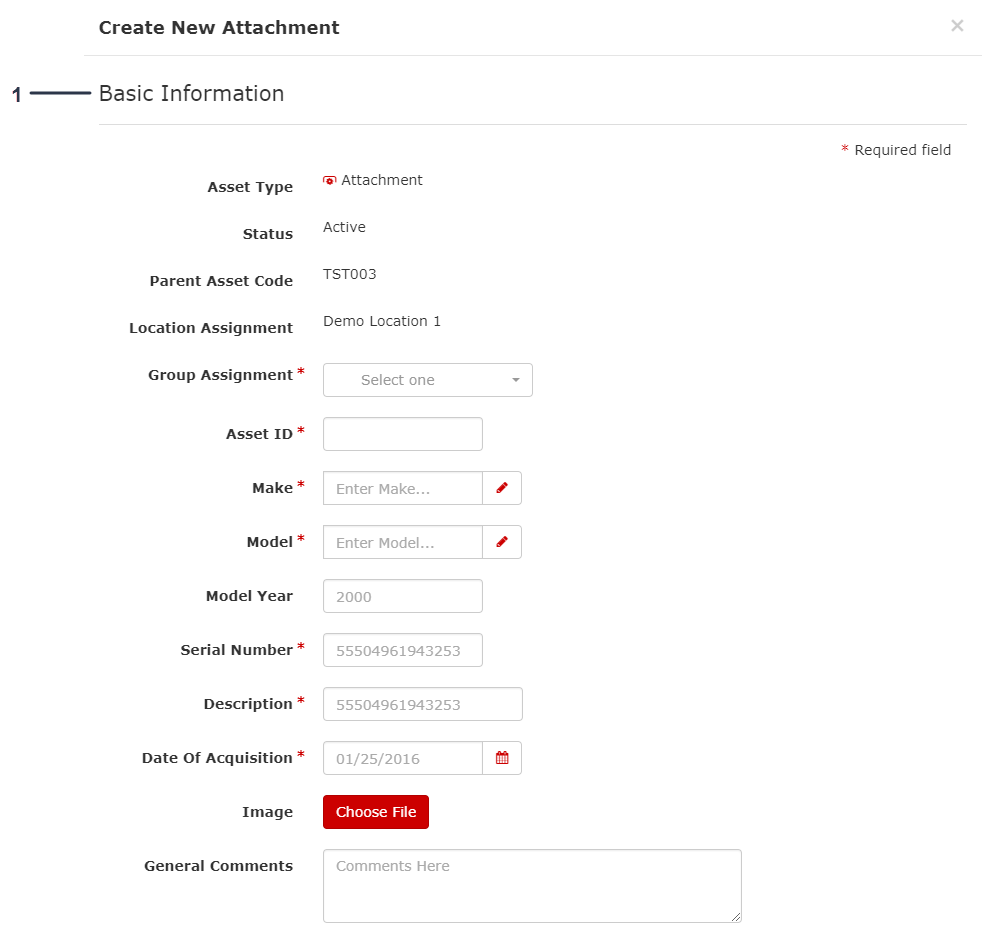
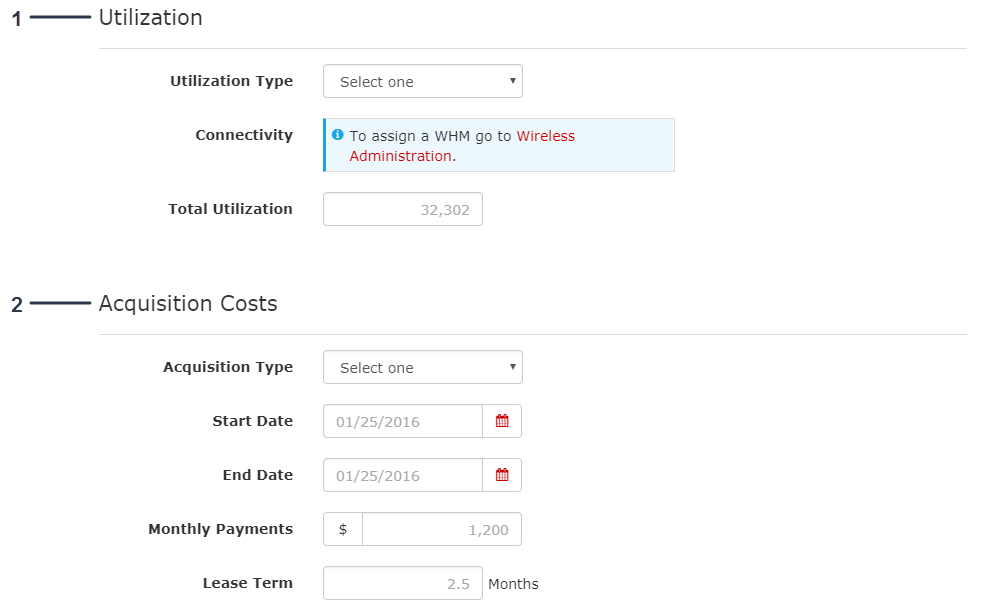
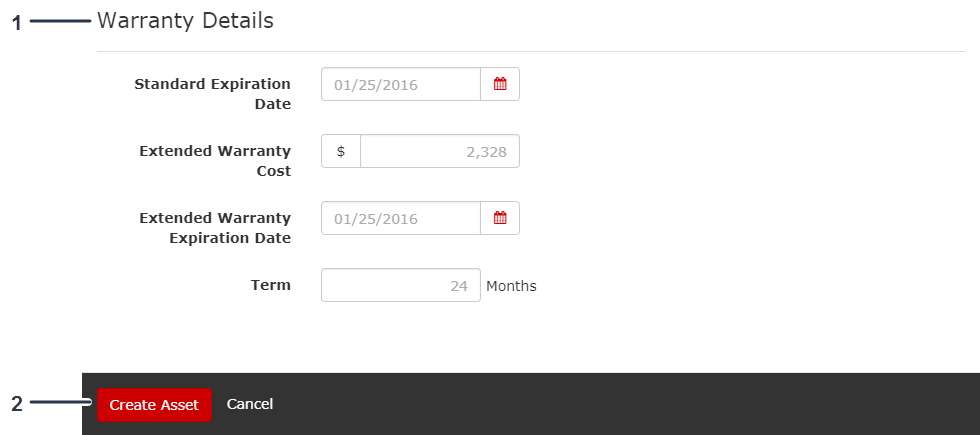
Adding an Attachment
Navigating myTurf
Dashboard
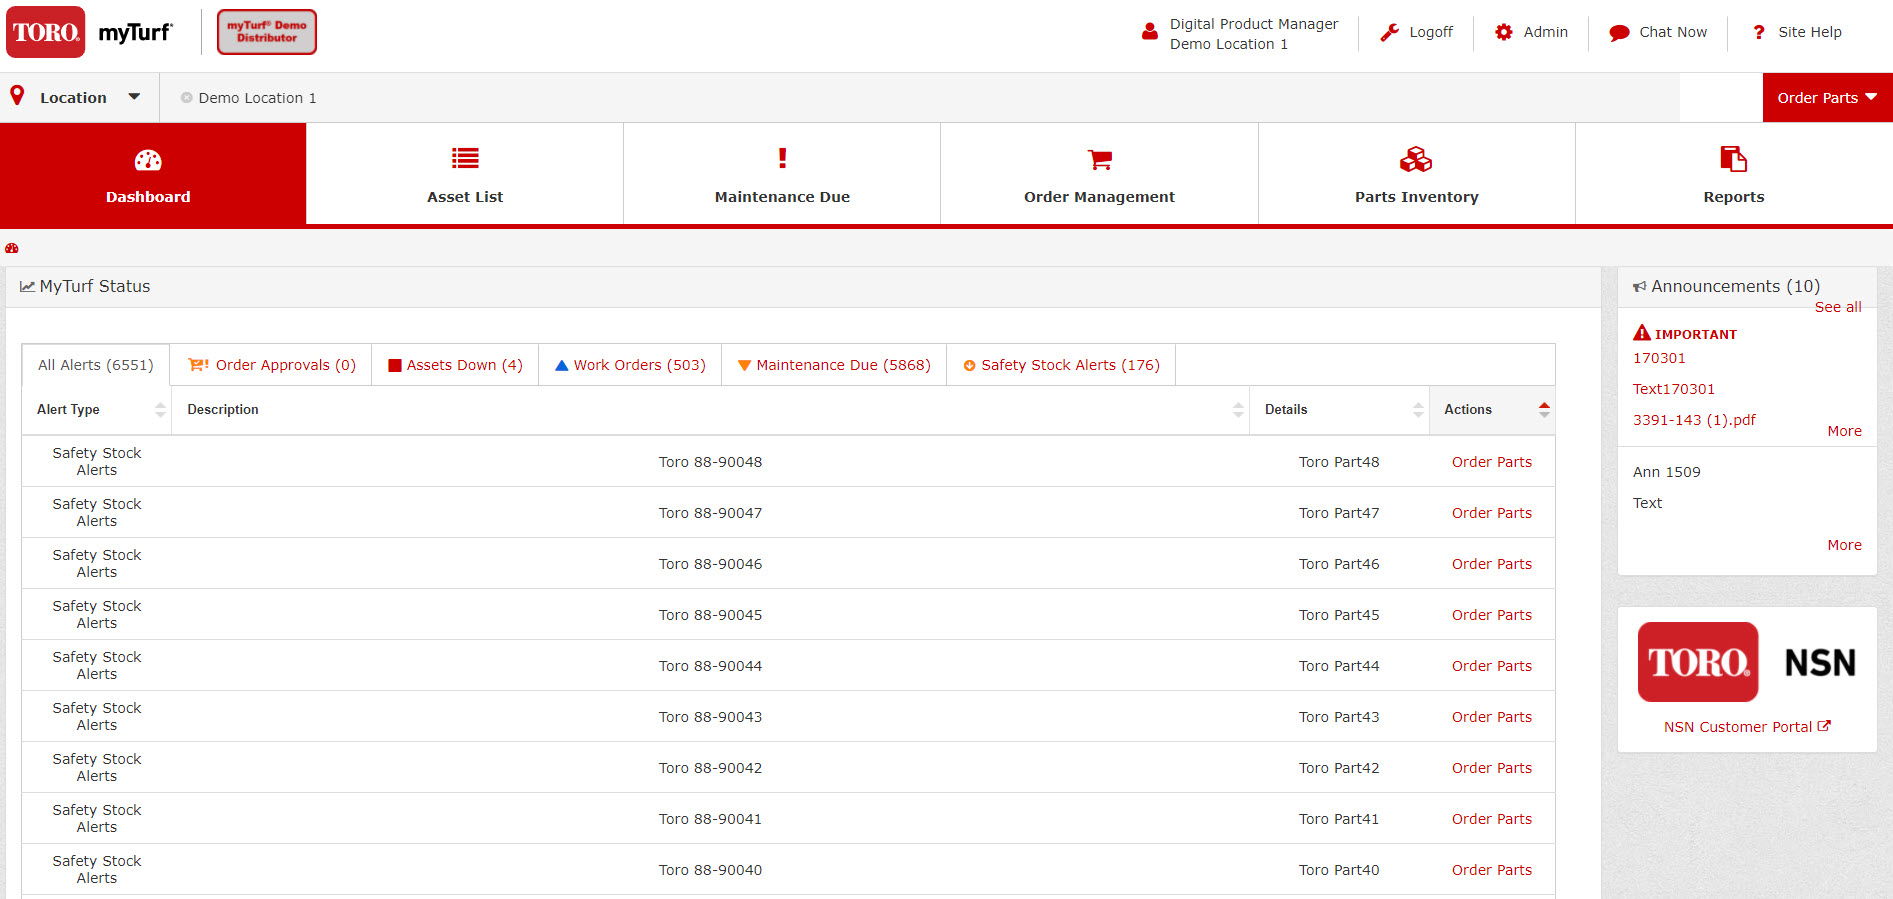
When you first enter myTurf, the dashboard appears. The dashboard is the overall summary of your system.
From the dashboard, you can access following tabs:
myTurf Status
As shown in the example screen (Figure 32), the dashboard provides the status of your fleet when you first enter myTurf.
The myTurf status tells you the following at-a-glance information:
-
Machines in your fleet are under repair or maintenance
-
Maintenance is due and parts are needed for machines in your fleet
-
Maintenance is due and you have the parts on hand for machines in your fleet
-
Parts with safety stock alert
-
Open work orders
-
Service bulletin alerts
-
Any error occurring with a wireless device
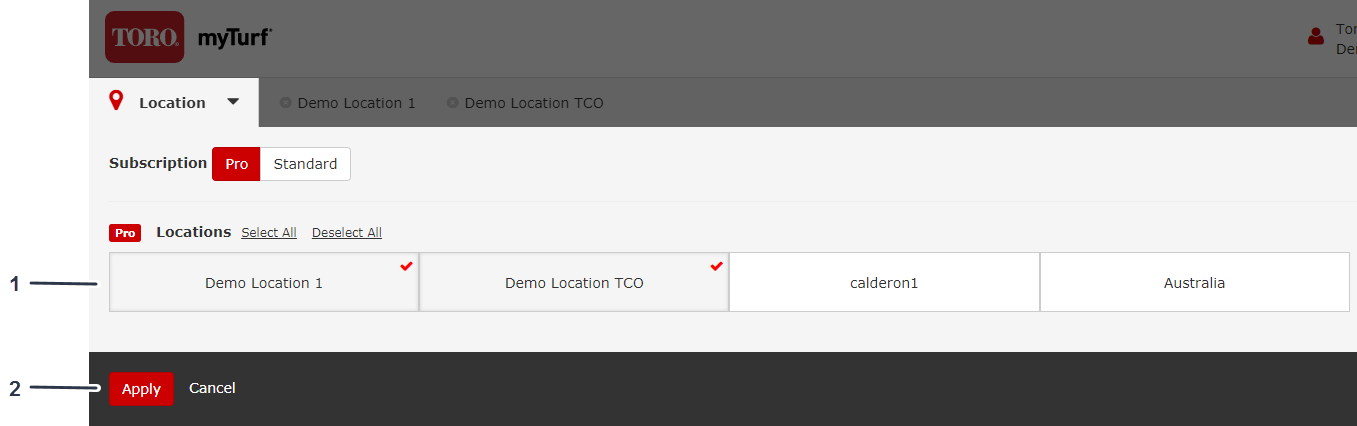
Selecting Locations
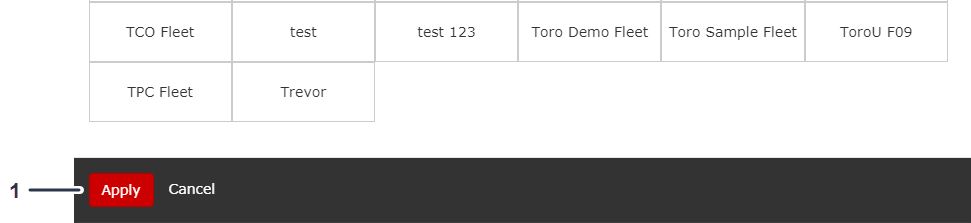
From the Dashboard, you can select the location(s) that you want to view.
After you select the desired location(s), click Apply to set the location(s) as shown in Figure 33.
Filtering Assets by Group
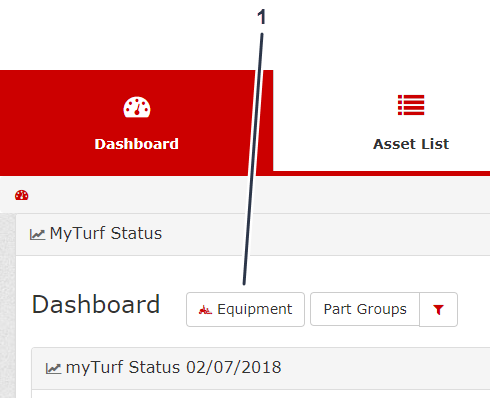
-
From the Dashboard, click Equipment (Figure 34).
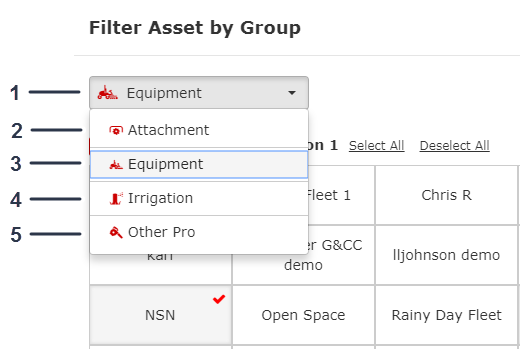
-
From the Dashboard, click the Filter Assets by Group drop-down to filter your assets so that you can view those groups only (Figure 35).
You can select the groups of equipment, attachments, irrigation, or other assets that you would like to view, regardless of location. After selecting the desired groups, you can view the assets in your Asset List (Figure 35).
-
Select the particular location(s) that you want to filter (Figure 36).
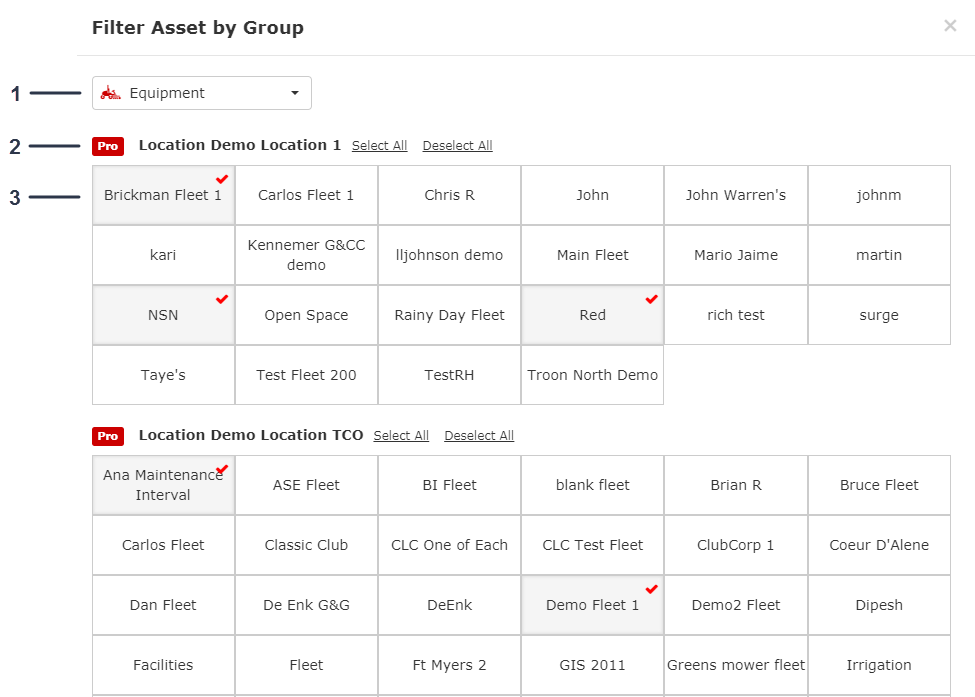
-
Click Apply to filter the assets by the selected locations (Figure 37).
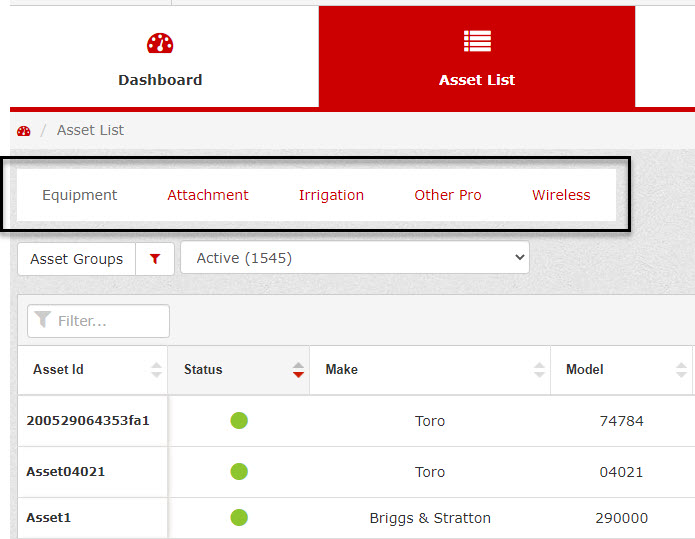
Asset List
From the Dashboard, click the Asset List tab.
The asset list provides the summary of your assets (Figure 38).
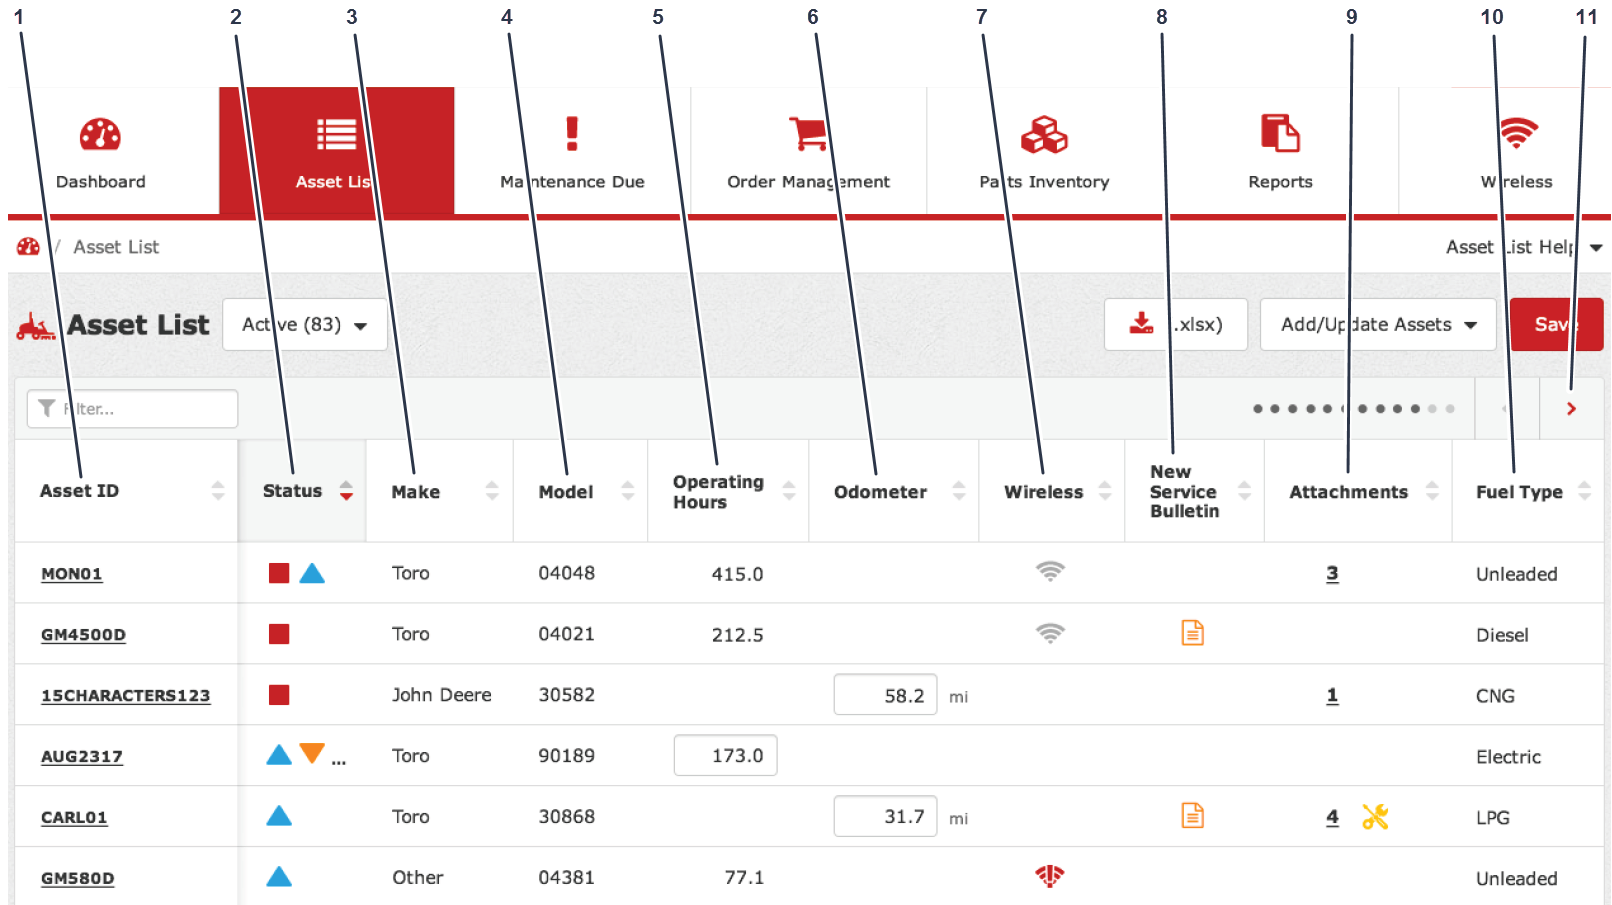
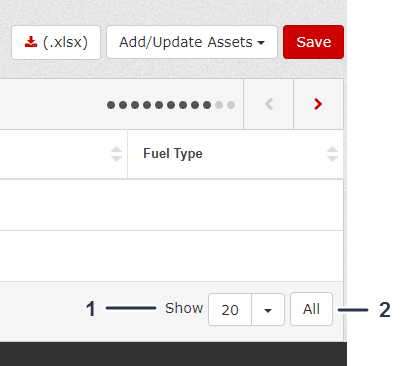
When viewing your Asset List, you can display a select number of assets at a time by selecting a number, or you can click All to display all your assets at once (Figure 39).
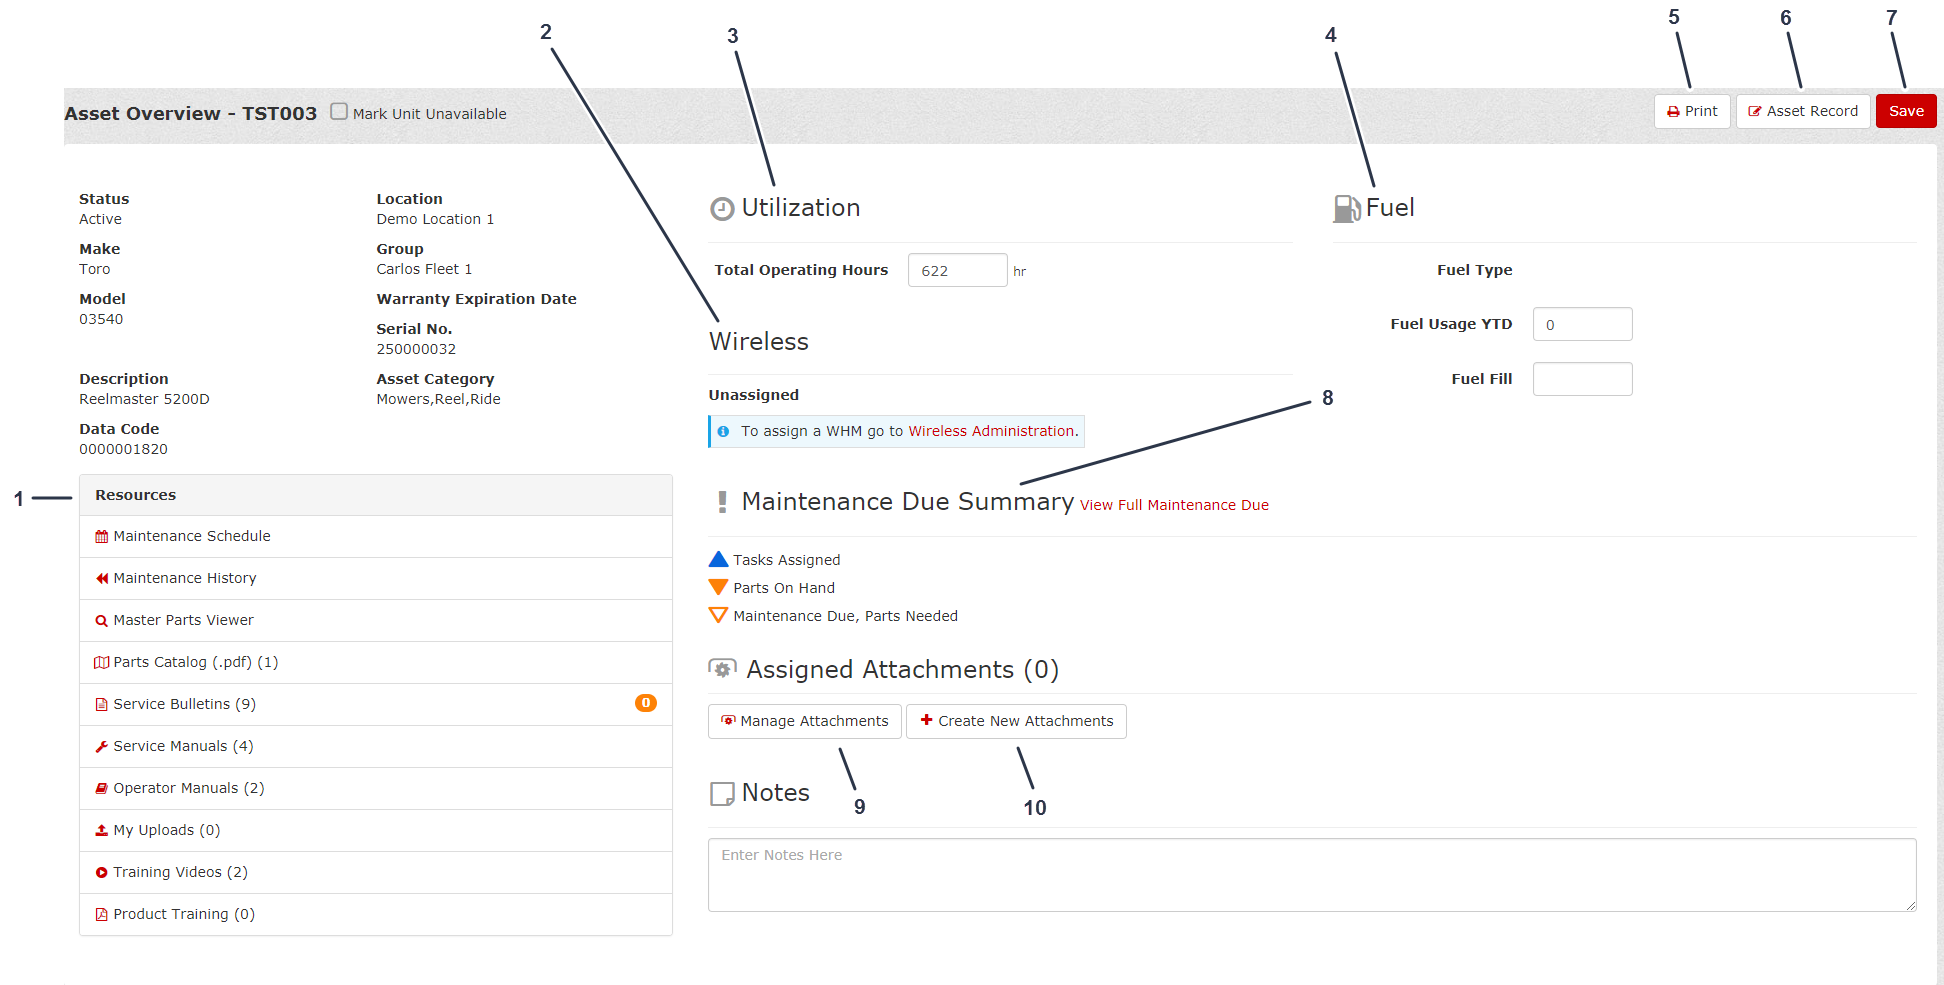
Asset ID/Asset Overview
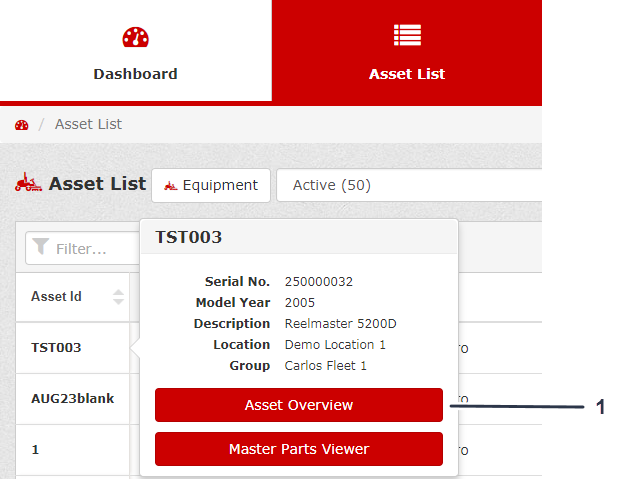
From the Asset List, you can select a particular Asset ID to view details pertaining to that asset.
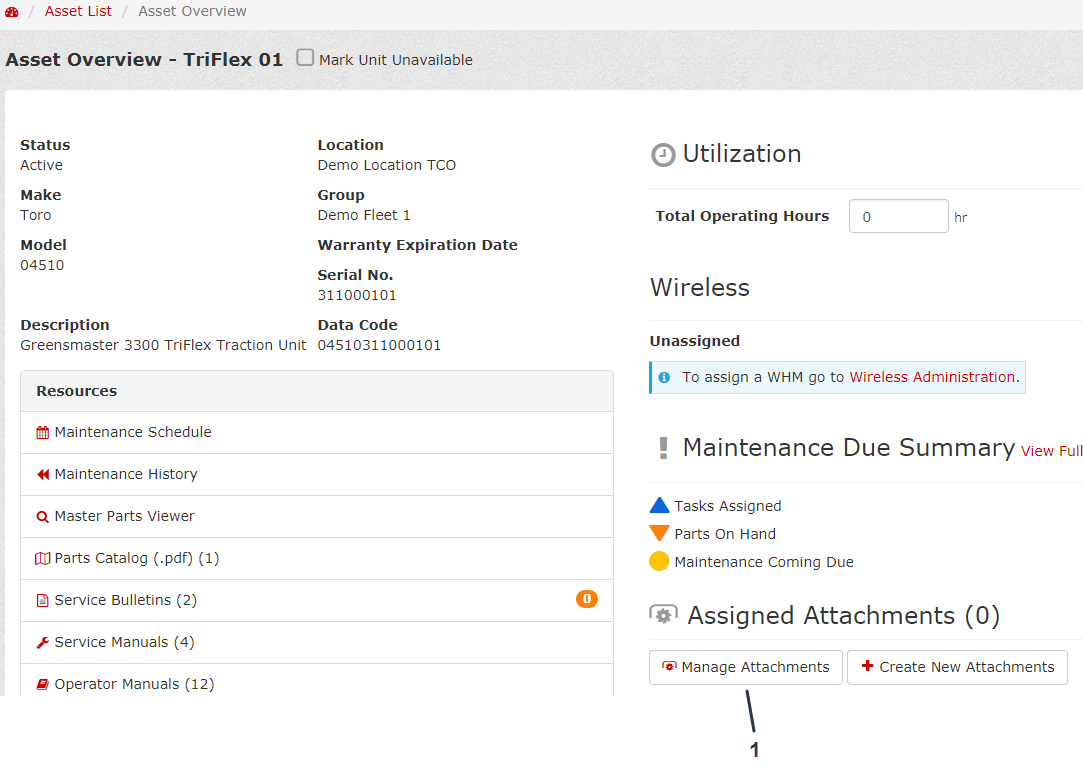
To view an asset, select that particular Asset ID to view the Asset Overview (Figure 40).
You can download the asset overview as a document (Figure 40).
You can change details about the asset by clicking Asset Record (Figure 40).
Note: After altering the Asset Record, click Save.
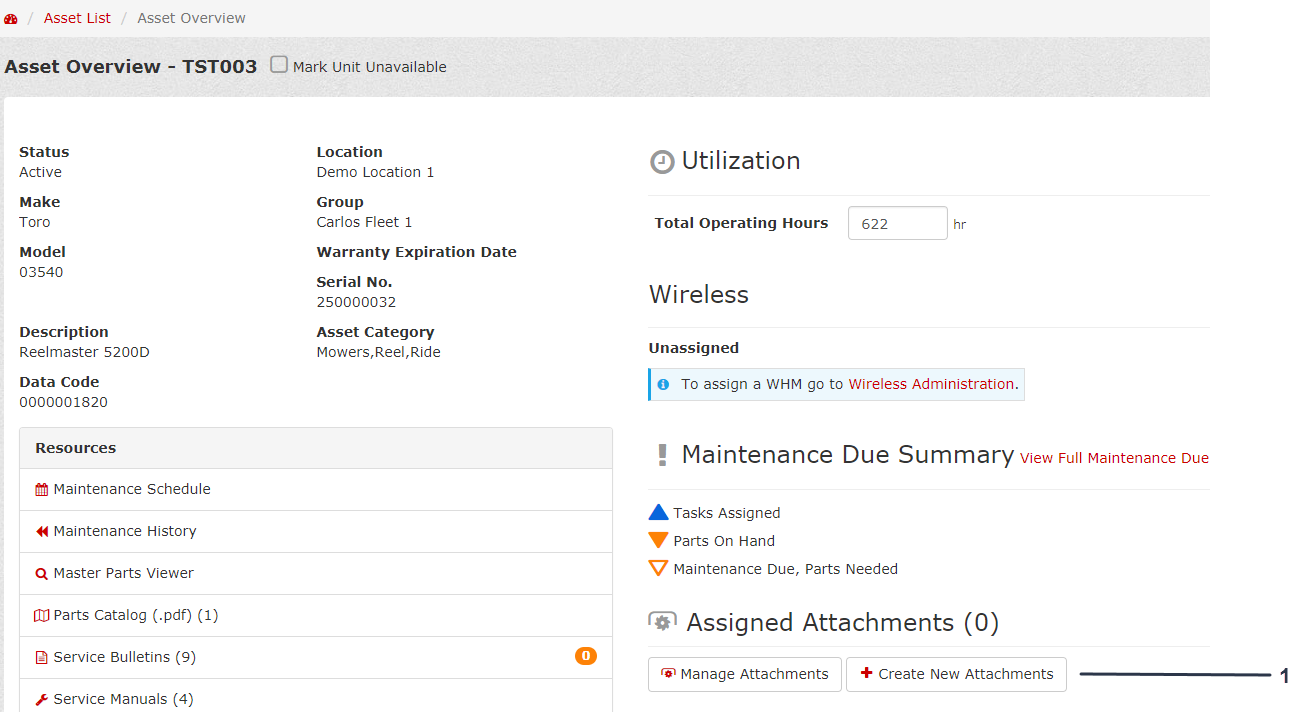
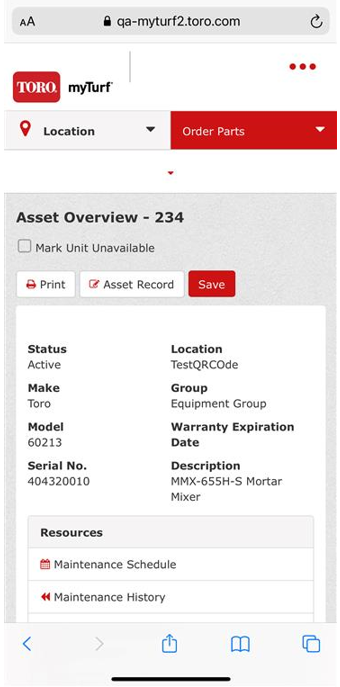
The Asset Overview, allows you to view the following information for an asset:
-
Asset details:
-
Status
-
Make
-
Model number
-
Serial number
-
Description (example: Groundsmaster 4500-D, Workman HDX-D, Reelmaster 5010-H, etc.)
-
Location
-
Group
-
Warranty expiration date (if applicable)
-
Extended protection expiration date (if applicable)
-
-
Utilization and fuel details:
-
Total operating hours
-
Fuel type
-
Fuel usage (year-to-date)
-
Fuel fill
-
-
Wireless hour meter connection (if applicable)
-
Maintenance status
-
Assigned attachments
-
Manage attachments
-
Create a new attachment
-
-
Notes
-
Resources
-
Maintenance schedule
-
Maintenance history
-
Master parts viewer
-
Parts Catalog
-
Service Bulletins
-
Service Manuals
-
Operator’s Manuals
-
My uploads
-
Training videos
-
Product training
-
Asset Types
You can select the asset type that you want to view in your asset list by clicking one of the tabs shown in Figure 41.
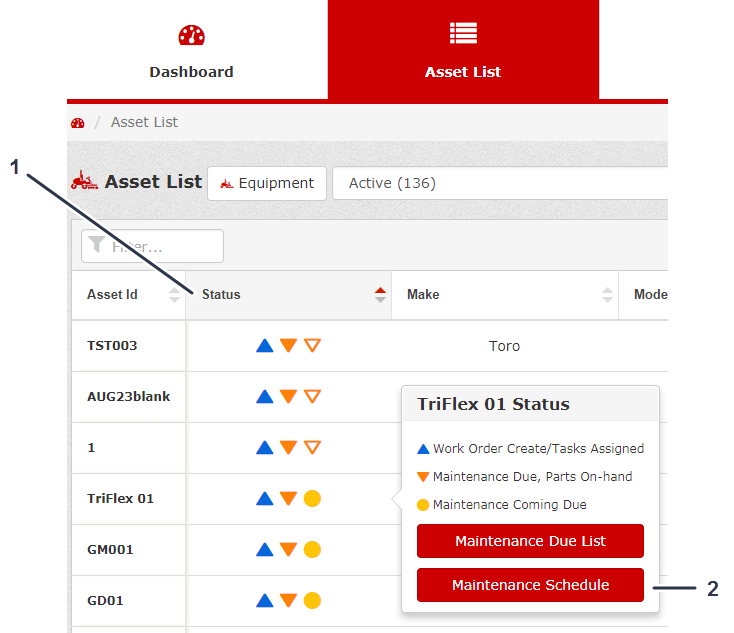
Status
The status of an asset in your fleet is designated as follows:
| Symbol | Status |
 | Asset is in good, operating condition |
 | Work order created/tasks assigned |
 | Maintenance due, parts on hand |
 | Maintenance due, parts needed |
 | Safety stock alert |
 | Maintenance coming due |
 | Asset under repair or maintenance |
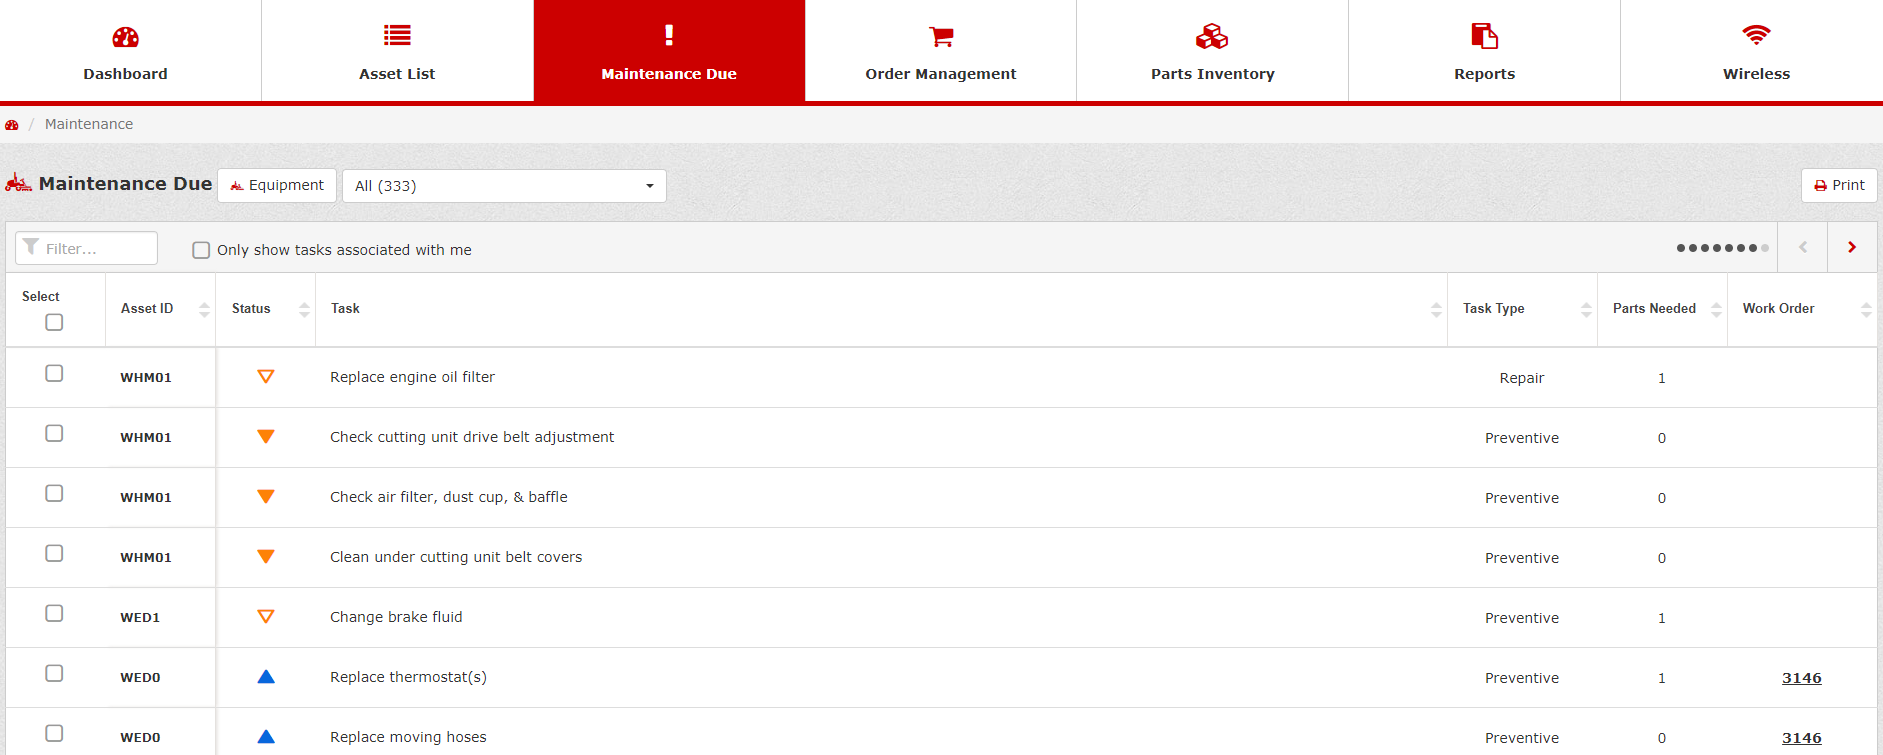
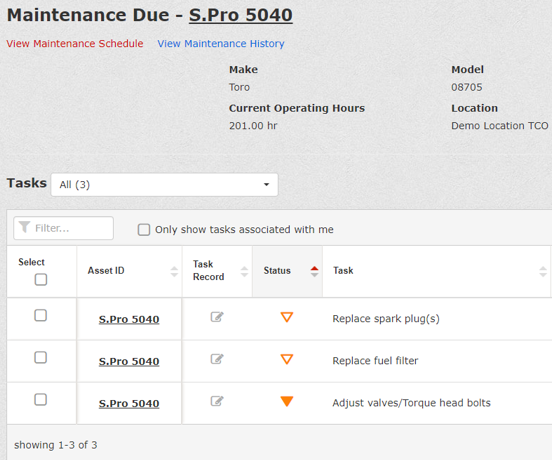
Maintenance Due
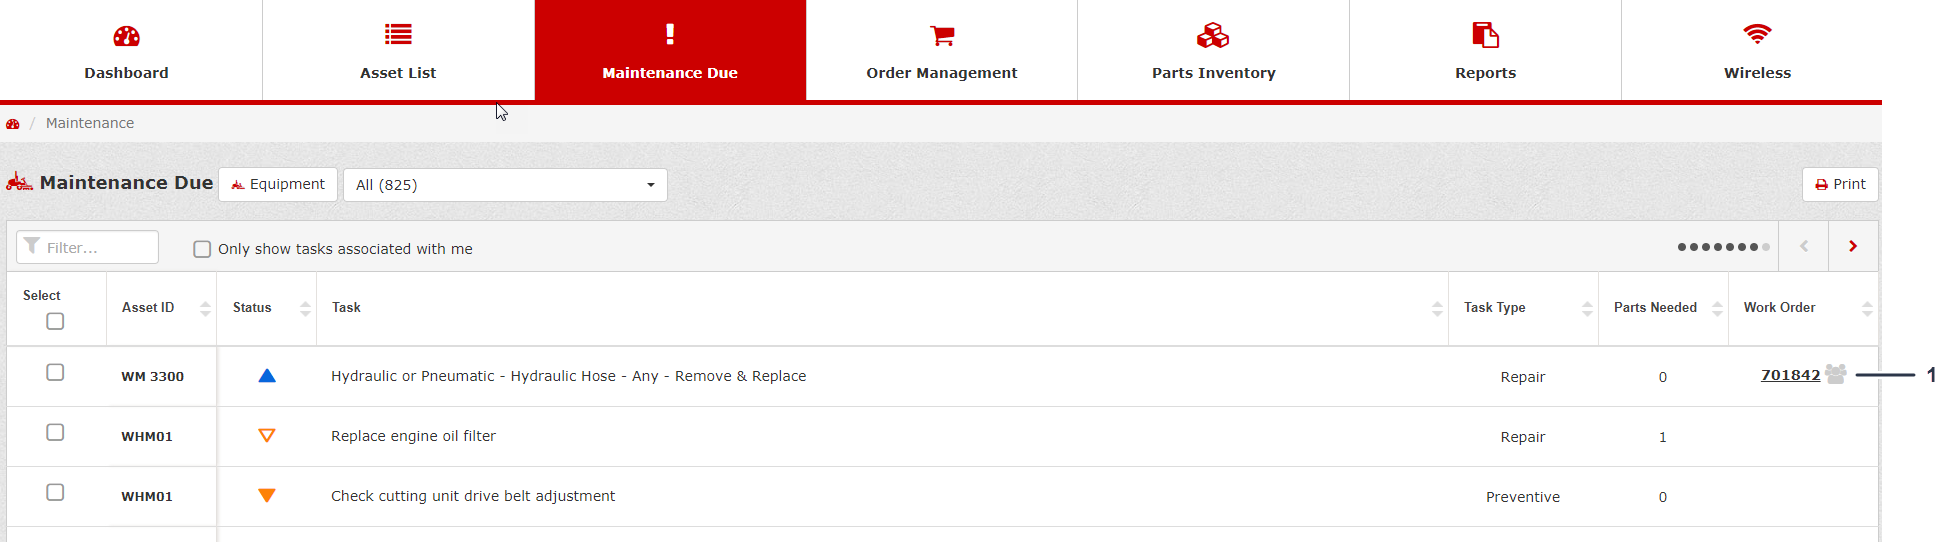
The Maintenance Due tab allows you to view the following information:
-
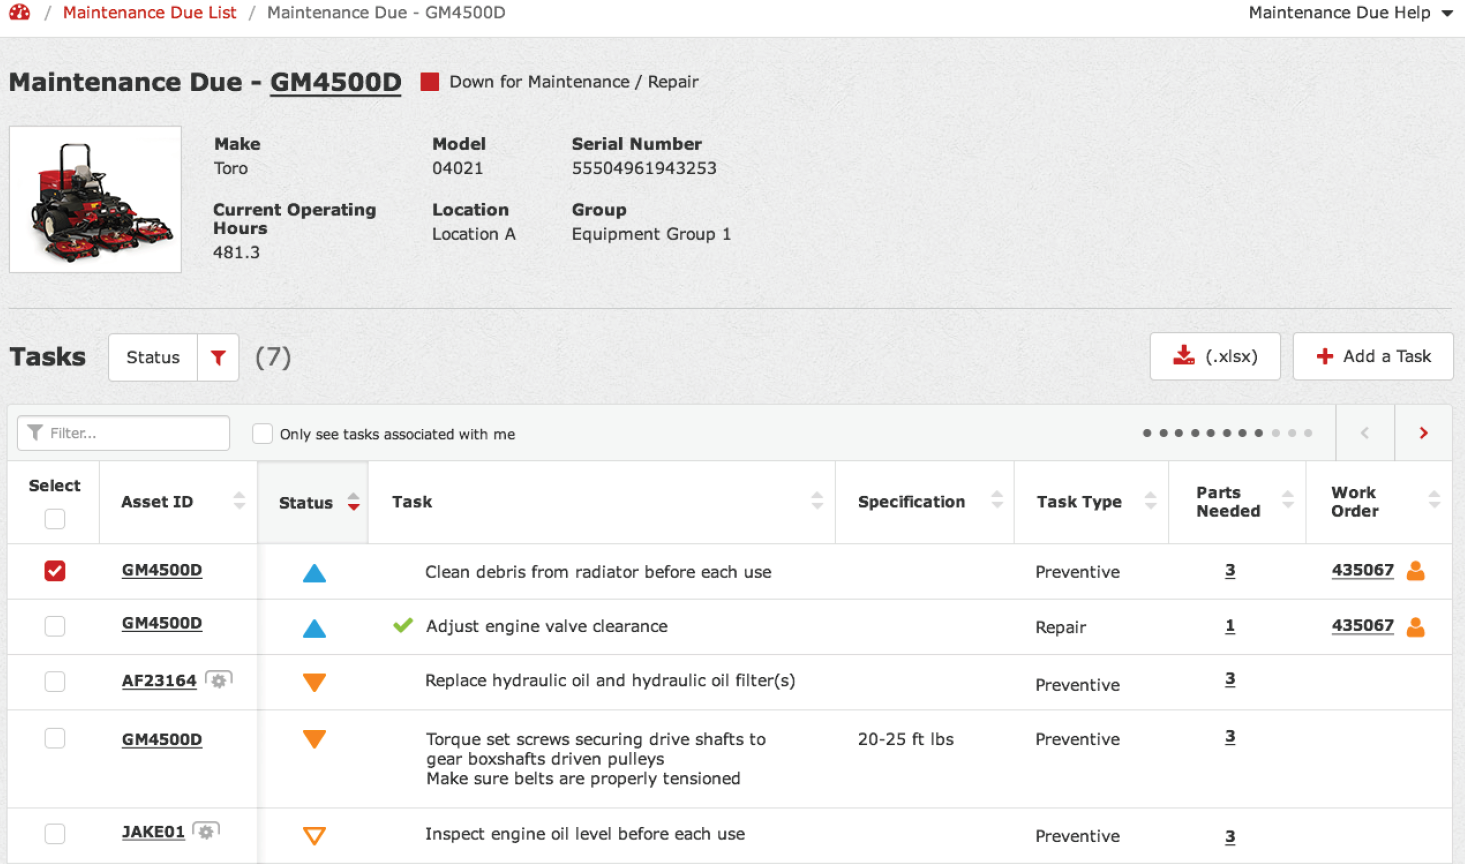
Asset ID—allows you to select a particular asset to view all the maintenance tasks for that asset (Figure 42 and Figure 43).
-
Status—refer to the Status table for the current status of an asset.
-
Task—states the task that you need to complete (Figure 42).
-
Task Type—the type of task is categorized as general, preventive, or repair (Figure 42).
-
Parts Needed—click the number below the column to view the parts necessary for the maintenance task (Figure 42).
-
Work Order—click the work order number to view the work order details and to see who is assigned to the work order (Figure 42).
-
Attachments—click the number below the column to view the associate attachments to the asset. If there is a tool icon next to the number of attachments, attachments also need service (Figure 42).
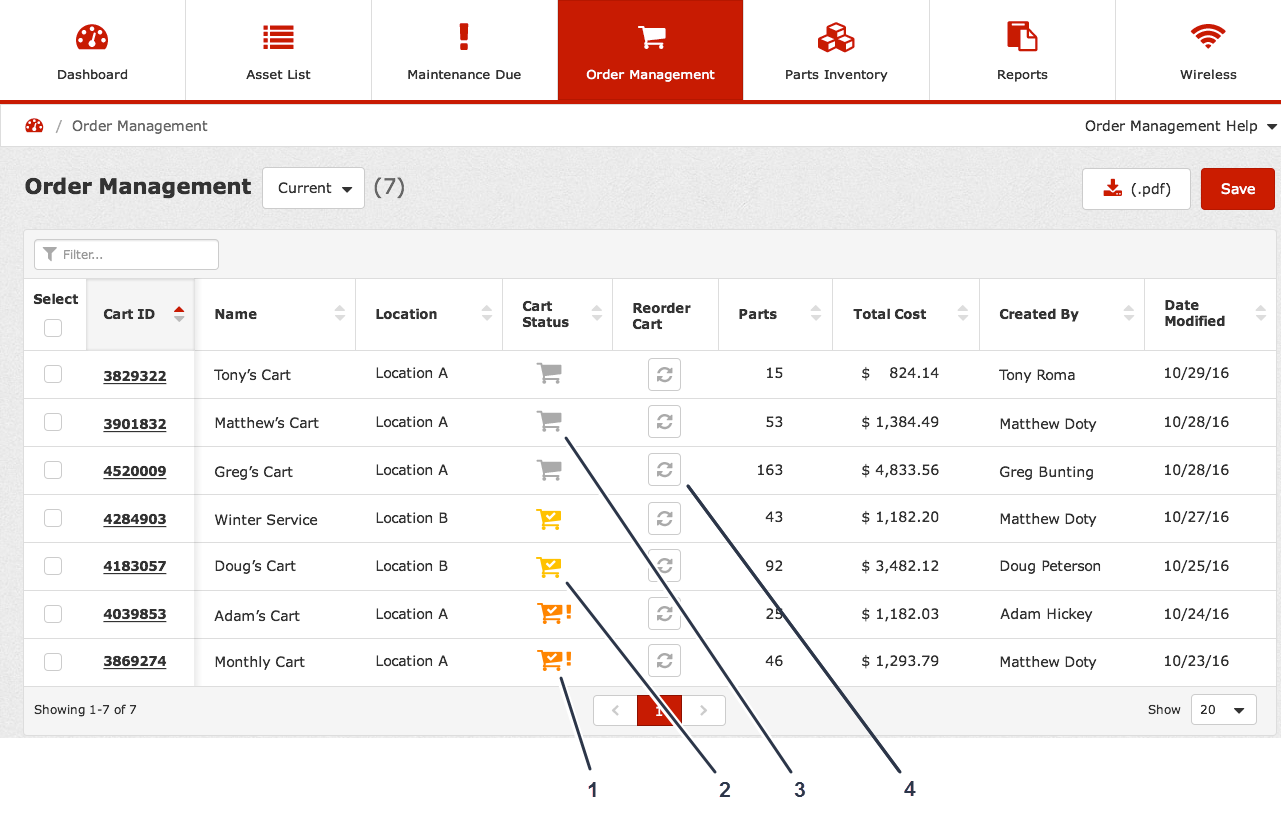
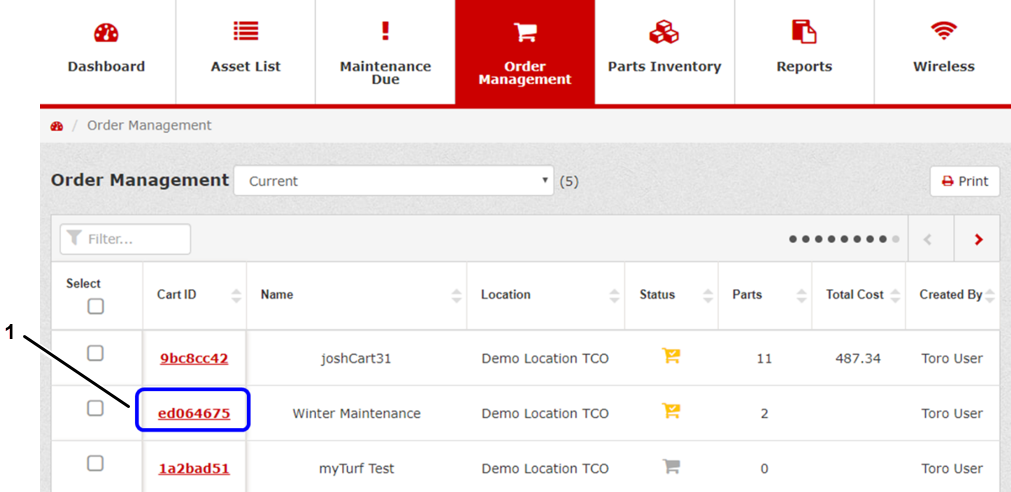
Order Management
The Order Management tab allows you to view the following information for current or past orders:
-
Cart ID—click the Cart ID to view all the particular information that cart (Figure 44).
-
Name—tells you to whom the cart belongs (Figure 44)
-
Location—states the location of the cart (Figure 44)
-
Cart Status—tells you whether a cart is still being compiled, if a cart is ready to order, or if the cart is awaiting approval from the supervisor (Figure 44)
-
Reorder Cart—click the reorder cart icon to order the same parts again (Figure 44).
-
Parts—states the total number of parts in the order (Figure 44)
-
Total Cost—states the total cost of the parts in the order (Figure 44)
-
Created By—states who created the order (Figure 44)
-
Date Modified—states the date that the order was last modified (Figure 44)
If you want to delete a cart, select the cart, and click Delete Selected (Figure 44).
Parts Inventory
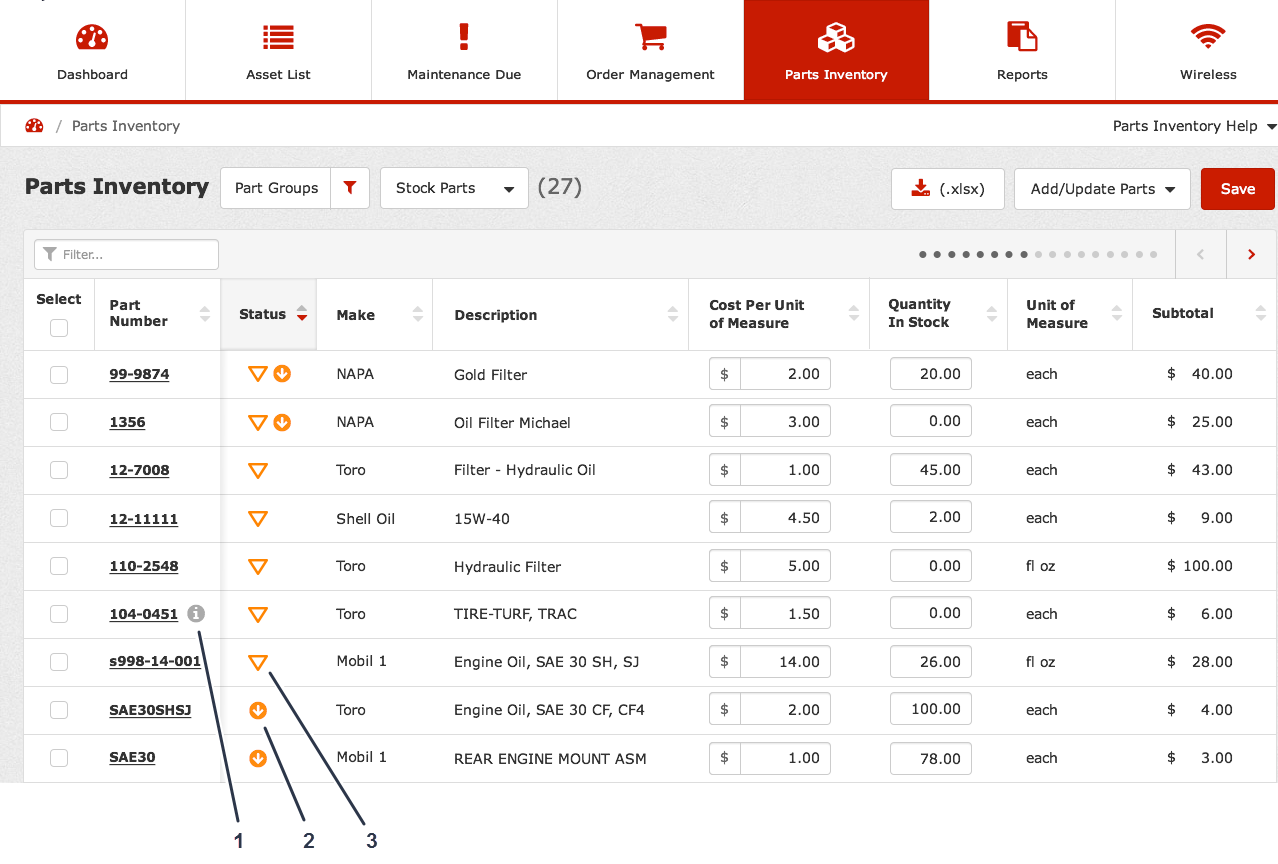
The Parts Inventory tab allows you to view the following information for the parts in your inventory:
-
Part Number—states the part number that you want to order (Figure 45)
Click the “i” icon next to a part number for additional information. The part you have in your inventory may have been superseded, cross-referenced, discontinued, etc. (Figure 45).
-
Status—tells you whether or not you have the required parts in your inventory, if you need to order parts, or if the parts have been ordered but are in process (Figure 45)
-
Make—lists the manufacturer of the part (Figure 45)
-
Description—provides a description of the part (Figure 45)
-
Cost Per Unit of Measure—states how much each part costs (Figure 45)
-
Quantity in Stock—states how many of that particular part that you have in your inventory (Figure 45)
-
Unit of Measure—provides how the part is measured (i.e., each, fl oz, mg, gram, etc.); refer to Figure 45
-
Subtotal—states the subtotal cost of the parts (Figure 45)
-
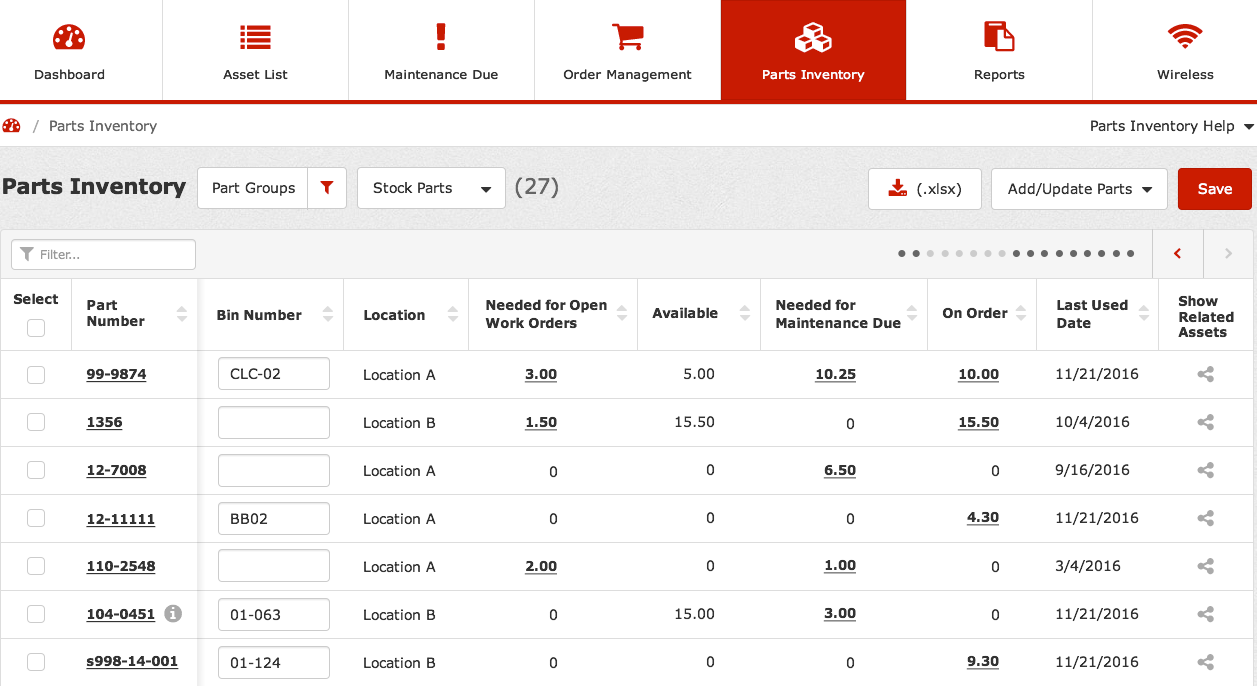
Bin Number—enter the bin number where you want the part located (Figure 46).
-
Location—states the location in which the parts exist (Figure 46)
-
Needed for Open Work Orders—tells you the quantity of the parts you need to fulfill the current open work orders (Figure 46)
-
Available—states the total quantity of the part currently available (Figure 46)
-
Needed for Maintenance Due—tells you the quantity of the parts you need to fulfill for the machines due for maintenance (Figure 46)
-
On Order—states the quantity of the parts you currently have on order, but are in your inventory yet (Figure 46)
-
Last Used Date—states the date that the parts were last used for maintenance (Figure 46)
-
Show Related Assets—click the icon to view related assets (Figure 46).
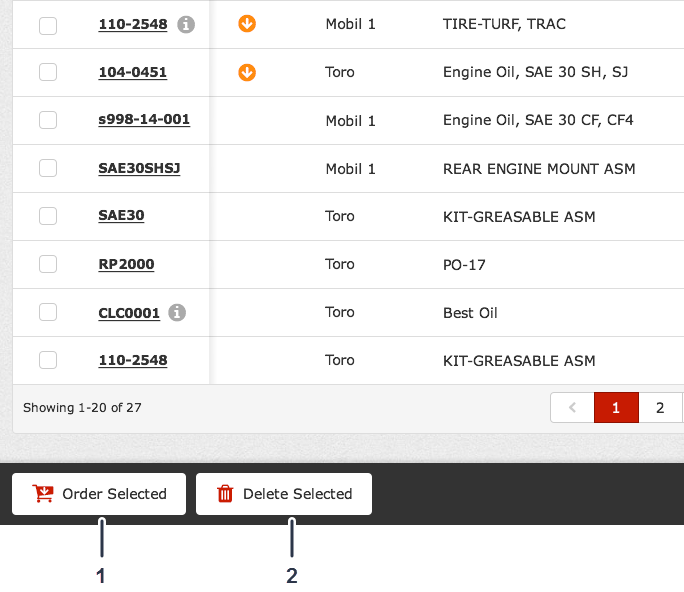
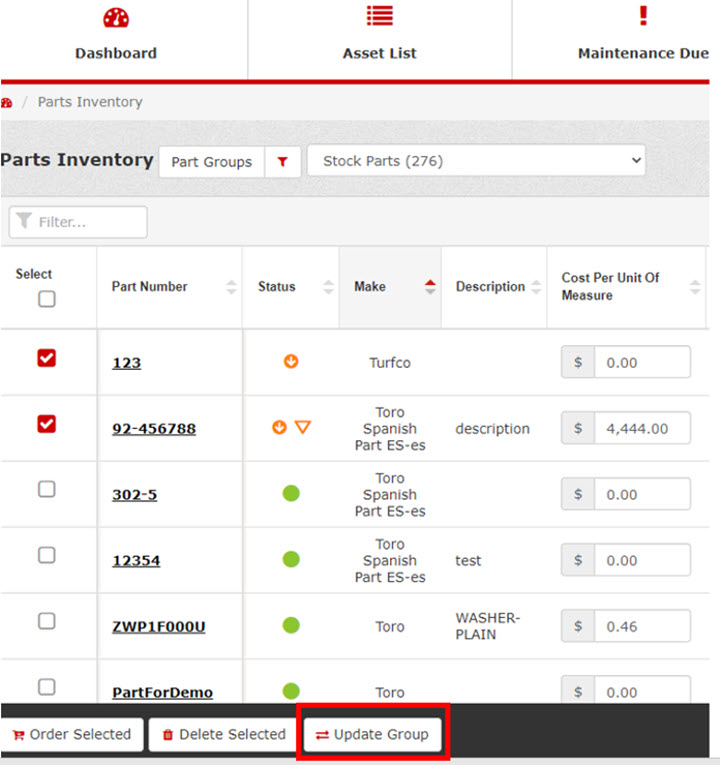
Select the parts that you want to order, and click Order Selected to order the selected parts (Figure 47).
If you want to delete parts, select the parts, and click Delete Selected (Figure 47).
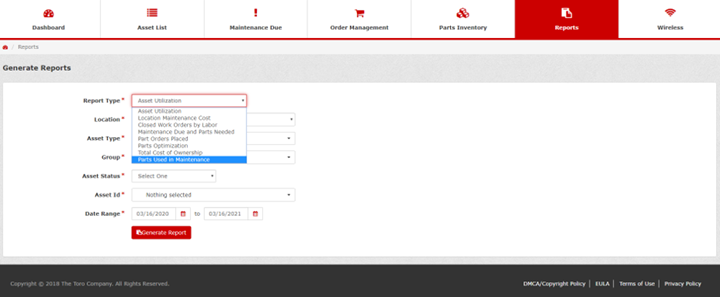
Reports
The Reports tab (Figure 48) allows you to generate the following types of reports:
-
Asset Utilization
-
Location Maintenance Cost
-
Maintenance Due and Parts Needed
-
Part Orders Placed
-
Option 1—by carts
-
Option 2—by part numbers
-
-
Total Cost of Ownership
To generate a report, refer to Generating Reports.
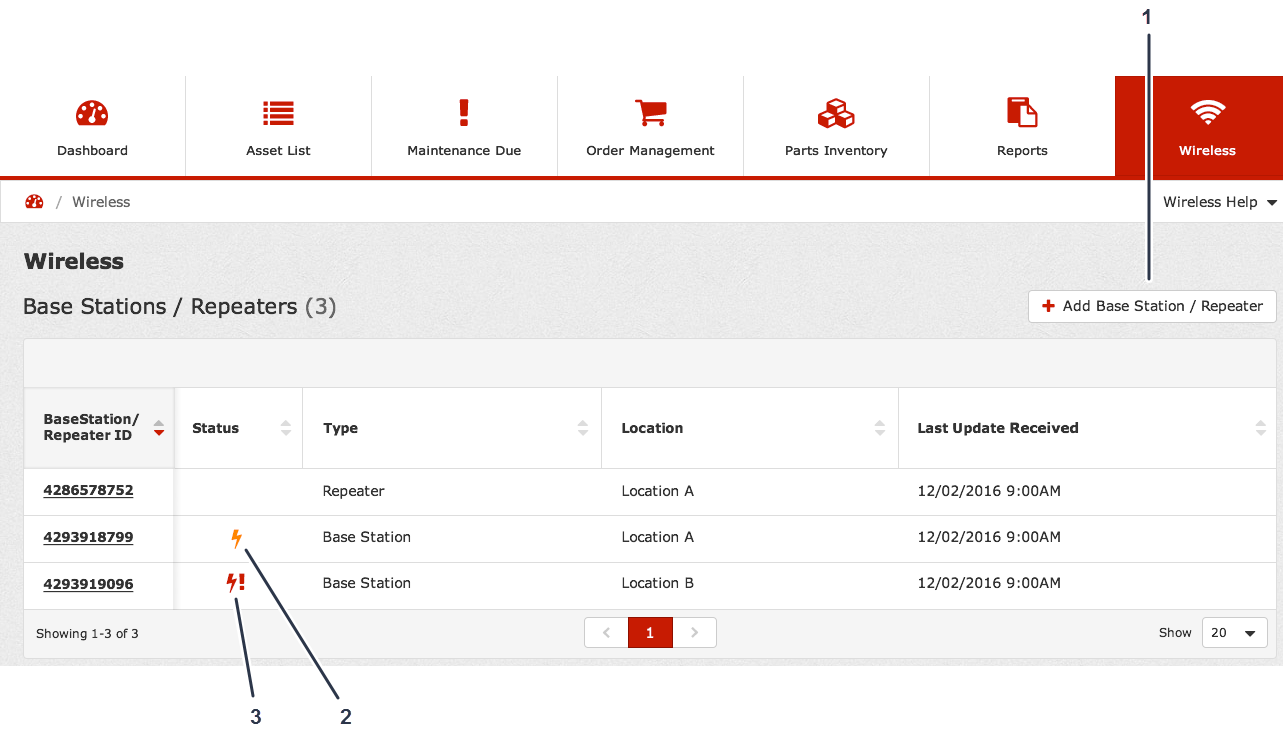
Wireless
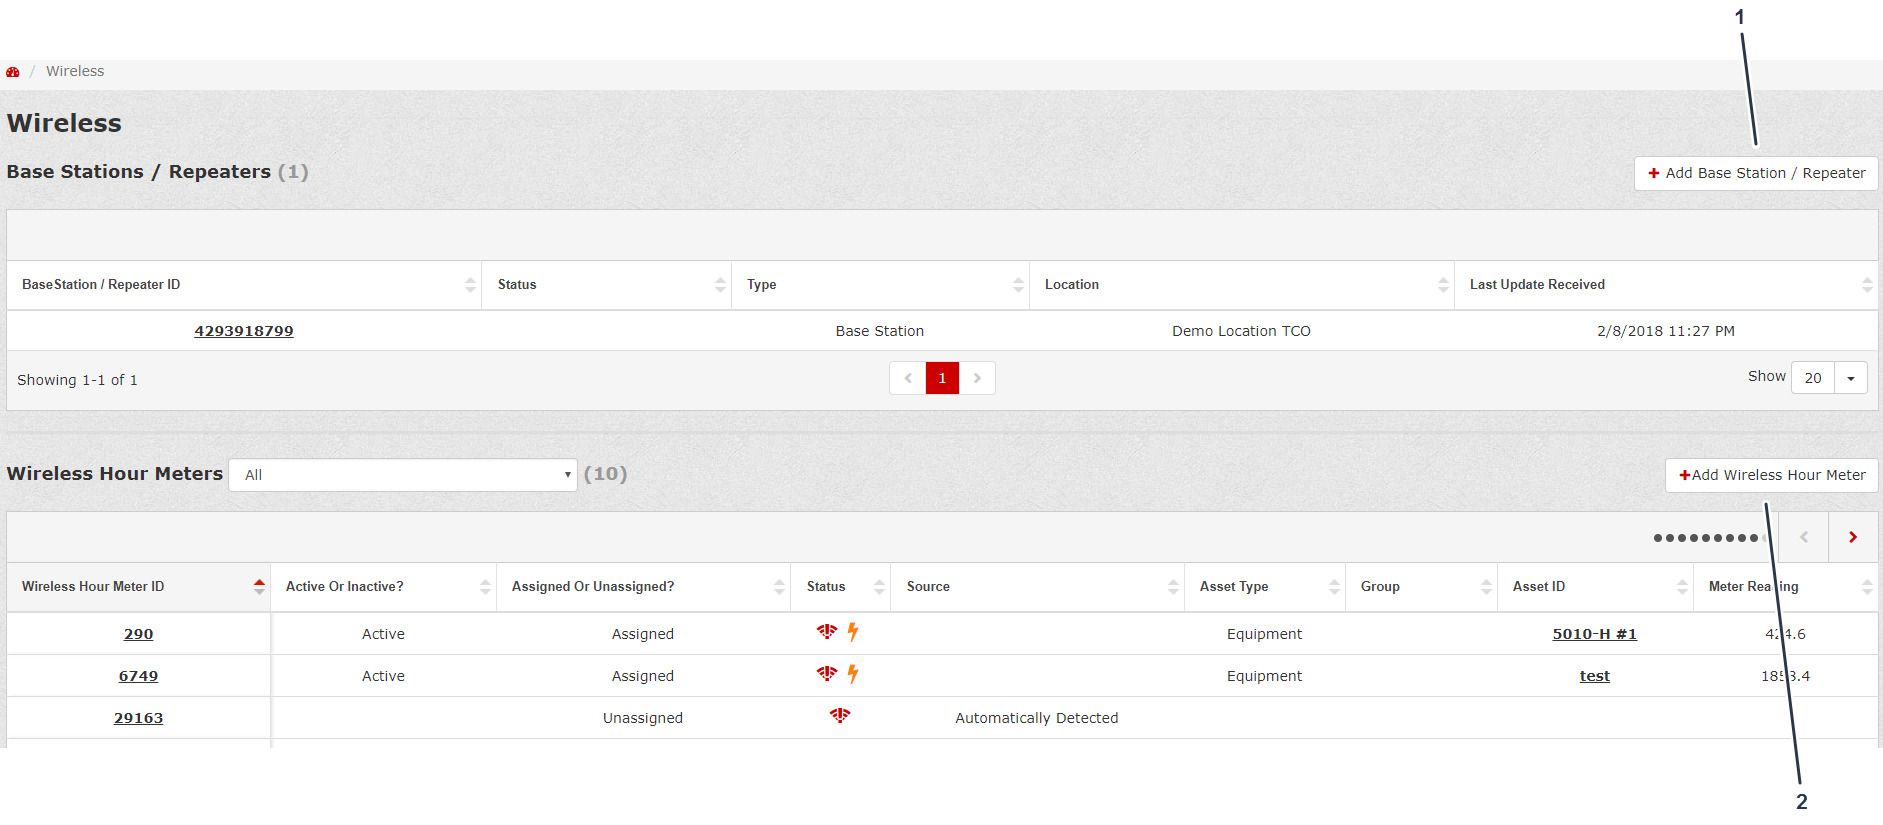
The Wireless tab allows you to view the following information for base stations/repeaters:
-
Base Station/Repeater ID—states the identification number of the base station/repeater (Figure 49)
-
Status—tells you if the base station/repeater is not connected or is out of range (Figure 49)
-
Location—states the location in which the base station/repeater exists (Figure 49)
-
Last Update Received—states when the base station/repeater most recently received an update (Figure 49)
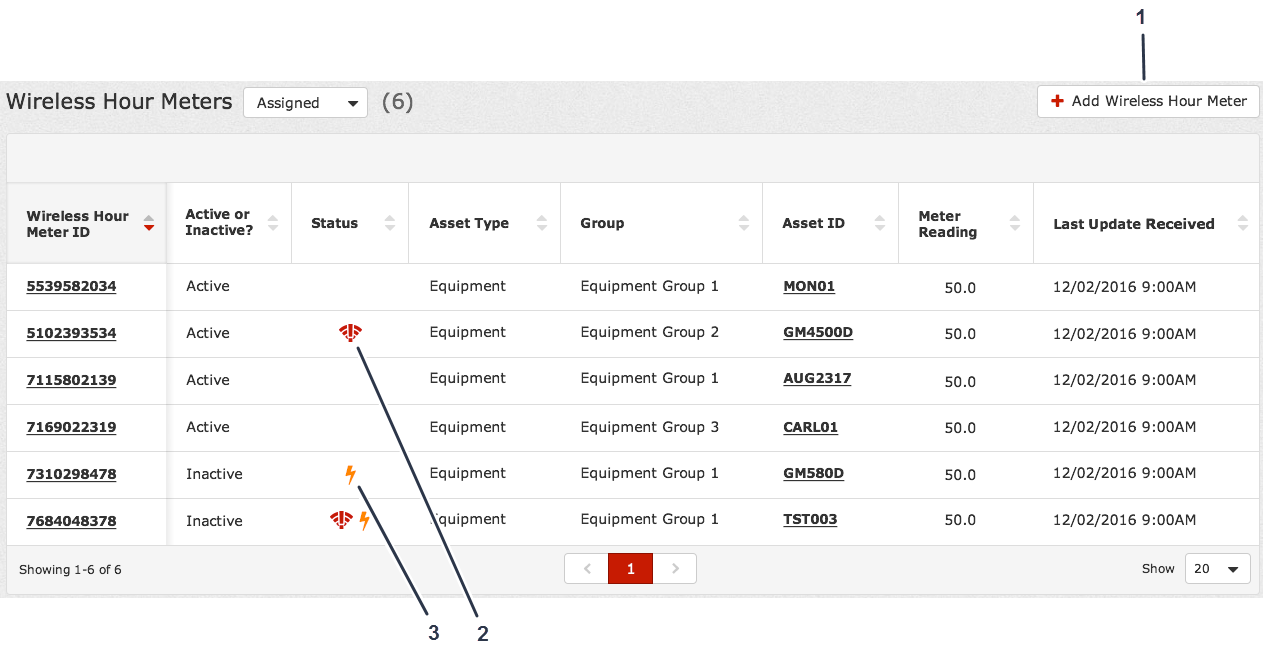
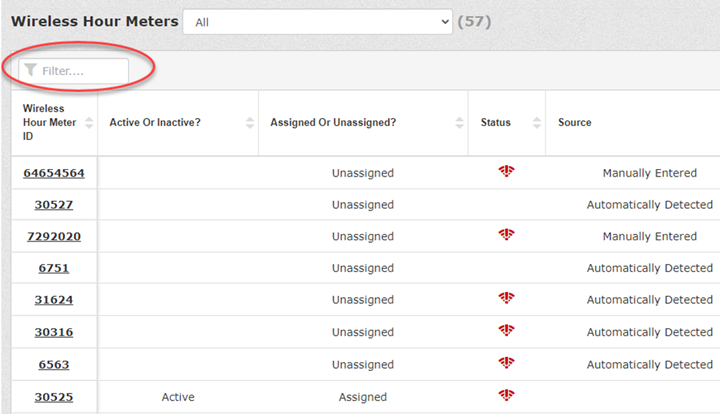
The Wireless tab also allows you to view the following information for assigned or unassigned wireless hour meters:
-
Wireless Hour Meter ID—states the identification number of the wireless hour meter (Figure 50)
-
Active or Inactive—states whether the wireless hour meter is active or inactive (Figure 50)
-
Status—tells you if the base station/repeater is not connected or is out of range (Figure 50)
-
Asset Type—tells you which type of asset the wireless hour meter is paired with (Figure 50)
-
Group—states the group in which the base station/repeater exists (Figure 50)
-
Asset ID—state the asset ID associated with the wireless hour meter (Figure 50)
-
Meter Reading—provides the current wireless hour meter reading (Figure 50)
-
Last Update Received—states when the wireless hour meter most recently sent an update (Figure 50)
To add a base station/repeater, click Add Base Station/Repeater ID (Figure 49); refer to Adding a Base Station/Repeater.
To add a wireless hour meter, click Add Wireless Hour Meter (Figure 50); refer to Adding a Wireless Hour Meter.
Accessing the myTurf Help Center


Editing Parts Groups
Location administrators can create, delete (if there are no associated parts only), and edit (change the name) of Parts Groups.
-
From the Location Record, click Asset Groups (Figure 53).

-
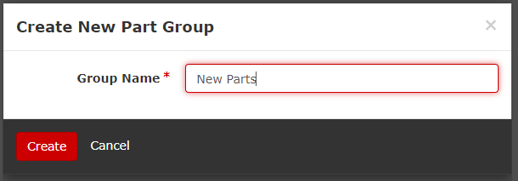
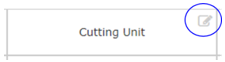
At the bottom of the screen, click Create New Part Group or click the Edit icon next to the Part Group (Figure 54).

-
To create a new part group, enter the Group Name and click Create (Figure 55).
-
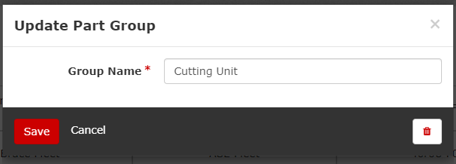
To edit or delete a Part Group, enter the Group Name and click Save or click the trash can icon to delete the group (Figure 56 and Figure 57).
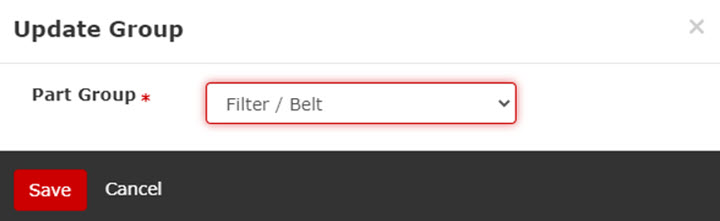
Updating Parts Groups
Creating an Address for Ordering Parts
-
From the Dashboard, click Admin, located in the upper, right corner of the screen (Figure 60).
-
Click the Edit Location Icon (Figure 61).
-
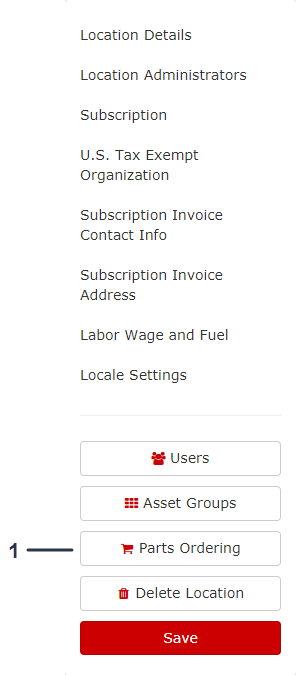
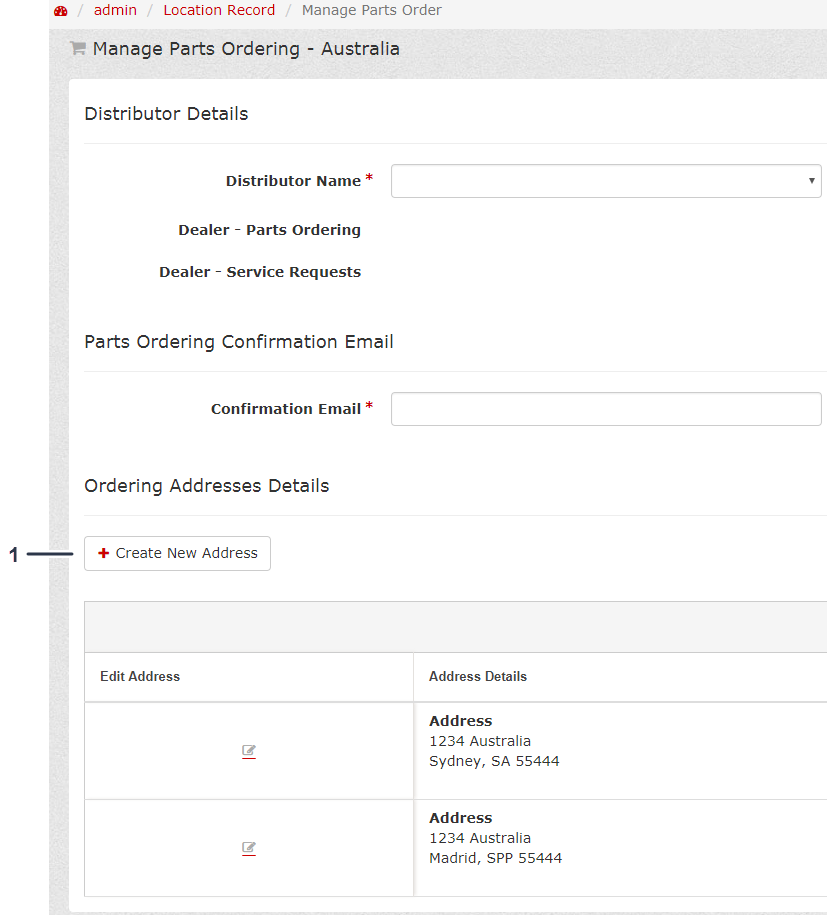
From the Location Record, click Parts Ordering (Figure 62).
-
From the Manage Parts Ordering screen, click Create New Address (Figure 63).
-
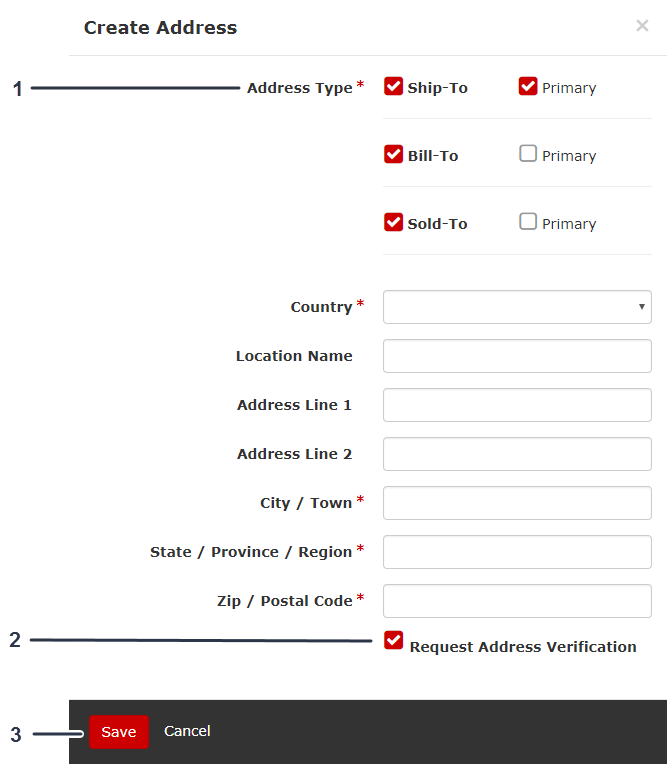
Fill out the Create New Address form, and click Create to complete the process (Figure 64).
Editing an Address for Ordering Parts
-
From the Dashboard, click Admin, located in the upper, right corner of the screen (Figure 60).
-
Click the Edit Location Icon (Figure 61).
-
From the Location Record, click Parts Ordering (Figure 62).
-
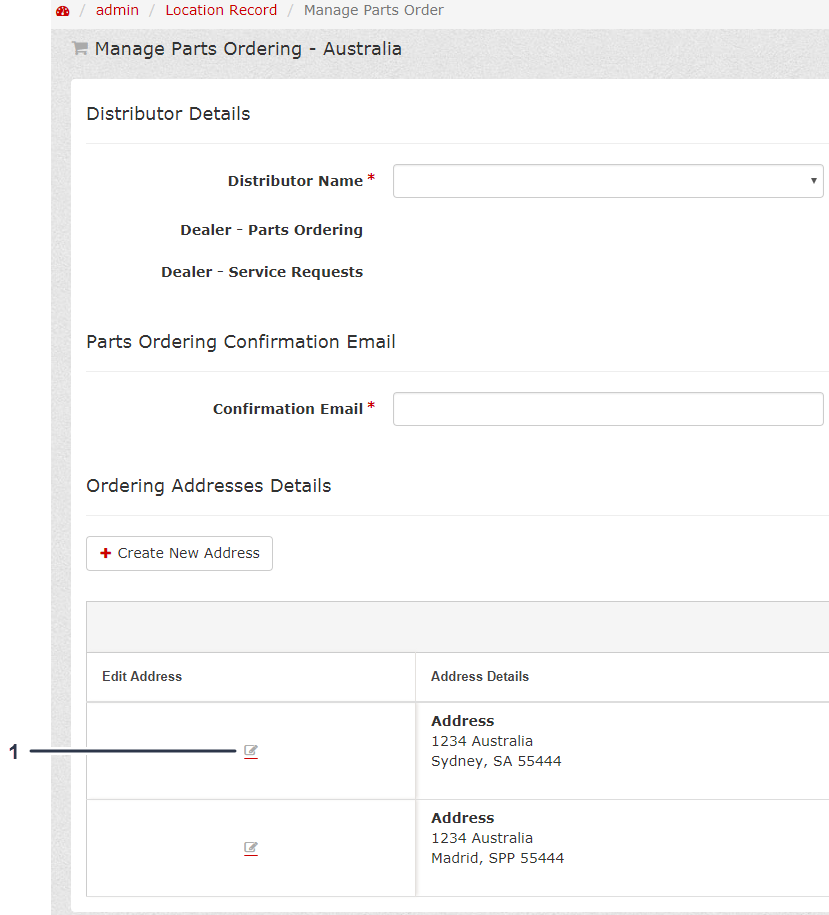
From the Manage Parts Ordering screen, click the Edit Address icon (Figure 65).
-
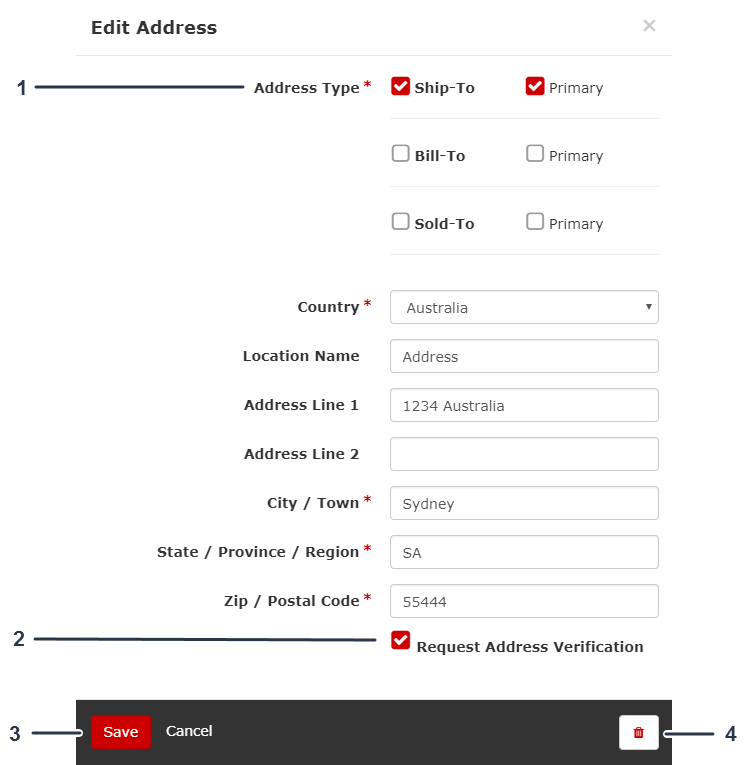
Fill out the Edit Address form, and click Save after you make the changes (Figure 66).
Note: You can delete the address by clicking the trash can icon (Figure 66).
Ordering Parts for Repair
-
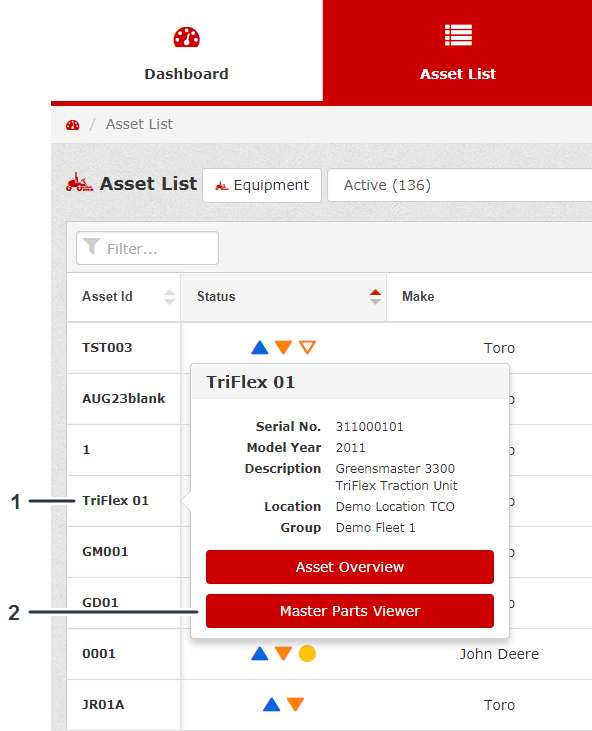
Click the Asset List tab.
-
Click the desired Asset ID (Figure 67).
-
Click Master Parts Viewer (Figure 67).
Note: You can also access the Master Parts Viewer from the Asset Overview.
-
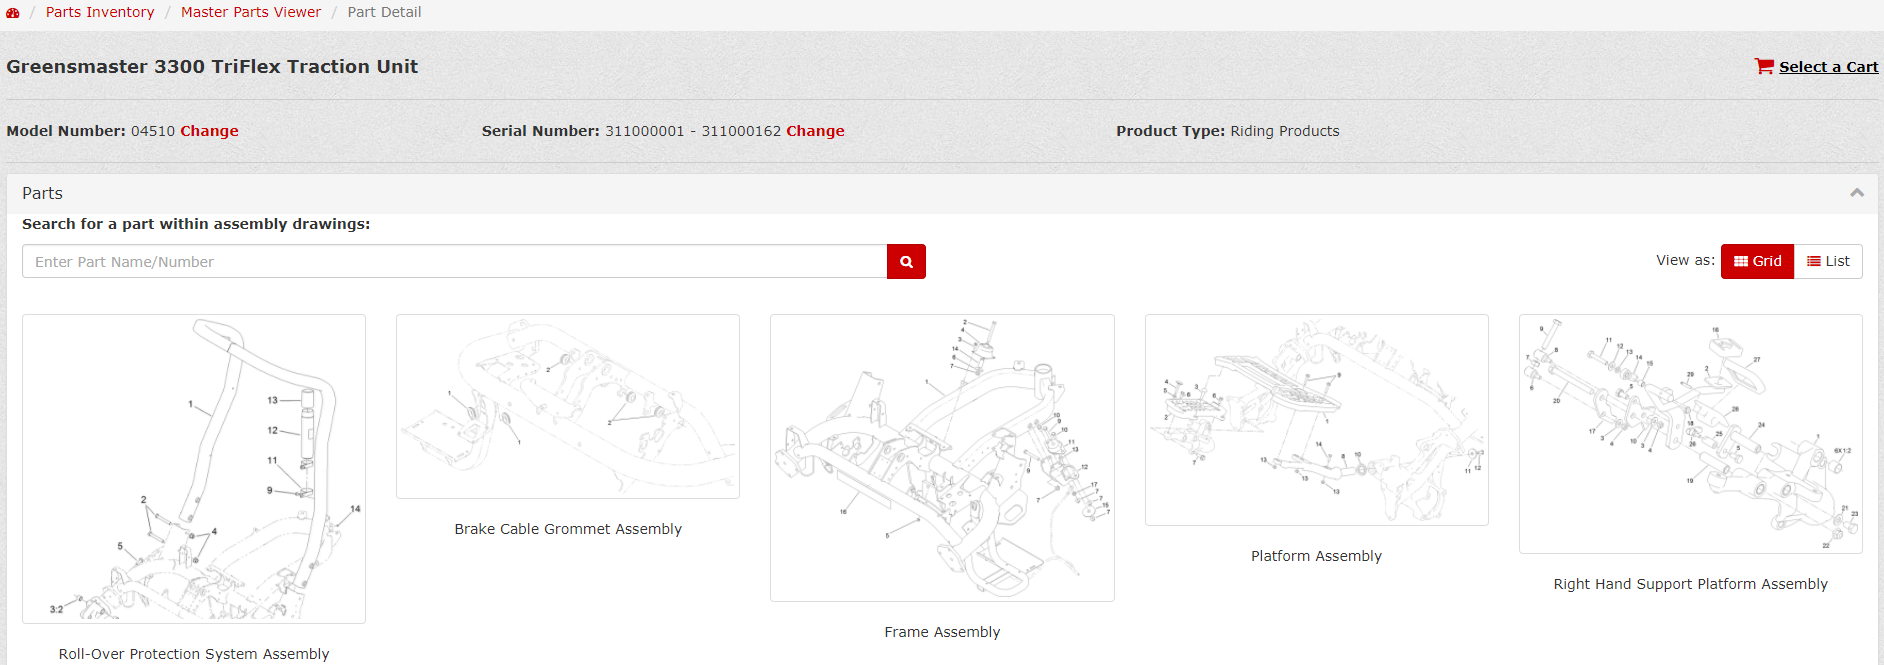
Find the appropriate assembly drawing that includes the part(s) you need (Figure 68).
-
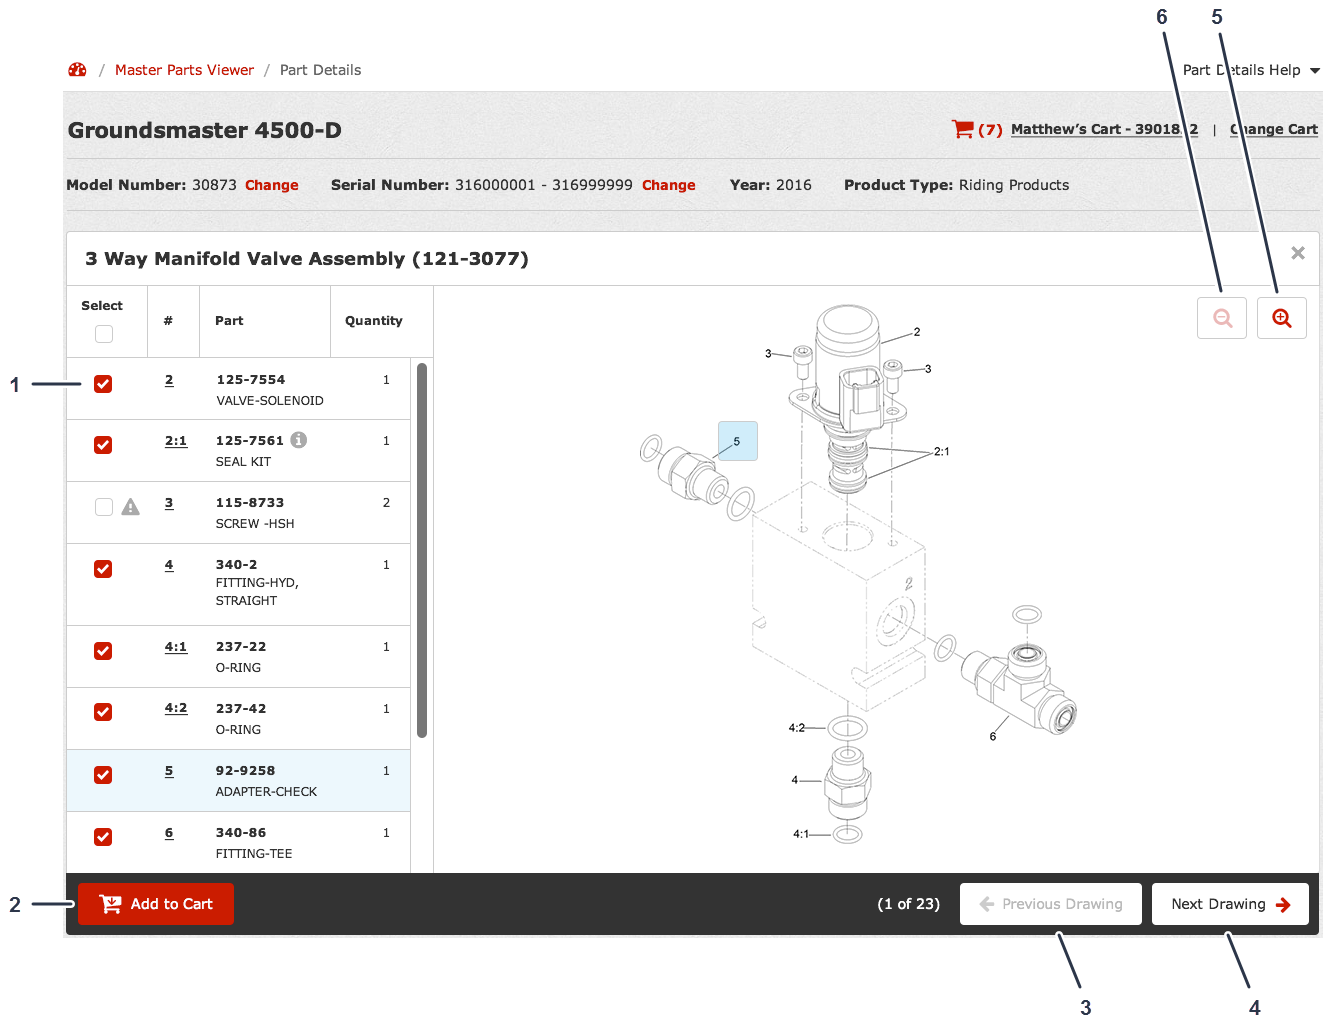
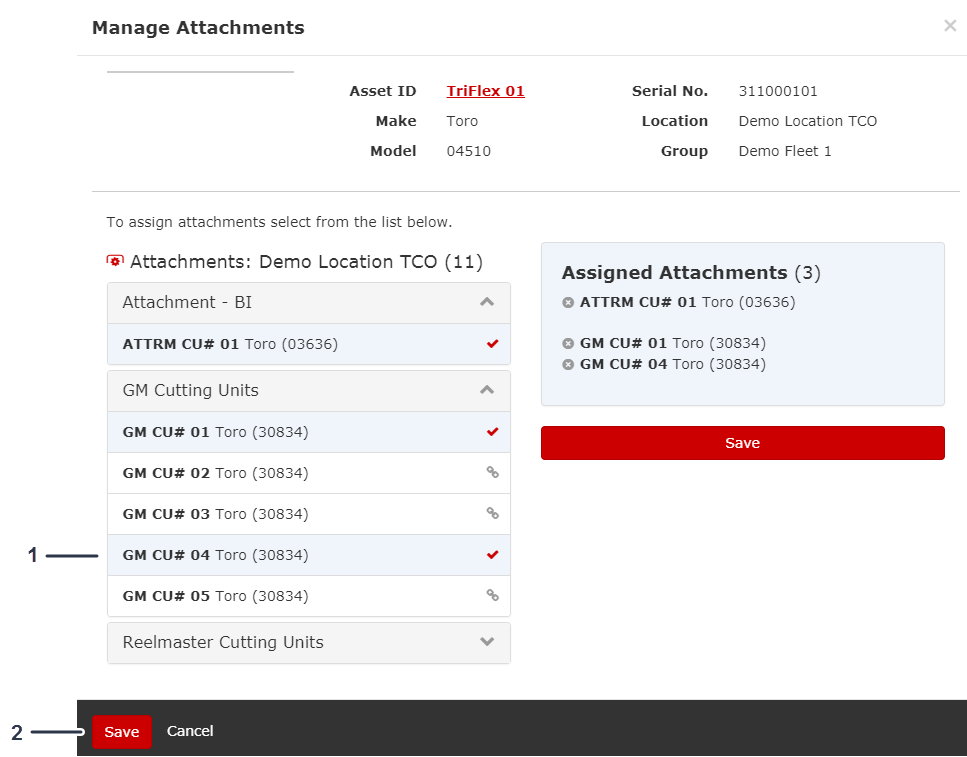
After you find the parts you need, select them on the left side of the assembly drawing and click Add to Cart (Figure 69).
-
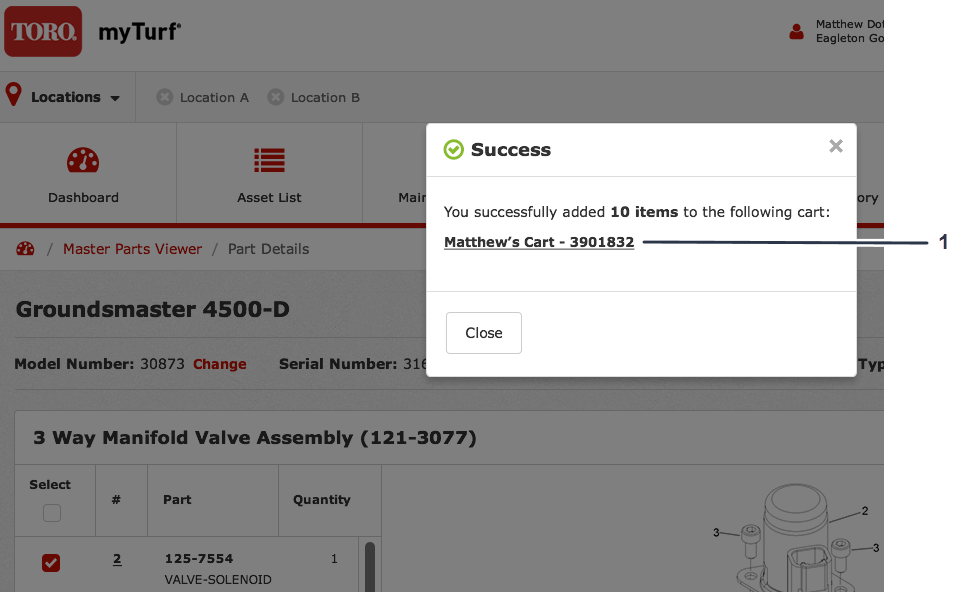
After you receive the message indicating that you successfully added the parts, click your Shopping Cart (Figure 70).
-
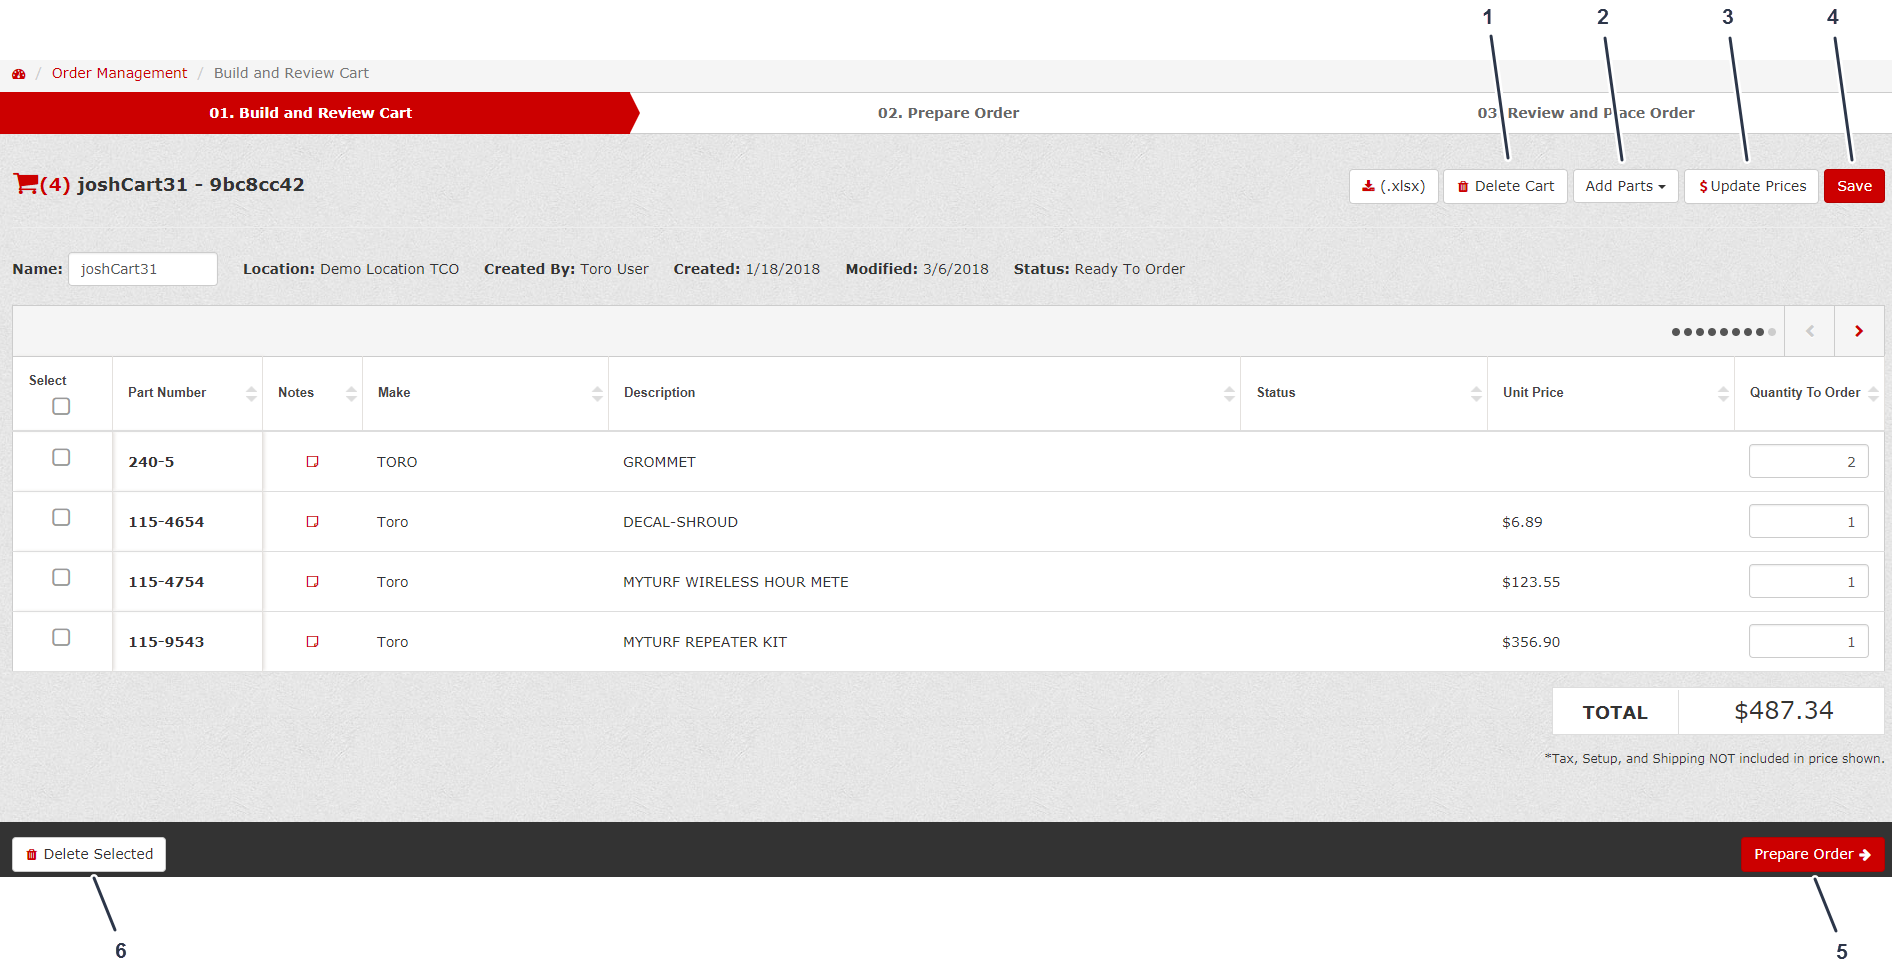
Review the parts and the quantities of the parts in your Shopping Cart, and ensure that they are correct (Figure 71).
If you want to delete any parts from your cart, select them on the left side, and click Delete Selected.
-
Click Prepare Order and fill out the necessary information (Figure 71).
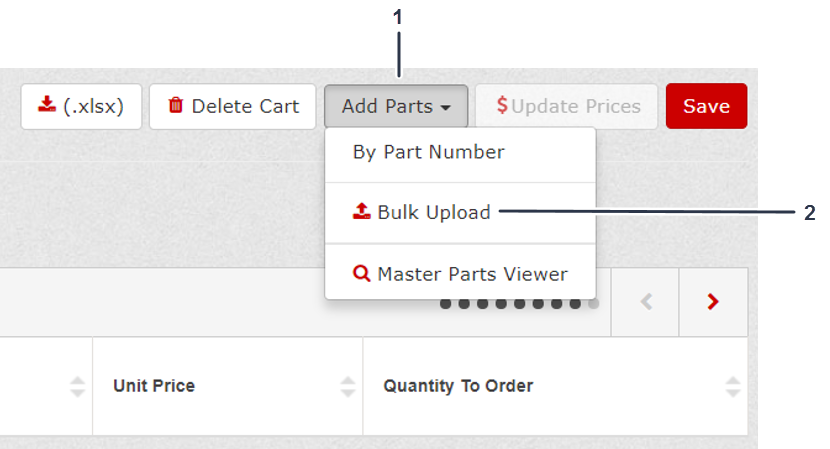
To add parts by Bulk Upload, do the following:
-
Click Add Parts (Figure 72).
-
Click Bulk Upload (Figure 72).
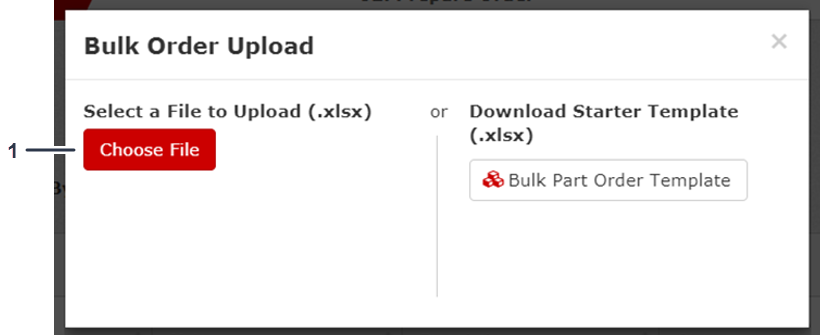
-
In the Bulk Order Upload, click and download the Bulk Part Order Template (Figure 73).

-
Fill out the spreadsheet and save it to your computer (Figure 74).
Note: Do not exceed 50 line items.

-
In the Bulk Order Upload, click Choose File and upload your saved file (Figure 75).
-
-
After reviewing the payment and shipping information, click Review and Place Order (Figure 76).
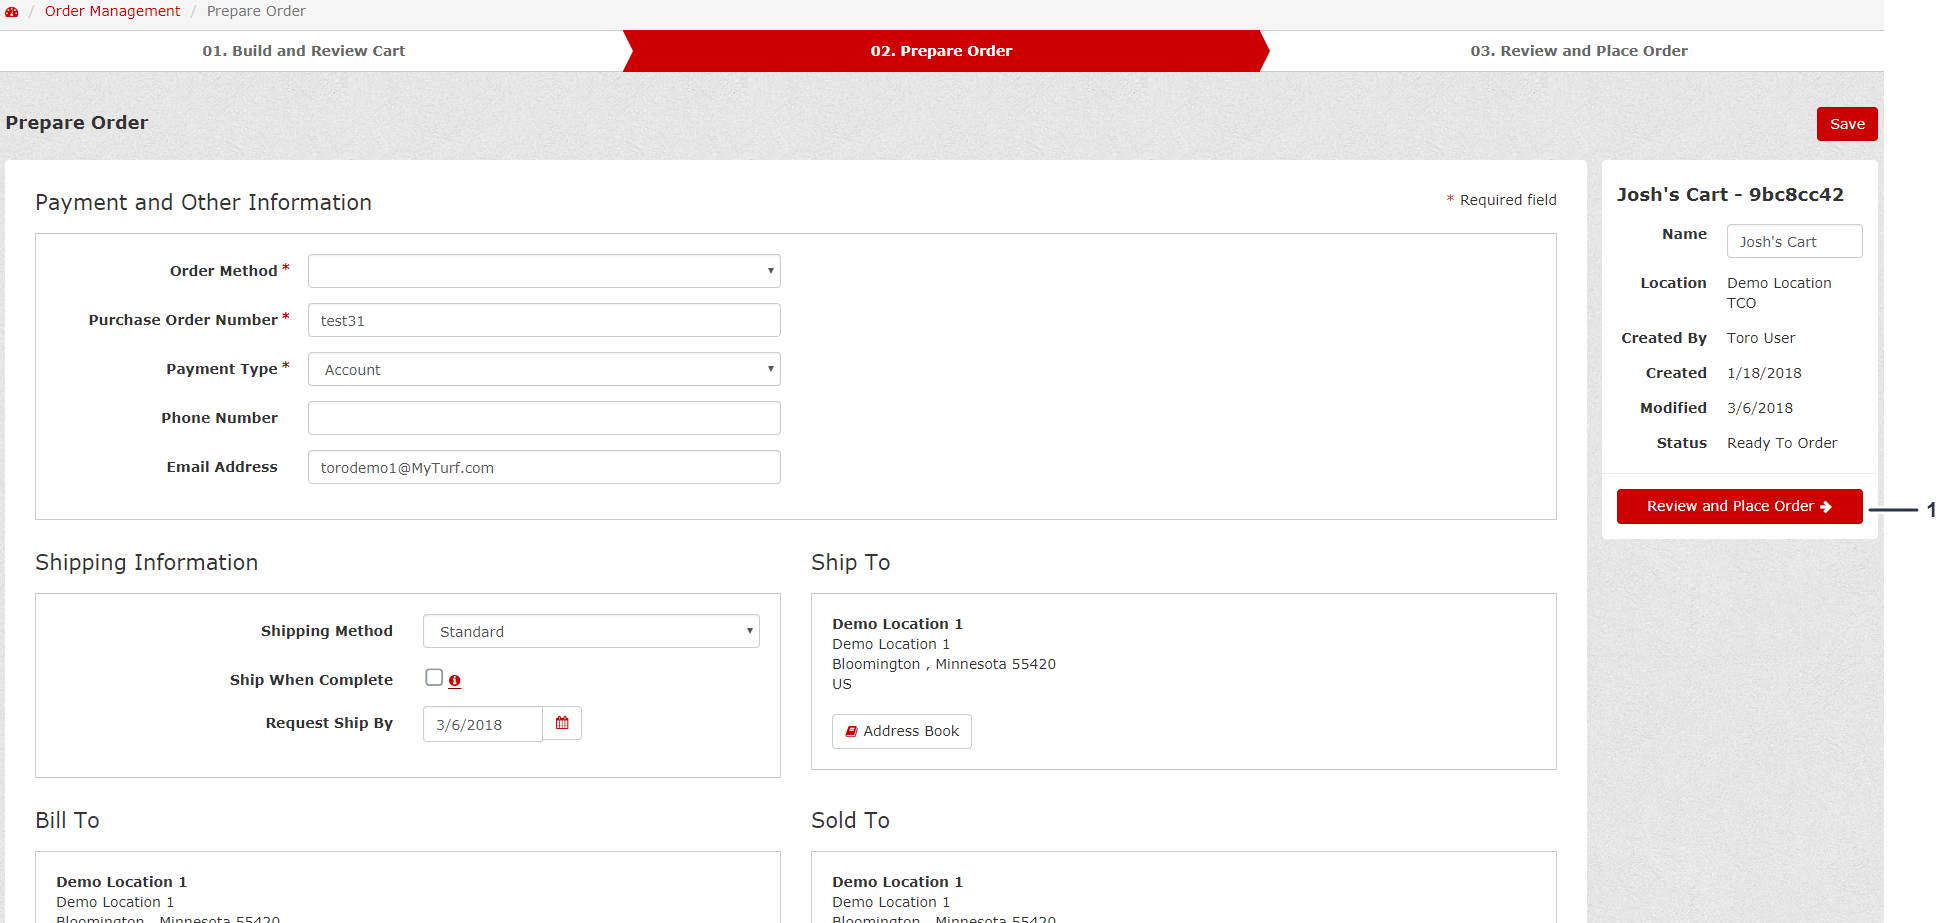
-
Ensure that all the details are correct, then either click Place Order or select Mark for Approval (for supervisor approval) and click Place Order.
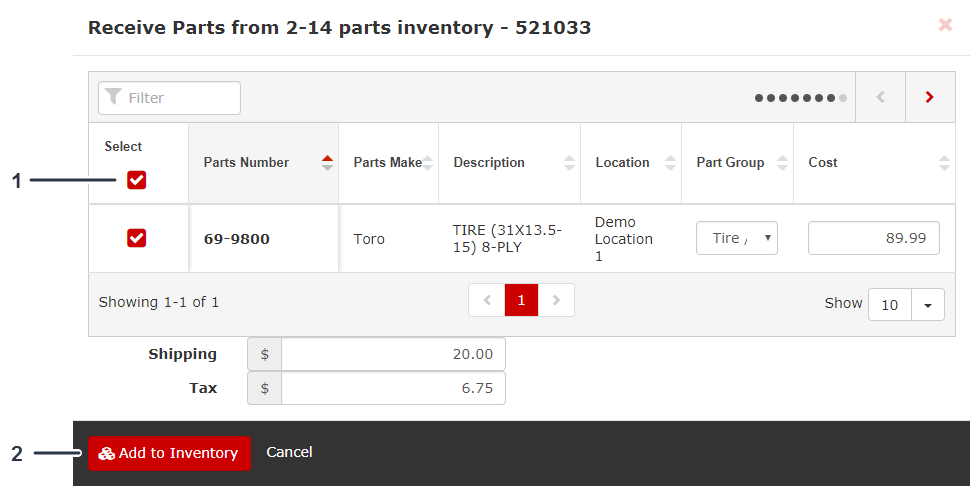
Receiving Parts into Inventory
-
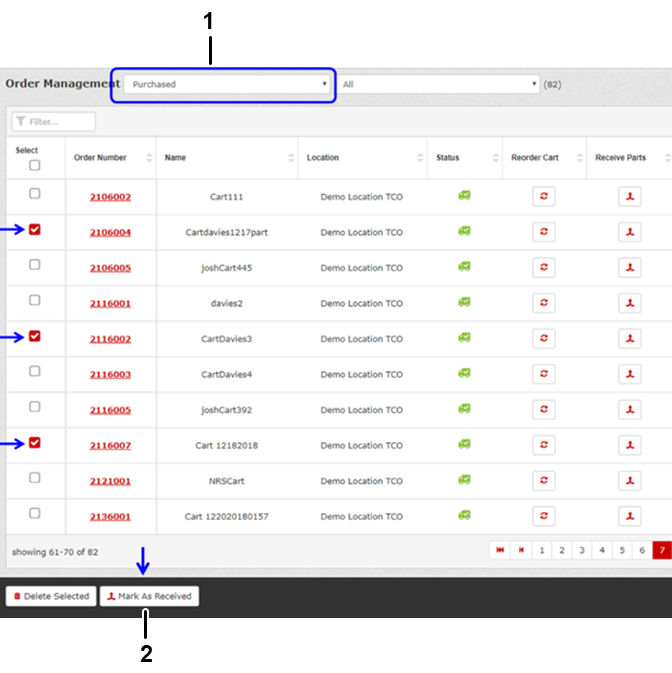
Click the Order Management tab (Figure 77).
-
Select Purchased orders to view the orders that were placed, but you have not received, and orders that you received (Figure 77).
-
After receiving your parts, click the Receive Parts icon to view the parts from that order (Figure 77).

-
Select the parts you received, then, if necessary, adjust the Part Group they belong to, the cost, and/or the quantity of each part received (Figure 78).
Note: You can also adjust the shipping and tax costs before adding the parts to your inventory.
-
Click Add to Inventory to add the selected parts to your inventory (Figure 78).
Note: If this was done properly, you should receive a message indicating that you successfully received the parts into your inventory.
Adding a Parts Inventory to a Task
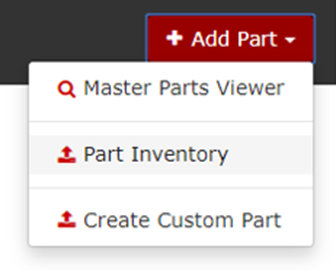
To quickly load large parts inventories to a Task Record, you can upload a Part Inventory using the Add Part feature.
-
From a Task Record, click Add Part, then click Part Inventory (Figure 79).
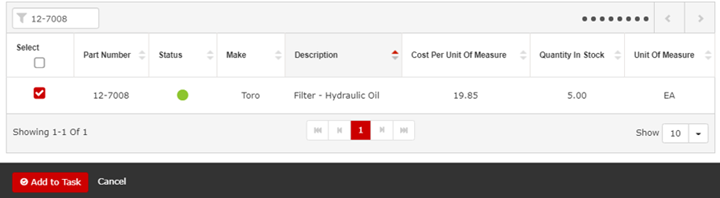
The Add Parts to Task screen will display with a subset of Parts Data, including the Part Number, Status, Make, Description, Cost per Unit of Measure, Quantity in Stock, and Unit of Measure (Figure 80).

-
Once you find the part you want to add, select the part and click Add to Task (Figure 81).
-
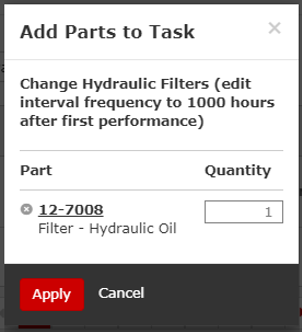
From the pop-up screen enter the Quantity and click Apply (Figure 82).
-
Click Save.
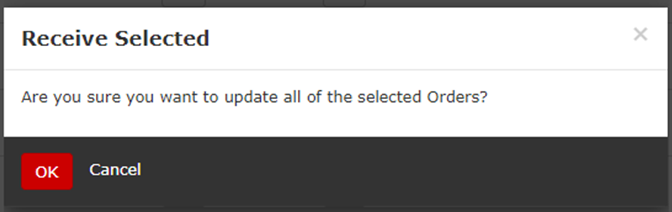
Receiving Multiple Orders
This feature allows you to select multiple carts and change their status to Received (but does not add the parts to Inventory) at the same time.
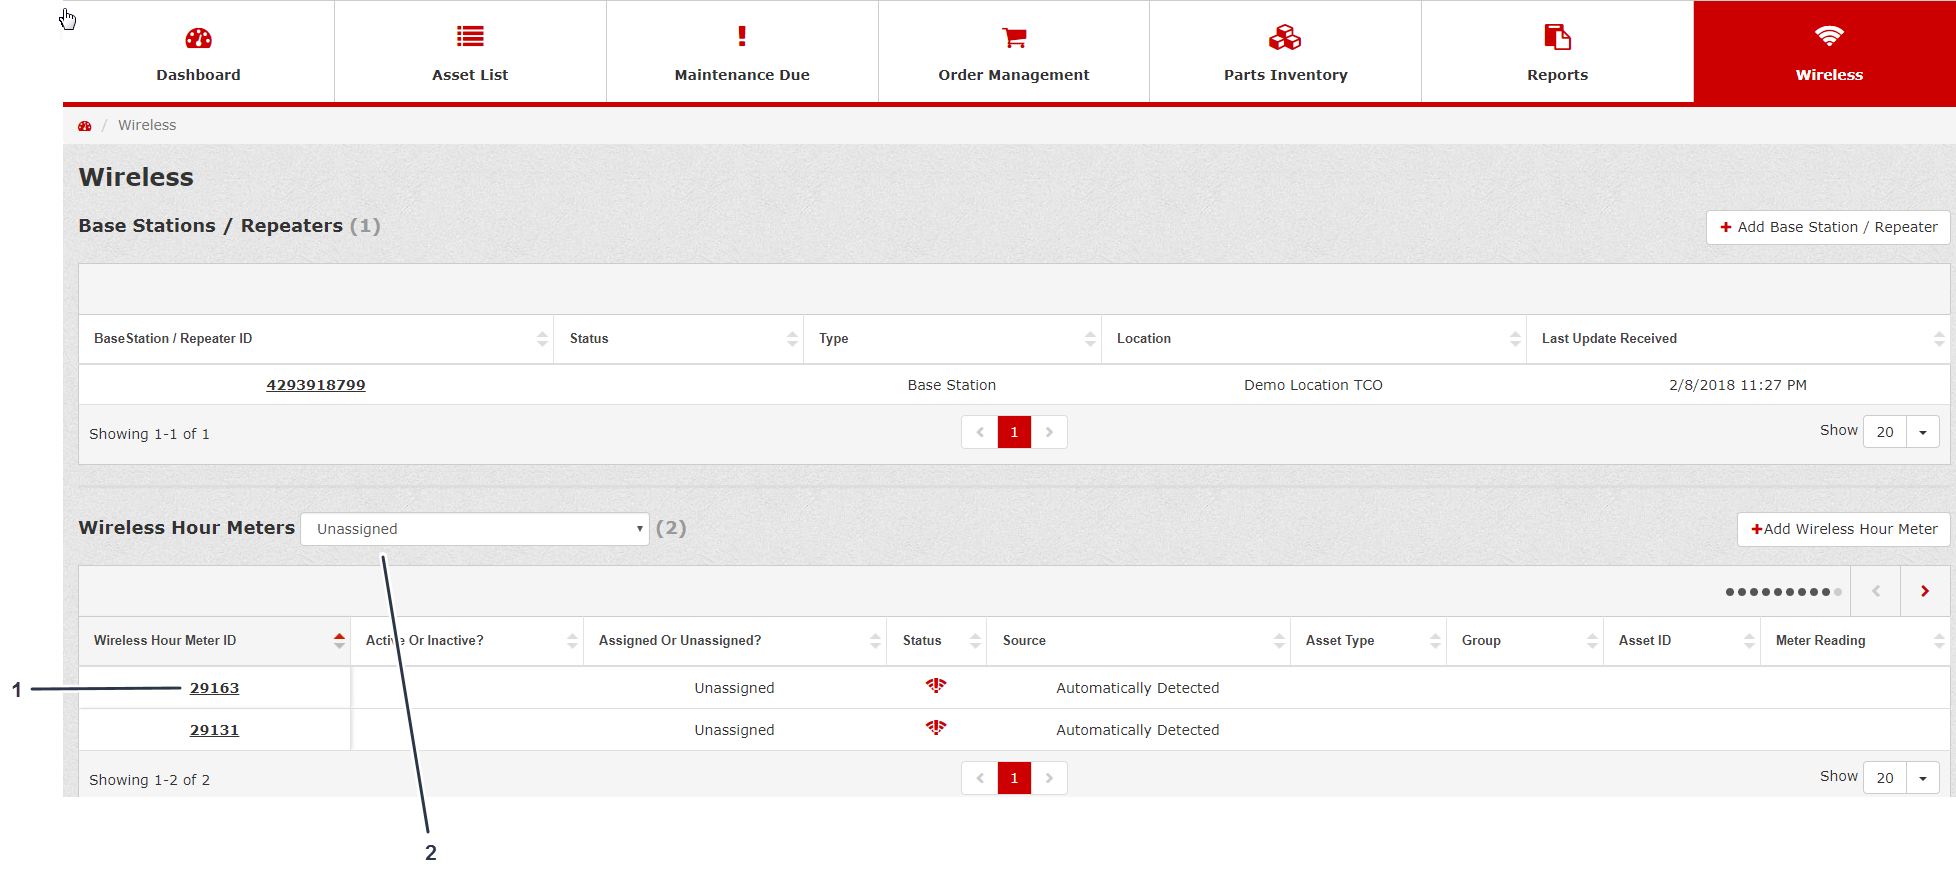
Assigning a Wireless Hour Meter
-
Click the Wireless tab (Figure 85).
-
Under Wireless Hour Meters, select Unassigned from the drop-down (Figure 85).
-
Click the desired Wireless Hour Meter ID (Figure 85).
-
From the Wireless Hour Meter Record, select the Location, Asset Type, Group, and Asset ID that you would like to assign the wireless hour meter with (Figure 86).
-
Enter the Meter Reading shown on your wireless hour meter (Figure 86).
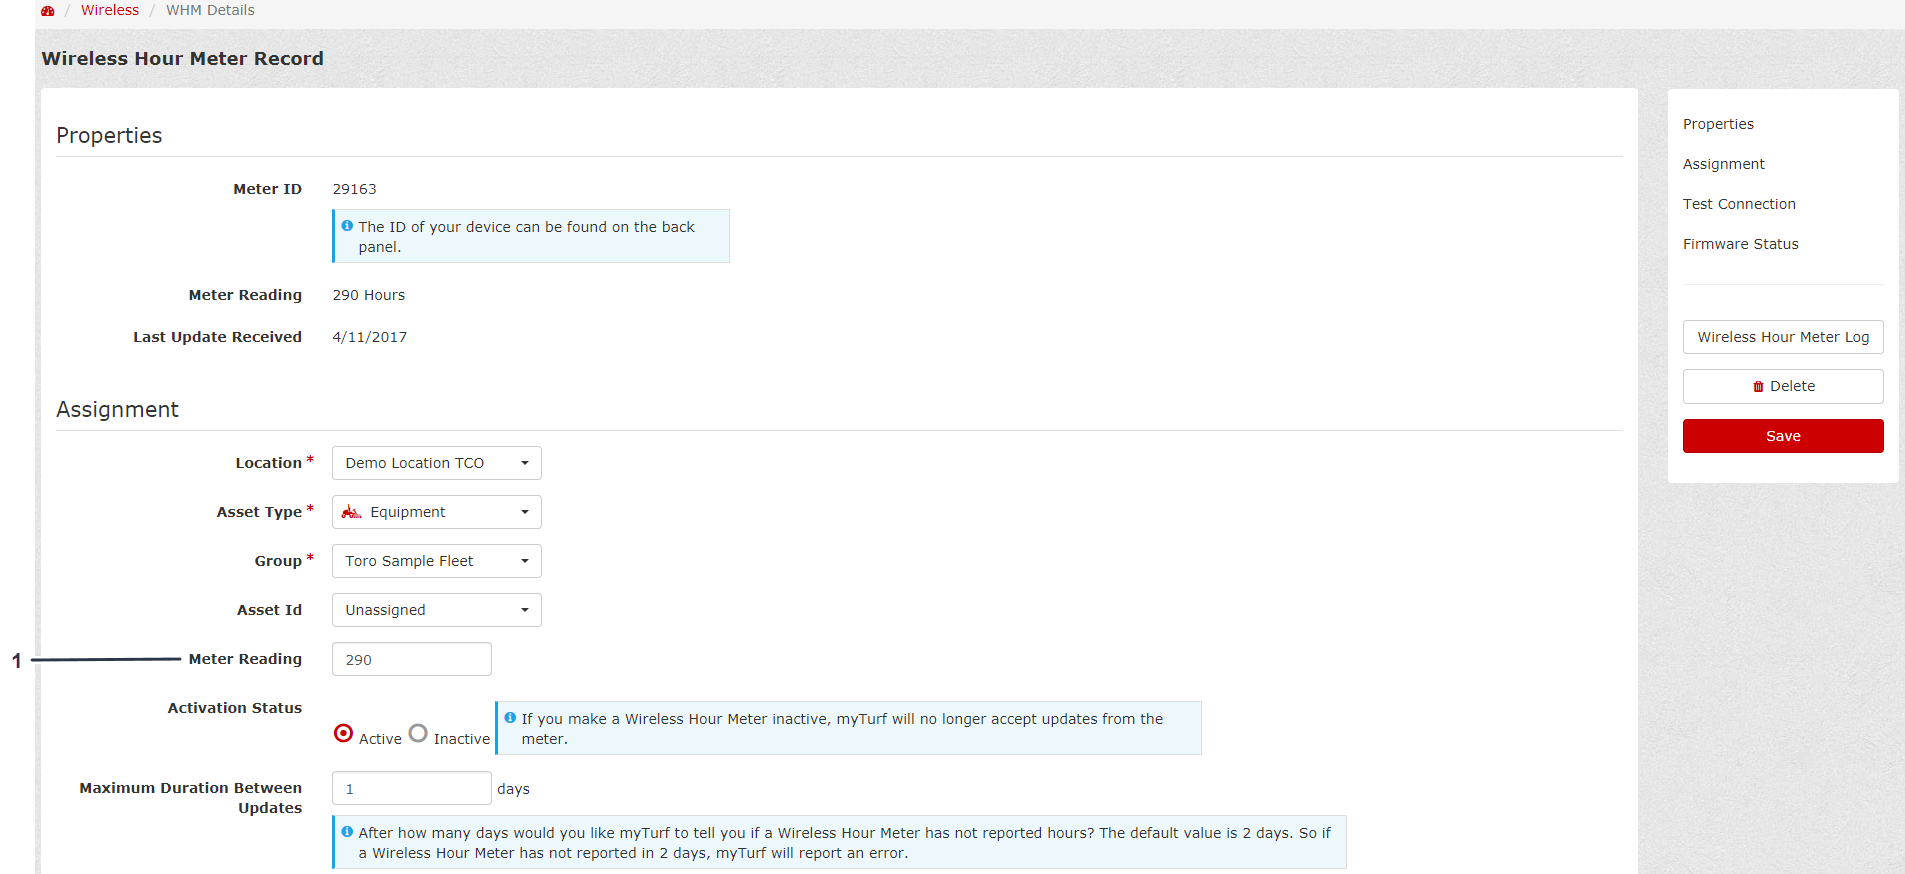
-
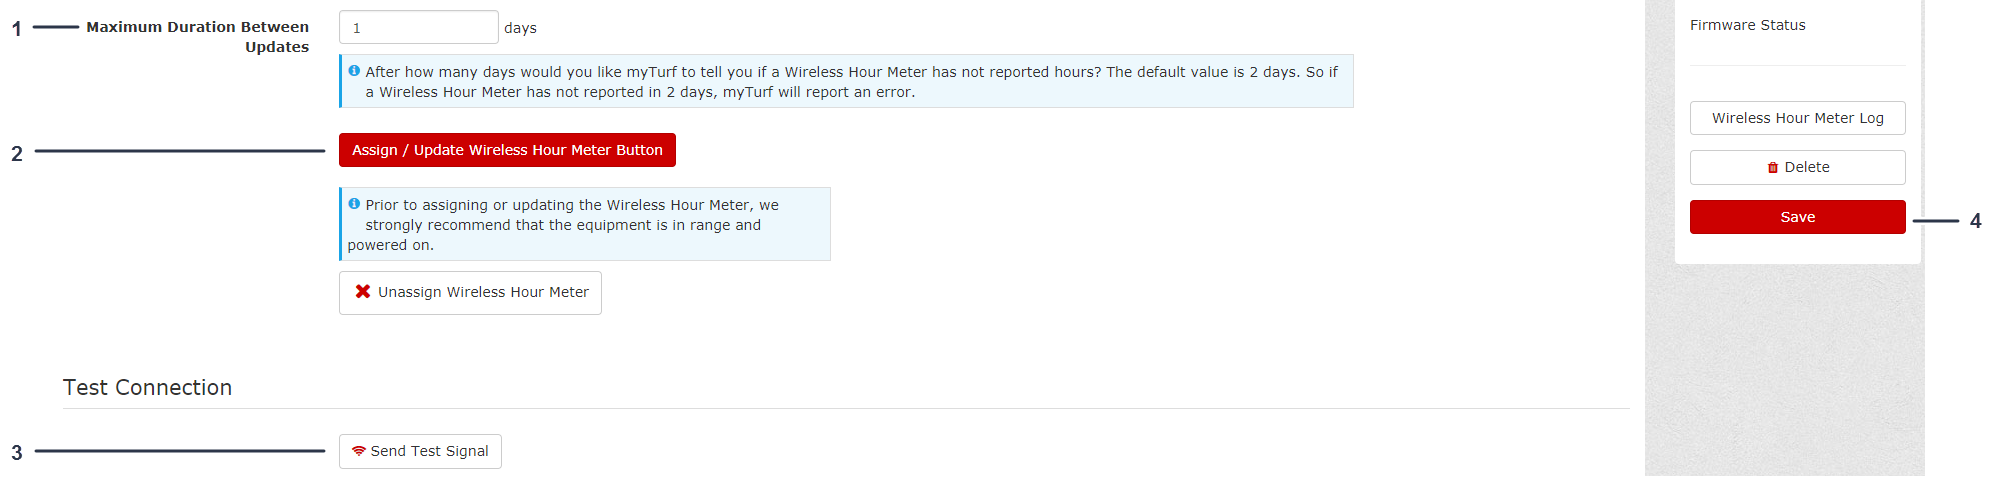
Enter the desired Maximum Duration Between Updates (Figure 87).
-
Click Assign/Update Wireless Hour Meter (Figure 87).
Note: Prior to assigning or updating the wireless hour meter, park the machine within range of the wireless hour meter, and ensure that it is in the ON position.
-
Click Send Test Signal to test the connection (Figure 87).
-
After successful connection, click Save on the right side of the screen (Figure 87).
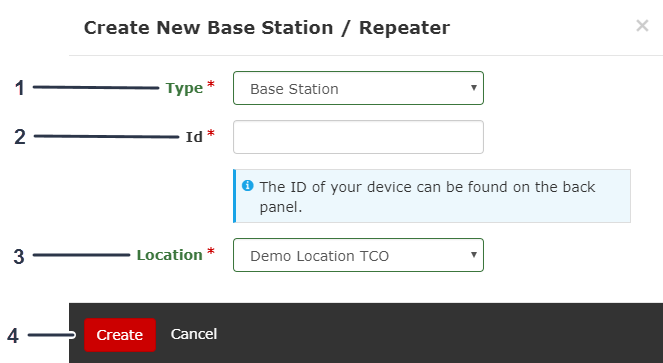
Adding a Base Station/Repeater
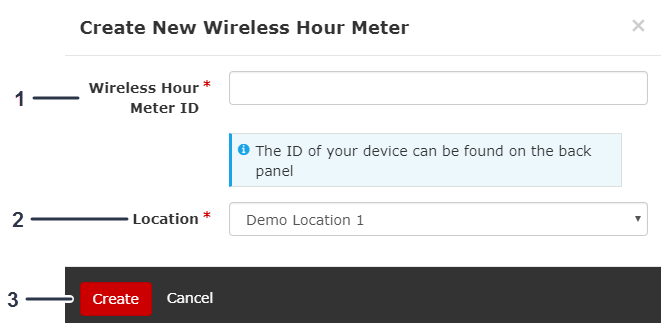
Adding a Wireless Hour Meter
Filtering the Wireless Hour Meter IDs
From the Wireless Hour Meters screen, enter the wireless hour meter ID or asset ID to filter the results (Figure 91).
Managing Attachments
Managing the Preventive Maintenance Schedule
When you load an asset into myTurf, the Preventive Maintenance Schedule for that asset automatically populates.
Accessing the Maintenance Schedule
Downloading a Maintenance Schedule
Click the Download (.xlsx) button to download your Preventive Maintenance Schedule.
Adding a Maintenance Task
If there are maintenance tasks not listed in the Preventive Maintenance Schedule, you can manually add them.
When adding a maintenance task, you can choose one of the following task types:
-
Scheduled Maintenance
-
As Needed Inspection
-
Daily Checks
-
Break-In Maintenance
Copying a Maintenance Task
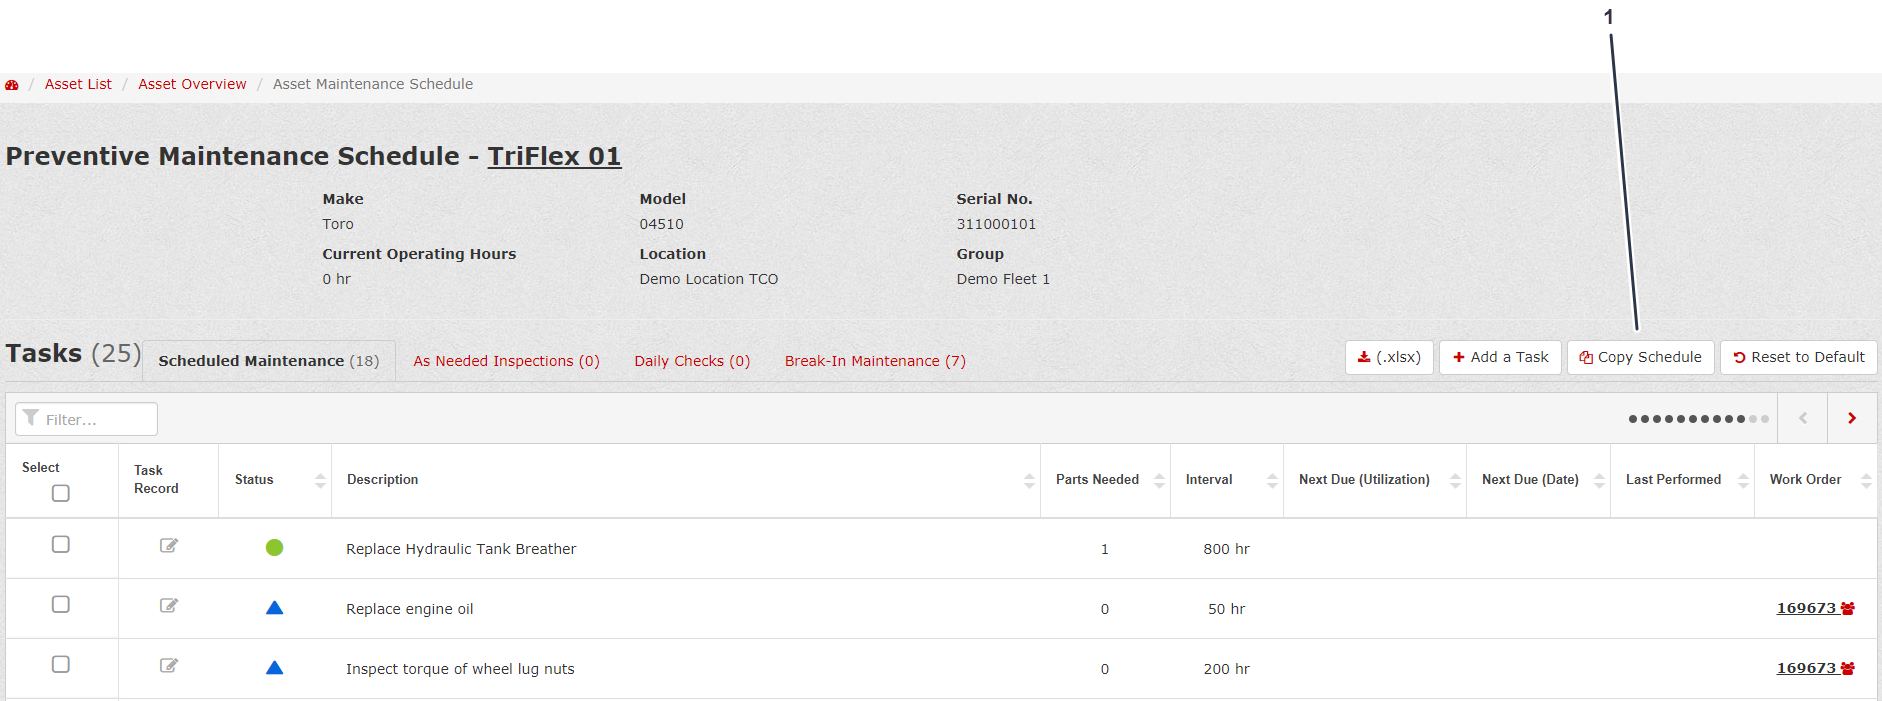
You can copy a maintenance task to your asset from another asset in your fleet by clicking Copy Schedule from the Preventive Maintenance Schedule screen (Figure 97).
Resetting the Preventive Maintenance Schedule
You can reset the Preventive Maintenance Schedule to the Toro default schedule by clicking Reset to Default from the Preventive Maintenance Schedule screen (Figure 97).
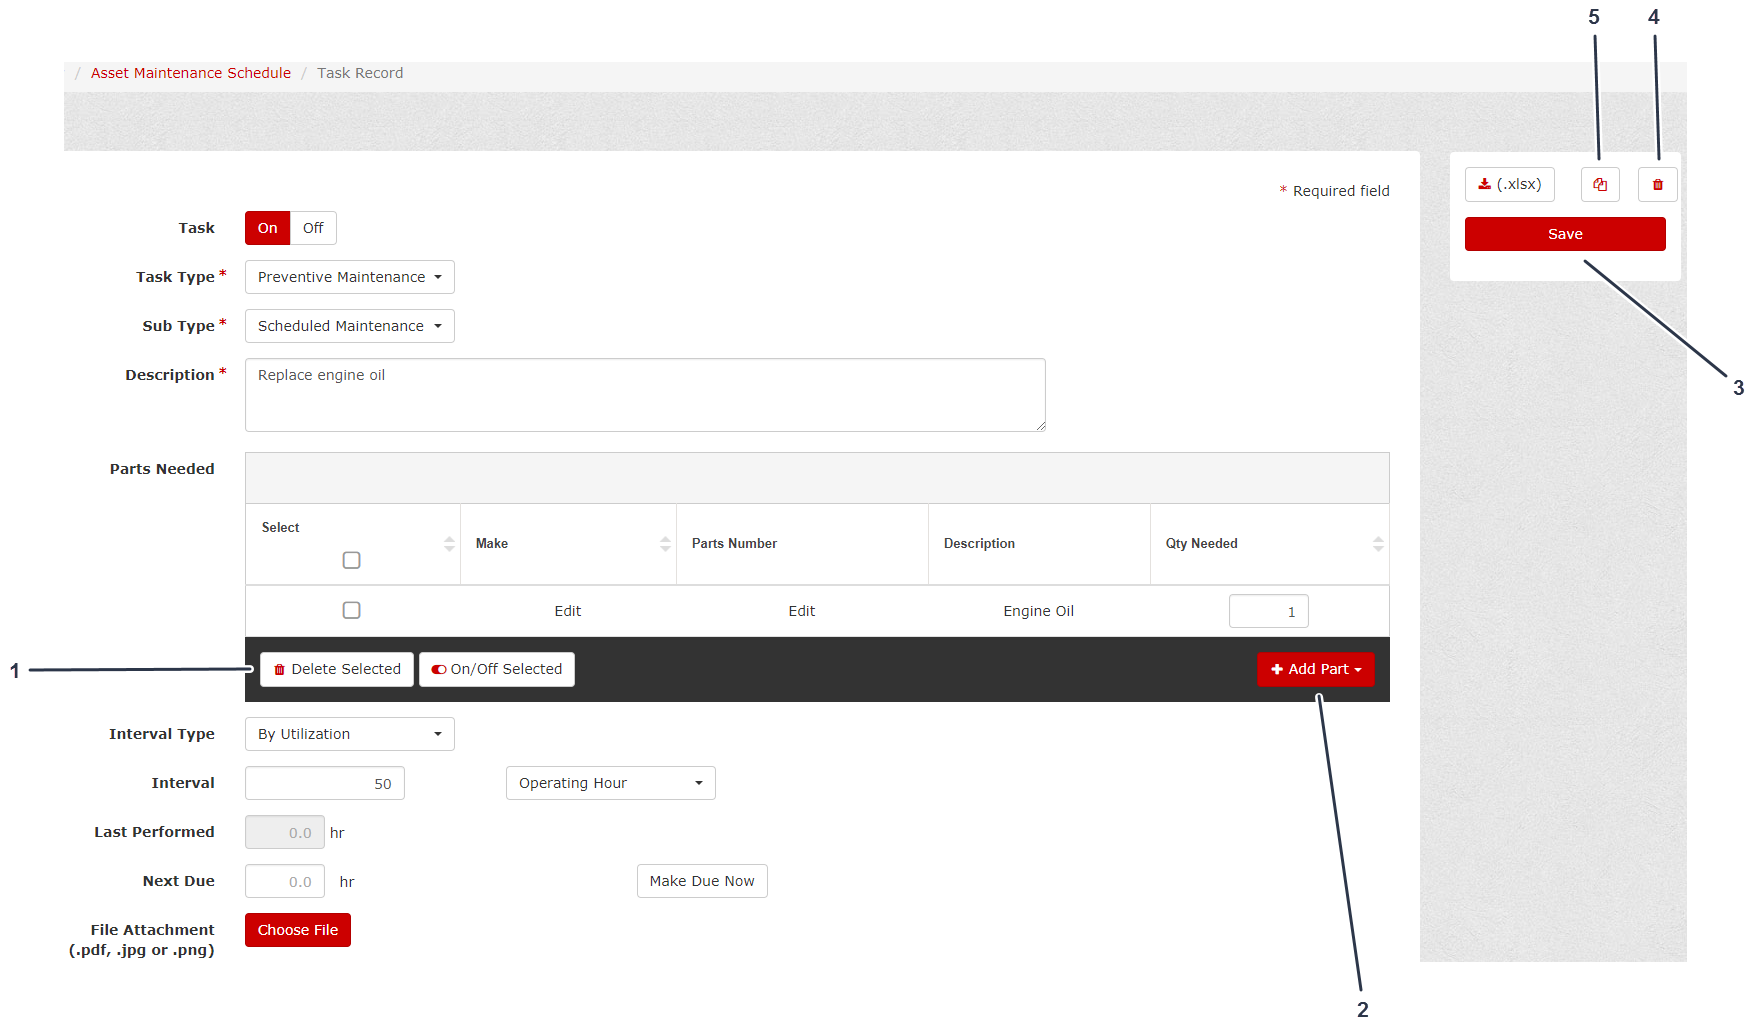
Editing a Maintenance Task
-
From the Preventive Maintenance Schedule screen, click the Task Record icon (Figure 97).
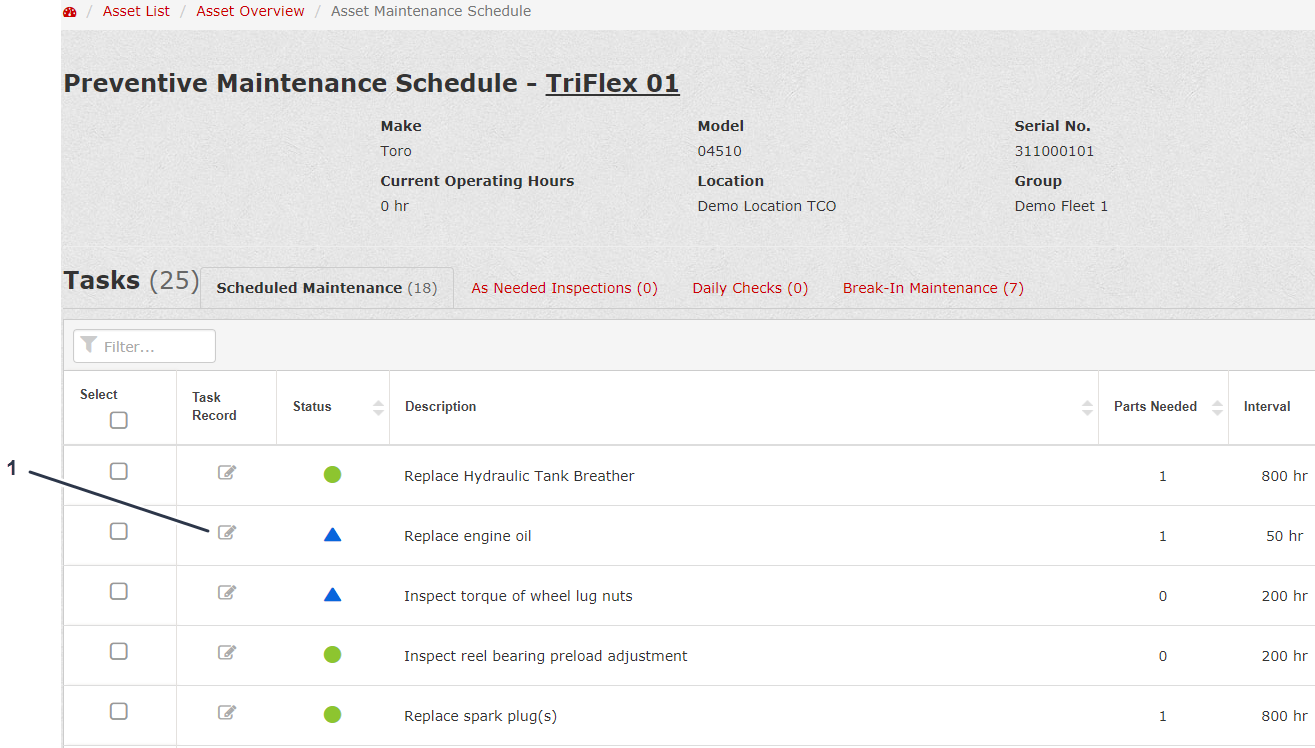
-
From the Task Record screen, you can turn the Task to the ON or OFF position, edit the Task Type, Sub Type, Description, Parts Needed for the task (you can add or delete parts here), Interval Type, Interval, when the task is Next Due, and you can attach a file for the task (Figure 98).
-
After you edit the task, click Save (Figure 98).
Multi-Selecting a Make Due Now Maintenance Schedule
This functionality in the Preventive Maintenance Schedule allows you to select multiple Tasks and make them all due now at the same time.
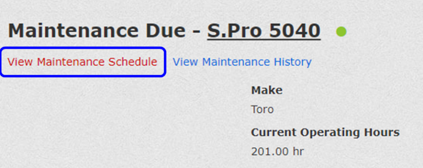
If you are starting from the Asset—Maintenance Due, do the following:
-
Click View Maintenance Schedule (Figure 99).
-
From the new Maintenance Schedule tab, select the tasks that you want to Make Due Now, and click Make Due Now (Figure 100).
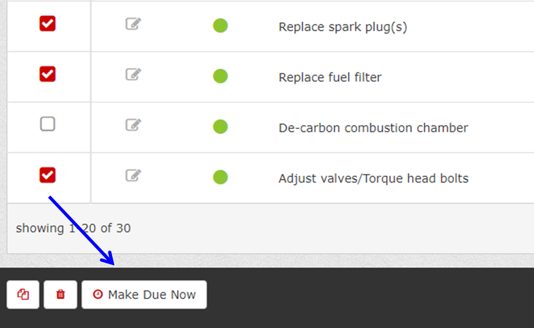
-
Click Continue (Figure 101).
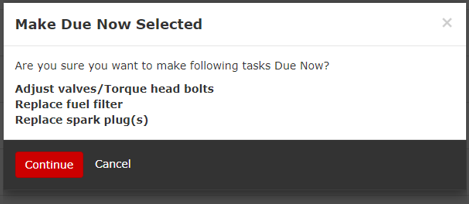
Note: You will automatically return to the Asset—Maintenance Due screen with the Due Now tasks visible (Figure 102).
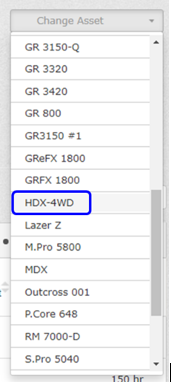
Changing the Selected Asset in Maintenance Due
The Change Asset drop-down menu allows you to switch the Maintenance Due list of a different Asset without returning to the Asset List.
From the Maintenance Due menu, click the Change Asset drop-down menu (Figure 103) and select the Asset ID of the Asset that you want to change to in Maintenance Due (Figure 104).

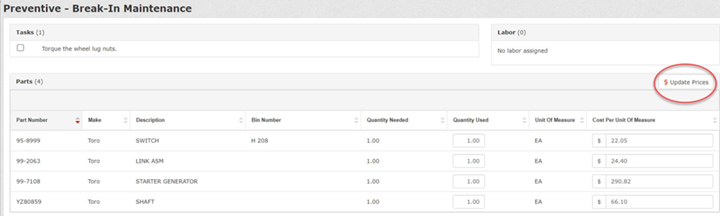
Updating the Parts Prices for a Maintenance Task
While in the work order for a specific maintenance task, click Update Prices to update the prices for the parts used in the maintenance task (Figure 105).
Managing Work Orders
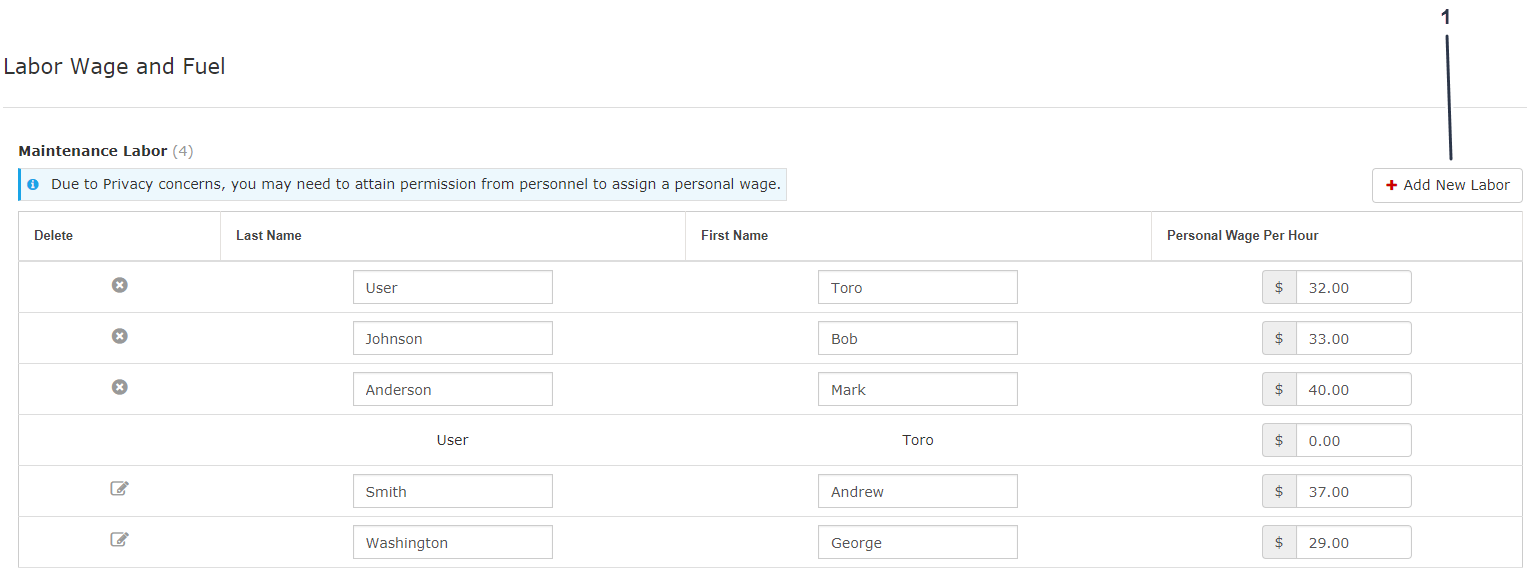
Adding Maintenance Labor
-
From the Dashboard, click Admin, located in the upper, right corner of the screen (Figure 106).
-
Click the Edit Location Icon (Figure 107).
-
From the Location Record, click Add New Labor (Figure 108).
-
Enter the individual’s name and their wage per hour (Figure 108).
-
Click Save on the right side of the screen.
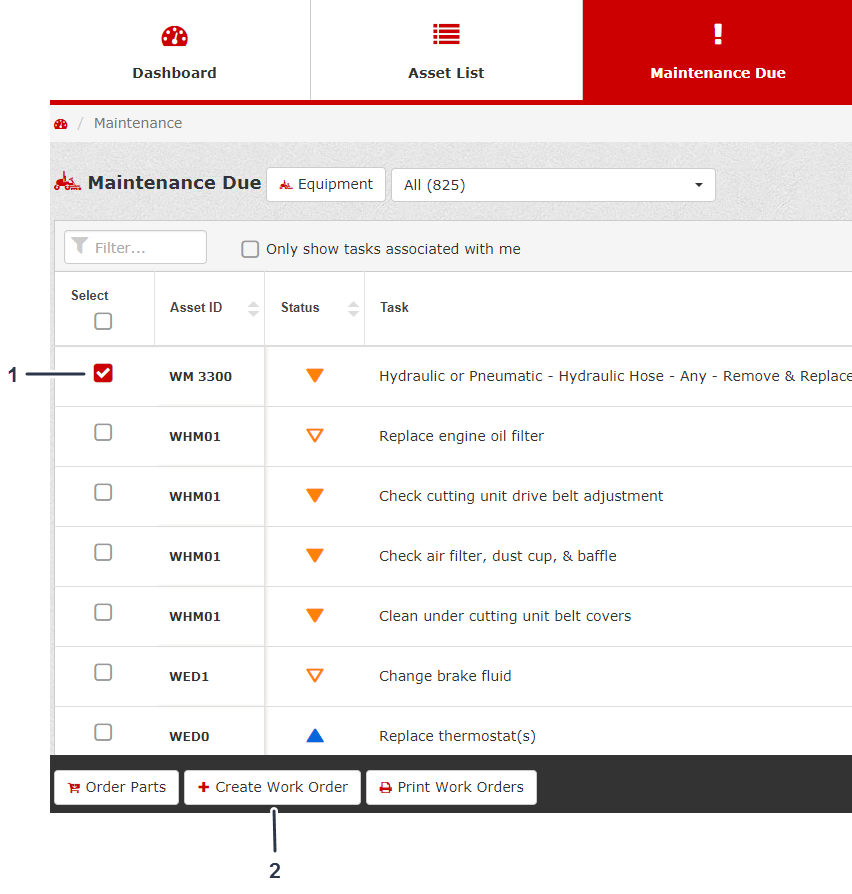
Creating a Work Order
-
Click the Maintenance Due tab (Figure 109).
-
Select the Task in the list that you need to create a work order for, and click Create Work Order (Figure 109).
-
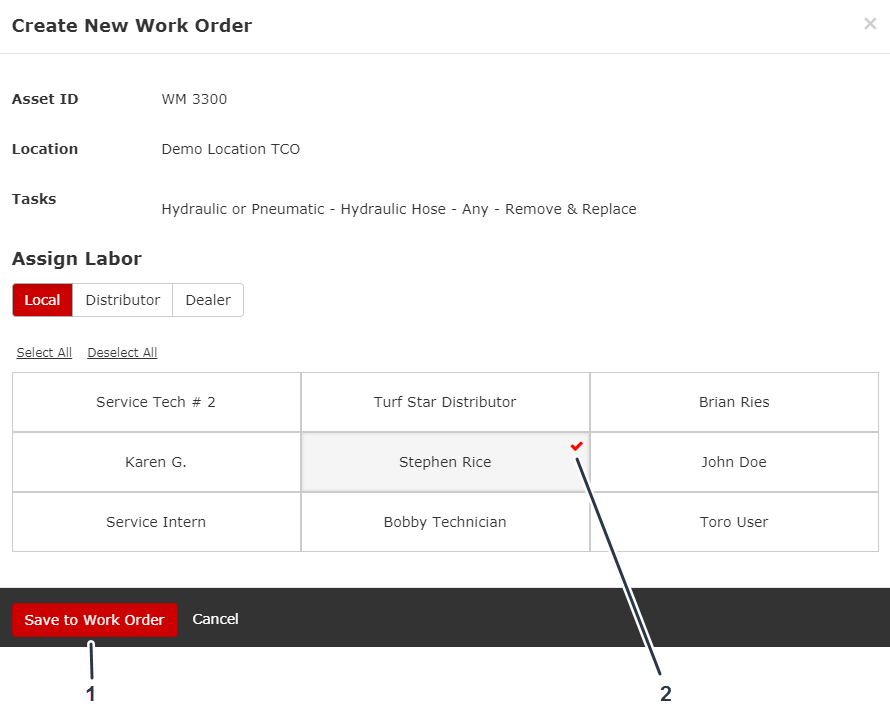
Complete the Create New Work Order form by selecting the individual that you want to assign the work order to and click Save to Work Order (Figure 110).
Completing a Work Order
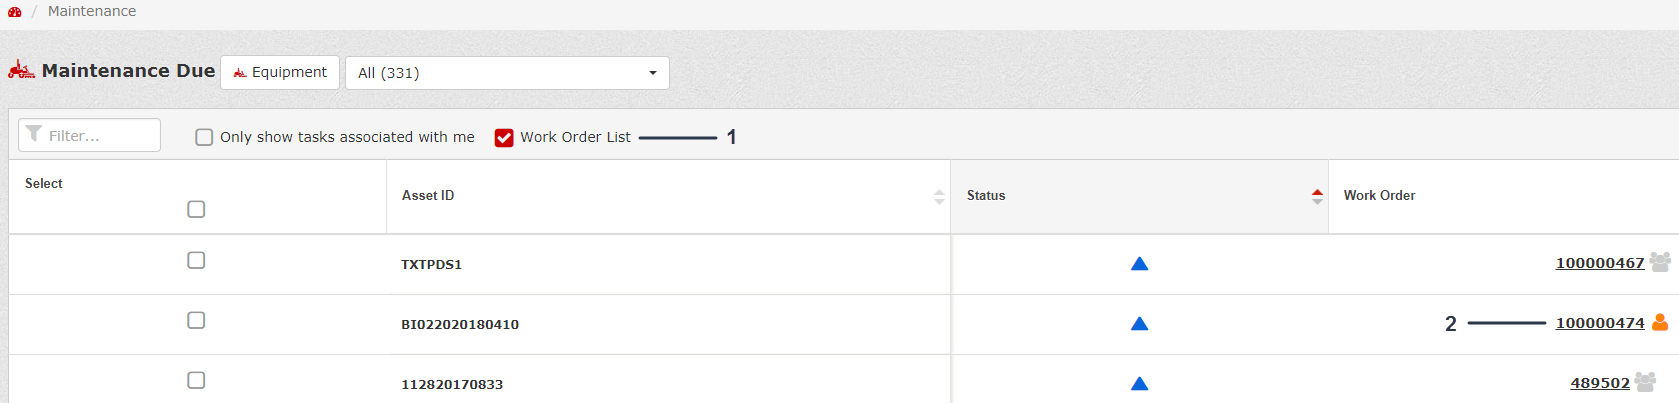
Completing a Work Order by Work Order List
-
After creating the work order, select Work Order List (Figure 111).
-
Click a work order number (Figure 111).
-
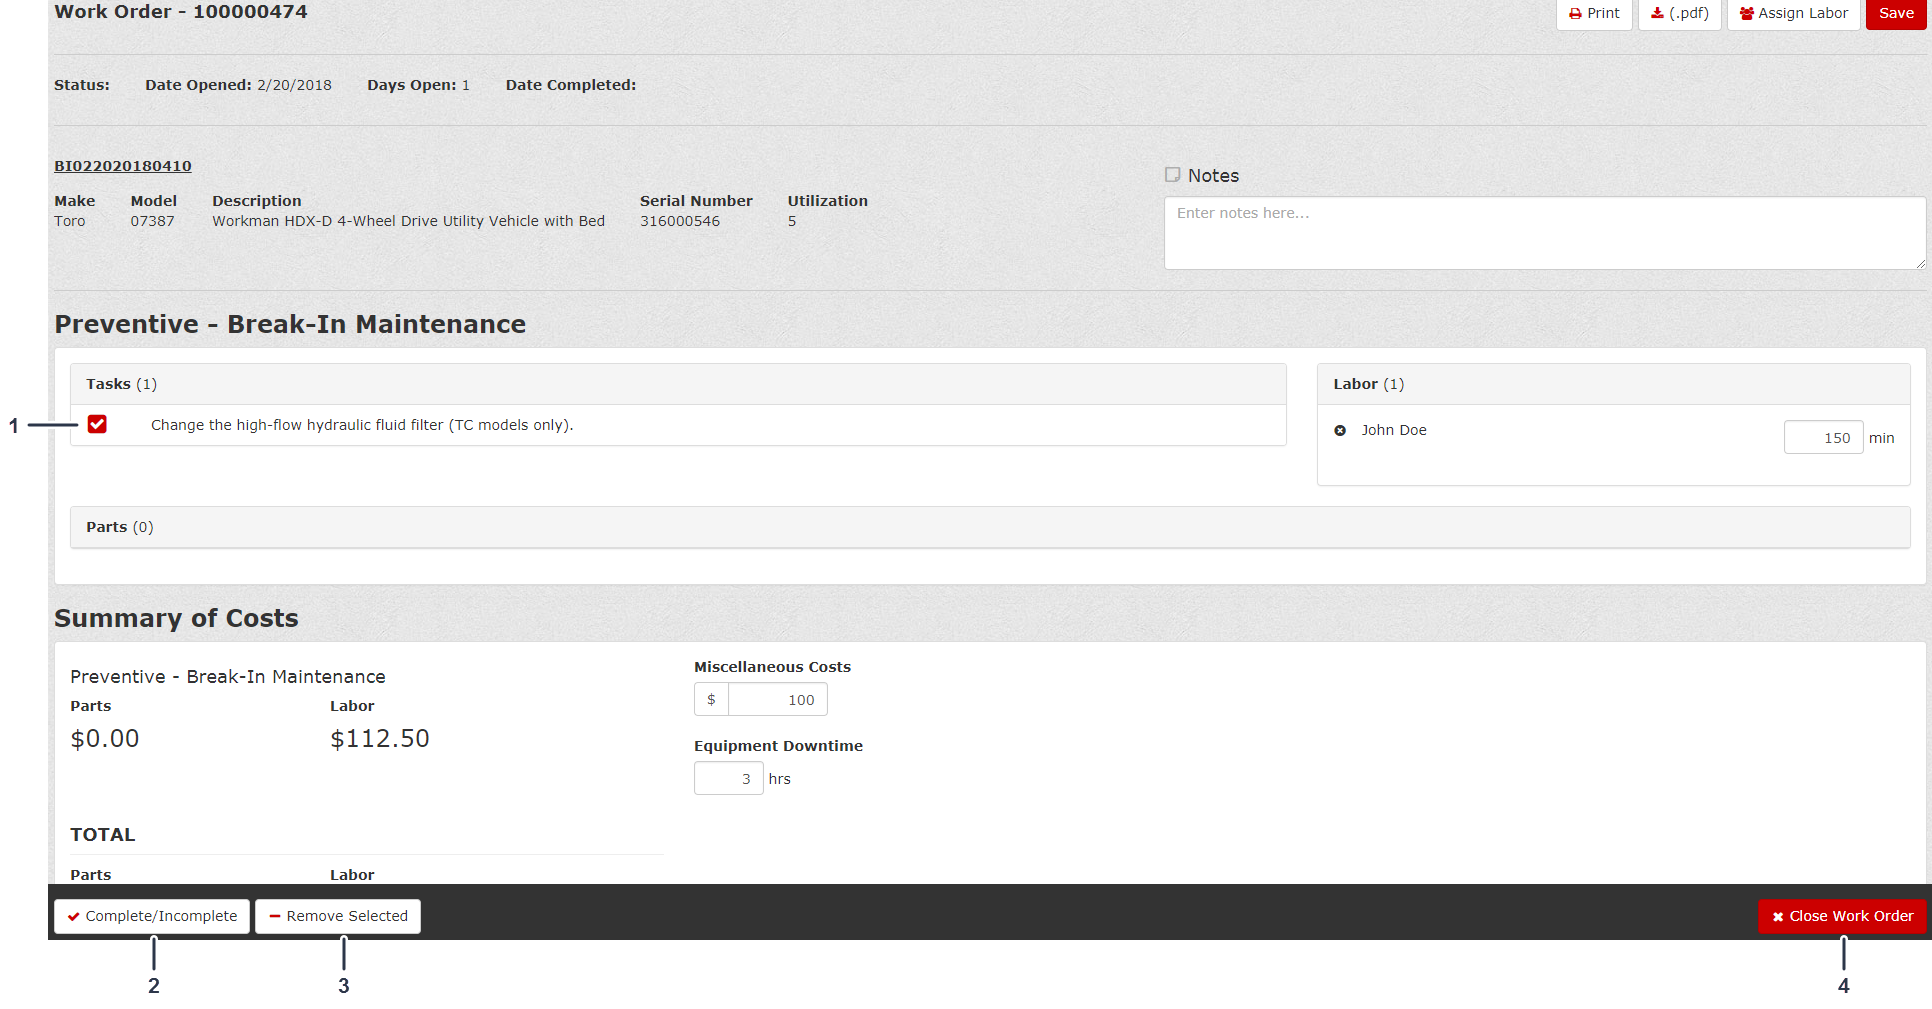
Check the tasks completed in the work order, enter the time the individual spent on the task, enter any associated miscellaneous costs, and record any equipment downtime that occurred during the task (Figure 112).
-
Click Complete/Incomplete (Figure 112).
-
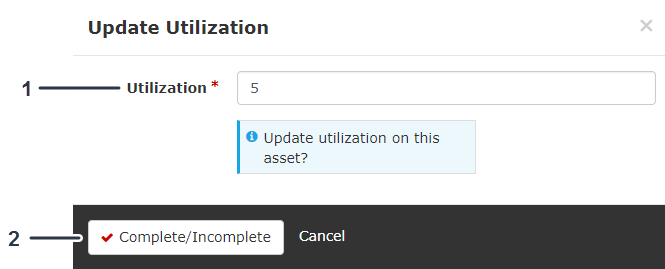
Enter the updated Utilization and click Complete/Incomplete (Figure 113).
Completing a Work Order by Task List
-
After creating the work order, click the Work Order number on the right side of the screen (Figure 114).
-
Check the tasks completed in the work order, enter the time the individual spent on the task, enter any associated miscellaneous costs, and record any equipment downtime that occurred during the task (Figure 115).
-
Click Complete/Incomplete to complete the work order (Figure 115).
Note: You will receive a message indicating that you updated the work order and when you return to the screen, the completed tasks will have green check marks next to them.

-
Enter the updated Utilization and click Complete/Incomplete (Figure 116).
Closing a Work Order
After completing the work order, click Close Work Order (Figure 115).
Managing the Maintenance Schedule for an Asset
Accessing the Maintenance Schedule
Adding a Task to the Maintenance Schedule
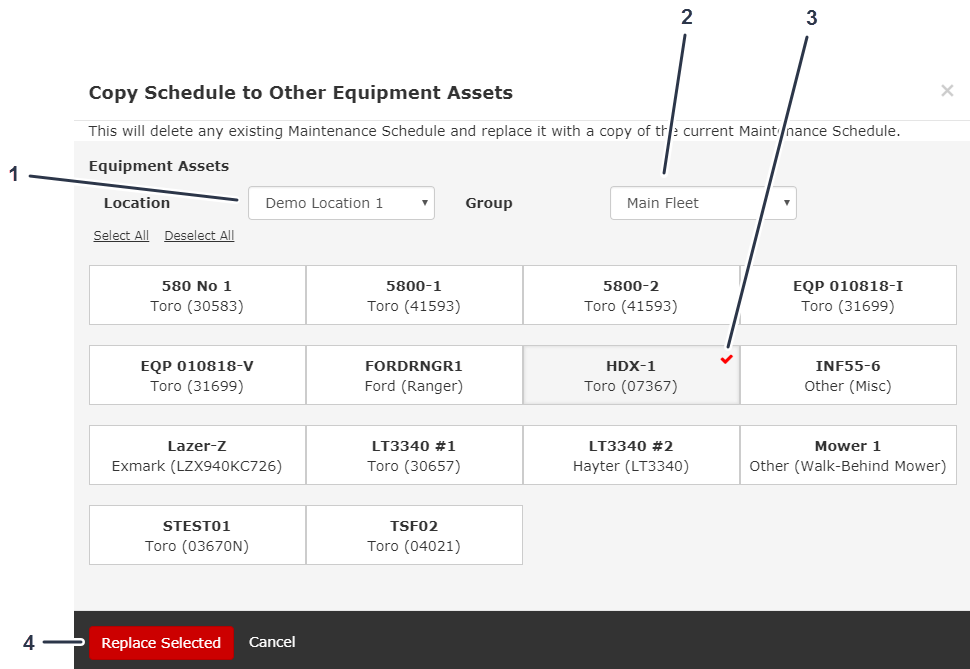
Copying a Maintenance Schedule to Other Equipment Assets
Note: Performing this task deletes any maintenance schedule and replaces it with a copy of the current maintenance schedule that you copy.
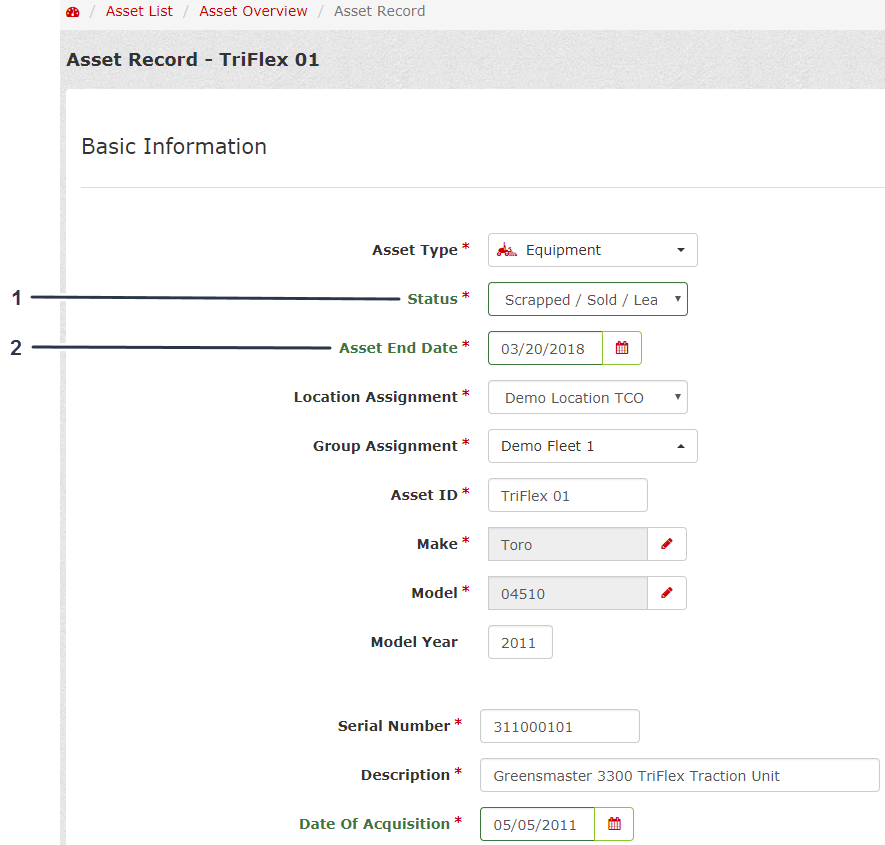
Retiring or Scrapping an Asset
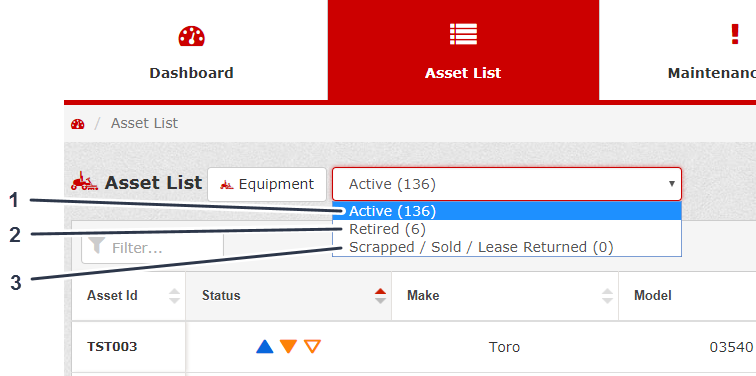
An asset can have 1 of the following 3 statuses:
-
Active—describes an asset that is currently being managed, operated, and is part of your maintenance program. You will receive maintenance alerts pertaining to an active asset.
-
Retired—describes an asset that is no longer active. You can still use the data of a retired asset in reports. Retired assets may still physically exist at your location, but is not in current use. You will not receive any maintenance alerts pertaining to a retired asset.
-
Scrapped/Sold/Lease Returned—describes an asset that is no longer in your possession. After a designated date, this asset will be deleted from your inventory and will no longer be available in reports.
From the any group of assets, you can select 1 of the 3 statuses. Within the Asset List, you can select from a drop-down list which asset state you want to view (Figure 123).
To retire an asset, select the desired asset in the Asset Record, then select Retired from the Status drop-down list (Figure 124). Save the edits to the Asset Record.
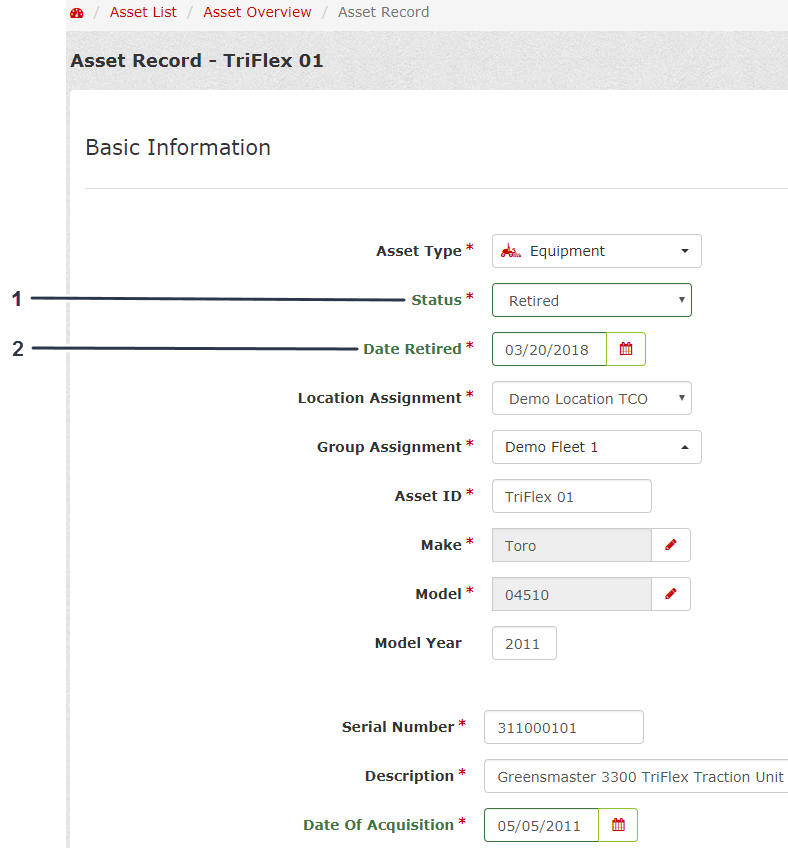
To delete an asset, select the desired asset in the Asset Record, then select Scrapped/Sold/Lease Returned from the Status drop-down list (Figure 125). Save the edits to the Asset Record.
Note: It is recommended that you set the Asset End Date as January 1 of the following year, but you can set it for the day, if desired.
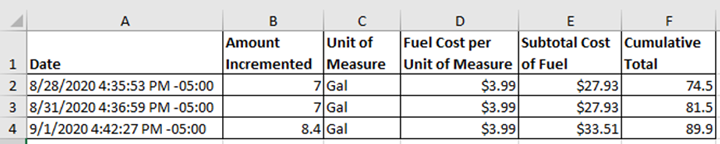
Tracking Fuel Usage and Cost
You can track fuel usage/cost for your equipment. This data is included in both the Utilization Report and the Total Cost of Ownership report.
There are 2 primary ways to track your fuel usage for equipment:
-
Entry of Fuel Fill (fill-up) amounts or update of Fuel Used Year-to-Date (YTD)
-
Use of an estimated amount/operating hour
Setting up the Location for Fuel Tracking
To set up fuel tracking, fill out the Fuel Cost table in your Location Record (Location Administration). In the table, you can update the Unit of Measure for each fuel type and the Fuel Cost per Unit of Measure (Figure 126).

Setting up Fuel Tracking for an Asset
-
From the Asset Overview, navigate to the Asset Record for which you would like to set up fuel tracking.
-
From the Asset Record, navigate to the Fuel Tracking section (Figure 127).
-
Select the method that you want to use for fuel tracking.
-
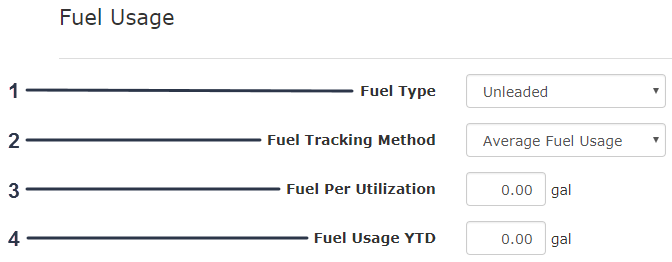
Average Fuel Usage:
Enter the Fuel Per Utilization and Fuel Usage Year-to-Date (YTD) as shown in Figure 128.
Note: The system automatically increments the Fuel Usage Year-to-Date (YTD) as the asset accrues operating hours or miles/km. This provides an estimated fuel usage.
-
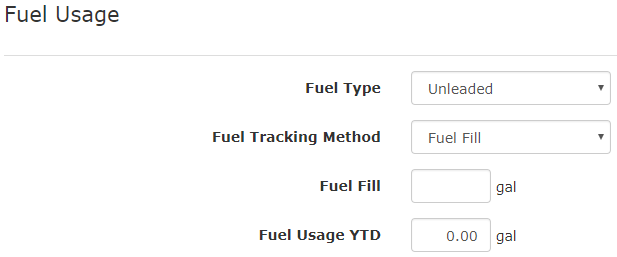
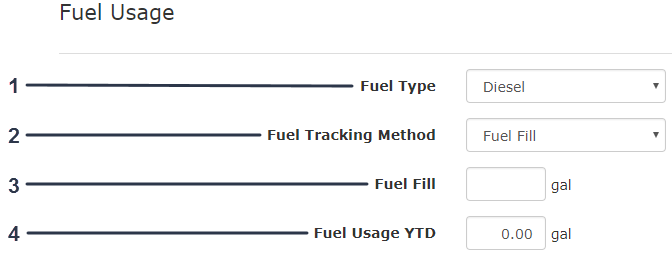
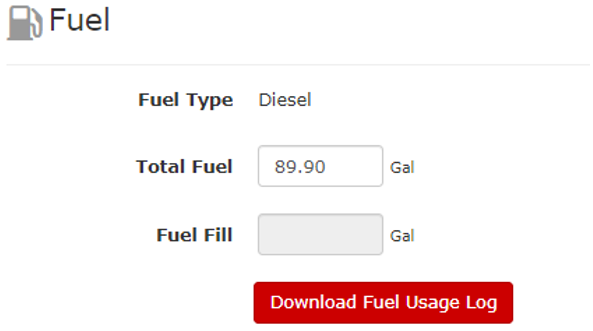
Fuel Fill:
Enter the Fuel Fill and Fuel Usage Year-to-Date (YTD) as shown in Figure 129.
Note: The fill amount increments the Fuel Usage Year-to-Date (YTD) by that amount.
-
Generating Reports
Note: If your selected report has no data, a spreadsheet does not generate.
-
Click the Reports tab (Figure 130).
-
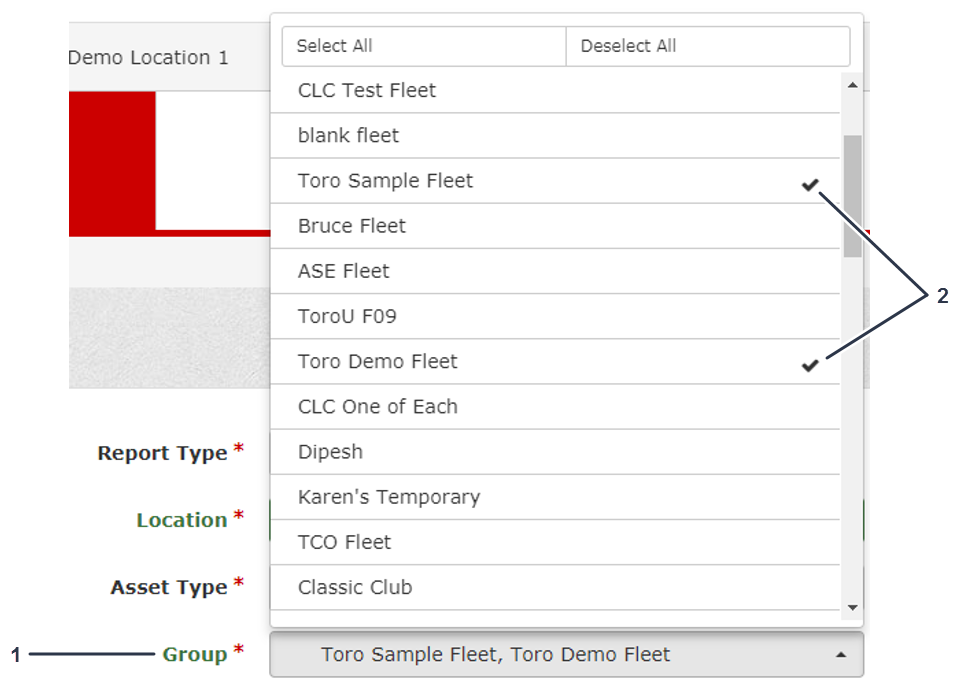
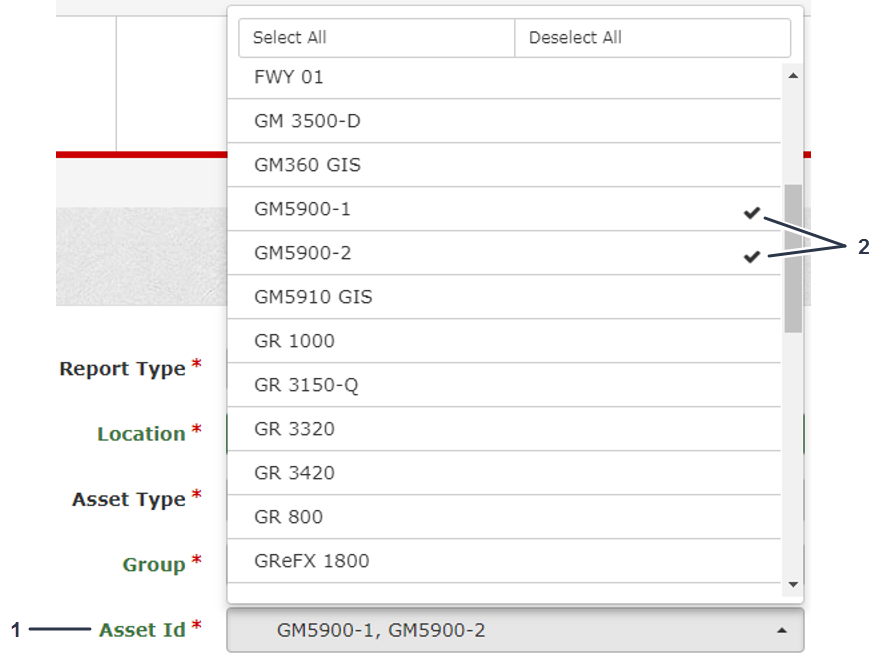
Select which Report Type you want to generate, the Location, Asset Type, Group, Asset ID, and Date Range (Figure 130).
Note: If you select Asset Utilization, Location Maintenance Cost, or Maintenance Due and Parts Needed as the Report Type, you can select 1, multiple, or all Groups or Asset IDs (Figure 131 and Figure 132).
Note: You can select from 5 types of reports; refer to Reports.

-
Click Generate Report (Figure 130).
Note: After you click Generate Report, the report generates as a spreadsheet.
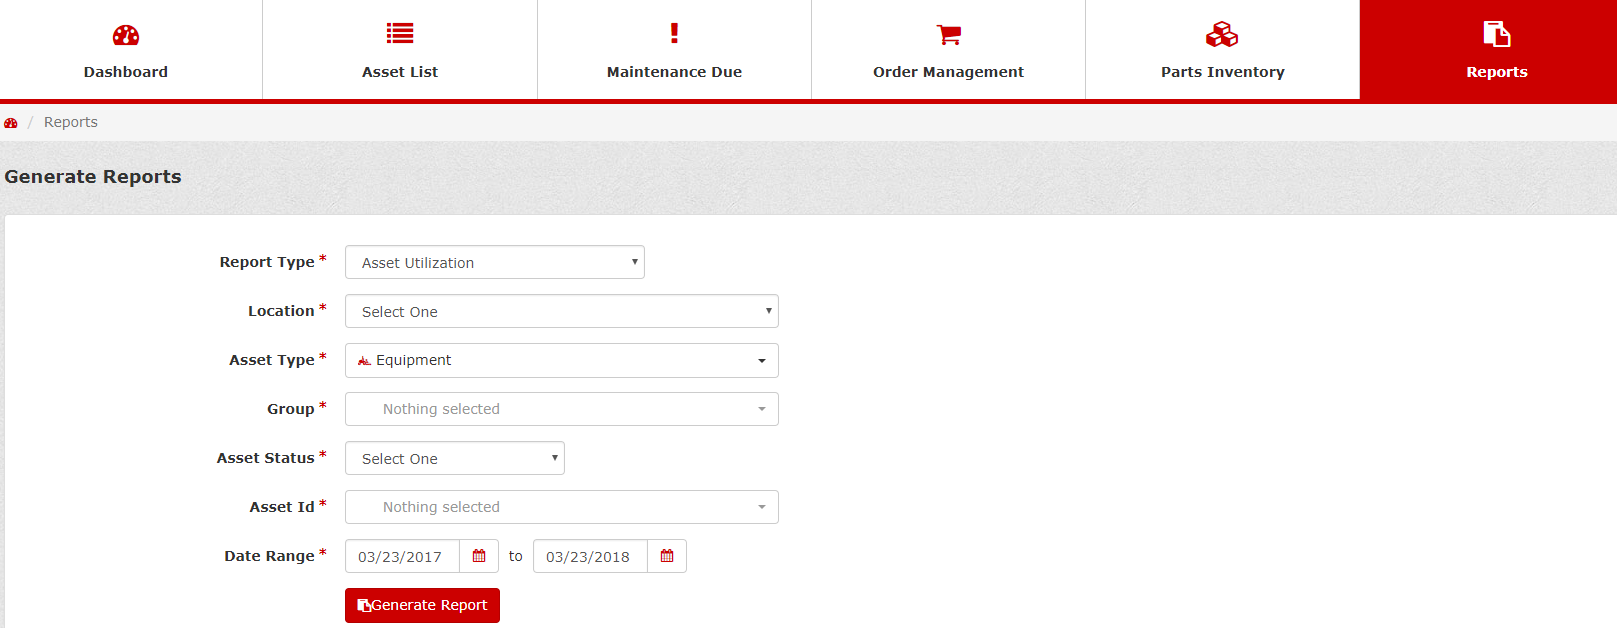
Generating an Asset Utilization Report
-
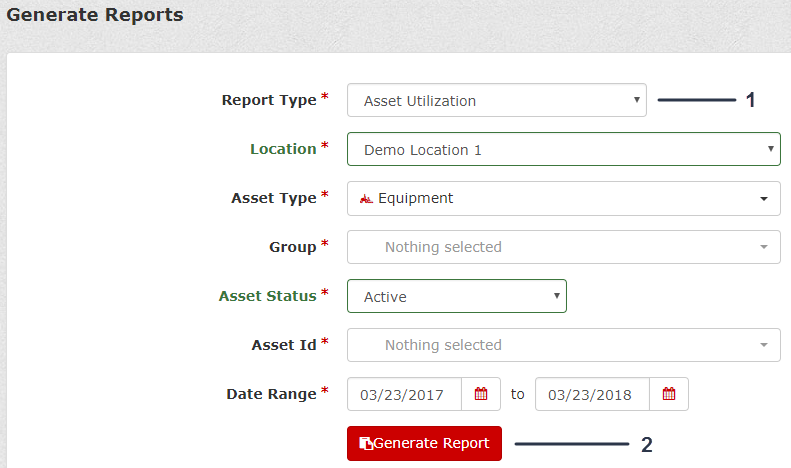
Select Asset Utilization as the Report Type (Figure 133).
-
Select the Location, Asset Type, Group, Asset Status, Asset ID, and Date Range (Figure 133).
-
Click Generate Report (Figure 133).
After you generate an Asset Utilization report, a spreadsheet generates with the Asset Code (Asset ID), Make, Model, Serial Number, Group, Utilization within Date Range, Fuel Usage within Date Range, Operating Labor Cost, Fuel Total Cost, Total Labor Cost, and Total Cost (Labor + Fuel).
Generating a Location Maintenance Cost Report
-
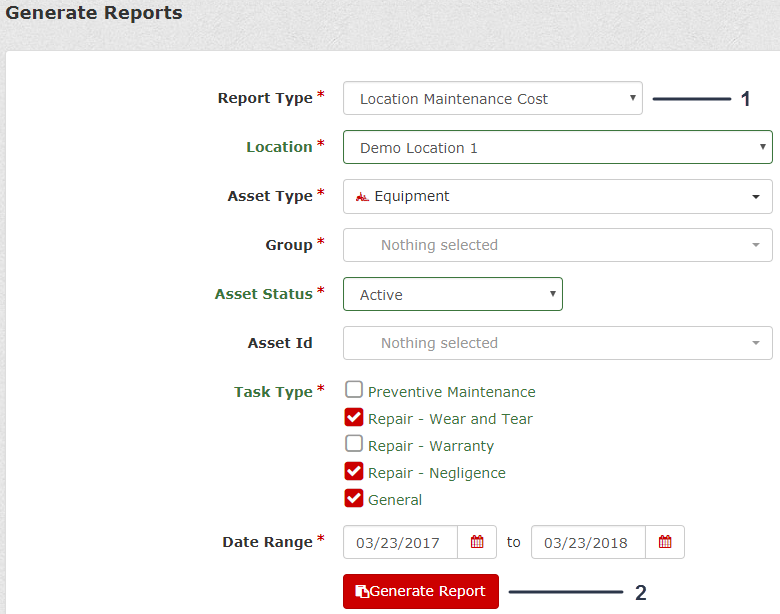
Select Location Maintenance Cost as the Report Type (Figure 134).
-
Select the Location, Asset Type, Group, Asset Status, Asset ID, Task Type, and Date Range (Figure 134).
-
Click Generate Report (Figure 134).
After you generate a Location Maintenance Cost report, a spreadsheet generates with the Asset Code (Asset ID), Preventive Maintenance Parts Cost, Preventive Labor Cost, Repair Part Cost, Repair Labor Cost, General Parts Cost, General Labor Cost, Miscellaneous Cost, Downtime Days, and Report Totals.
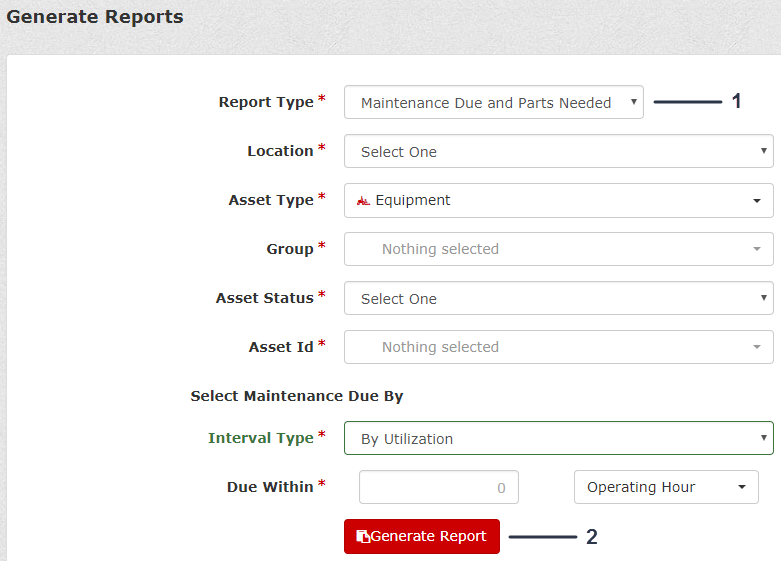
Generating a Maintenance Due and Parts Needed Report
-
Select Maintenance Due and Parts Needed as the Report Type (Figure 135).
-
Select the Location, Asset Type, Group, Asset Status, Asset ID, Interval Type (Utilization or Date), and Due Within (Operating Hour, Mile, or Kilometer) as shown in Figure 135.
-
Click Generate Report (Figure 135).
After you generate a Location Maintenance Cost report, a spreadsheet generates with the Asset Code (Asset ID), Make, Model, Serial Number, Current Utilization (total), Task, Task Type, Next Due (utilization or date), Parts Needed, and Quantity Available.
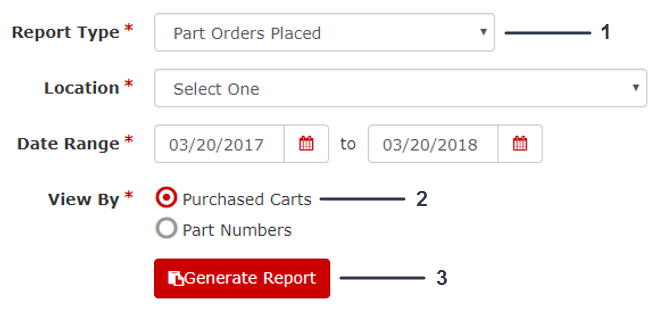
Generating a Parts Orders Placed Report
For Purchased Carts
-
Select Parts Orders Placed as the Report Type (Figure 136).
-
Select the Location, Date Range, and View By Purchased Carts (Figure 136).
-
Click Generate Report (Figure 136).
After you generate a Parts Orders Placed report, a spreadsheet generates with the Cart Name, Order Number, Date Placed, Created By (user), Number of Parts (total number of items in the cart), Part Total Cost, Shipping Cost, Tax Cost, and Summary (report totals).
For Part Numbers
-
Select Parts Orders Placed as the Report Type (Figure 137).
-
Select the Location, Date Range, and View By Part Numbers (Figure 137).
-
Click Generate Report (Figure 137).
After you generate a Parts Orders Placed report, a spreadsheet generates with the Make, Part Number, Description, Quantity Ordered, Unit Price Cost, Extended Total (part quantities cost), and Summary (report totals).

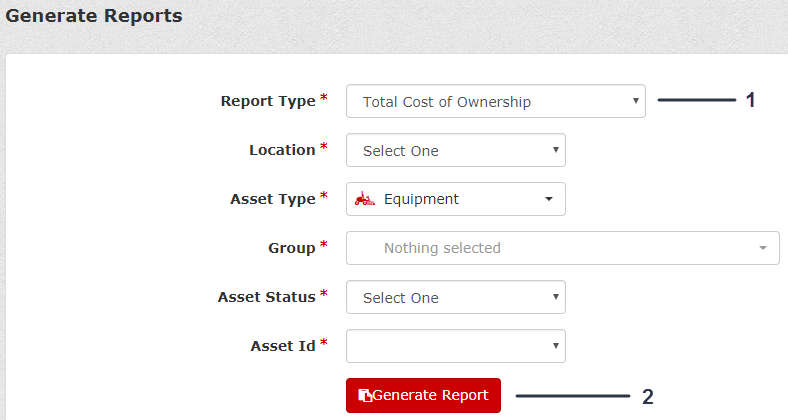
Generating a Total Cost of Ownership Report
-
Select Total Cost of Ownership as the Report Type (Figure 138).
-
Select the Location, Asset Type, Group, Asset Status, and Asset ID (Figure 138).
-
Click Generate Report (Figure 138).
After you generate a Total Cost of Ownership report, a spreadsheet generates with full details of what an asset cost in total.
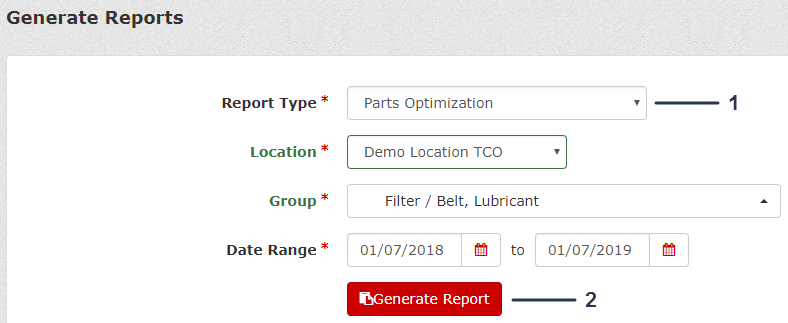
Generating a Parts Optimization Report
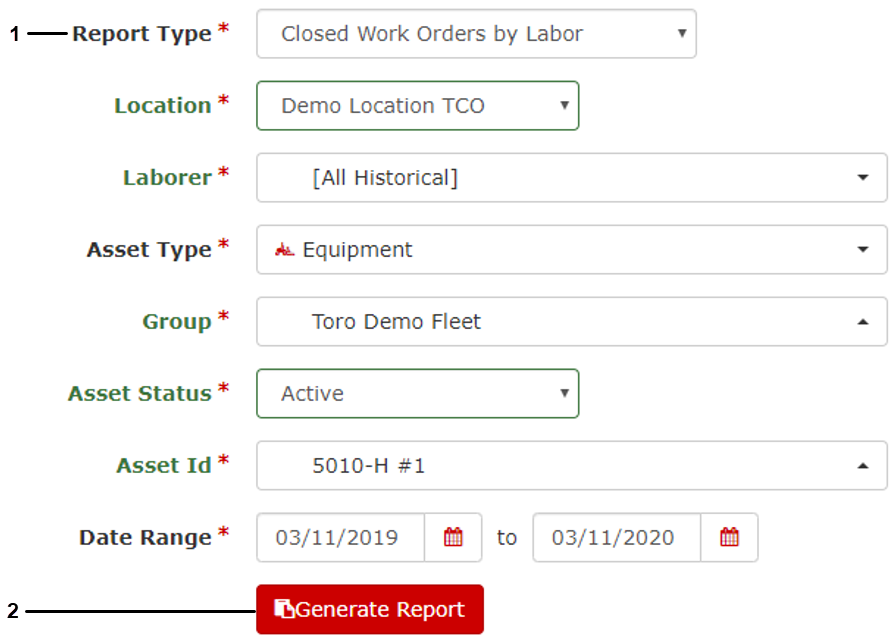
Generating a Closed Work Order by Labor Report
The purpose of this report is to determine whom worked on which assets and the time and cost incurred from that work.
-
Select Closed Work Order by Labor as the Report Type (Figure 140).
-
Select the Location, Laborer, Asset Type, Group(s) you want to view, the Asset Status, Asset ID, and Date Range (Figure 140).
-
Click Generate Report (Figure 140).
After you generate a Closed Work Order by Labor report, a spreadsheet generates with the full details.
Generating a Parts Used in Maintenance Report
Creating a One-Time Preventive Maintenance Task
The one-time preventive maintenance task allows you to create a task that logs costs as preventive maintenance, but does not record the task as a recurring task in the Asset Preventive Maintenance Schedule. The task is designed to track items, such as preventive maintenance, but are not part of the standard scheduled maintenance tasks. The one-time preventive maintenance task functions similarly to Repair or General tasks, in that it due immediately upon creation and it has no interval.
-
From the Asset Overview of an asset, click Maintenance Schedule (Figure 144).
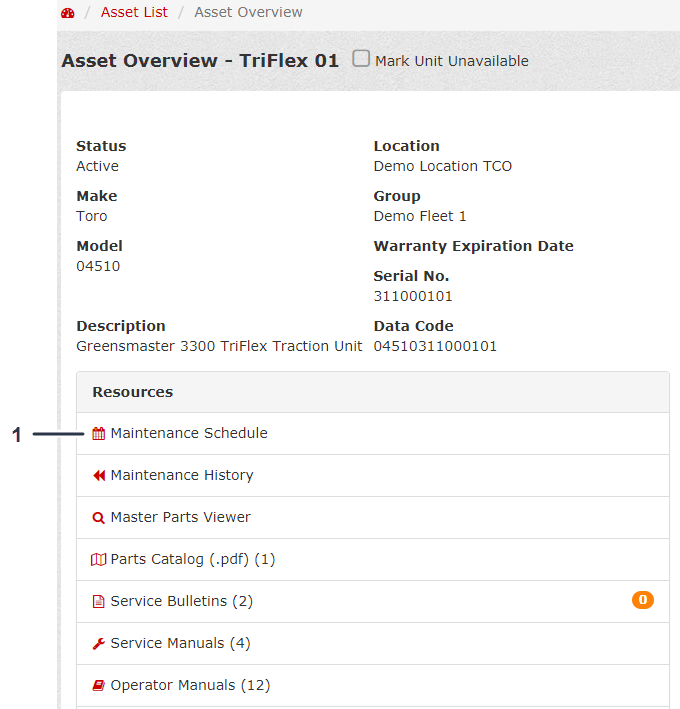
-
Click Add a Task (Figure 145).
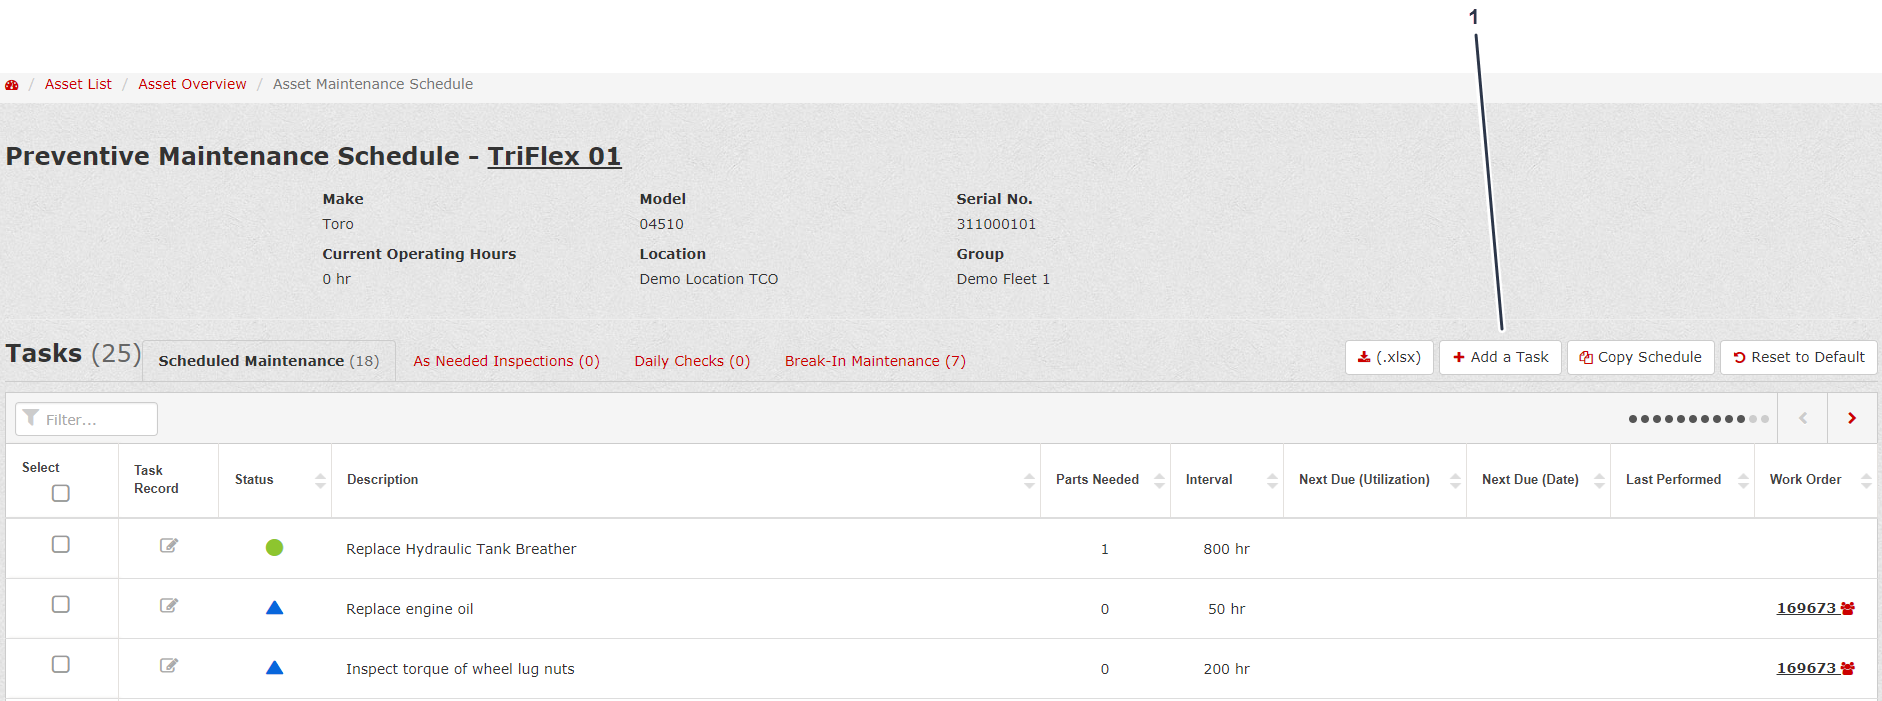
-
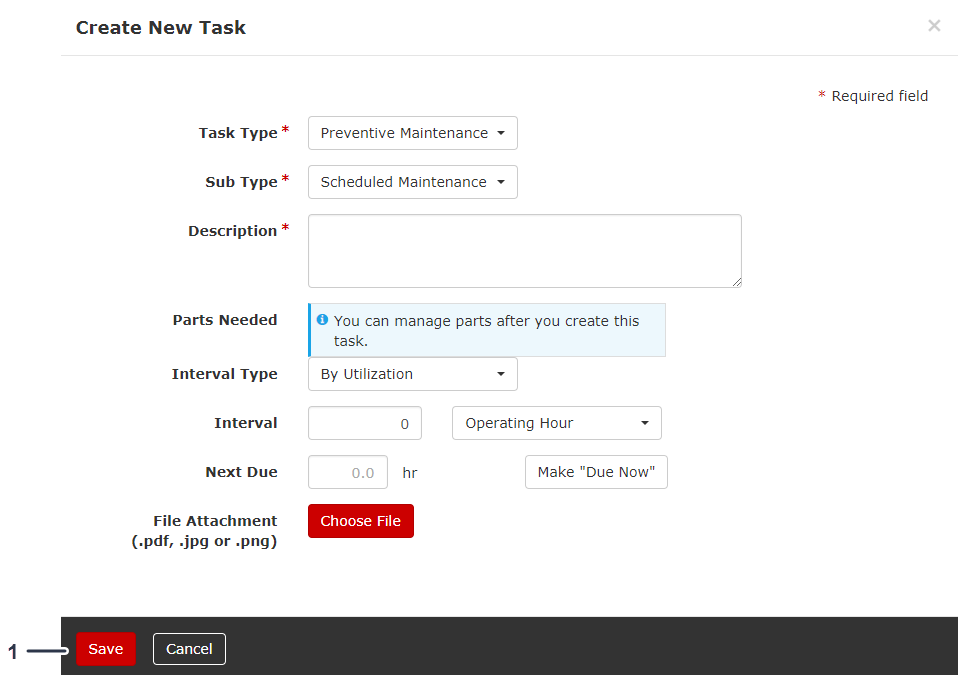
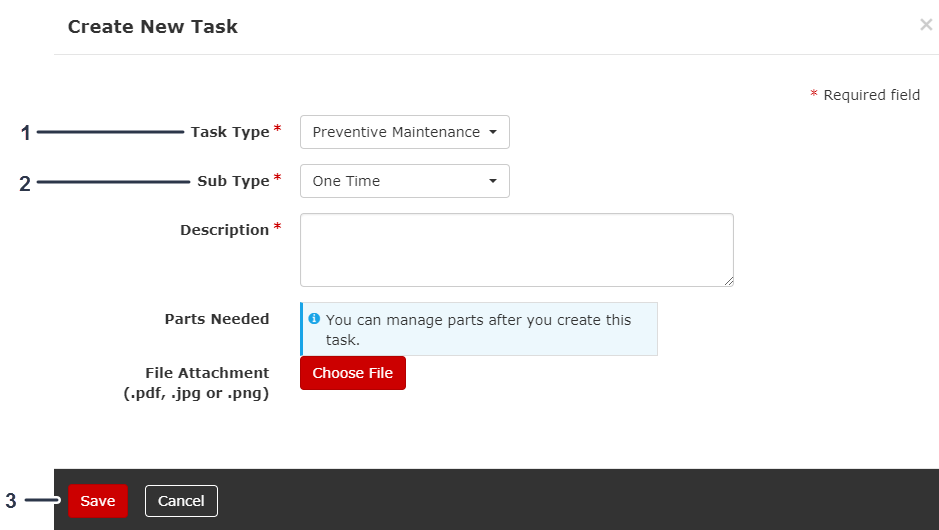
Under the Task Type, select Preventive Maintenance (Figure 146).
-
Under the Sub Type, select One Time (Figure 146).
-
Fill out the Create New Task form and click Save (Figure 146).
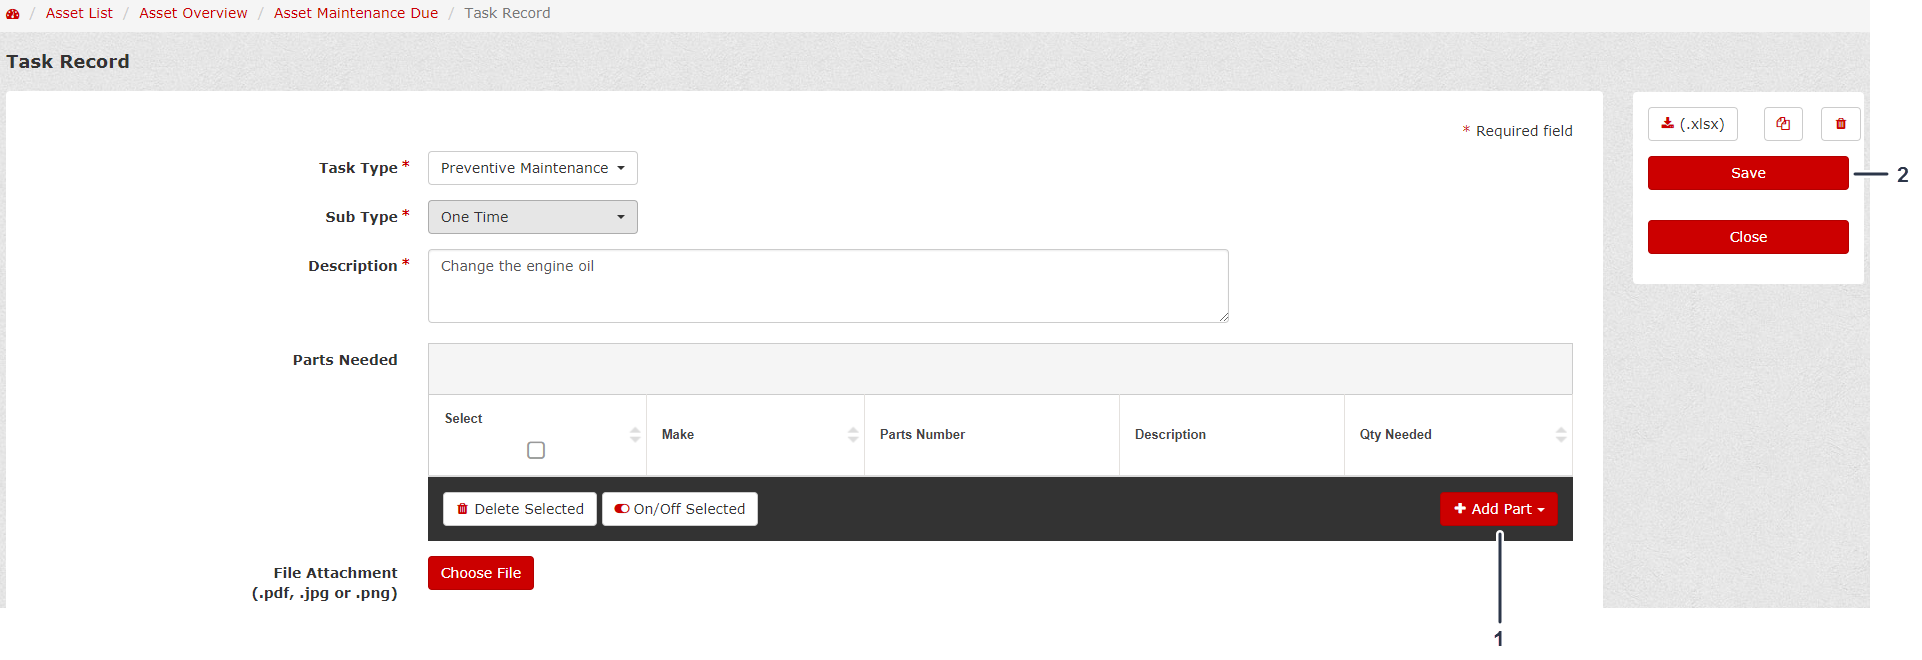
If you want to add parts to the One Time task, do the following:

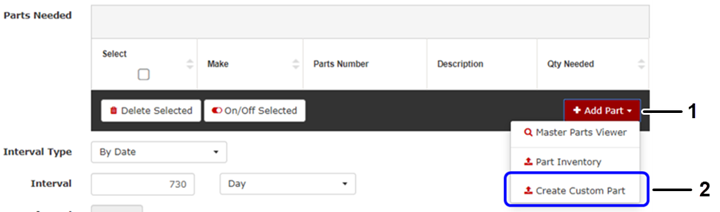
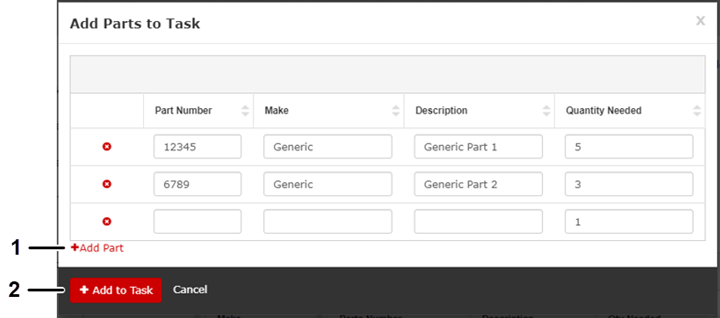
Adding Multiple Custom Parts to a Task
From the Add Part drop-down, you can create multiple custom parts for a Task Record.
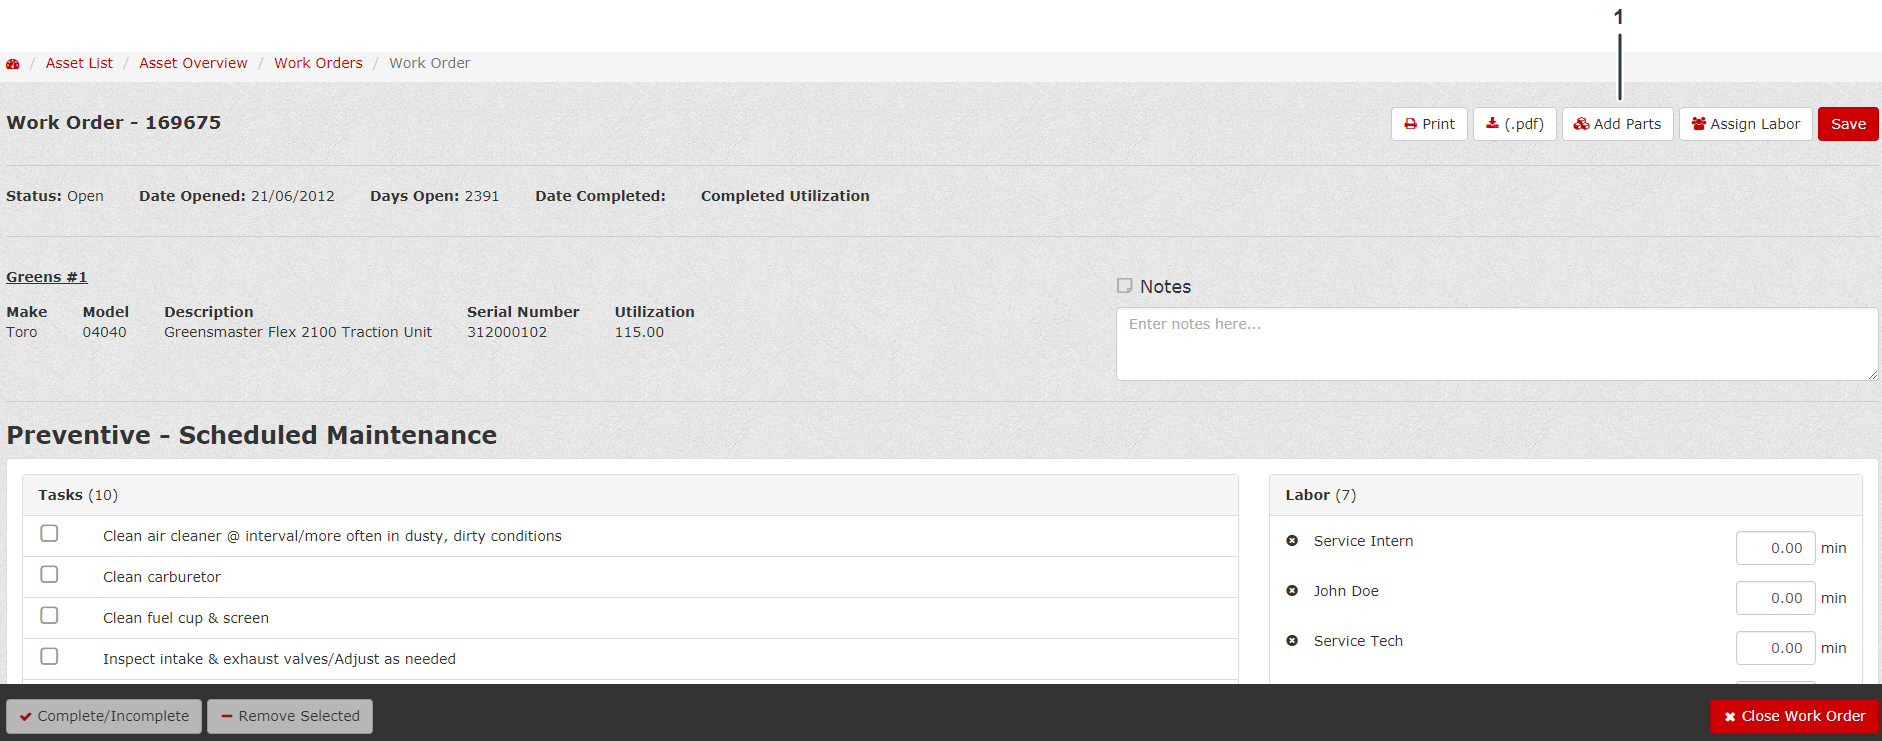
Adding Parts to a Work Order
-
Click the Maintenance Due tab (Figure 151).
-
Click the desired Work Order (Figure 151).

-
Click Add Parts (Figure 152).
Note: After clicking Add Parts, a new one-time preventive maintenance task with the description “Parts Replaced” appears.
-
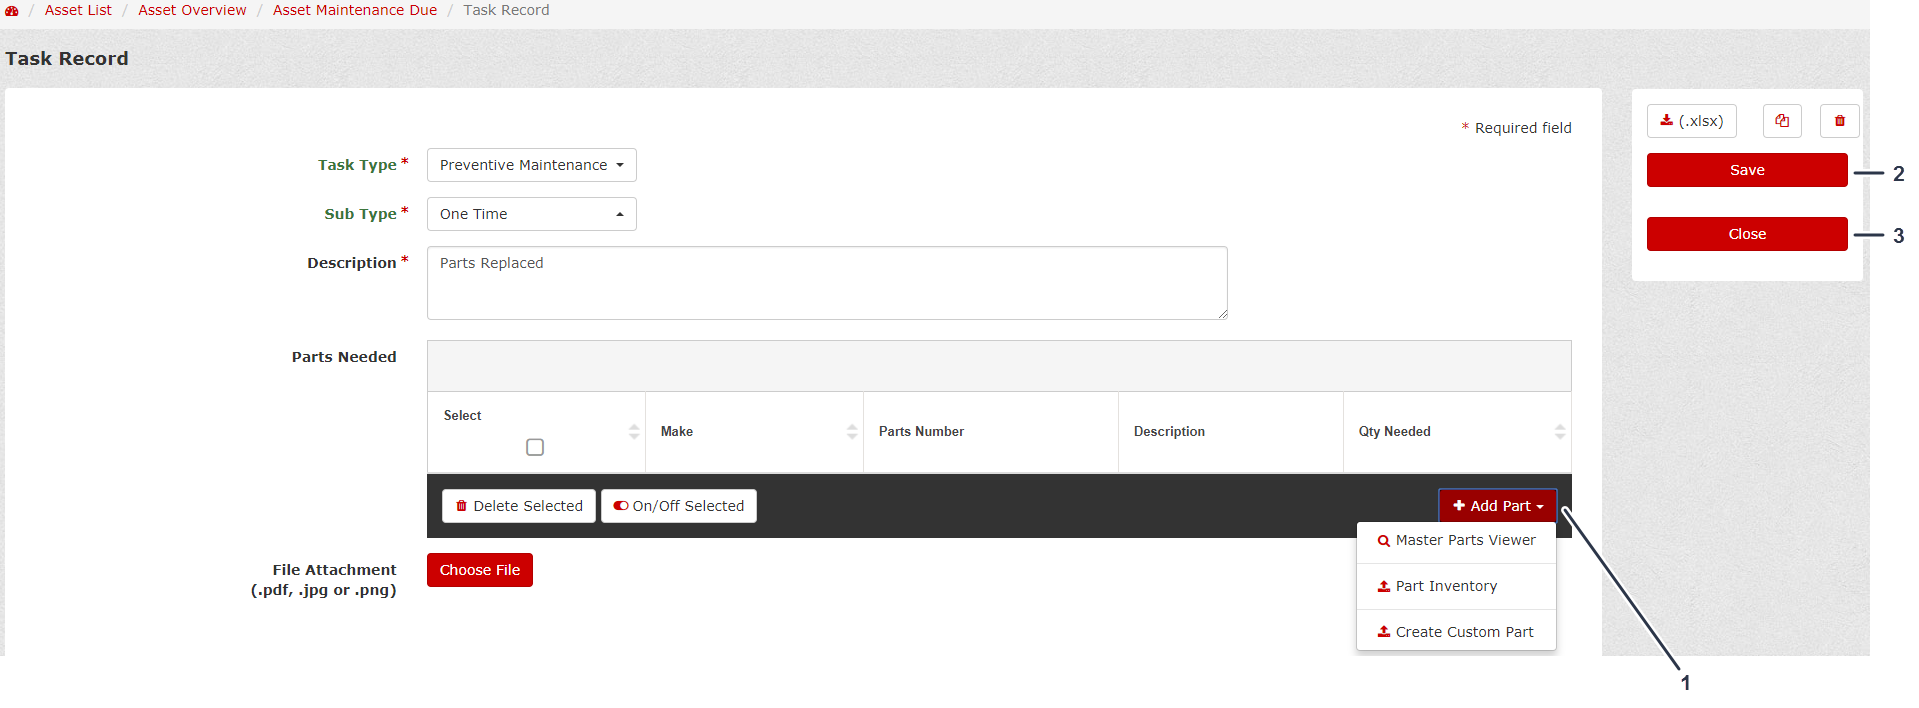
Fill out the Task Record and add the parts to the work order (Figure 153).
Note: You can add parts to the Task Record using the standard Master Parts Viewer, Part Inventory, or Create Custom Part (Figure 153).
-
After you add the parts to the Work Order, click Save, then Close (Figure 153).
Creating and Using Carts
Creating a Cart to Use
-
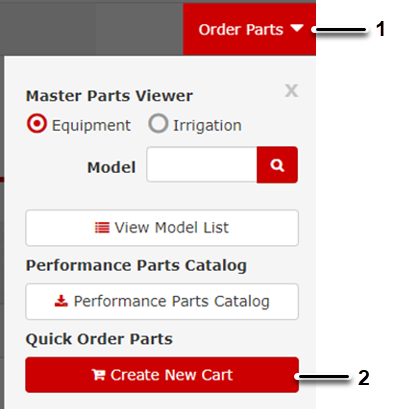
Click Order Parts, located in the upper, right corner of the screen (Figure 154).
-
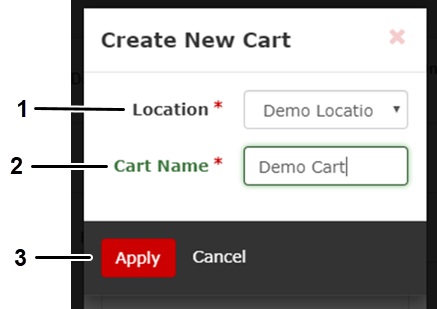
Click Create New Cart at the bottom of the menu (Figure 154).
-
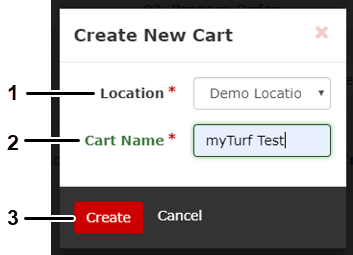
Select the desired Location for the cart, edit the Cart Name, and click Create (Figure 155).
This creates the cart and start the ordering process; refer to Using a Cart.
Creating a Cart in Parts Inventory and Maintenance Due
Using a Cart
After creating a cart, you can add parts from multiple locations.
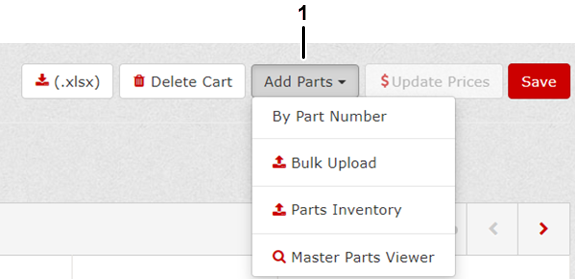
From the Build and Review Cart screen, click Add Parts (Figure 159).
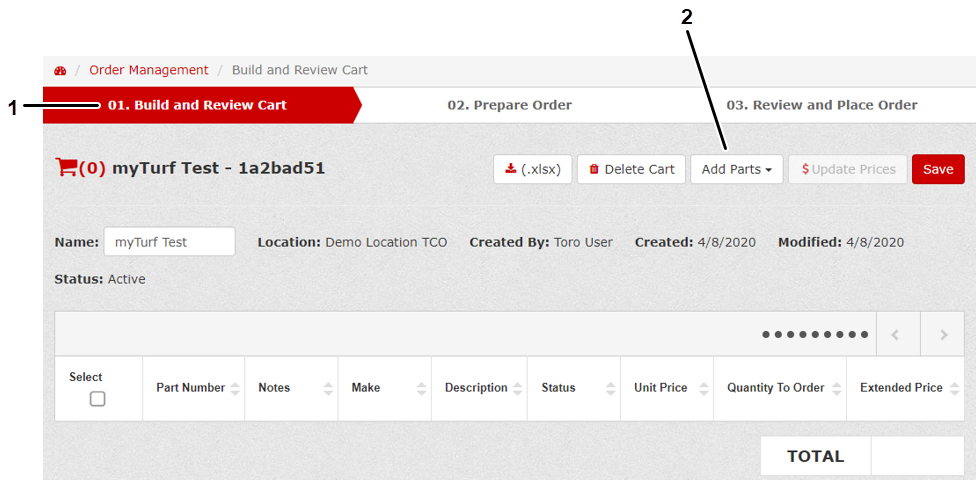
Note: You can add parts By Part Number (if you know the part number), Bulk Upload by Excel spreadsheet, Parts Inventory, or by searching the Master Parts Viewer as shown in Figure 160.
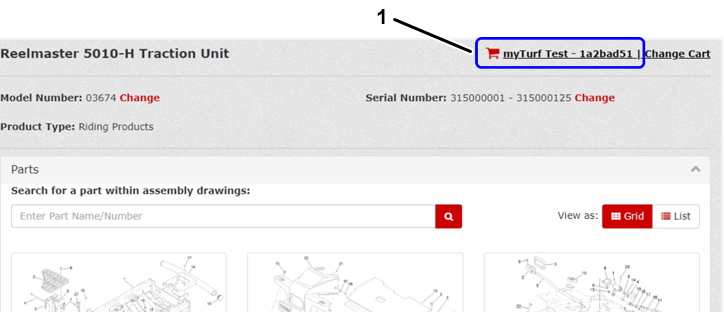
Note: If you leave the Build and Review Cart screen, the cart follows you (Figure 161) to continue adding parts to the cart. This can be done from the Master Parts Viewer, Parts Inventory, or Maintenance Due List.
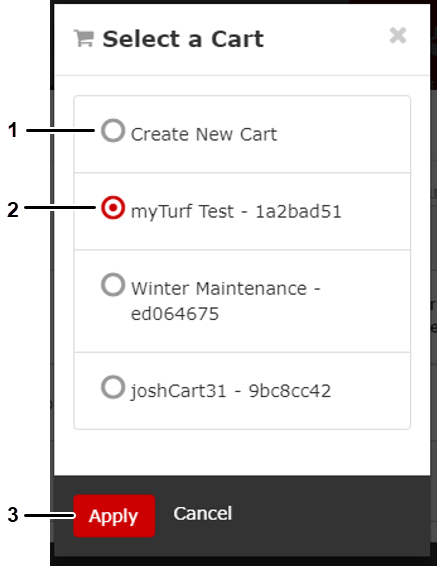
Choosing a Different Cart
There are 2 ways to choose a different cart than the cart you are currently using:
-
Click the Order Management tab and click the cart you want to use (Figure 162).
When you enter the Build and Review Cart screen, the cart follows you to continue adding parts to the cart.
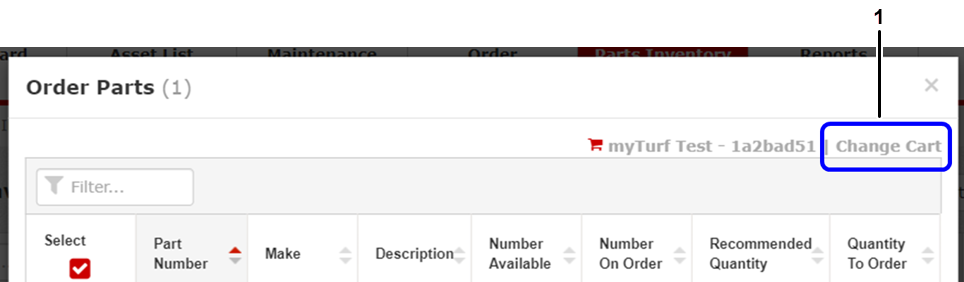
-
When you go through the ordering process in the Master Parts Viewer, Parts Inventory, or Maintenance Due List, click Change Cart (Figure 163).
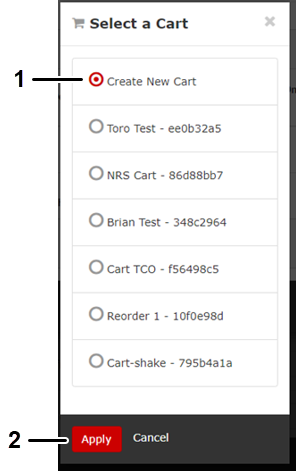
When you click Change Cart, you can either create a new cart or select an existing cart (Figure 164).
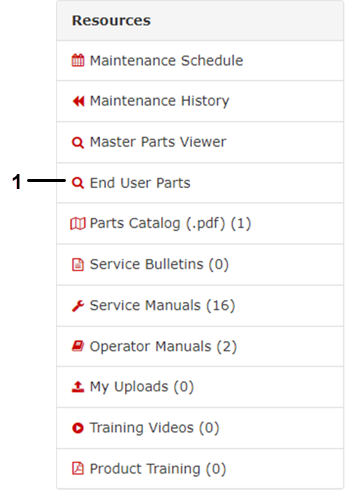
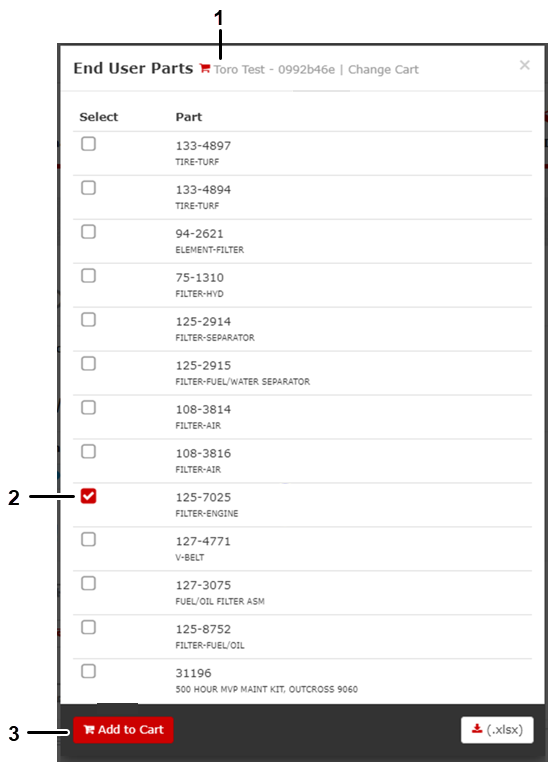
Downloading End-User Parts
In Asset Overview Resources, click End User Parts (Figure 165) to view a list of Toro-designated end user parts for the machine model number and serial number.
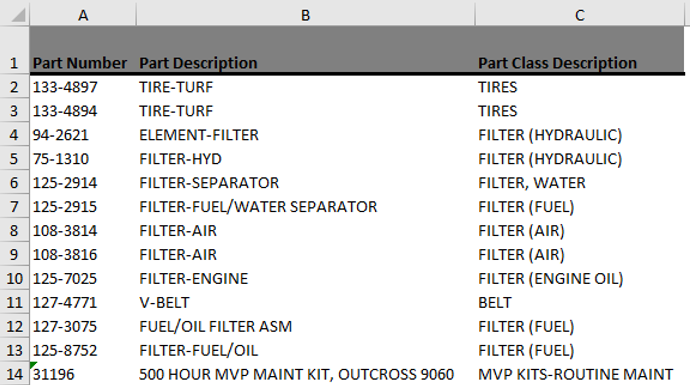
From this list, you can add parts to a cart or download a spreadsheet of the parts list.
Ordering End-User Parts
-
Ensure that the correct cart is selected or create a new cart (Figure 166).
-
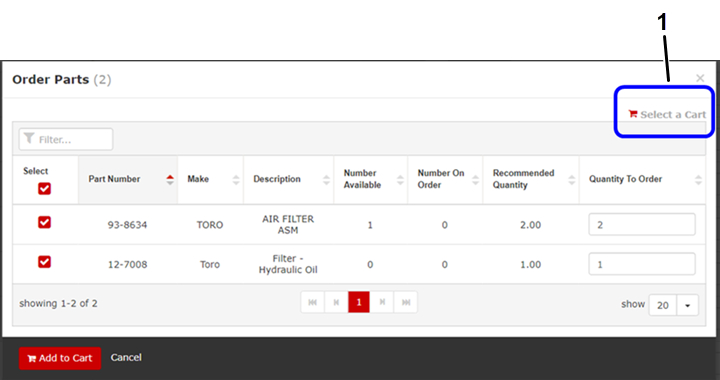
Select the part(s) that you want to order (Figure 166).
-
Click Add to Cart (Figure 166).
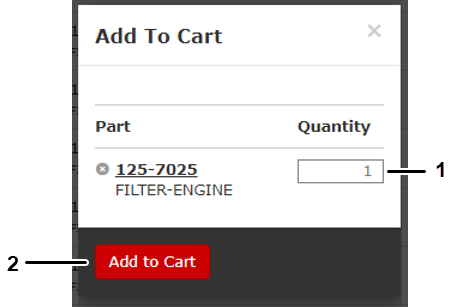
-
After the next screen appears, enter the quantity of the part and click Add to Cart (Figure 167).
Note: If this was done properly, you should receive a message indicating that you successfully added the end-user parts to the cart.
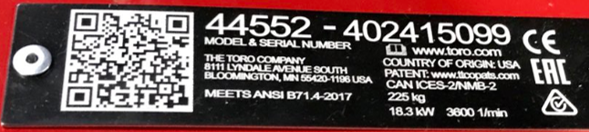
Accessing an Asset Overview using a QR Code
-
Using your mobile device, click Scan in the Help Menu (Figure 171).

-
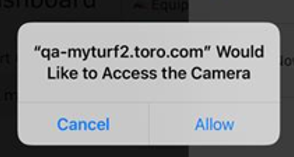
When myTurf requests access your mobile device, click Allow (Figure 172).
-
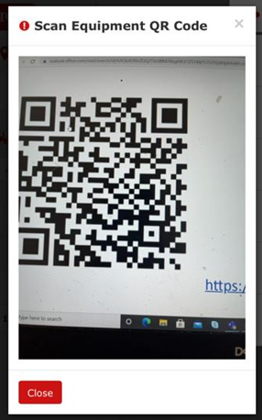
Scan the QR Code (Figure 173).
-
If the Equipment exists as an Asset in the authorized Location(s) for the user, you will be directed to the Asset Overview for that Asset. This enables quick access to Resources, updating operating hours, etc. (Figure 174).
-
If the Equipment does not exist in the Organization or if the user does not have access to the Location in which the asset is located, myTurf delivers a warning message with the option to Create Asset (Figure 175).
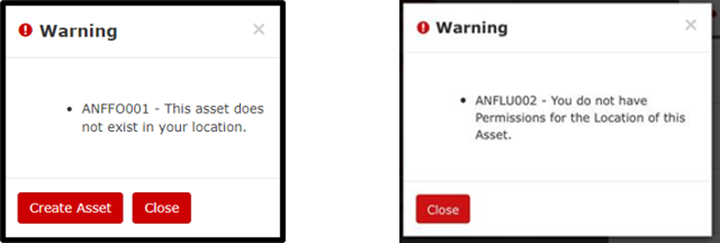
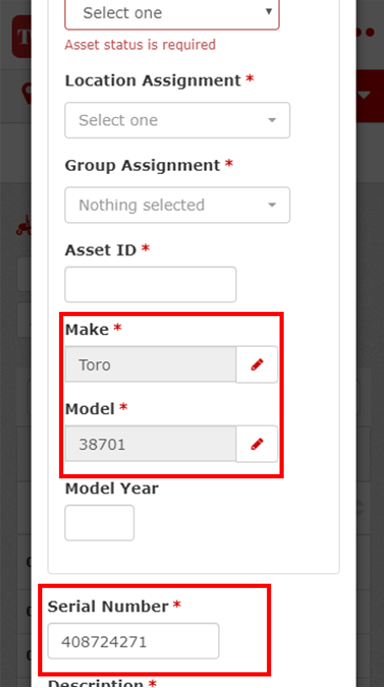
If you click Create Asset, you will be directed to the Add Asset screen (Figure 176).
Enter all the Asset information and click Create Asset (Figure 176).
-
Allowing Access for a Distributor to View a Customer Asset List
For a distributor to be able to view their customer’s asset list, that customer need to allow the distributor permission to view their assets.
-
To grant permission, the customer needs to log in and click the Admin menu at the top of the screen.
-
From the Distributor Permissions screen, click I authorize my distributor to view my asset list and click Save (Figure 177).