Maintenance
Checking the Mesh
| Maintenance Service Interval | Maintenance Procedure |
|---|---|
| Before each use or daily |
|
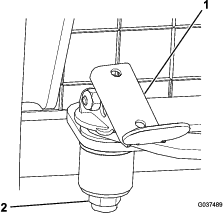
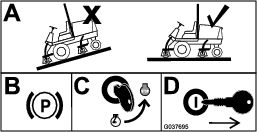
Park the machine on a level surface, engage the parking brake, shut off the engine, and remove the key from the key switch (Figure 1).
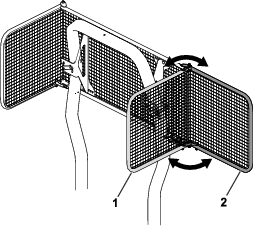
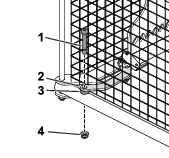
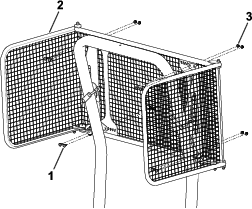
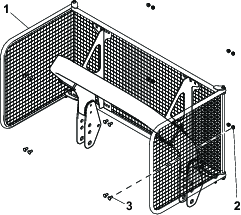
| 1 | Guard assembly |
| 2 | Flange nut |
| 2 | Shoulder bolt |
| 2 | Spacer |
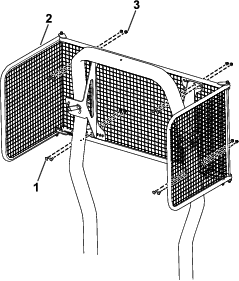
Swing the guard wings closed to align perpendicular with the rear guard panel.
Attach each latch-arm with 2 shoulder bolts, 2 spacers, and 2 nuts. Tighten the flange nuts and shoulder bolts.
Parts needed for this procedure:
| Guard assembly | 1 |
| Left mounting bracket | 1 |
| Right mounting bracket | 1 |
| Strap | 4 |
| Carriage bolt—3/8 x 3-1/2 inch (Reelmaster 3100/3500, Groundsmaster 3500, and Machines with a Straight Roll Bar) | 4 |
| Carriage bolt—3/8 x 4-1/2 inch (Reelmaster 3555/3575/5010/7000 and Groundsmaster 4300-D/4500/4700) | 4 |
| Flange nut | 14 |
| Carriage bolt—3/8 x 7/8 inch | 8 |
| Shoulder bolt | 2 |
| Spacer | 2 |
| 1 | Guard assembly |
| 1 | Left mounting bracket |
| 1 | Right mounting bracket |
| 4 | Strap |
| 4 | Carriage bolt—3/8 x 3-1/2 inches |
| 12 | Flange nut |
| 8 | Carriage bolt—3/8 x 7/8 inch |
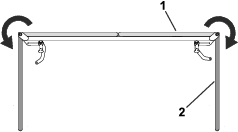
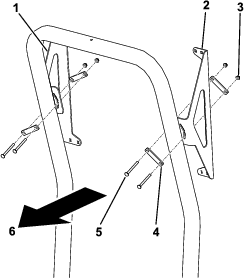
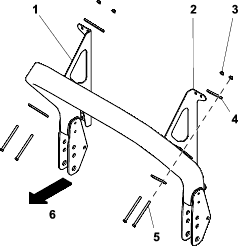
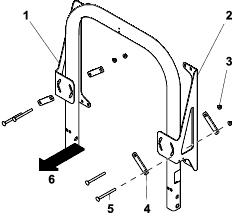
Loosely mount the 2 brackets to the roll bar with 4 straps, 4 carriage bolts, and 4 flange nuts.
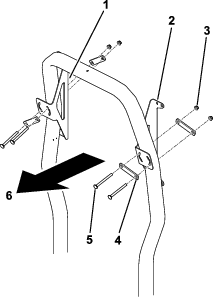
Align the ball guard assembly with the brackets and verify there is enough clearance to open the hood without contacting the ball guard. Position the height of the brackets on the roll bar as needed.
Make sure the two brackets are at an even height and tighten the flange nuts.
Loosely install the ball guard to the brackets with 8 carriage bolts and 8 flange nuts.
Center the ball guard on the brackets and tighten the 8 flange nuts.
| 1 | Guard assembly |
| 1 | Left mounting bracket |
| 1 | Right mounting bracket |
| 4 | Strap |
| 4 | Carriage bolt—3/8 x 4-1/2 inches |
| 12 | Flange nut |
| 8 | Carriage bolt—3/8 x 7/8 inch |
Loosely mount the 2 brackets to the roll bar with 4 straps, 4 carriage bolts, and 4 flange nuts.
Align the ball guard assembly with the brackets and verify there is enough clearance to open the hood without contacting the ball guard. Position the height of the brackets on the roll bar as needed.
Make sure the two brackets are at an even height and tighten the flange nuts.
Loosely install the ball guard to the brackets with 8 carriage bolts and 8 flange nuts.
Center the ball guard on the brackets and tighten the 8 flange nuts.
| Kit Description | Toro Part No. | Quantity |
|---|---|---|
| Adapter-ball guard | 137-1392 | 1 |
Note: Do not use the hardware provided with the adapter kit.
| 1 | Guard assembly |
| 1 | Left mounting bracket |
| 1 | Right mounting bracket |
| 4 | Strap |
| 4 | Carriage bolt—3/8 x 3-1/2 inches |
| 12 | Flange nut |
| 8 | Carriage bolt—3/8 x 7/8 inch |
Loosely mount the 2 brackets to the roll bar with 4 straps, 4 carriage bolts, and 4 flange nuts.
Align the ball guard assembly with the brackets and verify there is enough clearance to open the hood without contacting the ball guard. Position the height of the brackets on the roll bar as needed.
Make sure the two brackets are at an even height and tighten the flange nuts.
Loosely install the ball guard to the brackets with 8 carriage bolts and 8 flange nuts.
Center the ball guard on the brackets and tighten the 8 flange nuts.
| Kit Description | Toro Part No. | Quantity |
|---|---|---|
| Adapter-ball guard | 137-1081 | 1 |
| 1 | Guard assembly |
| 1 | Left mounting bracket |
| 1 | Right mounting bracket |
| 4 | Strap |
| 4 | Carriage bolt—3/8 x 3-1/2 inches |
| 12 | Flange nut |
| 8 | Carriage bolt—3/8 x 7/8 inch |
Loosely mount the 2 brackets to the roll bar with 4 straps, 4 carriage bolts, and 4 flange nuts.
Align the ball guard assembly with the brackets and verify there is enough clearance to open the hood without contacting the ball guard. Position the height of the brackets on the roll bar as needed.
Make sure the two brackets are at an even height and tighten the flange nuts.
Loosely install the ball guard to the brackets with 8 carriage bolts and 8 flange nuts.

Center the ball guard on the brackets and tighten the 8 flange nuts.
| Maintenance Service Interval | Maintenance Procedure |
|---|---|
| Before each use or daily |
|