Safety
Safety and Instructional Decals
 |
Safety decals and instructions are easily visible to the operator and are located near any area of potential danger. Replace any decal that is damaged or missing. |
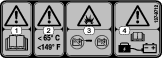

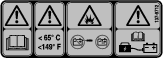
Battery Decal
The battery manufacturer provides the following language that corresponds to decal 137-9712:
-
Do not expose battery to temperature above 65°C (149°F).
-
Do not disassemble or mistreat battery. Do not crush.
-
Do not drop or subject it to impact.
-
Use only OEM approved charger.
-
Failure to follow those instructions may present risk of explosion, fire or high temperatures.
-
See owner’s manual for additional safety instructions.
Installation
Preparing the Machine
-
Park the machine on a level surface.
-
Engage the parking brake.
-
Shut off the machine.
-
Disconnect the battery; refer to your Operator’s Manual.
Removing the Existing Battery
Note: You may discard all removed parts unless otherwise noted.
-
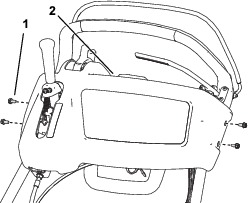
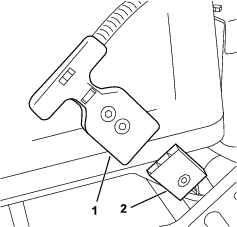
Remove the 4 bolts that secure the console cover and remove it (Figure 2).
Note: Retain the bolts for later installation.
-
Cut the cable ties that secure the existing battery wire harness to the machine, disconnect all battery wire harness connections, and remove the wire harness.
Important: Record the existing wire harness routing, cable tie, and connection locations; use this as a reference for routing and connecting the new battery wire harness.
Note: The only remaining harness on the machine should be the short harness extending from the top of the electric motor.
Note: You may have to raise the battery platform to disconnect the harness beneath the battery.
-
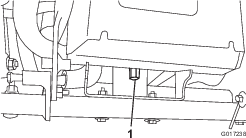
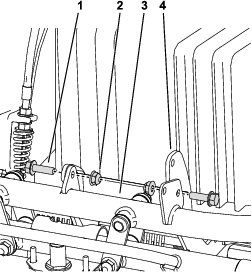
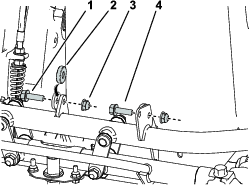
Remove the tall nut that secures the rear of the battery platform to the machine frame (Figure 3).
-
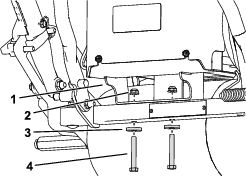
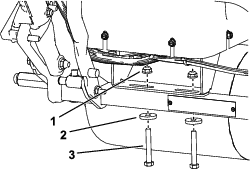
Remove the 2 bolts and nuts that secure the battery platform to the front of the machine and remove the platform and battery (Figure 4).
-
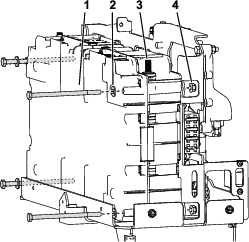
Remove the 2 nuts, washers, and bolts securing the power center bracket to the rear of the machine and remove it (Figure 5).
-
Remove the battery and the battery platform from the machine (Figure 6).
-
Remove the bolts and washers securing the battery to the platform; dispose of or recycle the battery in accordance with local, state, and federal regulations (Figure 6).
Installing the Battery to the Battery Platform
Parts needed for this procedure:
| Battery pack | 1 |
| Bolt (1/4 x 4-1/2 inches) | 4 |
| Washer (1/4 inch) | 4 |
| Nut (1/4 inch) | 4 |
| Lock washer (M8) | 2 |
| Hex nut (M8) | 2 |
Warning
The battery pack is shipped with a slight charge and is capable of shocking you.
-
Do not touch or allow tools to touch both the positive and negative terminals of the battery at the same time.
-
Use insulated tools when installing the battery.
-
Remove the new battery pack from its carton.
Important: Save the carton and all packing material; if you ever need to ship the battery for maintenance, warranty, or recycling, this special packaging is required.
-
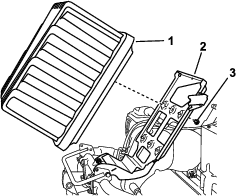
Loosen the 8 screws securing the battery cover and remove it (Figure 7).
Note: You do not need to completely remove the screws to remove the cover.
-
Place the battery in the battery platform and install the hardware as shown in Figure 8.
-
Connect the controller cable to the connector at the top of the battery (Figure 9).
-
Connect the positive (red) cable to the positive (+) battery terminal and secure it with a lock washer and a hex nut as shown in Figure 9; torque the hex nut to 9 N⋅m (6.6 ft-lb).
-
Connect the negative (black) cable to the negative (-) battery terminal and secure it with a lock washer and a hex nut as shown in Figure 9; torque the hex nut to 9 N⋅m (6.6 ft-lb).
Installing the Battery Platform and Wire Harness Assembly
Parts needed for this procedure:
| Battery, platform, and wire harness assembly | 1 |
| Bolt (5/16 x 1 inch) | 2 |
| Spacer (5/16 inch) | 1 |
| Nut (5/16 inch) | 4 |
| Bolt (5/16 x 2-1/4 inches) | 2 |
| Hardened washer (5/16 inch) | 2 |
-
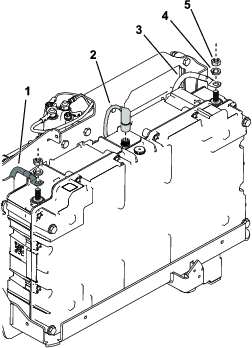
Align the front of the new battery platform onto the frame and install the hardware as shown in Figure 10.
-
Install the rear platform assembly mount to the frame as shown in Figure 11.
-
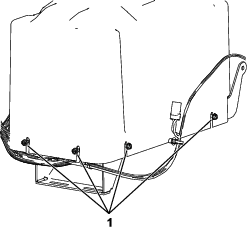
Route the wire harness up the left side of the handle to the underside of the control console.
Note: Route the wire harness away from any sharp, hot, or moving parts; secure it with cable ties as needed.
-
Connect all of the wire harness connections as they were connected on the previous wire harness, except for the T-handle power connector.
Note: Some wire harness connections may not be used depending on the attachments installed on your machine.Refer to the labels on the wire harness and your previously recorded references from Removing the Existing Battery.
-
Secure the wire harness with cable ties and the cable clips as needed.
-
Install the battery cover and secure it with the screws loosened in step 3 of Installing the Battery to the Battery Platform.
Completing the Installation
-
Connect the T-handle connector to the main power supply connector (Figure 12).
-
Use Toro DIAG to update the software to the latest available; refer to your Toro DIAG Operator’s Manual.
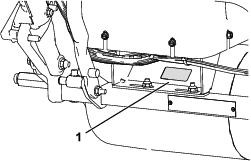
Important: When prompted by Toro DIAG for model and serial number, do not use the model and serial number information from the machine frame, use the information from the decal located on the battery platform (Figure 13).
-
Turn the key to the RUN position to start the machine and test the operation; if there are any issues check the wire harness connections.
Important: The LED display should turn on and there should be no error messages or flashing lights.
Note: You do not need to turn and hold the key in the START position, turning the key to RUN turns the machine on.
-
Install the console cover using the 4 screws removed previously.
-
Charge the machine; refer to your charger Operator’s Manual.
Important: Ensure that you use the new, correct charger per the charger Operator’s Manual; do not use the old charger with the new battery.
Note: The battery is shipped with a partial charge (approximately 30%); this is enough charge for you to perform software installation, function checks on machine, and move it as needed to complete setup.