Introduction

This pole saw attachment is designed for trimming small branches and limbs up to 6 inches (15.2 cm) in diameter. It is to be used only by adults. It is designed to be used in combination with the Toro Flex-Force Power System 60V MAX Attachment-Capable Power Head Model 51810T. Using this product for purposes other than its intended use could prove dangerous to you and bystanders.

Important: In some cases, a quick-release harness for must be used for proper support and balance. If you are using this attachment combined with the Model 51810T power head, and battery pack Model 88640, 88650, 88660, or 88675 is installed, you must install quick-release harness Model 88622 (not included).

Read this information carefully to learn how to operate and maintain your product properly and to avoid injury and product damage. You are responsible for operating the product properly and safely.

Visit www.Toro.com for more information, including safety tips, training materials, accessory information, help finding a dealer, or to register your product.

Whenever you need service, genuine Toro parts, or additional information, contact an Authorized Service Dealer or Toro Customer Service and have the model and serial numbers of your product ready. Figure 1 identifies the location of the model and serial numbers on the product. Write the numbers in the space provided.

Important: With your mobile device, you can scan the QR code (if equipped) on the serial number plate to access warranty, parts, and other product information.

g363089

This manual identifies potential hazards and has safety messages identified by the safety-alert symbol (Figure 2), which signals a hazard that may cause serious injury or death if you do not follow the recommended precautions.

sa-black

This manual uses 2 words to highlight information. Important calls attention to special mechanical information and Note emphasizes general information worthy of special attention.

The Model 51810T Power Head is compatible with a variety of Toro-approved attachments that, when combined, comply with specific standards; see the following table for more detail.

CombinationPower Head ModelAttachment ModelStandard
String Trimmer51810T88716Conforms to UL STD 82Certified to CSA STD C22.2 No. 147
Edger51810T88710Conforms to UL STD 82Certified to CSA STD C22.2 No. 147
Pole Saw51810T88714Conforms to UL STD 82Certified to CSA STD C22.2 No. 147
Cultivator51810T88715Conforms to UL STD 82Certified to CSA STD C22.2 No. 147
Hedge Trimmer51810T88713Conforms to UL STD 62841-4-2Certified to CSA STD C22.2 62841-4-2
Graphic

For assistance, please see www.Toro.com/support for instructional videos or contact 1-888-384-9939 before returning this product.

Warning

CALIFORNIA

Proposition 65 Warning

The power cord on this product contains lead, a chemical known to the State of California to cause birth defects or other reproductive harm. Wash hands after handling.

Use of this product may cause exposure to chemicals known to the State of California to cause cancer, birth defects, or other reproductive harm.

Safety

Warning

Read all safety warnings designated by the safety-alert symbol and all instructions.

Failure to follow the warnings and instructions may result in electric shock, fire and/or serious injury.

Save all warnings and instructions for future reference.

The term “power tool” in all the warnings refers to your mains-operated (corded) power tool or battery-operated (cordless) power tool.

IMPORTANT SAFETY

INSTRUCTIONS

I. Work area safety

  1. Keep work area clean and well lit.Cluttered or dark areas invite accidents.

  2. Do not operate power tools in explosive atmospheres, such as in the presence of flammable liquids, gasses, or dust.Power tools create sparks, which may ignite the dust or fumes.

  3. Keep children and bystanders away while operating a power tool.Distractions can cause you to lose control.

II. Pole Saw Safety Warnings - Personal safety

  1. Stay alert, watch what you are doing and use common sense when operating a power tool. Do not use a power tool while you are tired or under the influence of drugs, alcohol, or medication.A moment of inattention while operating power tools may result in serious personal injury.

  2. Use personal protective equipment. Always wear eye protection.Protective equipment such as dust mask, non-skid safety shoes, hard hat, or hearing protection used for appropriate conditions reduces personal injuries. Use of rubber gloves is recommended.

  3. Prevent unintentional starting. Ensure the switch is in the OFF-position before connecting to power source and/or battery pack, picking up or carrying the tool.Carrying power tools with your finger on the switch or energizing power tools that have the switch on invites accidents.

  4. Remove any adjusting key or wrench before turning the power tool on.A wrench or a key left attached to a rotating part of the power tool may result in personal injury.

  5. Do not overreach. Keep proper footing and balance at all times.This enables better control of the power tool in unexpected situations.

  6. Dress properly. Do not wear loose clothing or jewelry. Keep your hair, clothing, and gloves away from moving parts.Loose clothes, jewelry, or long hair can be caught in moving parts. Adequate protective clothing will reduce personal injury by flying debris or accidental contact with the saw chain.

  7. If devices are provided for the connection of dust extraction and collection facilities, ensure these are connected and properly used.Use of dust collection can reduce dust-related hazards.

  8. Do not let familiarity gained from frequent use of tools allow you to become complacent and ignore tool safety principles.A careless action can cause severe injury within a fraction of a second.

III. Pole Saw Safety Warnings - Power tool use and care

  1. Do not force the power tool. Use the correct power tool for your application.The correct power tool will do the job better and safer at the rate for which it was designed.

  2. Do not use the power tool if the switch does not turn it on and off.Any power tool that cannot be controlled with the switch is dangerous and must be repaired.

  3. Disconnect the plug from the power source and/or the battery pack from the power tool before making any adjustments, changing accessories, or storing power tools.Such preventive safety measures reduce the risk of starting the power tool accidentally.

  4. Store idle power tools indoors, out of the reach of children, and do not allow persons unfamiliar with the power tool or these instructions to operate the power tool.Power tools are dangerous in the hands of untrained users.

  5. Maintain power tools. Check for misalignment or binding of moving parts, breakage of parts, and any other condition that may affect the power tool’s operation. If damaged, have the power tool repaired before use.Many accidents are caused by poorly maintained power tools.

  6. Keep cutting tools sharp and clean.Properly maintained cutting tools with sharp cutting edges are less likely to bind and are easier to control.

  7. Use the power tool, accessories, and tool bits etc. in accordance with these instructions, taking into account the working conditions and the work to be performed.Use of the power tool for operations different from those intended could result in a hazardous situation.

  8. Keep handles and grasping surfaces dry, clean and free from oil and grease.Slippery handles and grasping surfaces do not allow for safe handling and control of the tool in unexpected situations.

IV. Battery tool use and care

  1. Recharge only with the charger specified by the manufacturer.A charger that is suitable for one type of battery pack may create a risk of fire when used with another battery pack.

  2. Use power tools only with specifically designated battery packs.Use of any other battery packs may create a risk of injury and fire.

  3. When battery pack is not in use, keep it away from other metal objects, like paper clips, coins, keys, nails, screws or other small metal objects, that can make a connection from one terminal to another.Shorting the battery terminals together may cause burns or a fire.

  4. Under abusive conditions, liquid may be ejected from the battery; avoid contact. If contact accidentally occurs, flush with water. If liquid contacts eyes, additionally seek medical help.Liquid ejected from the battery may cause irritation or burns.

  5. Do not use a battery pack or tool that is damaged or modified.Damaged or modified batteries may exhibit unpredictable behaviour resulting in fire, explosion or risk of injury.

  6. Do not expose a battery pack or tool to fire or excessive temperature.Exposure to fire or temperature above 100 °C (212 °F) may cause explosion.

  7. Do not expose a battery pack or tool to rain or wet conditions.Water entering a power tool will increase the risk of electric shock.

  8. Follow all charging instructions and do not charge the battery pack or tool outside the temperature range specified in the instructions.Charging improperly or at temperatures outside the specified range may damage the battery and increase the risk of fire.

  9. CAUTION—A mistreated battery pack may present a risk of fire or chemical burn.Do not disassemble the battery pack. Do not heat the battery pack above 68°C (154°F) or incinerate it. Replace the battery pack with a genuine Toro battery pack only; using another type of battery pack may cause a fire or explosion. Keep battery packs out of the reach of children and in the original packaging until you are ready to use them.

V. Service

  1. Have your power tool serviced by a qualified repair person using only identical replacement parts.This will ensure that the safety of the power tool is maintained.

  2. Never service damaged battery packs.Service of battery packs should only be performed by the manufacturer or authorized service providers.

VI. Pole saw safety

  1. Keep all parts of the body away from the saw chain. Do not remove cut material or hold material to be cut when the saw chain is moving. Make sure the switch is off and the battery disconnected when clearing jammed material. Saw chain continues to move after the switch is turned off. Before you start the pole saw, make sure the saw chain is not contacting anything.A moment of inattention while operating pole saws may cause entanglement of your clothing or body with the saw chain.

  2. Carry the pole saw by the handle with the saw chain stopped. When transporting or storing the pole saw, always fit the saw chain device cover.Proper handling of the pole saw will reduce possible personal injury from the saw chain.

  3. Hold the power tool by insulated gripping surfaces only, because the saw chain may contact hidden wiring.Saw chains contacting a ″live″ wire may make exposed metal parts of the power tool ″live″ and could give the operator an electric shock.

  4. Do not use the pole saw in bad weather conditions, especially when there is a risk of lightning.This decreases the risk of being struck by lightning.

  5. To reduce the risk of electrocution, never use near any electrical power lines. Contact with or use near power lines may cause serious injury or electric shock resulting in death.

  6. Always use two hands when operating the pole saw.Hold the pole saw with both hands to avoid loss of control.

  7. Always use head protection when operating the pole saw overhead.Falling debris can result in serious personal injury.

  8. Do not operate a pole saw in a tree.Operation of a pole saw while up in a tree may result in personal injury.

  9. Always keep proper footing and operate the pole saw only when standing on fixed, secure and level surface.Slippery or unstable surfaces such as ladders may cause a loss of balance or control of the pole saw.

  10. When cutting a limb that is under tension be alert for spring back.When the tension in the wood fibres is released the spring loaded limb may strike the operator and/or throw the pole saw out of control.

  11. Use extreme caution when cutting brush and saplings.The slender material may catch the saw chain and be whipped toward you or pull you off balance.

  12. Follow instructions for lubricating, chain tensioning, and changing accessories.Improperly tensioned or lubricated chain may either break or increase the chance for kickback.

  13. Keep handles dry, clean, and free from oil and grease.Greasy, oily handles are slippery causing loss of control.

  14. Cut wood only. Do not use pole saw for purposes not intended. For example: do not use pole saw for cutting plastic, masonry or non-wood building materials.Use of the pole saw for operations different than intended could result in a hazardous situation.

  15. Avoid kickback.Kickback may occur when the nose or tip of the guide bar touches an object, or when the wood closes in and pinches the saw chain in the cut.

    Tip contact in some cases may cause a sudden reverse reaction, kicking the guide bar up and back toward you.

    Pinching the saw chain along the top of the guide bar may push the guide bar rapidly back toward you.

    Either of these reactions may cause you to lose control of the saw, which could result in serious personal injury. Do not rely exclusively upon the safety devices built into your saw. As a pole saw user, you should take several steps to keep your cutting jobs free from accident or injury.

    Kickback is the result of tool misuse and/or incorrect operating procedures or conditions and can be avoided by taking proper precautions as given below:

    • Maintain a firm grip, with thumbs and fingers encircling the pole saw handles, with both hands on the handle and position your body and arm to allow you to resist kickback forces.Kickback forces can be controlled by the operator, if proper precautions are taken. Do not let go of the pole saw.

    • Only use replacement bars and chains specified by the manufacturer.Incorrect replacement bars and chains may cause chain breakage and/or kickback.

    • Follow the manufacturer’s sharpening and maintenance instructions for the saw chain.Decreasing the depth gauge height can lead to increased kickback..

SAVE THESE

INSTRUCTIONS

Safety and Instructional Decals

Graphic

Safety decals and instructions are easily visible to the operator and are located near any area of potential danger. Replace any decal that is damaged or missing.

decal145-3141
decal139-5345

Setup

Installing the Bar and Chain

Danger

Contact with the pole saw teeth can cause serious personal injury.

  • Remove the battery pack before adjusting or maintaining the pole saw.

  • Always wear gloves when adjusting or maintaining the pole saw.

  1. Place the pole saw on a flat surface and do not install the battery pack.

  2. Remove the side cover; turn the bar cover screw counterclockwise until the screw is removed and then remove the side cover (Figure 3).

    g358884
  3. Place the chain around the sprocket on the front end of the guide bar, with the cutting edge of the chain teeth on the top of the bar facing forward as shown in the diagram beneath the side cover of the pole saw.

  4. Continue to feed the chain around the guide bar and align the chain into the groove of the guide bar.

  5. Position the open loop of the chain (the side not on the guide bar) around the drive sprocket on the pole saw (Figure 3).

    Important: Ensure that the chain adjusting stud is inserted into the chain adjusting stud slot on the guide bar (Figure 3).You may need to rotate the chain-tensioning screw to fit the stud into the slot on the guide bar (Figure 14).

  6. Install the side cover and bar cover screw and loosely tighten the side cover by turning the screw clockwise.

  7. Adjust the chain tension; refer to Adjusting the Chain Tension.

Connecting the Attachment to the Power Head

  1. Install the square shaft of the attachment into the square shaft of the power head (A of Figure 4).

  2. Align the locking button on the lower shaft with the slotted hole on the upper shaft and slide the 2 shafts together (B and C of Figure 4).

    Note: The locking button clicks into the slotted hole when the shafts are secured (C of Figure 4).

  3. Using the screw-handle, tighten the screw on the shaft connector until it is secure (D of Figure 4).

g358795

Adding Bar and Chain Oil to the Pole Saw

Important: Use only bar and chain oil (sold separately).

Fill the pole saw with bar and chain oil before first operation; refer to Checking the Oil Level and Adding Bar and Chain Oil.

Product Overview

g358797
Model88714, attaches to 51810T
Bar Length (with 88619 and 88621 equipped)25.4 cm (10 inches)
Chain Gauge (with 88619 and 88621 equipped)0.050 inches
Chain Pitch (with 88619 and 88621 equipped)1/4 inch
Chain Length (with 88619 and 88621 equipped)58 links
Rated Voltage60V DC maximum, 54 VDC nominal usage
Weight (without a battery)4.2 kg (9.3 lbs)
Charger Type88610, 88602, or 88605
Battery Type88620, 88625, 88640, 88650, 88660, or 88675*

*If you are using this machine with battery pack Models 88640, 88650, 88660, or 88675, you must install quick-release harness Model 88622 (not included).

Appropriate Temperature Ranges

Charge/store the battery pack at5°C (41°F) to 40°C (104°F)*
Use the battery pack at-30°C (-22°F) to 49°C (120°F)*
Use the tool at 0°C (32°F) to 49°C (120°F)*

*Charging time will increase if you do not charge the battery within this range.

Store the tool, battery pack, and battery charger in an enclosed clean, dry area.

Operation

Before Using the Pole Saw

Before using the pole saw, do the following:

Starting the Attachment

  1. Ensure that the vents on the attachment, power head, and battery are clear of any dust and debris.

  2. Align the cavity in the battery pack with the tongue on the handle housing (Figure 6).

    g357444
  3. Push the battery pack into the handle until the battery locks into the latch.

  4. To start the attachment, press the lockout button, then squeeze the run trigger (Figure 7).

    Note: Slide the variable-speed switch to change the speed of the attachment.

    g357456

Shutting Off the Pole Saw

To shut off the pole saw, release the trigger.

Whenever you are not using the pole saw or are transporting the pole saw to or from the work area, remove the battery pack and install the guide bar cover.

Removing the Battery Pack from the Power Head

Press the battery latch on the machine to release the battery pack and slide the battery pack out of the machine (Figure 8).

g357457

Removing the Attachment from the Power Head

  1. Ensure that the battery pack is removed from the power head; refer to Removing the Battery Pack from the Power Head.

  2. Loosen the screw-handle on the shaft connector (Figure 4).

  3. Press the locking button down while pulling the 2 shafts apart (Figure 4).

Cutting with the Pole Saw

Warning

Operating a pole saw improperly can cause serious personal injury or death.

Read and follow all operating instructions carefully to avoid possible personal injury.

Warning

Do not operate near electrical power lines; the pole saw has not been designed to provide protection from electric shock in the event of contact with overhead electric lines,

Consult local regulations for safe distances from overhead electric power lines and ensure that the operating position is safe and secure before operating the pole saw.

Warning

Kickback can cause serious or fatal injury to you.

Avoid touching objects to be cut with the nose of the pole saw guide bar.

There are 2 types of kickback:

  • A fast upward motion of the pole saw that results when the chain at the nose or top of the bar contacts an object

  • A fast backward motion of the pole saw that results when the chain at the nose or top of the bar is pinched by the object being cut

Figure 9 shows the area of the bar to avoid contacting an object to prevent kickback.

g318677
  1. Grip the pole saw with 2 hands.

  2. Stand on solid, even ground in front of the tree to be trimmed and position yourself for balanced, stable footing while cutting.

  3. Ensure that you only cut the wood that you intend to cut; do not allow the saw chain to contact the earth, other logs, or any other objects when cutting.

  4. Ensure that the saw chain is rotating at full speed before starting a cut.

  5. Cut with the branch near the rear of the guide bar, close to the cutting guide; press the saw chain lightly against the wood and allow the weight of the pole saw to drive the cutting (Figure 10).

    Important: If the chain binds in the cut, do not attempt to free it by running the motor. Shut off the pole saw, remove the battery, and lift the limb while holding the saw; this should release the pinch and free the pole saw.

    g358883
  6. Keep steady pressure on the pole saw, cutting in a straight line, and release pressure only near the end of the cut.

  7. Release the trigger as soon as you complete a cut.

Pruning a Tree

Warning

Cutting higher limbs from a tree off the ground can put you in an unstable position that could be unsafe for you while handling a pole saw, resulting in possible serious personal injury or death to you or bystanders.

When cutting limbs from a standing tree, use the following practices:

  • Do not climb on limbs or branches with a pole saw.

  • Do not overreach, and cut with both hands on the pole saw.

  • Ensure that all bystanders are away from the area where branches may fall.

  1. Grip the pole saw as described in Cutting with the Pole Saw.

  2. While cutting small branches, apply light pressure to the branch to be cut.

  3. While cutting larger branches, make a shallow undercut and then complete the cut from the topside of the branch.

    1. Cut from the underside of the limb about 15 cm (6 inches) from the trunk. Cut a third of the way through the limb.

    2. Cut 5.0 to 10.0 cm (2 to 4 inches) farther out on the limb and from above. Cut the limb until it falls.

    3. Cut the limb stub at the branch collar (Figure 11).

      Important: Do not cut the limb past the collar, flush to the trunk, or leave a large limb stub; this damages the tree.

      g316577

Maintenance

Recommended Maintenance Schedule(s)

Maintenance Service IntervalMaintenance Procedure
Before each use or daily
  • Check the oil level and add bar and chain oil if necessary.
  • Check that oil is flowing to the chain.
  • Check the chain tension and adjust it if necessary.
  • Ensure that the bar is straight and undamaged
  • Check the chain for sharpness; contact an Authorized Service Dealer to have the chain sharpened or replaced.
  • After each battery drain cycle
  • Check the oil level and add bar and chain oil if necessary.
  • Check the chain tension and adjust it if necessary.
  • Yearly or before storage
  • Service the guide bar, chain, and drive sprocket.
  • Check the chain for sharpness; contact an Authorized Service Dealer to have the chain sharpened or replaced.
  • Checking the Oil Level and Adding Bar and Chain Oil

    Maintenance Service IntervalMaintenance Procedure
    Before each use or daily
  • Check the oil level and add bar and chain oil if necessary.
  • After each battery drain cycle
  • Check the oil level and add bar and chain oil if necessary.
  • Important: Use only bar and chain oil (sold separately).

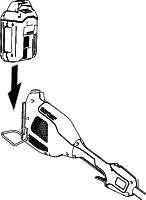
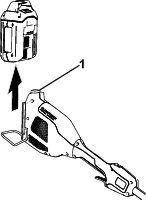
    1. Shut off the pole saw and remove the battery pack; refer to Removing the Battery Pack from the Power Head.

    2. Place the pole saw on a flat surface with the oil cap facing up.

    3. Check the oil level in the oil tank; if the oil does not reach the MIN line of the oil tank, add bar and chain oil as needed.

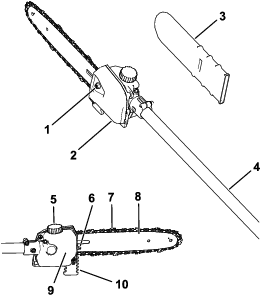
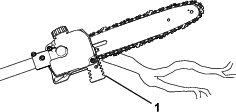
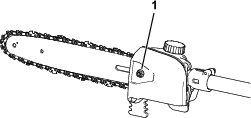
    4. Clean the area around the oil cap (Figure 9).

      Note: Ensure that you do not allow debris/wood chips to enter the oil tank.

    5. Remove the oil-tank cap by rotating counterclockwise, and pour bar and chain oil into the pole saw until the oil reaches the MAX line on the oil tank (Figure 9).

      Important: Do not fill the pole saw higher than the MAX line on the oil tank.

    6. Clean up any spilled oil and secure the oil-tank cap.

    7. Ensure that oil is flowing to the chain; refer to Checking the Flow of Bar and Chain Oil.

    Checking the Flow of Bar and Chain Oil

    Maintenance Service IntervalMaintenance Procedure
    Before each use or daily
  • Check that oil is flowing to the chain.
    1. Prepare to use the pole saw; refer to Before Using the Pole Saw.

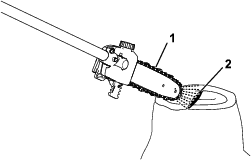
    2. To ensure that oil is flowing to the chain, point the nose of the pole saw a few inches from a surface (e.g. paper, cardboard, a stump) and run the pole saw; you should be able to see a light spray of oil on the surface (Figure 12).

      g358880
    3. If necessary, adjust the flow of oil as follows:

      1. Place the pole saw on a flat surface and remove the battery pack; refer to Removing the Battery Pack from the Power Head.

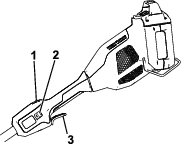
      2. Turn the screw on the bottom of the pole saw head according to the diagram on the side cover to increase or decrease the flow of oil.

      3. Check the flow of bar and chain oil; repeat this procedure until oil flows at the desired rate.

    4. If oil is not flowing, ensure that there is oil in the tank and that the area under the side cover is clean; refer to Checking the Oil Level and Adding Bar and Chain Oil and Servicing the Guide Bar, Chain, and Drive Sprocket.

    Adjusting the Chain Tension

    Maintenance Service IntervalMaintenance Procedure
    Before each use or daily
  • Check the chain tension and adjust it if necessary.
  • After each battery drain cycle
  • Check the chain tension and adjust it if necessary.
  • Ensure that the chain is properly tensioned.

    A loose chain shortens the life of the drive sprocket and the guide bar and may cause the chain to fall off.

    An overtightened chain overheats the guide bar and chain, causing rapid wear, and may burn out the motor or break the chain.

    The chain tension is correct when you are able to use a gloved hand to pull the chain smoothly around the guide bar. The chain should remain in contact with the bottom edge of the guide bar.

    Also, check the chain tension of a new chain after a few cuts; a new chain usually stretches and requires adjustment after a few cuts.

    Danger

    Contact with the pole saw teeth can cause serious personal injury.

    • Remove the battery pack before adjusting or maintaining the pole saw.

    • Always wear gloves when adjusting or maintaining the pole saw.

    1. Place the pole saw on a level surface and remove the battery pack; refer to Removing the Battery Pack from the Power Head.

    2. Allow the saw chain to cool.

      Important: Do not tension a hot chain; it may contract as it cools, resulting in an overtightened chain.

    3. Inspect the guide bar for bends or damage, replace if necessary.

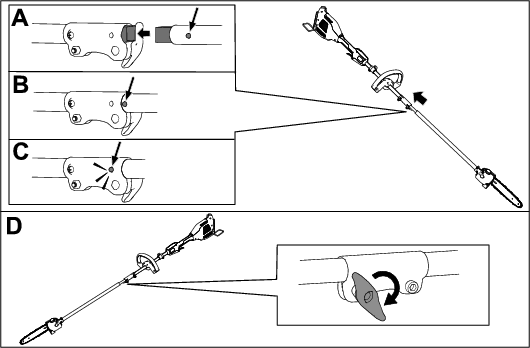
    4. Turn the bar cover screw counterclockwise to loosen the bar cover, but do not remove it (Figure 13).

      g358882
    5. Adjust the chain tension using the chain tensioning screw (Figure 14), and then secure the side cover to the pole saw by turning the bar cover screw clockwise before checking the tension (Figure 13).

      • To tighten the chain, turn the chain tensioning screw clockwise.

      • To loosen the chain, turn the chain tensioning screw counterclockwise.

      g358881

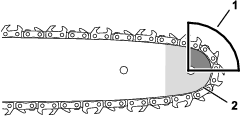
      Adjust the chain tension until the chain touches the bottom edge of the guide bar, then pull the chain away from the bottom edge of the guide bar; a properly adjusted chain can only be pulled 3.2 to 6.4 mm (1/8 to 1/4 inch) away from the guide bar, and snaps back on release.

      Note: While adjusting the chain tension, lift up the tip of the guide bar with a gloved hand to ensure the guide bar does not sag and affect chain tension.

    6. Use a gloved hand to pull the chain around the guide bar. A properly tensioned chain should move smoothly and remain in contact with the bottom edge of the guide bar.

    7. If the chain is not properly tensioned, repeat steps 4 through 7.

    Servicing the Guide Bar, Chain, and Drive Sprocket

    Maintenance Service IntervalMaintenance Procedure
    Before each use or daily
  • Ensure that the bar is straight and undamaged
  • Yearly or before storage
  • Service the guide bar, chain, and drive sprocket.
  • Danger

    Contact with the pole saw teeth can cause serious personal injury.

    • Remove the battery pack before adjusting or maintaining the pole saw.

    • Always wear gloves when adjusting or maintaining the pole saw.

    1. Place the pole saw on a flat surface and remove the battery pack; refer to Removing the Battery Pack from the Power Head.

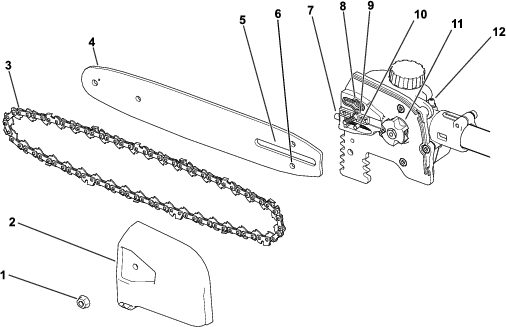
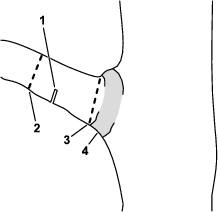
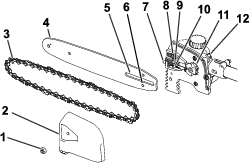
    2. Remove the side cover; turn the bar cover screw counterclockwise until the screw is removed, then remove the side cover (Figure 15).

      g363400
    3. Loosen the chain by turning the chain-tightening screw counterclockwise (Figure 14).

    4. Separate the chain from the guide bar and set them aside.

    5. Clean any debris from the area under the side cover.

      Important: Ensure that the chain adjusting stud is inserted into the chain adjusting stud slot on the guide bar (Figure 15).You may need to rotate the chain-tensioning screw to fit the stud into the slot on the guide bar (Figure 15).

    6. Inspect the drive sprocket; if it is excessively worn or damaged, replace it; contact your authorized service dealer.

    7. Check the oil outlet (Figure 15) for debris and clean the area if necessary.

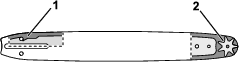
    8. Clean the guide bar and chain; use a wire or a small flat-head screwdriver to remove dirt and debris from the groove along the edge of the guide bar, starting from the sprocket on the front end and moving rearward.

      Ensure that the oil channel in the bar that aligns with the oil outlet on the pole saw is clean so that oil can flow freely to the chain (Figure 16).

      g315856
    9. Inspect the guide bar and chain; if the bar is bent, the grooves are damaged, or if the sprocket on the front end does not rotate freely, replace the guide bar; if the chain is excessively worn or damaged, replace it.

    10. Install the guide bar and chain; refer to Installing the Guide Bar and Chain.

    11. Ensure that oil is flowing to the chain; refer to Checking the Flow of Bar and Chain Oil.

    Greasing the Pole Saw

    Maintenance Service IntervalMaintenance Procedure

    Grease Type: General-purpose grease.

    1. Place the pole saw on a flat surface and remove the battery pack; refer to Removing the Battery Pack from the Power Head.

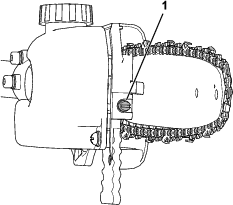
    2. Clean the grease fitting with a rag (Figure 15).

    3. Connect a grease gun to the fitting and pump grease into the fitting until grease flows out from the fitting.

    4. Wipe up any excess grease.

    Installing the Guide Bar and Chain

    Danger

    Contact with the pole saw teeth can cause serious personal injury.

    • Remove the battery pack before adjusting or maintaining the pole saw.

    • Always wear gloves when adjusting or maintaining the pole saw.

    1. If the side cover is installed to the machine, remove it; refer to Servicing the Guide Bar, Chain, and Drive Sprocket.

    2. Place the chain around the sprocket on the front end of the guide bar, with the cutting edge of the chain teeth on the top of the bar facing forward as shown in the diagram beneath the side cover of the pole saw.

    3. Feed the chain around the guide bar and align the chain into the groove of the guide bar.

      Note: If you are installing a new chain, flip the guide bar to avoid uneven wear.

    4. Position the open loop of the chain (not on the guide bar) around the drive sprocket on the pole saw and install the guide bar and attached chain onto the pole saw.

    5. Install the side cover, but do not fully tighten the side cover screw.

    6. Adjust the chain tension; refer to Adjusting the Chain Tension.

    Sharpening the Chain

    Maintenance Service IntervalMaintenance Procedure
    Before each use or daily
  • Check the chain for sharpness; contact an Authorized Service Dealer to have the chain sharpened or replaced.
  • Yearly or before storage
  • Check the chain for sharpness; contact an Authorized Service Dealer to have the chain sharpened or replaced.
  • A sharp chain ensures better cutting performance and longer battery life.

    The chain needs to be sharpened or replaced if you must force it onto the wood, or if it produces sawdust instead of full wood chips.

    Contact an Authorized Service Dealer to have the chain sharpened or replaced.

    Service

    Should the pole saw need service, take the tool to your Authorized Service Dealer.

    Storage

    Important: Store the machine, battery pack, and charger only in temperatures that are within the appropriate range; refer to Specifications.

    Important: If you are storing the battery pack for the off-season, charge it until 2 or 3 LED indicators turn green on the battery. Do not store a fully charged or fully depleted battery. When you are ready to use the machine again, charge the battery pack until the left indicator light turns green on the charger or all 4 LED indicators turn green on the battery.

    • Disconnect the machine from the power supply (i.e., remove the battery pack) and check for damage after use.

    • Clean all foreign material from the machine.

    • Do not store the machine with the battery pack installed.

    • Store the machine, battery pack, and battery charger in a well-ventilated place that is inaccessible to children.

    • Keep the machine, battery pack, and battery charger away from corrosive agents such as garden chemicals and de-icing salts.

    • To reduce the risk of serious personal injury, do not store the battery pack outside or in vehicles.

    • Store the machine, battery pack, and battery charger in an enclosed clean, dry area.

    Preparing the Battery Pack for Recycling

    Important: Upon removal, cover the terminals of the battery pack with heavy-duty adhesive tape. Do not attempt to destroy or disassemble the battery pack or remove any of its components.

    Graphic

    Lithium-ion battery packs labeled with the Call2Recycle seal can be recycled at any participating retailer or battery recycling facility in the Call2Recycle program (US and Canada only). To locate a participating retailer or facility closest to you, please call 1-800-822-8837 or visit www.call2recycle.org. If you cannot locate a participating retailer or facility nearby, or if your rechargeable battery is not labeled with the Call2Recycle seal, please contact your local municipality for more information on how to responsibly recycle the battery. If you are located outside of the US and Canada, please contact your authorized Toro distributor.

    Troubleshooting

    Perform only the steps described in these instructions. All further inspection, maintenance, and repair work must be performed by an authorized service center or a similarly qualified specialist if you cannot solve the problem yourself.

    ProblemPossible CauseCorrective Action
    The pole saw does not run or does not run continuously.
    1. The battery pack is low on charge.
    2. The battery pack is not fully seated.
    3. The battery pack is over or under the appropriate temperature range.
    4. The battery pack has exceeded high amperage limits.
    5. There is moisture on the leads of the battery pack.
    6. There is debris under the cover.
    1. Charge the battery pack.
    2. Ensure that the battery pack is inserted all the way into the housing.
    3. Move the battery pack to a place where it is dry and the temperature is between 5°C (41°F) and 40°C (104°F).
    4. Release the trigger, then press the trigger switch.
    5. Allow the battery pack to dry or wipe it dry.
    6. Remove the cover and clean out any debris.
    The pole saw runs, but the chain does not rotate.
    1. The chain is not properly seated on the drive sprocket.
    2. There is debris under the cover.
    1. Install the chain and ensure that the links are properly seated in the drive sprocket.
    2. Remove the cover and clean out any debris.
    The pole saw does not properly cut.
    1. The chain is not tensioned correctly.
    2. The chain is dull or damaged.
    3. The guide bar is bent or the grooves are damaged.
    4. The chain is installed backward.
    5. The chain is not being lubricated properly.
    1. Set the proper tension on the chain.
    2. Replace the chain.
    3. Replace the guide bar
    4. Install the chain correctly.
    5. Check the oil level and ensure that oil is flowing to the chain.
    The chain oil is not lubricating properly.
    1. The oil level is low.
    2. The oil outlet is plugged.
    3. There is debris under the cover.
    4. The oil channel or groove in the guide bar is plugged.
    1. Check the oil level.
    2. Clean out debris from the oil outlet.
    3. Remove the cover and clean out any debris.
    4. Clean out debris in the bar.