Introduction

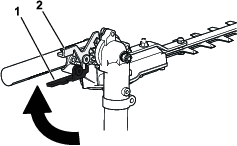
This pole hedge trimmer attachment is intended to be used by residential homeowners to maintain bushes and hedges. It is to be used only by adults. It is designed to be used in combination with the Toro Flex-Force Power System 60V MAX Attachment-Capable Power Head Model 51810T. Using this product for purposes other than its intended use could prove dangerous to you and bystanders.

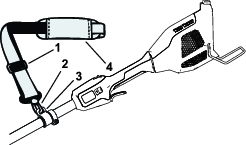
Important: You must install the included quick-release harness for proper support and balance.

Read this information carefully to learn how to operate and maintain your product properly and to avoid injury and product damage. You are responsible for operating the product properly and safely.

Visit www.Toro.com for more information, including safety tips, training materials, accessory information, help finding a dealer, or to register your product.

Whenever you need service, genuine the manufacturer parts, or additional information, contact an Authorized Service Dealer or the manufacturer Customer Service and have the model and serial numbers 
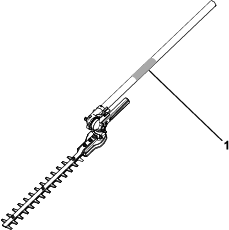
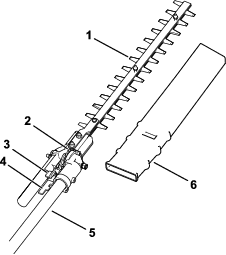
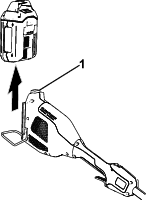
of your product ready. Figure 1 identifies the location of the model and serial numbers on the product. Write the numbers in the space provided.

Important: With your mobile device, you can scan the QR code (if equipped) on the serial number plate to access warranty, parts, and other product information.

g363088

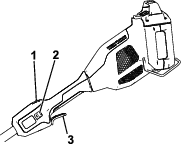
This manual identifies potential hazards and has safety messages identified by the safety-alert symbol (Figure 2), which signals a hazard that may cause serious injury or death if you do not follow the recommended precautions.

sa-black

This manual uses 2 words to highlight information. Important calls attention to special mechanical information and Note emphasizes general information worthy of special attention.

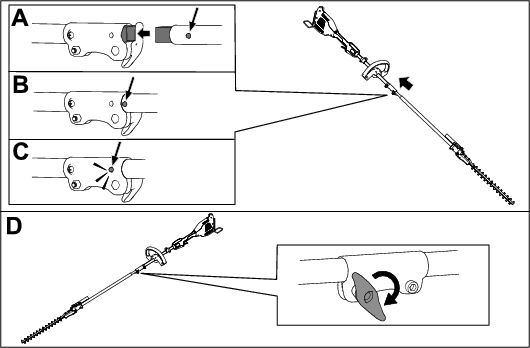
The Model 51810T Power Head is compatible with a variety of Toro-approved attachments that, when combined, comply with specific standards; see the following table for more detail.

CombinationPower Head ModelAttachment ModelStandard
String Trimmer51810T88716Conforms to UL STD 82Certified to CSA STD C22.2 No. 147
Edger51810T88710Conforms to UL STD 82Certified to CSA STD C22.2 No. 147
Pole Saw51810T88714Conforms to UL STD 82Certified to CSA STD C22.2 No. 147
Cultivator51810T88715Conforms to UL STD 82Certified to CSA STD C22.2 No. 147
Hedge Trimmer51810T88713Conforms to UL STD 62841-4-2Certified to CSA STD C22.2 62841-4-2
Graphic

For assistance, please see www.Toro.com/support for instructional videos or contact your Authorized Service Dealer before returning this product.
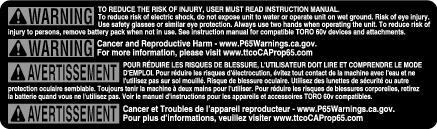
Warning

CALIFORNIA

Proposition 65 Warning

The power cord on this product contains lead, a chemical known to the State of California to cause birth defects or other reproductive harm. Wash hands after handling.

Use of this product may cause exposure to chemicals known to the State of California to cause cancer, birth defects, or other reproductive harm.

Safety

Warning

Read all safety warnings, instructions, illustrations and specifications provided with this power tool.

Failure to follow the warnings and instructions may result in electric shock, fire and/or serious injury.

Save all warnings and instructions for future reference.

The term "power tool" in the warnings refers to your mains-operated (corded) power tool or battery-operated (cordless) power tool.

IMPORTANT SAFETY

INSTRUCTIONS

I. Work area safety

  1. Keep work area clean and well lit.Cluttered or dark areas invite accidents.

  2. Do not operate power tools in explosive atmospheres, such as in the presence of flammable liquids, gases or dust. Power tools create sparks which may ignite the dust or fumes.

  3. Keep children and bystanders away while operating a power tool.Distractions can cause you to lose control.

II. Electrical safety

  1. Power tool plugs must match the outlet. Never modify the plug in any way. Do not use any adapter plugs with earthed (grounded) power tools.Unmodified plugs and matching outlets will reduce risk of electric shock.

  2. Avoid body contact with earthed or grounded surfaces, such as pipes, radiators, ranges and refrigerators.There is an increased risk of electric shock if your body is earthed or grounded.

  3. Do not expose power tools to rain or wet conditions.Water entering a power tool will increase the risk of electric shock..

  4. Do not abuse the cord. Never use the cord for carrying, pulling or unplugging the power tool. Keep cord away from heat, oil, sharp edges or moving parts.Damaged or entangled cords increase the risk of electric shock.

  5. When operating a power tool outdoors, use an extension cord suitable for outdoor use.Use of a cord suitable for outdoor use reduces the risk of electric shock.

  6. If operating a power tool in a damp location is unavoidable, use a residual current device (RCD) protected supply.Use of an RCD reduces the risk of electric shock.

III. Personal safety

  1. Stay alert, watch what you are doing and use common sense when operating a power tool. Do not use a power tool while you are tired or under the influence of drugs, alcohol or medication.A moment of inattention while operating power tools may result in serious personal injury.

  2. Use personal protective equipment. Always wear eye protection.Protective equipment such as a dust mask, non-skid safety shoes, hard hat or hearing protection used for appropriate conditions will reduce personal injuries.

  3. Prevent unintentional starting. Ensure the switch is in the off-position before connecting to power source and/or battery pack, picking up or carrying the tool.Carrying power tools with your finger on the switch or energizing power tools that have the switch on invites accidents.

  4. Remove any adjusting key or wrench before turning the power tool on.A wrench or a key left attached to a rotating part of the power tool may result in personal injury.

  5. Do not overreach. Keep proper footing and balance at all times.This enables better control of the power tool in unexpected situations.

  6. Dress properly. Do not wear loose clothing or jewellery. Keep your hair and clothing away from moving parts.Loose clothes, jewelry or long hair can be caught in moving parts.

  7. If devices are provided for the connection of dust extraction and collection facilities, ensure these are connected and properly used.Use of dust collection can reduce dust-related hazards.

  8. Do not let familiarity gained from frequent use of tools allow you to become complacent and ignore tool safety principles.A careless action can cause severe injury within a fraction of a second.

IV. Power tool use and care

  1. Do not force the power tool. Use the correct power tool for your application.The correct power tool will do the job better and safer at the rate for which it was designed.

  2. Do not use the power tool if the switch does not turn it on and off.Any power tool that cannot be controlled with the switch is dangerous and must be repaired.

  3. Disconnect the plug from the power source and/or remove the battery pack, if detachable, from the power tool before making any adjustments, changing accessories, or storing power tools.Such preventive safety measures reduce the risk of starting the power tool accidentally.

  4. Store idle power tools out of the reach of children and do not allow persons unfamiliar with the power tool or these instructions to operate the power tool.Power tools are dangerous in the hands of untrained users.

  5. Maintain power tools and accessories. Check for misalignment or binding of moving parts, breakage of parts and any other condition that may affect the power tool’s operation. If damaged, have the power tool repaired before use.Many accidents are caused by poorly maintained power tools.

  6. Keep cutting tools sharp and clean.Properly maintained cutting tools with sharp cutting edges are less likely to bind and are easier to control.

  7. Use the power tool, accessories and tool bits etc. in accordance with these instructions, taking into account the working conditions and the work to be performed.Use of the power tool for operations different from those intended could result in a hazardous situation.

  8. Keep handles and grasping surfaces dry, clean and free from oil and grease.Slippery handles and grasping surfaces do not allow for safe handling and control of the tool in unexpected situations.

V. Battery tool use and care

  1. Recharge only with the charger specified by the manufacturer.A charger that is suitable for one type of battery pack may create a risk of fire when used with another battery pack.

  2. Use power tools only with specifically designated battery packs.Use of any other battery packs may create a risk of injury and fire.

  3. When battery pack is not in use, keep it away from other metal objects, like paper clips, coins, keys, nails, screws or other small metal objects, that can make a connection from one terminal to another.Shorting the battery terminals together may cause burns or a fire.

  4. Under abusive conditions, liquid may be ejected from the battery; avoid contact. If contact accidentally occurs, flush with water. If liquid contacts eyes, additionally seek medical help.Liquid ejected from the battery may cause irritation or burns.

  5. Do not use a battery pack or tool that is damaged or modified.Damaged or modified batteries may exhibit unpredictable behaviour resulting in fire, explosion or risk of injury.

  6. Do not expose a battery pack or tool to fire or excessive temperature.Exposure to fire or temperature above 100 °C (212 °F) may cause explosion.

  7. Do not expose a battery pack or tool to rain or wet conditions.Water entering a power tool will increase the risk of electric shock.

  8. Follow all charging instructions and do not charge the battery pack or tool outside the temperature range specified in the instructions.Charging improperly or at temperatures outside the specified range may damage the battery and increase the risk of fire.

  9. CAUTION—A mistreated battery pack may present a risk of fire or chemical burn.Do not disassemble the battery pack. Do not heat the battery pack above 68°C (154°F) or incinerate it. Replace the battery pack with a genuine Toro battery pack only; using another type of battery pack may cause a fire or explosion. Keep battery packs out of the reach of children and in the original packaging until you are ready to use them.

VI. Service

  1. Have your power tool serviced by a qualified repair person using only identical replacement parts.This will ensure that the safety of the power tool is maintained.

  2. Never service damaged battery packs.Service of battery packs should only be performed by the manufacturer or authorized service providers.

VII. Hedge trimmer safety warnings

  1. To reduce the risk of electrocution, never use the extended-reach hedge trimmer near any electrical power lines.Contact with or use near power lines may cause serious injury or electric shock resulting in death.

  2. Always use two hands when operating the extended-reach hedge trimmer.Hold the extended-reach hedge trimmer with both hands to avoid loss of control.

  3. Always use head protection when operating the extended-reach hedge trimmer overhead.Falling debris can result in serious personal injury.

  4. Keep all parts of the body away from the blade. Do not remove cut material or hold material to be cut when blades are moving.Blades continue to move after the switch is turned off. A moment of inattention while operating the hedge trimmer may result in serious personal injury.

  5. Carry the hedge trimmer by the handle with the blade stopped and taking care not to operate any power switch.Proper carrying of the hedge trimmer will decrease the risk of inadvertent starting and resultant personal injury from the blades.

  6. When transporting or storing the hedge trimmer, always fit the blade cover.Proper handling of the hedge trimmer will decrease the risk of personal injury from the blades.

  7. When clearing jammed material or servicing the unit, make sure all power switches are off and the battery pack is removed or disconnected.Unexpected actuation of the hedge trimmer while clearing jammed material or servicing may result in serious personal injury.

  8. Hold the hedge trimmer by insulated gripping surfaces only, because the blade may contact hidden wiring or its own cord.Blades contacting a "live" wire may make exposed metal parts of the hedge trimmer "live" and could give the operator an electric shock.

  9. Keep all power cords and cables away from cutting area.Power cords or cables may be hidden in hedges or bushes and can be accidentally cut by the blade.

  10. Do not use the hedge trimmer in bad weather conditions, especially when there is a risk of lightning.This decreases the risk of being struck by lightning.

SAVE THESE

INSTRUCTIONS

Safety and Instructional Decals

Graphic

Safety decals and instructions are easily visible to the operator and are located near any area of potential danger. Replace any decal that is damaged or missing.

decal145-3141
decal145-3136

Setup

Connecting the Attachment to the Power Head

  1. Install the square shaft of the attachment into the square shaft of the power head (A of Figure 3).

  2. Align the locking button on the lower shaft with the slotted hole on the upper shaft and slide the 2 shafts together (B and C of Figure 3).

  3. The locking button clicks into the slotted hole when the shafts are secured (C of Figure 3).

  4. Using the screw-handle, tighten the screw on the shaft connector until it is secure (D of Figure 3).

g358758

Installing the Harness

Connect the metal hook on the shoulder harness to the strap collar on the pole saw handle (Figure 4).

g364485

The strap length is adjustable; slide the strap adjuster up to decrease the length of the strap, or down to increase the length of the strap (Figure 4).

If there is ever an emergency and you need to rapidly remove the harness, disconnect the quick-release buckle as follows:

  1. Press in on the sides of the buckle (A of Figure 5).

  2. Allow the buckle to disconnect (B of Figure 5).

g340477

Product Overview

g358713
Model88713, attaches to 51810T
Cutting Length406 mm (16 inches)
Rated Voltage60V DC maximum, 54 VDC nominal usage
No-load Speed3000 spm at 60 VDC max
Cutting width23 mm (9/10 inch)
Weight (attached to powerhead without a battery)4.8 kg (10.6 lbs)
Charger Type88610, 88602, or 88605
Battery Type88620, 88625, 88640, 88650, 88660, or 88675*

Appropriate Temperature Ranges

Charge/store the battery pack at5°C (41°F) to 40°C (104°F)*
Use the battery pack at-30°C (-22°F) to 49°C (120°F)*
Use the machine at0°C (32°F) to 49°C (120°F)*

*Charging time will increase if you do not charge the battery pack within this range.

Store the machine, battery pack, and battery charger in an enclosed clean, dry area.

Operation

Starting the Attachment

  1. Ensure that the vents on the attachment, power head, and battery are clear of any dust and debris.

  2. Align the cavity in the battery pack with the tongue on the handle housing (Figure 7).

    g357444
  3. Push the battery pack into the handle until the battery locks into the latch.

  4. To start the attachment, press the lockout button, then squeeze the run trigger (Figure 8).

    Note: Slide the variable-speed switch to change the speed of the attachment.

    g357456

Rotating the Hedge Trimmer Head

The hedge trimmer head can rotate 90° for different cutting situations.

  1. Remove the battery pack; refer to Removing the Battery Pack from the Power Head.

  2. Press the release trigger and the adjusting lever toward each other and rotate the hedge trimmer head.

  3. Release the lever and the trigger, and ensure that the hedge trimmer head and adjusting lever lock into place.

    g363855

Shutting Off the Hedge Trimmer

To shut off the hedge trimmer, release the run trigger (Figure 8). Allow at least 5 seconds for the cutting blade to stop moving.

Whenever you are not using the trimmer or are transporting the trimmer to or from the work area, remove the battery pack and install the blade cover.

Removing the Battery Pack from the Power Head

Press the battery latch on the machine to release the battery pack and slide the battery pack out of the machine (Figure 10).

g357457

Removing the Attachment from the Power Head

  1. Ensure that the battery pack is removed from the power head; refer to Removing the Battery Pack from the Power Head.

  2. Loosen the screw-handle on the shaft connector (Figure 3).

  3. Press the locking button down while pulling the 2 shafts apart (Figure 3).

Operating Tips

  • Use the power tool for cutting in either direction in a slow, sweeping action from side to side.

  • When trimming new growth, use a wide sweeping action so that the stems are fed directly into the cutting blade.

  • Use a non-powered hand saw or pruning saw to trim stems that are too large.

  • If desired, you can use a string to help cut your hedge level. Decide how high you want the hedge. Stretch a piece of string along the hedge at the desired height. Trim the hedge just above the guide line of string.

Maintenance

Remove the battery pack before maintenance or cleaning work.

Use only the manufacturer’s recommended replacement parts and accessories.

Inspect and maintain the product regularly. Have the product repaired only by an Authorized Service Dealer.

Greasing the Hedge Trimmer

Maintenance Service IntervalMaintenance Procedure

Grease Type: Lithium–based grease.

  1. Place the hedge trimmer on a flat surface and remove the battery pack; refer to Removing the Battery Pack from the Power Head.

  2. Clean the grease fittings with a rag (Figure 11).

  3. Connect a grease gun to each of the fittings and pump grease into the fittings until grease flows out from the fittings.

  4. Wipe up any excess grease.

    g363854

Storage

Important: Store the tool, battery pack, and charger only in temperatures that are within the appropriate range; refer to Specifications.

Important: If you are storing the battery pack for the off-season, charge it until 2 or 3 LED indicators turn green on the battery. Do not store a fully charged or fully depleted battery. When you are ready to use the tool again, charge the battery pack until the left indicator light turns green on the charger or all 4 LED indicators turn green on the battery.

  • Disconnect the product from the power supply (i.e., remove the plug from the power supply or the battery pack) and check for damage after use.

  • Clean all foreign material from the product.

  • Do not store the tool with the battery pack installed.

  • When not in use, store the tool, battery pack, and battery charger out of the reach of children.

  • Keep the tool, battery pack, and battery charger away from corrosive agents, such as garden chemicals and de-icing salts.

  • To reduce the risk of serious personal injury, do not store the battery pack outside or in vehicles.

  • Store the tool, battery pack, and battery charger in an enclosed clean, dry area.

Troubleshooting

Perform only the steps described in these instructions. All further inspection, maintenance, and repair work must be performed by an authorized service center or a similarly qualified specialist if you cannot solve the problem yourself.

ProblemPossible CauseCorrective Action
The tool does not start.
  1. The battery is not fully installed in the tool.
  2. The battery pack is not charged.
  3. The battery pack is damaged.
  4. There is another electrical problem with the tool.
  1. Remove and then replace the battery into the tool, making sure that it is fully installed and latched.
  2. Remove the battery pack from the tool and charge it.
  3. Replace the battery pack.
  4. Contact an Authorized Service Dealer.
The tool does not reach full power.
  1. The battery pack charge capacity is too low.
  2. The air vents are blocked.
  1. Remove the battery pack from the tool and fully charge the battery pack.
  2. Clean the air vents.
The tool is producing excessive vibration or noise.
  1. The blades are dull or damaged.
  1. Contact an Authorized Service Dealer.
The battery pack loses charge quickly.
  1. The battery pack is over or under the appropriate temperature range.
  2. The machine is overloaded
  1. Move the battery pack to a place where it is dry and the temperature is between 5°C (41°F) and 40°C (104°F).
  2. Trim at a slower pace.