Installation
Preparing the Machine
-
Move the machine to a level surface.
-
Lower all attachments.
-
Set the parking brake, shut off the engine, and wait for all moving parts to stop before you leave the machine.
-
Remove the key.
-
Ensure that the machine is secure from movement before you begin the installation.
-
Disconnect the negative (–) cable from the battery.
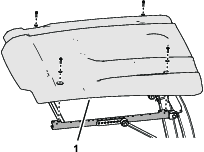
Removing the Sunshade
Installing the Switch Panel Kit
The Switch Panel Kit is required; refer to the Installation Instructions for the kit.
Installing the Lights
Parts needed for this procedure:
| Light | 4 |
| Front bracket | 2 |
| Rear bracket | 2 |
| Spacer | 4 |
| Long carriage screw | 4 |
| Short carriage screw | 4 |
| Flange nut | 8 |
| Carriage bolt | 4 |
| Nut | 4 |
| Harness | 1 |
| Switch | 1 |
| Fuse | 1 |
| Cable ties | 6 |
-
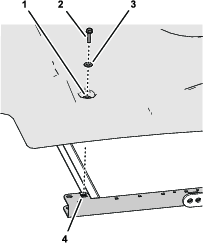
Secure each bracket to the sunshade frame with a long carriage bolt, a short carriage bolt, a spacer, and 2 flange nuts (Figure 3 and Figure 5).
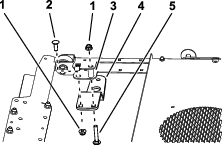
If the Beacon Kit is installed, remove and discard the beacon bracket and install the beacon to the light bracket (Figure 4).

-
Install a light to each bracket with a carriage bolt and a nut (Figure 5).

-
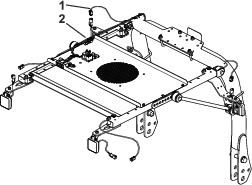
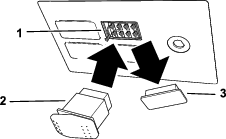
Plug the connector on the light-kit harness into the connector on the switch-panel harness (Figure 6).
-
Route the harness as shown in (Figure 6), and secure with the cable ties.
-
Remove and discard the plug from the front right space in the switch panel (Figure 7).
-
Plug the electrical connector into the switch and install the switch into the switch panel (Figure 7).
Note: Install the switch so that the thicker, rounded part is toward the rear of the machine.
-
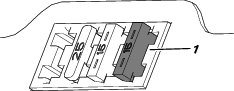
Insert the fuse into the position farthest to the right when looking at the fuse block (Figure 8).
Note: The fuse may not need to be installed if a fuse has already been installed from another Toro kit.
Connecting the Battery
Connect the battery; refer to the electrical system maintenance section of your Operator’s Manual.
Installing the Sunshade
-
Align the holes in the grommets of the sunshade with the 4 clip nuts of the side-frame channels.
-
Assemble the sunshade to the frame channels (Figure 2) with the 4 flange-head bolts (5/16 x 1-1/4 inches) and 4 washers (5/16 inch) that you removed earlier.
-
Torque the flange-head bolts to 10 to 14 N∙m (90 to 120 in-lb).
Operation
Using the Lights
Press the back of the switch to turn on the lights.
Press the front of the switch to turn off the lights.