Installation

Preparing the Machine

  1. Park the machine on a level surface.

  2. Engage the parking brake.

  3. Shut off the machine and remove the key.

Installing the Folding Windshield

Parts needed for this procedure:

Windshield assembly1
Middle windshield support1
Delta-point screw1
Spacer4
Hex-socket flange head bolt (M6 x 55 mm)4
Locknut (M6)4
  1. Remove the hood.

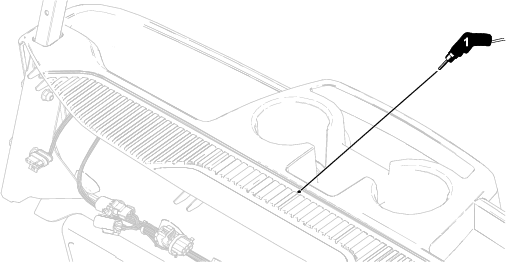
  2. At the indent in the dash, drill a hole (6 mm or 1/4 inch) as shown in Figure 1.

    g384988
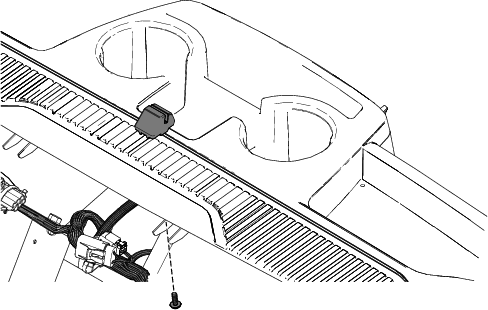
  3. Secure the middle windshield support to the opening in the dash using the delta-point screw (Figure 2).

    Torque the delta-point screw to 112 N∙cm (10 in-lb).

    g384989
  4. Insert the bottom of the windshield assembly into the middle windshield support.

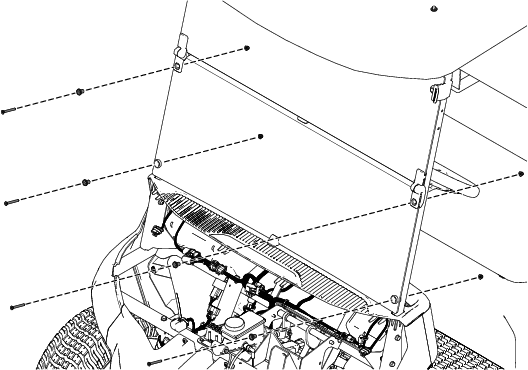
  5. Secure the windshield to the front canopy frame tubes using the 4 hex-socket flange head bolts (M6 x 55 mm), 4 spacers, and 4 locknuts (M6) as shown in Figure 3.

    Torque the hex-socket flange head bolts (M6 x 55 mm) to 9 N∙m (80 in-lb).

  6. Install the hood.

    g384990

Operation

Transporting a Machine with the Windshield Installed

When transporting a machine with the folded windshield installed, ensure that you follow these recommendations:

  • The machine is facing forward during transportation.

  • The folding windshield is secured in the down position using the rubber clamps.

  • Do not exceed a vehicle speed of 96 km/h (60 mph).

Maintenance

Cleaning the Windshield

  1. Rinse the windshield with lukewarm water.

  2. Using a soft cloth or sponge, wash the windshield with mild-detergent soap to clear the dirt and grime.

    Important: Do not scrub the windshield with a brush or rough fiber.

  3. Rinse the windshield with lukewarm water.

  4. Dry the windshield using a soft, microfiber cloth to prevent water spots.