Introduction

This machine is intended to be used by residential homeowners to trim grass as needed outdoors. Using this product for purposes other than its intended use could prove dangerous to you and bystanders.

Read this information carefully to learn how to operate and maintain your product properly and to avoid injury and product damage. You are responsible for operating the product properly and safely.

Visit www.Toro.com for product safety and operation training materials, accessory information, help finding a dealer, or to register your product.

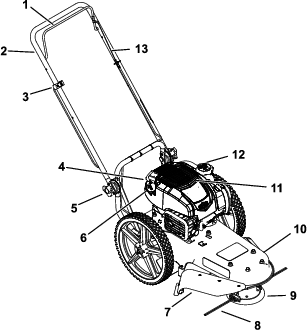
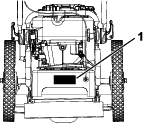
Whenever you need service, genuine Toro parts, or additional information, contact an Authorized Service Dealer or Toro Customer Service and have the model and serial numbers of your product ready. Figure 1 identifies the location of the model and serial numbers on the product. Write the numbers in the space provided.

g337001

This manual identifies potential hazards and has safety messages identified by the safety-alert symbol (Figure 2), which signals a hazard that may cause serious injury or death if you do not follow the recommended precautions.

g000502

This manual uses 2 words to highlight information. Important calls attention to special mechanical information and Note emphasizes general information worthy of special attention.

It is a violation of California Public Resource Code Section 4442 or 4443 to use or operate the engine on any forest-covered, brush-covered, or grass-covered land unless the engine is equipped with a spark arrester, as defined in Section 4442, maintained in effective working order or the engine is constructed, equipped, and maintained for the prevention of fire.

The enclosed engine owner's manual is supplied for information regarding the US Environmental Protection Agency (EPA) and the California Emission Control Regulation of emission systems, maintenance, and warranty. Replacements may be ordered through the engine manufacturer.

Please refer to the engine manufacturer’s information included with the machine.

Warning

CALIFORNIA

Proposition 65 Warning

The engine exhaust from this product contains chemicals known to the State of California to cause cancer, birth defects, or other reproductive harm.

Battery posts, terminals, and related accessories contain lead and lead compounds, chemicals known to the State of California to cause cancer and reproductive harm. Wash hands after handling.

Use of this product may cause exposure to chemicals known to the State of California to cause cancer, birth defects, or other reproductive harm.

Safety

This machine has been designed in accordance with EN 14910:2007+A1:2009.

General Safety

This product is capable of throwing objects. Always follow all safety instructions to avoid serious personal injury.

  • Read, understand, and follow the instructions and warnings in this Operator’s Manual and on the machine and attachments before starting the engine.

  • Do not put your hands or feet near moving parts or under the machine.

  • Do not operate the machine without all guards and other safety protective devices in place and functioning properly on the machine.

  • Keep bystanders and children out of the operating area. Do not allow children to operate the machine. Local regulations may restrict the age of the operator. Allow only people who are responsible, trained, familiar with the instructions, and physically capable to operate the machine.

  • Stop the machine, shut off the engine, and wait for all moving parts to stop before servicing, fueling, or unclogging the machine.

  • Improperly using or maintaining this machine can result in injury. To reduce the potential for injury, comply with these safety instructions and always pay attention to the safety-alert symbol Graphic, which means Caution, Warning, or Danger—personal safety instruction. Failure to comply with these instructions may result in personal injury.

Safety and Instructional Decals

Graphic

Safety decals and instructions are easily visible to the operator and are located near any area of potential danger. Replace any decal that is damaged or missing.

decal133-8062
decal144-4838
decal144-4840

Setup

Raising the Handle

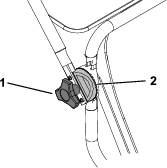
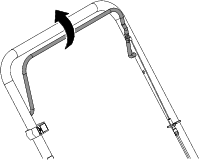
  1. Hold the handle with 1 hand and use the other to loosen both handle-adjustment knobs until the ratchet teeth are disengaged. Do not remove the knobs.

  2. Raise the handle and adjust it to the desired position and align the ratchet teeth. Ensure that both sides are level.

    Important: Ensure the cables are not pinched between the upper and lower handles.

  3. Tighten the knobs and ensure that the handle pivots lock in place.

g393640

Installing the Discharge Chute

Parts needed for this procedure:

Discharge chute1
Screw4

Install the discharge chute to the mower deck as shown.

g393638

Adding Oil to the Engine

Parts needed for this procedure:

Engine oil1

Important: If the oil level in the engine is too low or too high and you run the engine, you may damage the engine.

  1. Move the machine to a level surface.

  2. Carefully pour about 3/4 of the engine capacity of oil into the oil-fill tube.

  3. Wait 3 minutes for the oil to settle in the engine.

  4. Wipe the dipstick clean with a clean cloth.

    g334792
  5. Insert the dipstick into the oil-fill tube, then remove the dipstick.

  6. Read the oil level on the dipstick (Figure 5).

    • If the oil level on the dipstick is too low, carefully pour a small amount of oil into the oil-fill tube, wait 3 minutes, and repeat steps 4 through 6 until the oil level on the dipstick is correct.

    • If the oil level on the dipstick is too high, drain the excess oil until the oil level on the dipstick is correct.

    Important: If the oil level in the engine is too low or too high and you run the engine, you may damage the engine.

  7. Install the dipstick into the oil-fill tube securely.

  8. Recycle the used oil properly.

Product Overview

g393639

Note: Specifications and design are subject to change without notice.

Length137 cm (54 inches)
Width with discharge chute installed62 cm (24 inches)
Width without chute installed54.5 cm (21.5 inches)
Height99 cm (39 inches)
Weight31 kg (68 lb)
Cutting width56 cm (22 inches)

To ensure optimum performance and continued safety certification of the machine, use only genuine Toro replacement parts and accessories. Replacement parts and accessories made by other manufacturers could be dangerous, and such use could void the product warranty.

Operation

Determine the left and right sides of the machine from the normal operating position.

Before Operation

Before Operation Safety

General Safety

  • Do not allow children or untrained people to operate or service the machine. Local regulations may restrict the age of the operator.

  • Shut off the machine and wait for all moving parts to stop before you leave the operator’s position. Allow the machine to cool before adjusting, fueling, unclogging, servicing, cleaning, or storing the machine.

  • Become familiar with the safe operation of the equipment, operator controls, and safety signs.

  • Check that all guards and safety devices, such as deflectors, are in place and functioning properly. Do not operate the machine unless they are functioning properly.

  • Know how to shut off the engine quickly.

  • Inspect the machine frequently to ensure that it is in safe working condition and that engine-mounting bolts and other fasteners are properly tightened.

  • Inspect the area where you will use the machine and remove all objects that could interfere with the operation of the machine or that the machine could throw.

  • Contact with the moving string lines will cause serious injury. Do not put your hands or feet near them.

Fuel Safety

  • Use extreme care in handling fuel. It is extremely flammable and its vapors are explosive.

  • Extinguish all cigarettes, cigars, pipes, and other sources of ignition.

  • Use only an approved fuel container.

  • Do not remove the fuel cap or add fuel to the tank while the engine is running.

  • Allow the engine to cool before filling the fuel tank.

  • Do not fill the fuel tank indoors.

  • Do not store the machine or fuel container where there is an open flame, spark, or pilot light, such as on a water heater or other appliance.

  • Do not fill containers inside a vehicle or on a truck or trailer bed with a plastic liner. Always place containers on the ground, away from the vehicle before filling.

  • Remove the machine from the truck or trailer before filling the fuel tank. If this is not possible, then add fuel from a portable container rather than from a fuel-dispenser nozzle.

  • Keep the fuel-dispenser nozzle in contact with the rim of the fuel tank or container opening at all times until fueling is complete. Do not use a nozzle lock-open device.

  • If you spill fuel on your clothing, change your clothing immediately.

  • Do not overfill the fuel tank. Replace the fuel cap and tighten it securely after fueling.

  • If you spill fuel, do not attempt to start the engine; move the machine away from the spill and avoid creating a source of ignition until the fuel vapors have dissipated.

  • Store fuel in a fuel container and keep it out of the reach of children.

  • Fuel is harmful or fatal if swallowed. Long-term exposure to vapors can cause serious injury and illness.

    • Avoid prolonged breathing of vapors.

    • Keep your hands and face away from the nozzle and the fuel-tank opening.

    • Keep fuel away from your eyes and skin.

Adding Fuel

Fuel Specifications

TypeUnleaded gasoline
Minimum octane rating87 (US) or 91 (research octane; outside the US)
EthanolNo more than 10% by volume
MethanolNone
MTBE (methyl tertiary butyl ether)Less than 15% by volume
OilDo not add to the fuel

Use only clean, fresh (no more than 30 days old), fuel from a reputable source.

Using Stabilizer/Conditioner

Use fuel stabilizer/conditioner in the machine to keep the fuel fresh longer when used as directed by the fuel-stabilizer manufacturer.

Important: Do not use fuel additives containing methanol or ethanol.

Add the amount of fuel stabilizer/conditioner to fresh fuel as directed by the fuel-stabilizer manufacturer.

Filling the Fuel Tank

Fill the fuel tank as shown in Figure 7.

g230458

Adjusting the Handle Height and Angle

  1. Holding the handle with 1 hand, loosen both handle-adjustment knobs until the ratchet teeth are disengaged. Do not remove the knobs.

  2. Adjust the handle to the desired position and align the ratchet teeth. Ensure that both sides are level.

  3. Tighten the knobs.

g334885

Performing Daily Maintenance

Before starting the machine each day, perform the Each Use/Daily procedures listed in .

Adjusting the Height of Cut

You can adjust the height of cut from 38 to 76 mm (1-1/2 to 3 inches). The recommended cutting height for most yards is 51 mm (2 inches).

  1. Move the machine to a level surface, shut off the engine, and wait for all moving parts to stop.

  2. Disconnect the spark-plug wire from the spark plug.
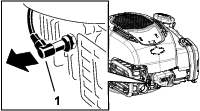
  3. Use an Allen wrench (5 mm) to loosen the 2 capscrews.

  4. Adjust the mower head to the desired height.

  5. Tighten the capscrews.

  6. Connect the spark plug.

g335100

During Operation

During Operation Safety

General Safety

  • Wear appropriate clothing, including eye protection; long pants; substantial, slip-resistant footwear; and hearing protection. Tie back long hair and do not wear loose clothing or loose jewelry.

  • Use your full attention while operating the machine. Do not engage in any activity that causes distractions; otherwise, injury or property damage may occur.

  • Do not operate the machine while ill, tired, or under the influence of alcohol or drugs.

  • Keep bystanders out of the operating area. Keep small children out of the operating area and under the watchful care of a responsible adult who is not operating the machine. Stop the machine if anyone enters the area.

  • Always look down and behind you before moving the machine in reverse or pulling the machine toward you.

  • Operate the machine only in good visibility and appropriate weather conditions. Do not operate the machine when there is the risk of lightning.

  • Wet grass or leaves can cause injury if you slip and fall. Avoid mowing in wet conditions.

  • Use extreme care when approaching blind corners, shrubs, trees, or other objects that may block your view.

  • Do not direct the discharge material toward anyone. Avoid discharging material against a wall or obstruction; material may ricochet toward you. Stop the machine when crossing gravel surfaces.

  • Watch for holes, ruts, bumps, rocks, or other hidden objects. Uneven terrain could cause you to lose your balance or footing.

  • If the machine strikes an object or starts to vibrate, immediately shut off the engine, wait for all moving parts to stop, and disconnect the wire from the spark plug before examining the machine for damage. Make all necessary repairs before resuming operation.

  • Do not pick up or carry the machine while the engine is running.

  • Always shut off the machine, wait for all moving parts to stop, and allow the machine to cool before adjusting, servicing, cleaning, or storing it.

  • If the engine has been running, it will be hot and can severely burn you. Keep away from the hot engine.

  • Operate the engine only in well-ventilated areas. Exhaust gases contain carbon monoxide, which is an odorless, deadly poison.

  • Do not change the engine governor settings or overspeed the engine.

  • When shutting off the engine, reduce the throttle setting and, if the engine is equipped with a shut-off valve, shut off the fuel.

  • Shut off the machine if you must tilt it to transport it when crossing surfaces other than grass and when transporting it to and from the operating area.

  • Do not engage the bail when starting the engine.

  • Start the engine carefully according to the instructions and keep your feet away from the cutting line.

  • Do not tilt the machine when starting the engine unless it is necessary. If you must tilt the machine, do not tilt it more than necessary and lift only the part that is away from you.

  • Never replace the cutting lines with metal parts.

  • Never adjust or repair the machine while the engine is running. Always wear eye protection whenever you make adjustments or repairs.

Slope Safety

  • Mow across the face of slopes; never up and down. Use caution when changing direction on slopes.

  • Do not mow on excessively steep slopes. Walk, never run. Poor footing could cause a slip-and-fall accident.

  • Mow with caution near drop-offs, ditches, or embankments.

Starting the Engine

  1. Set the engine on/off switch to the ON position.

  2. Pull the recoil-start handle.

    Note: When you pull the recoil-start handle, pull it lightly until you feel resistance, then pull it sharply. Allow the rope to return to the handle slowly.

    Note: If the machine does not start after several attempts, contact an Authorized Service Dealer.

Engaging the Mower Head

  1. After starting the engine, hold the mower bail against the handle to start mower head.

  2. Push the machine forward to mow.

  3. Release the bail to disengage the mower head.

g337012

Shutting Off the Engine

  1. Release the mower bail.

  2. Move the engine on/off switch to the OFF position.

  3. Wait for all moving parts to stop before leaving the operating position.

Operating Tips

  • When mowing tall and thick weeds or grass, operate the machine at a slower walking speed.

  • Frequently remove grass buildup under the mower; refer to Removing Debris from the Machine.

  • For best results and increased line life, mow using the ends of the line by moving slowly through thick or heavy weeds.

  • Shorter mower lines increase job time. Replace the mower lines when they are worn to less than half their original length.

  • Mower head contact with concrete, asphalt, and harder surfaces may cause premature wear to the height guide and lines.

After Operation

After Operation Safety

General Safety

  • Always shut off the machine, wait for all moving parts to stop, and allow the machine to cool before adjusting, servicing, cleaning, or storing it.

  • Clean grass, debris, and excessive grease from the machine to help prevent fires. Clean up oil or fuel spills.

  • Never store the machine or fuel container where there is an open flame, spark, or pilot light, such as on a water heater or on other appliances.

Hauling Safety

  • Use care when loading or unloading the machine.

  • Secure the machine from rolling.

Maintenance

Maintenance Safety

  • Shut off the machine and wait for all moving parts to stop before you leave the operator’s position. Allow the machine to cool before adjusting, fueling, unclogging, servicing, cleaning, or storing it.

  • Disconnect the spark-plug wire from the spark plug before performing any maintenance procedure.

  • Never tamper with safety devices. Check their proper operation regularly.

  • Keep all nuts, bolts and screws tight to ensure that the machine is in safe working condition.

  • Replace a faulty muffler.

  • Tipping the machine may cause the fuel to leak. Fuel is flammable and explosive, and can cause personal injury. Run the engine dry or remove the fuel with a hand pump; never siphon the fuel.

  • Inspect the machine regularly and replace worn or damaged parts. Ensure that parts are not bent, damaged, or loose.

  • To ensure optimum performance of the machine, use only genuine Toro replacement parts and accessories. Replacement parts and accessories made by other manufacturers could be dangerous, and such use could void the product warranty.

Recommended Maintenance Schedule(s)

Maintenance Service IntervalMaintenance Procedure
Before each use or daily
  • Check the mower lines.Replace the line when it is half the original length.
  • Remove debris from the machine.
  • Check the mower head engagement.
  • Check and tighten fasteners.
  • Every 25 hours
  • Service the air filter; service it more frequently in dusty operating conditions.
  • Lubricate the jackshaft assembly.
  • Before storage
  • Change the engine oil per engine manufacturer requirements..
  • Service the air cleaner.
  • Empty the fuel tank.
  • Yearly
  • Replace the air filter; replace it more frequently in dusty operating conditions.
  • Change the engine oil per engine manufacturer requirements.
  • Important: Refer to your engine manual for additional maintenance procedures.

    Pre-Maintenance Procedures

    Preparing for Maintenance

    1. Move the machine to a level surface, shut off the engine, and wait for all moving parts to stop.

    2. Disconnect the spark-plug wire from the spark plug.

      g339525
    3. After performing the maintenance procedure(s), connect the spark-plug wire to the spark plug.

      Important: Before tipping the machine to change the oil or replace the mower line, allow the fuel tank to run dry through normal usage. If you must tip the machine prior to running out of fuel, use a hand fuel pump to remove the fuel. Always tip the machine onto its side, with the dipstick down.

    Engine Maintenance

    Servicing the Air Filter

    Maintenance Service IntervalMaintenance Procedure
    Every 25 hours
  • Service the air filter; service it more frequently in dusty operating conditions.
  • Yearly
  • Replace the air filter; replace it more frequently in dusty operating conditions.
    1. Unclip the top of the air-filter cover.
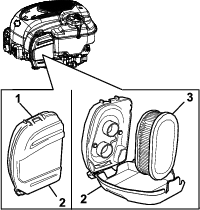
      g334791
    2. Remove the air filter.

    3. Inspect the air filter.

      Note: If the air filter is excessively dirty, replace it with a new filter. Otherwise, gently tap the air filter on a hard surface to loosen debris.

    4. Install the air filter.

    5. Use the clip to install the air-filter cover.

    Changing the Engine Oil

    Maintenance Service IntervalMaintenance Procedure
    Yearly
  • Change the engine oil per engine manufacturer requirements.
  • Changing the engine oil is not required, but if you want to change the oil, use the following procedure.

    Note: Run the engine a few minutes before changing the oil to warm it. Warm oil flows better and carries more contaminants.

    Engine Oil Specifications

    Engine oil capacity0.44 L (15 fl oz)*
    Oil viscositySAE 30 or SAE 10W-30 detergent oil
    API service classificationSJ or higher

    *There is residual oil in the crankcase after you drain the oil. Do not pour the entire capacity of oil into the crankcase. Fill the crankcase with oil as directed in the following steps.

    1. Move the machine to a level surface.

    2. Refer to Preparing for Maintenance.

    3. Remove the dipstick by rotating the cap counterclockwise and pulling it out.
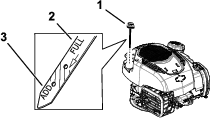
      g334792
    4. Tip the machine onto its side (so that the air filter is up) to drain the used oil from the oil-fill tube.
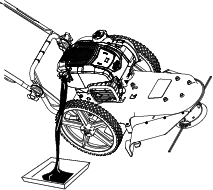
      g393637
    5. After draining the used oil, return the machine to the operating position.

    6. Carefully pour about 3/4 of the engine capacity of oil into the oil-fill tube.

    7. Wait 3 minutes for the oil to settle in the engine.

    8. Wipe the dipstick clean with a clean cloth.

    9. Insert the dipstick into the oil-fill tube, then remove the dipstick.

    10. Read the oil level on the dipstick.

      • If the oil level on the dipstick is too low, carefully pour a small amount of oil into the oil-fill tube, wait 3 minutes, and repeat steps 8 through 10 until the oil level on the dipstick is correct.

      • If the oil level on the dipstick is too high, drain the excess oil until the oil level on the dipstick is correct.

      Important: If the oil level in the engine is too low or too high and you run the engine, you may damage the engine.

    11. Install the dipstick into the oil-fill tube securely.

    12. Recycle the used oil properly.

    Servicing the Spark Plug

    Ensure that the air gap between the center and side electrodes is correct before installing the spark plug.

    Use a spark plug wrench for removing and installing the spark plug(s) and a gapping tool/feeler gauge to check and adjust the air gap. Install a new spark plug(s) if necessary.

    Type: Champion RN9YC or equivalent

    Air gap: 0.75 mm (0.03 inch)

    Removing the Spark Plug

    1. Disconnect the spark-plug wire from the spark plug.

      g339525
    2. Clean around the spark plugs to prevent dirt from entering the engine and potentially causing damage.

    3. Remove the spark plug.

    Checking the Spark Plug

    Important: Do not clean the spark plug(s). Always replace the spark plug(s) when it has a black coating, worn electrodes, an oily film, or cracks.

    If you see light brown or gray on the insulator, the engine is operating properly. A black coating on the insulator usually means the air cleaner is dirty.

    Set the gap to 0.75 mm (0.03 inch).
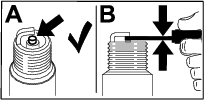
    g206628

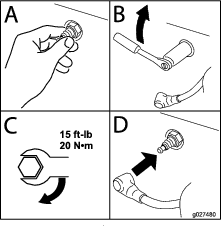
    Installing the Spark Plug

    g027480

    Drive System Maintenance

    Removing and Installing the Wheels

    Maintenance Service IntervalMaintenance Procedure
    Every 25 hours
  • Lubricate the jackshaft assembly.
  • Remove and install the wheels as shown.
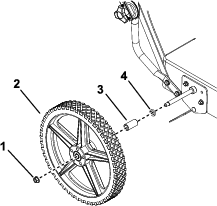
    g337013

    Replacing the Drive Belt

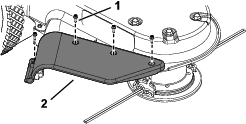
    1. Remove the 2 fasteners securing the rear of the shield to the mower housing.
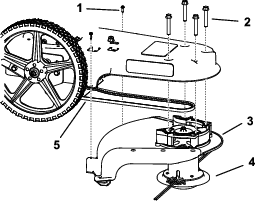
      g393641
    2. Remove the 4 fasteners securing the front of the shield and mower head to the mower housing.

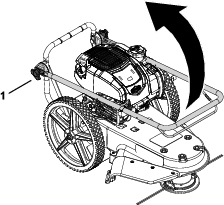
    3. Raise the front of the mower housing, loosen the mounting bolt on the drive pulley, and remove the “V” pulley from the idler bracket.

      Important: Do not bend the belt guides.
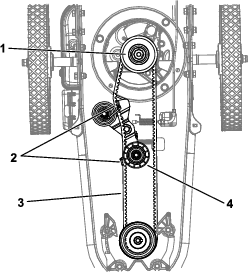
      g393642
    4. Remove the drive belt and install a new one.

    5. Install the “V” pulley to the idler bracket.

    6. Tighten the mounting bolt on the drive pulley.

    7. Secure the mower head and the shield (Figure 19).

    Adjusting the Drive Belt Tension

    Maintenance Service IntervalMaintenance Procedure

    Maintain proper belt tension to improve machine performance. Engage the drive lever and ensure that the spring extends 3 to 6 mm (1/8 to 1/4 inch). If it does not, adjust the belt tension.

    Note: You may hear a short buzzing sound after releasing the engagement lever while using the machine. This is normal and is caused by the teeth of the cogged belt contacting the wire belt guide to stop rotation. You do not need to adjust the belt tension for this.
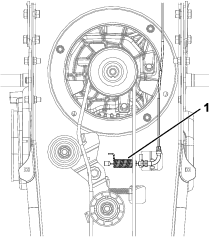
    g337958
    1. Loosen the upper jam nut on the adjustment cable.
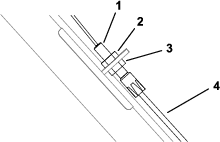
      g337972
    2. Tighten the lower jam nut in 3 mm (1/8 inch) increments.

      Note: A higher number of barrel-nut threads below the bracket increases the tension on the belt.

      Important: Do not overadjust the tension.

    3. Engage the drive lever and verify that the spring extends 3 to 6 mm (1/8 to 1/4 inch); adjust the jam nut again as needed.

    4. Tighten the bottom jam nut.

    5. If the mower still does not properly engage after adjusting the cable, adjust the jam nut for the second cable under the mower deck.
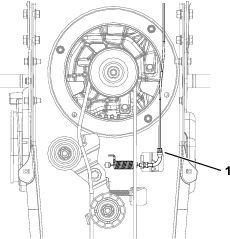
      g337971

    Mower Maintenance

    Replacing the Mower Line

    Maintenance Service IntervalMaintenance Procedure
    Before each use or daily
  • Check the mower lines.Replace the line when it is half the original length.
  • Use a 4 mm (0.155 inch diameter) mower line, with a length of 55 cm (21-1/2 inches).

    Important: Do not allow the line lengths to vary more than 2.5 cm (1 inch). Otherwise, the mower head may not be balanced and vibrate during operation.

    Note: Keep the mower line moist to extend its life, maintain flexibility, and ease replacement. Store extra line in water.

    1. Remove the worn mower line from the line retainer.

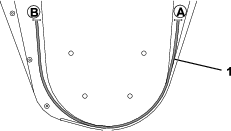
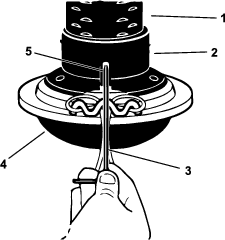
    2. Cut new mower line to 55 cm (21-1/2 inches) or using the length guide (Figure 24) as follows:

      1. Place 1 end of the line at 1 mark on the shield.

      2. Bend the line along the raised portion of the shield to the second mark.

      3. Cut the line at the second mark.

      g338089
    3. Thread the ends of the new mower line through the outer loops (Figure 25).

    4. Cross the ends over the line retainer and threat them through the center hole.

    5. Ensure that the ends of the line are even.
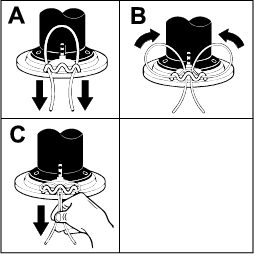
    g335099

    Cleaning

    Removing Debris from the Machine

    Maintenance Service IntervalMaintenance Procedure
    Before each use or daily
  • Remove debris from the machine.
  • Regular cleaning and washing increases the lifespan of the machine. Clean the machine directly after use.

    Check before cleaning that the fuel tank cap is properly in place to avoid getting water in the tank.

    Important: You can wash the machine with mild detergent and water. Do not pressure-wash the machine. Avoid excessive use of water, especially near the engine.
    Storage

    Storage Safety

    • Always shut off the machine, wait for all moving parts to stop, and allow the machine to cool before adjusting, servicing, cleaning, or storing it.

    • Never store the machine with fuel in the tank inside a building where fumes may reach an open flame or spark.

    Storing the Machine

    For storage over 30 days, prepare the machine as follows:

    1. Park the machine on a level surface, disengage the mower head, and shut off the engine.

    2. Remove debris from the machine and engine.

      Important: You can wash the machine with mild detergent and water. Do not pressure-wash the machine. Avoid excessive use of water, especially near the engine.

    3. Remove and discard line or store it in a sealed container.

    4. Service the air filter; refer to Servicing the Air Filter.

    5. Prepare the machine for storage for over 30 days as follows:

      1. Add fuel stabilizer/conditioner to fresh fuel in the tank. Follow mixing instructions from the fuel stabilizer manufacturer. Do not use an alcohol-based stabilizer (ethanol or methanol).

      2. Run the engine to distribute conditioned fuel through the fuel system for 5 minutes.

      3. Shut off the engine, allow it to cool, and drain the fuel tank.

      4. Start the engine and run it until it shuts off.

      5. Dispose of fuel properly. Recycle the fuel according to local codes.

        Important: Do not store fuel containing stabilizer/conditioner longer than the duration recommended by the fuel-stabilizer manufacturer.

    6. Remove and check the condition of the spark plug; refer to Servicing the Spark Plug. With the spark plug removed from the engine, pour 30 ml (2 tablespoons) of engine oil into the spark plug hole. Install the spark plug. Do not install the wire on the spark plug.

    7. Check and tighten all fasteners. Repair or replace any part that is damaged.

    8. Paint all scratched or bare metal surfaces. Paint is available from your Authorized Service Dealer.

    9. Store the machine in an upright position in a clean, dry garage or storage area. Keep it out of reach of children or other unauthorized users. Cover the machine to protect it and keep it clean.

    Troubleshooting

    ProblemPossible CauseCorrective Action
    The engine does not start.
    1. The spark-plug wire is loose or disconnected.
    2. The spark plug is wet, pitted, fouled, or the gap is incorrect.
    3. The fuel tank is empty.
    4. The air filter is dirty.
    5. There is dirt in fuel filter.
    6. The carburetor or fuel line is dirty.
    7. The carburetor is out of adjustment.
    8. The engine switch is in the Off posiiton.
    9. Dirt, water, or stale fuel is in fuel system.
    10. The engine switch or wire is defective.
    1. Install the wire on the spark plug.
    2. Install a new, correctly gapped spark plug.
    3. Fill the fuel tank.
    4. Replace the air filter.
    5. Replace the fuel filter.
    6. Clean the carburetor or fuel line.
    7. Contact an Authorized Service Dealer
    8. Move the switch to the On position.
    9. Contact an Authorized Service Dealer.
    10. Inspect and replace damaged parts.
    The engine runs poorly.
    1. The spark plug is faulty.
    2. The air filter is dirty.
    3. The carburetor is out of adjustment.
    4. Dirt, water, or stale fuel is in fuel system.
    5. The engine cooling system is clogged.
    1. Replace the spark plug.
    2. Replace the air filter.
    3. Contact an Authorized Service Dealer
    4. Contact an Authorized Service Dealer.
    5. Clean the debris screen and engine cooling fans.
    The engine overheats.
    1. The engine cooling system is clogged.
    2. The carburetor is out of adjustment.
    3. The engine-oil level is low.
    1. Clean the debris screen and engine cooling fans.
    2. Contact an Authorized Service Dealer
    3. Add engine oil.
    The engine does not shut off.
    1. The engine on/off switch is damaged.
    2. The wire disconnected from the engine on/off switch.
    1. Inspect and replace damaged parts
    2. Inspect, repair, or replace damaged parts.
    Mowing performance is poor.
    1. The mower line length is too short.
    1. Use the correct line length. When the line is less than half this length, replace it.
    The mower vibrates.
    1. The capscrews for the mower head are loose.
    2. The mower line lengths are substantially different.
    3. A nut or bolt is loose.
    4. The mower head is broken.
    1. Tighten the capscrews.
    2. Adjust the mower line lengths to approximately equal lengths.
    3. Check all bolts and nuts, including engine bolts.
    4. Replace broken parts.
    The mower head does not retain line.
    1. The mower line is not properly attached.
    2. The line retainer is broken.
    3. The mower line is not the correct size.
    1. Attach the mower line correctly.
    2. Replace the mower head assembly.
    3. Use a mower line with a 4 mm (0.155 inch) diameter.