Installation
Preparing the Machine
-
Park the machine on a level surface.
-
Engage the parking brake.
-
Lower the attachments.
-
Shut off the engine and remove the key.
Disconnecting the Battery
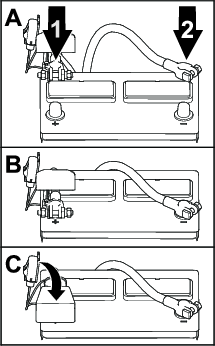
Removing the Battery Cables
Warning
Battery terminals or metal tools could short against metal components, causing sparks.
-
When removing or installing the battery, do not allow the battery terminals to touch any metal parts of the machine.
-
Do not allow metal tools to short between the battery terminals and metal parts of the machine.
Warning
Electrical sparks can cause the battery gasses to explode, resulting in personal injury.
Incorrect battery cable routing could damage the machine and cables, causing sparks.
-
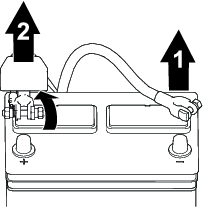
Always disconnect the negative (black) battery cable before disconnecting the positive (red) cable.
-
Always connect the positive (red) battery cable before connecting the negative (black) cable.
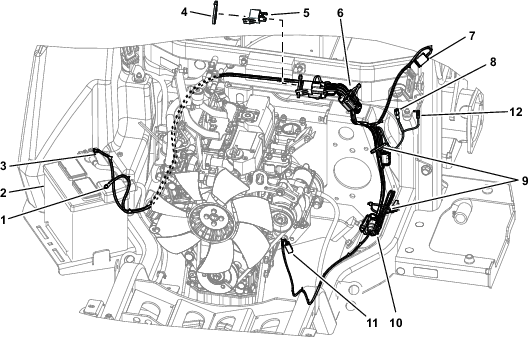
Routing the Power Harness
Parts needed for this procedure:
| Power harness | 1 |
| Cable tie | 6 |
| Relay | 1 |
| Fuse (10 A) | 1 |
Important: Route the wire harness away from any hot, sharp, or moving parts; secure with cable ties as needed.
-
Unlatch and open the hood.
-
Install the relay into the harness (Figure 3).
-
Route the 2 ring terminals for the battery around the engine (Figure 3).
-
Route the harness to the connector positions shown in Figure 3.
-
Secure the harness to the machine with the cable ties shown in Figure 3.
-
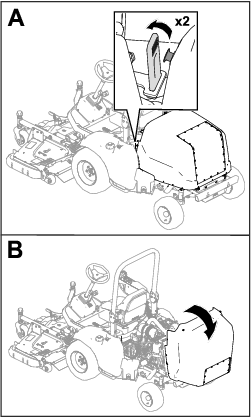
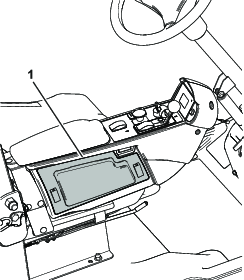
Rotate the latches and remove the side cover on the armrest (Figure 4).
-
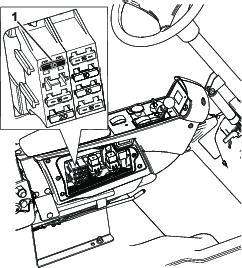
Install the 10 A fuse into the fuse block as shown in Figure 5.
-
Install the cover and secure it with the latches.
Connecting the Battery
Warning
Electrical sparks can cause the battery gasses to explode, resulting in personal injury.
Incorrect battery cable routing could damage the machine and cables, causing sparks.
-
Always disconnect the negative (black) battery cable before disconnecting the positive (red) cable.
-
Always connect the positive (red) battery cable before connecting the negative (black) cable.