This product complies with all relevant European directives. For details, please see the Declaration of Incorporation (DOI) at the back of this publication.

This kit is mounted to the reel mowers on a ride-on machine and is intended to be used by professional, hired operators in commercial applications. It is primarily designed to keep the rear roller of the cutting unit free of grass and debris, which leads to a better after-cut appearance on well-maintained lawns in parks, sports fields, and on commercial grounds.

Installation

Important: Use the Rear Roller Brush Kit only when cutting in the height-of-cut range of 6 to 25 mm (1/4 to 1 inch). Use the high height-of-cut brush when cutting above 25 mm (1 inch). Refer to the procedure for Installing the High Height-of-Cut Brush (Optional).

Note: Determine the left and right sides of the cutting unit from behind the cutting unit.

Note: 5-inch cutting units driven by electric reel motors or 7-inch cutting units driven by either electric or hydraulic reel motors need the additional End Weight Kit (Model 03419).

Determining the Roller-Brush Orientation

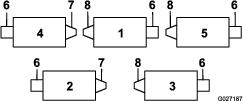
All cutting units are shipped with the counterweight mounted to the left end of the cutting unit. Refer to Figure 1 to determine the position of the roller brush and reel motors.

g027187

Note: These instructions and illustrations show the installation of the kit on cutting units with the universal groomer mounted on the left end of the cutting unit.

Installing the Roller Brush

Parts needed for this procedure:

Roller-brush assembly 5
Retaining ring5
Right belt-cover/plate assembly2
Left belt-cover/plate assembly3
90-degree grease fitting5
Bolt (5/16 x 1/2 inch)10
Carriage bolt (Model 03658 only)10
Weight plate (Model 03658 only)5
Locknut (Model 03658 only)10
Drive pulley 5
Hex-drive bolt (5/16 x 1/2 inch)5
Belt 5
Shim washer (as required for belt alignment) 5

Installing the Roller-Brush Assembly

  1. If the cutting units are installed on the traction unit, park the machine on a level surface, engage the parking brake, shut off the engine, and remove the key.

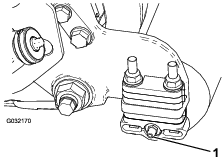
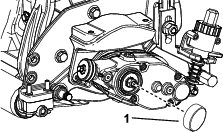
  2. Remove the grease fitting for the roller from the side of the cutting unit that has the roller-brush housing (Figure 3).

    g032170
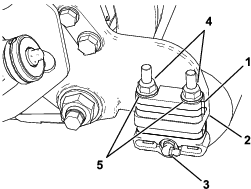
  3. Install the 90-degree grease fitting so that it faces rearward (Figure 2).

    g221188
  4. Remove the 2 flange locknuts and 10 washers securing each roller bracket to the side plates, as well as any 6 mm (1/4 inch) spacers positioned on the top side of the side-plate mounting flange (Figure 3).

    Note: Do not remove the bolts. Keep the flange locknuts and washers for future assembly.

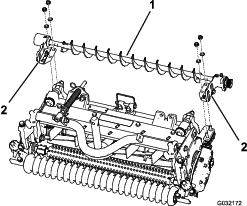
  5. Position the left or right roller-brush-assembly mounting brackets onto the roller-bracket bolts (Figure 4).

    g032172

    Important: Attach the mounting brackets for the roller-brush assembly directly to the top surface of the side-plate mounting flange of the cutting unit. Do not put spacers between the roller-brush mounting brackets and the side-plate mounting flanges. Save the additional 6 mm (1/4 inch) spacers for potential later use.

  6. Secure the brush-assembly mounting brackets to the cutting-unit side plates with the previously removed nuts.

Installing the Weights

Install the appropriate weights to the cutting units.

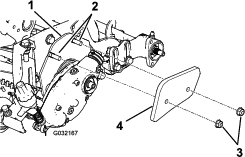
  • 5-inch hydraulic cutting units: as shown in Figure 5; parts included with Brush Kit (Model 03658).

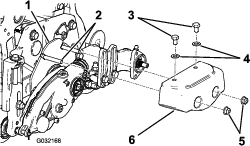
  • 5-inch electric cutting units: need Weight Kit (Model 03419) as shown in Figure 6, discard the weight and fasteners included with the brush kit (do not use).

  • 7-inch hydraulic and electric cutting units: need Weight Kit (Model 03419) as shown in Figure 6 for Brush Kit (Model 03659).

g032167
g032168

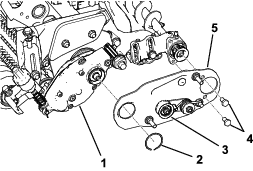
Installing the Roller-Brush Plate

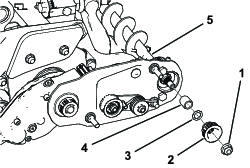
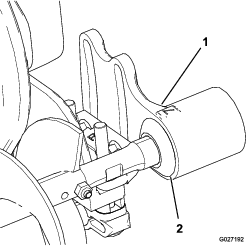
  1. Slide each excluder seal outward until the lip seals are in light contact with each bearing housing (Figure 7).

    g027192
  2. Remove and discard the cap.

    g283369
  3. Install the left or right roller-brush pivot plate (Figure 9).

    Note: Ensure that the idler-pulley assembly is installed on the bottom as shown in Figure 9.

    g221189
  4. Apply 242 Loctite (blue) to the 2 bolts (5/16 x 1/2 inch) and use them to mount the brush plate to the roller-brush-bearing housing (Figure 9).

    Note: Torque the bolts to 20 to 26 N∙m (15 to 19 ft-lb).

  5. Secure the brush plate to the roller-brush housing with the retaining ring (Figure 9).

  6. Ensure that the roller-brush plate is parallel to the cutting-unit side plate. If it is not parallel, proceed as follows:

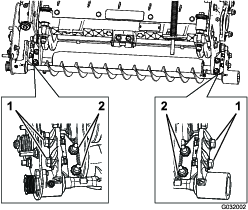
    1. Loosen the 2 flange locknuts securing the roller-brush mounting bracket to the cutting-unit side plate (Figure 10).

    2. Rotate the roller-brush-bearing housing until the brush plate is parallel to the cutting-unit side plate (Figure 10).

    3. Tighten the 2 flange locknuts securing the roller-brush mounting bracket to the cutting-unit side plate (Figure 10).

    g032002

Positioning the Roller Brush

  1. Loosen the 2 bolts securing each roller-brush-bearing housing to the roller-brush mounting bracket (Figure 10).

    Note: The bolts should be loose from the factory.

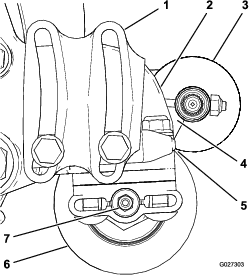
  2. Position the roller brush so that it is just touching or resting on the rear roller (Figure 11).

    Important: The roller-brush shaft must not contact the cutting-unit side plate.

    Important: Heavy brush contact on the roller causes premature brush wear.

    g027303

    Note: The roller-brush shaft must be parallel to the rear roller.

    Important: Position both roller-brush-bearing housings so that they are parallel to the ground to ensure clearance for the rear-roller grease fitting.

  3. Tighten the 2 bolts securing each roller-brush-bearing housing to the roller-brush mounting brackets.

Installing the Drive Pulley

  1. Restrain the reel for installation; refer to Restraining the Reel for Installing Threaded Inserts.

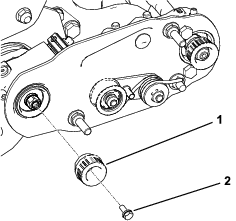
  2. Install the drive pulley onto the groomer shaft (Figure 12).

    g192352
  3. Apply 242 Loctite (blue) to the flange-head bolt and use the bolt to secure the pulley to the driveshaft; refer to Figure 12.

  4. Torque the bolt to 20 to 26 N∙m (15 to 19 ft-lb)

    Important: If you do not properly torque the bolt, the bolt will come loose.

Installing the Belt

  1. Install the belt onto the pulleys as follows:

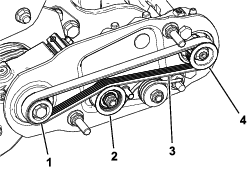
    • Loop the belt around the drive pulley and then over the top of the idler pulley (Figure 13).

      g192353
    • Start the belt on the driven pulley (Figure 14).

    • Use a deep-well socket (9/16 inch) to rotate the brush assembly and guide the belt onto the driven pulley (Figure 14).

      g020390

    Important: Ensure that the ribs on the belt are properly seated in the grooves in each pulley and that the belt is in the center of the idler pulley.

  2. Push down on the idler pulley to ensure that the idler-pulley assembly pivots freely.

Completing the Installation

  1. Check the alignment of the belt and pulleys as follows:

    Note: The belt must be properly tensioned prior to checking the alignment.

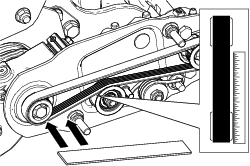
    • Lay a straightedge along the outer face of the drive pulley (Figure 15). Do not lay the straightedge across both the drive pulley and the driven pulley.

    • The outer faces of the drive pulley and the driven pulley should be in line within 0.76 mm (0.030 inch).

    • If the pulleys are not aligned, refer to Checking and Adjusting the Pulley Alignment.

    • If the pulleys are aligned, continue with the installation.

    • Do not use the idler pulley to check the alignment.

      Important: The belt may fail prematurely if the pulleys are not properly aligned.

      g192350
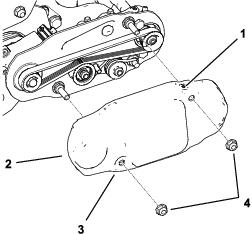
  2. Slide the belt cover onto the mounting bolts and secure the cover with 2 flange nuts (Figure 16).

    Ensure that the set screw is installed in the upper hole.

    Important: Do not overtighten the nuts as damage to the cover may occur.

    g221190
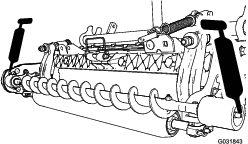
  3. Lubricate the grease fittings on each of the roller brush bearing housings with No. 2 lithium grease (Figure 17).

    Note: Wipe off any excess grease, specifically around the excluder seals.

    g031843

Installing the High Height-of-Cut Brush (Optional)

Parts needed for this procedure:

High height-of-cut brush (optional)

Install the high height-of-cut brush (sold separately) when the height of cut is 2.5 cm (1 inch) or more (5 or more spacers installed below the side-plate pad).

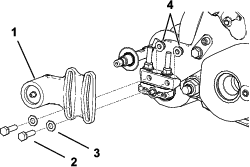
  1. If a roller brush is installed on the cutting unit, remove the 2 bolts, washers, and nuts securing the non-drive-bearing housing to the bearing-housing mounting bracket (Figure 18 and Figure 19).

    g221191
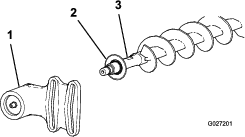
  2. Slide the non-drive-bearing housing and the excluder seal off the brush shaft (Figure 19).

    g027201
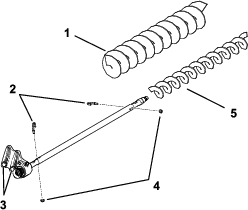
  3. Remove the 2 J-bolts and the nuts (Figure 20).

  4. Slide the existing brush off the brush shaft (Figure 20).

  5. Loosen the 2 bolts, washers, and nuts securing the drive-bearing housing to the bearing-housing mounting bracket (Figure 20).

  6. Slide the high height-of-cut brush onto the brush shaft (Figure 20).

  7. Clamp the brush onto the shaft with the 2 J-bolts and nuts previously removed (Figure 20).

    Important: Insert the threaded end of the J-bolts through the outer holes of the brush shaft while hooking the curved ends of the J-bolts into the inner holes.

  8. Torque the J-bolt locknuts to 2 to 3 N∙m (20 to 25 in-lb).

    g221192
  9. Install the excluder seal and the non-drive-bearing housing onto the brush shaft (Figure 19).

  10. Mount the non-drive-bearing housing to the bearing-housing mounting bracket with the 2 bolts, washers, and nuts previously removed.

    Note: Be careful not to knock the seal spring off.

  11. Tighten the 2 bolts, washers, and nuts securing the drive-bearing housing to the bearing-housing mounting bracket.

Maintenance

  • Ensure that the brush is parallel to the roller with 1.5 mm (0.060 inch) clearance to light contact.

  • Grease the fittings every 50 hours and after every washing.

  • When replacing a roller brush, torque the J-bolts to 2 to 3 N∙m (20 to 25 in-lb).

  • When replacing the brush-shaft-driven pulley, torque the nut to 36 to 45 N∙m (27 to 33 ft-lb).

  • When replacing the brush-drive pulley, apply 242 Loctite (blue) and torque the bolt to 20 to 26 N∙m (15 to 19 ft-lb).

Note: The roller brush, the idler bearing, and the belt are considered consumable items.

Checking and Adjusting the Pulley Alignment

  1. The driven pulley (at the roller-brush shaft) can move in or out (Figure 21).

    Note: Make note of which way the pulley needs to move.
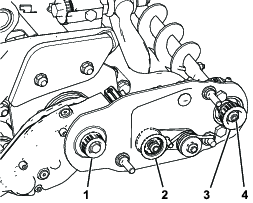
    g193169
  2. While rotating the reel, which rotates the drive pulley, pry the belt off the drive pulley (Figure 21

    Note: Wear a padded glove or use a heavy rag to rotate the reel.

  3. Remove the locknut securing the driven pulley to the brush shaft (Figure 21 or Figure 22).

    Note: Use a 1/2-inch wrench on the roller-brush shaft flats to keep it from rotating.

  4. Remove the driven pulley from the shaft (Figure 22).

  5. If the pulley needs to move out, add a 0.8 mm (0.032 inch) thick washer (Figure 22).

    Note: If the pulley needs to move in, remove the existing 0.8 mm (0.032 inch) thick washer.

  6. Install the pulley.

    g193168
  7. While holding the flats of the roller-brush shaft, secure the driven pulley on the shaft with the flange nut (3/8-16) previously removed.

    Note: Seat the locknut; then torque it to 36 to 45 N∙m (27 to 33 ft-lb).

  8. Install the belt onto the pulleys as follows:

    1. Loop the belt around the drive pulley and then over the top of the idler pulley (Figure 23).
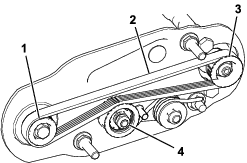
      g192351
    2. Start the belt on the driven pulley (Figure 23).

    3. Use a 9/16-inch deep-well socket to rotate the brush assembly and guide the belt onto the driven pulley (Figure 24).
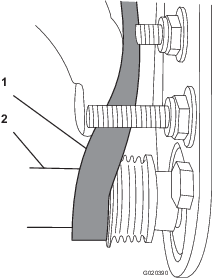
      g020390

    Important: Ensure that the ribs on the belt are properly seated in the grooves in each pulley and that the belt is in the center of the idler pulley.

  9. Check the pulley alignment again and repeat this procedure if necessary.

Restraining the Reel

Warning

The cutting reel blades are sharp and capable of amputating hands and feet.

  • Keep your hands and feet outside of the reel.

  • Ensure that the reel is restrained before servicing it.

Restraining the Reel for Removing Threaded Inserts

  1. Loosen the shield-bolt on the left side of the cutting unit and raise the rear shield (Figure 25).

  2. Insert a long-handled pry bar (recommended 3/8 inch x 12 inches with screwdriver handle) through the back of the cutting reel, closest to the side of the cutting unit that you will be torquing (Figure 25).

  3. Place the pry bar against the weld side of the reel support plate (Figure 25).

    Note: Insert the pry bar between the top of the reel shaft and the backs of 2 reel blades so that the reel will not move.

    Important: Do not contact the cutting edge of any blades with the pry bar; this may damage the cutting edge and/or cause a high blade.

    Important: The insert on the left side of the cutting unit has left-hand threads. The insert on the right side of the cutting unit has right-hand threads.
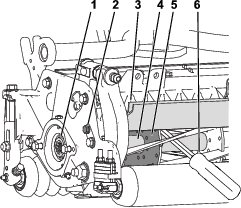
    g280383
  4. Rest the handle of the pry bar against the rear roller.

  5. Complete the removal of the threaded insert while ensuring that the pry bar stays in place, then remove the pry bar.

  6. Lower the rear shield and tighten the shield-bolt.

Restraining the Reel for Installing Threaded Inserts

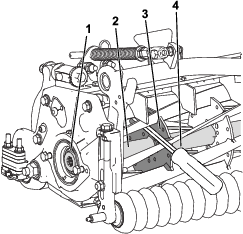
  1. Insert a long-handled pry bar (recommended 3/8 inch x 12 inches with screwdriver handle) through the front of the cutting reel, closest to the side of the cutting unit that you will be torquing (Figure 26).

  2. Place the pry bar against the weld side of the internal cutting reel reinforcement (Figure 26).

    Note: The pry bar should contact a blade at the front, the reel shaft, and a blade at the back of the back of the reel, locking it in place.

    Important: Do not contact the cutting edge of any blades with the pry bar; this may damage the cutting edge and/or cause a high blade.

    Important: The insert on the left side of the cutting unit has left-hand threads. The insert on the right side of the cutting unit has right-hand threads.
    g280384
  3. Rest the handle of the pry bar against the roller

  4. Per the insert’s installation instructions and torque requirements, complete the installation of the threaded insert while ensuring that the pry bar stays in place, then remove the pry bar.