
 , which means
Caution, Warning, or Danger—personal safety instruction. Failure
to comply with these instructions may result in personal injury or
death.
, which means
Caution, Warning, or Danger—personal safety instruction. Failure
to comply with these instructions may result in personal injury or
death.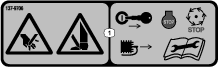

Maintenance
Note: Determine the left and right sides of the machine from the normal operating position.
Supporting the Cutting Unit
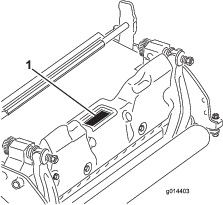
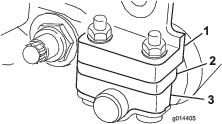
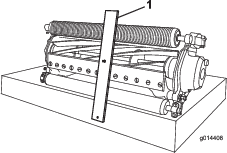
Whenever you need to tip the cutting unit to expose the bedknife/reel, prop up the rear of the cutting unit to ensure that the nuts on the back end of the bedbar-adjusting bolts are not resting on the work surface (Figure 12).
Servicing the Bedbar
Only a properly trained mechanic should service the bedbar and bedknife to prevent damage to the reel, bedbar, or bedknife. Ideally, take the cutting unit to your authorized Toro distributor for service. Refer to the Service Manual for your traction unit for complete instructions, special tools, and diagrams for servicing the bedknife. Should you ever need to remove or assemble the bedbar yourself, instructions are provided below, as are the specifications for servicing the bedknife.
Important: Always follow the bedknife procedures detailed in your Service Manual when servicing the bedknife. Failure to install and grind the bed knife correctly can lead to damage to the reel, bedbar, or bedknife.
Removing the Bedbar
-
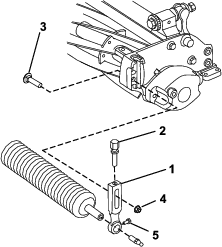
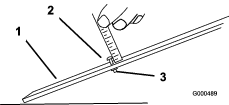
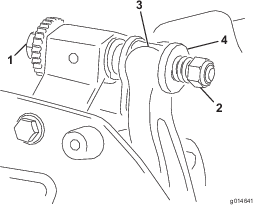
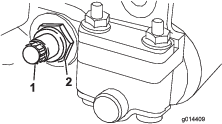
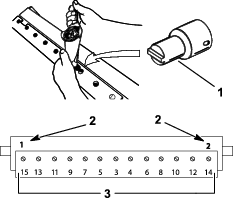
Turn the bedbar adjusting screw, counterclockwise, to back the bedknife away from the reel (Figure 13).
-
Back out the spring-tension nut until the washer is no longer tensioned against the bedbar (Figure 13).
-
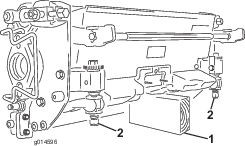
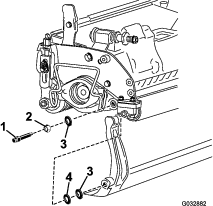
On each side of the machine, loosen the locknut securing the bedbar bolt (Figure 14).
-
Remove each bedbar bolt allowing the bedbar to be pulled downward and removed from the cutting unit (Figure 14).
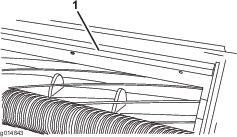
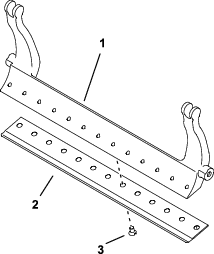
Account for the 2 nylon washers and 1 steel washer on each end of the bedbar (Figure 15).
Assembling the Bedbar
-
Install the bedbar, positioning the mounting ears between the washers and the bedbar-adjusting screw (Figure 13).
-
Secure the bedbar to each side plate with the bedbar bolts (nuts on bolts) and 3 washers (6 total).
-
Position a nylon washer on each side of the side-plate boss. Place a steel washer outside each of the nylon washers (Figure 15).
-
Torque the bedbar bolts to 27 to 36 N∙m (240 to 320 inch-lb).
-
Tighten the locknuts until you remove the end play from steel washers, but you are able to rotate them by hand. The washers on the inside may have a gap.
Important: Do not overtighten the locknuts or they will deflect the side plates.
-
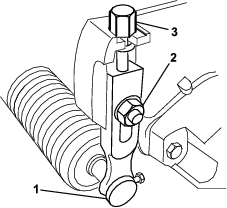
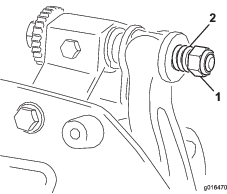
Tighten the spring tension nut until the spring is collapsed, then back it off 1/2 turn (Figure 16).
-
Adjust the bedknife to the reel; refer to Adjusting the Bedknife-to-Reel Contact.
Bedknife Specifications
Installing the Bedknife
-
Remove the rust, scale, and corrosion from the bedbar surface and apply a thin layer of oil to the bedbar surface.
-
Clean the screw threads.
-
Apply never-seize compound to the screws and install the bedknife to the bedbar.
-
Torque the 2 outer screws to 1 N∙m (10 in-lb).
-
Working form the center of the bedknife, torque the screws to 23 to 28 N∙m (200 to 250 in-lb).
-
Grind the bedknife.
Preparing the Reel for Grinding
-
Ensure that all cutting unit components are in good condition and correct any issues before grinding.
-
Follow the reel grinder manufacturer’s instructions to grind the cutting reel to the following specifications.
Reel Grinding Specifications New Reel Diameter 128.5 mm (5.06 inches) Reel Diameter Service Limit 114.3 mm (4-1/2 inches) Blade Relief Angle 30° ± 5° Blade Land Width 1.0 mm (0.04 inches) Blade Land Width Range .8 to 1.2 mm (0.03 to 0.05 inches) Reel Diameter Taper Service Limit 0.25 mm (1/100 inch)
Relief-Grinding the Reel
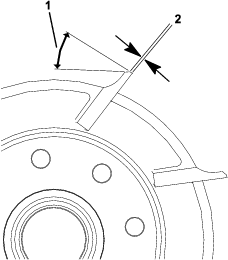
The new reel has a land width of 0.8 to 1.2 mm (0.03 to 0.05 inches) and a 30° relief grind.
When the land width gets larger than 3 mm (0.120 inch) wide, do the following:
-
Apply a 30° relief grind on all reel blades until the land width is 0.76 mm (0.030 inch) wide (Figure 19.
-
Spin grind the reel to achieve <0.025 mm (0.001 inch) reel run-out.
Note: This causes the land width to grow slightly.
-
Adjust the cutting unit; refer to your cutting unit Operator’s Manual.
Note: To extend the longevity of the sharpness of the edge of the reel and the bedknife—after grinding the reel and/or the bedknife—check the reel to bedknife contact again after cutting at the end of each day, as any burrs will be removed, which may create improper reel to bedknife clearance and thus accelerate wear.
Bedknife Grinding Specifications
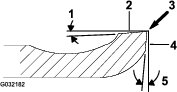
| Standard bedknife relief angle | 3° minimum |
| Extended bedknife relief angle | 7° minimum |
| Front Angle Range | 13° to 17° |
Checking the Top Grind Angle
The angle that you use to grind your bedknives is very important.
Use the angle indicator (Toro Part No. 131-6828) and the angle-indicator mount (Toro Part No. 131-6829) to check the angle that your grinder produces and then correct for any grinder inaccuracy.
-
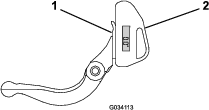
Place the angle indicator on the bottom side of the bedknife as shown in Figure 21.
-
Press the Alt Zero button on the angle indicator.
-
Place the angle-indicator mount on the edge of the bedknife so that the edge of the magnet mates with the edge of the bedknife (Figure 22).
Note: The digital display should be visible from the same side during this step as it was in step 1.
-
Place the angle indicator on the mount as shown in Figure 22.
Note: This is the angle that your grinder produces, and should be within 2 degrees of the recommended top grind angle.
Backlapping the Cutting Unit
Danger
Contact with the reel or other moving parts can result in personal injury.
Keep your fingers, hands, and clothing away from the reels or other moving parts.
-
Stay away from the reel while backlapping.
-
Never use a short-handled paint brush for backlapping. Long-handled brushes are available from your local authorized Toro distributor.
-
Position the machine on a clean, level surface, lower the cutting units, stop the engine, engage the parking brake, and remove the ignition key.
-
Remove the reel motors from the cutting units and disconnect and remove the cutting units from the lift arms.
-
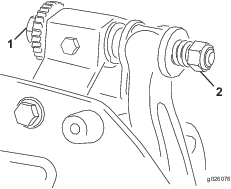
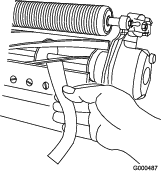
Connect the backlapping machine to the cutting unit by inserting a piece of 3/8 inch square stock into the splined coupling in the end of the cutting unit.
Note: Additional instructions and procedures on Backlapping are available in your traction unit Operator’s Manual and the Toro Sharpening Reel and Rotary Mowers Manual, Form Number 80-300PT.
Note: For a better cutting edge, run a file across the front face of the bedknife and reel when the lapping operation is completed. This will remove any burrs or rough edges that may have built up on the cutting edge.
Servicing the Roller
The Greens Roller Rebuild Kit (Part No. 140-5552) and the Greens Roller Rebuild Tool Kit (Part No. 140-5553) (Figure 23) are available for servicing the roller. The Roller Rebuild Kit includes all the bearings, bearing nuts, and seals to rebuild a roller.
The Roller Rebuild Tool Kit includes all the tools and the installation instructions required to rebuild a roller with the roller rebuild kit. Refer to your parts catalog or contact your authorized Toro distributor for assistance.
