Maintenance
Note: Determine the left and right sides of the machine from the normal operating position.
Disassembling the Dethatcher Blade Assembly
Disassemble the dethatcher blade assembly whenever you need to change a blade or replace the bearings.
-
Secure the jam nut on the end of the assembly, which contains the washer, in a vise.
Note: Do not remove the washer or nut on this side of the assembly.
-
Remove the hex bolt, bearing, and flock seal.
-
On other end of shaft, remove the left-hand threaded spline insert.
Caution
The blades are extremely sharp and may have burrs that will cut your hands.
Wear gloves and use caution when removing the blades from the shaft.
-
Remove the bearing, flock seal, blades, and spacers. Clean and lubricate the shaft with a light coating of grease to simplify the assembly.

-
Apply medium-strength thread-locking compound (such as Blue Loctite 243) to the threads of spline insert, hex bolt and jam nut when assembling the dethatcher blade assembly.
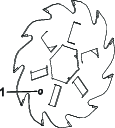
Important: The order of disassembly is extremely important. Do not invert the blades when disassembling or reverse the order when assembling them. Note the index hole in each blade. The index hole is provided for assembly in order to obtain the proper helix. Rotate the blade using index hole 1 helix flat counter clockwise for each successive blade for proper dethatcher blade assembly helix.
-
Torque the threaded spline insert, hex bolt, and jam nut to 108 to 135 N∙m (80 to 100 ft-lb).
Servicing the Roller
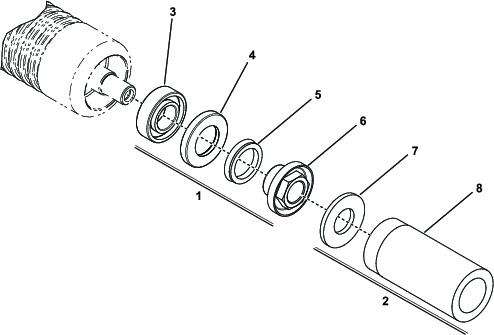
The Greens Roller Rebuild Kit (Part No. 140-5552) and the Greens Roller Rebuild Tool Kit (Part No. 140-5553) (Figure 8) are available for servicing the roller. The Roller Rebuild Kit includes all the bearings, bearing nuts, and seals to rebuild a roller.
The Roller Rebuild Tool Kit includes all the tools and the installation instructions required to rebuild a roller with the roller rebuild kit. Refer to your parts catalog or contact your authorized Toro distributor for assistance.

 , which means Caution, Warning,
or Danger—personal safety instruction. Failure to comply with
these instructions may result in personal injury or death.

