This product complies with all relevant European directives. For details, please see the Declaration of Incorporation (DOI) at the back of this publication.
Warning
Hydraulic fluid escaping under pressure can penetrate skin and cause injury.
-
Seek immediate medical attention if fluid is injected into skin. Injected fluid must be surgically removed within a few hours by a doctor.
-
Ensure that all hydraulic-fluid hoses and lines are in good condition and all hydraulic connections and fittings are tight before applying pressure to the hydraulic system.
-
Keep your body and hands away from pin-hole leaks or nozzles that eject high-pressure hydraulic fluid.
-
Use cardboard or paper to find hydraulic leaks.
-
Safely relieve all pressure in the hydraulic system before performing any work on the hydraulic system.
This kit requires the Front Lift Frame (Model 08712) to be installed on the machine.
Important: To maximize the safety, performance, and proper operation of this machine, carefully read and fully understand the contents of this Operator’s Manual. Failing to follow these operating instructions or to receive proper training may result in injury. For more information on safe operating practices, including safety tips and training materials, go to www.Toro.com.
Whenever you need service, genuine Toro parts, or additional information, contact an Authorized Service Dealer or Toro Customer Service and have the model and serial numbers of your product ready. Figure 1 identifies the location of the model and serial numbers on the product. Write the numbers in the space provided.
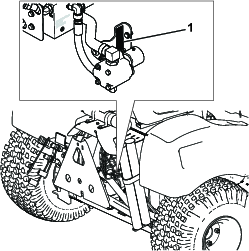
Note: Determine the left and right sides of the machine from the normal operating position.
Note: If you are installing this kit on Sand Pro Model 08705, you will also need to order the parts not included with this kit; refer to the addendum included with this kit.
Safety
Safety and Instructional Decals
 |
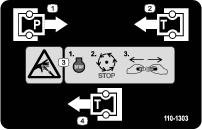
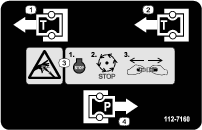
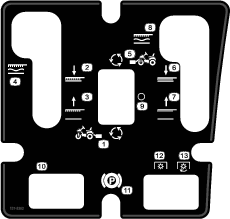
Safety decals and instructions are easily visible to the operator and are located near any area of potential danger. Replace any decal that is damaged or missing. |
Installation
Preparing the Machine
-
Park the machine on a level surface.
-
Lower the attachments.
-
Engage the parking brake.
-
Shut off the engine and remove the key.
-
Thoroughly clean the machine. Remove all debris to ensure that the mounting brackets will fit properly and that no dirt or debris gets into the hydraulic system.
Removing the Air Cleaner
-
Thoroughly clean the area around the air cleaner.
-
Loosen the radiator clamp around the hose and lower the clamp onto the hose.
-
Remove the inside bolt holding the air cleaner in place.
-
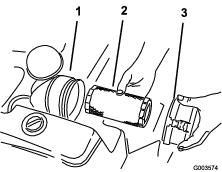
Remove the air-cleaner cover and filter (Figure 2).
-
Remove the hose from the air-cleaner canister.
-
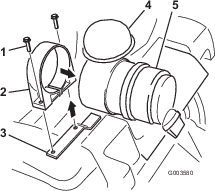
Spread the air-cleaner strap open and pull it over the end of the canister where the filter was taken out (Figure 3).
-
Cover the hose or insert a rag into it so that no dirt or debris gets into it while installing this kit.
-
Remove the opposite bolt holding the air-cleaner strap to the machine frame.
Removing the Hydraulic Reservoir, Left Rear Wheel Assembly, Shrouds, and Seat
-
Drain the hydraulic tank. Refer to the machine Operator's Manual.
-
Raise the rear of the machine off the ground and block up the rear of the machine. Refer to the machine Operator's Manual under Raising the Machine.
Warning
Mechanical or hydraulic jacks may fail to support the machine and cause serious injury.
Use jack stands when supporting the machine.
-
Remove the left rear tire.
-
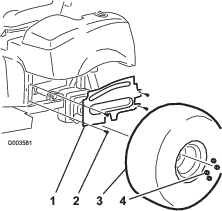
Remove and retain the 4 flange-head screws securing the left wheel shroud to the frame (Figure 4). Remove and retain the shroud.
-
Remove and retain the 2 flange-head screws securing the left front screen to the frame. Remove and retain the screen.
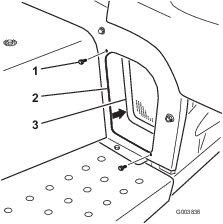
-
Remove and retain the 3 bolts securing the rear hitch shield to the frame.
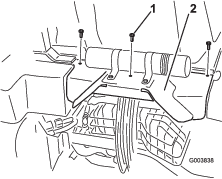
-
Loosen the 2 screws securing the center shroud to the machine (Figure 7). Remove and retain the shroud.
Note: The screws are secured to the shroud.
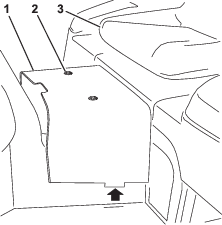
-
Remove the console shroud and the seat (Figure 8).
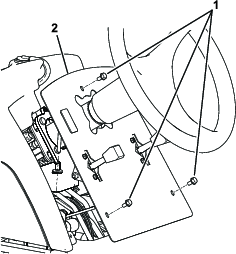
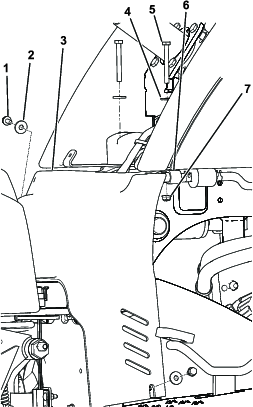
-
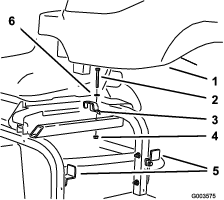
Disconnect the seat-switch wire from the seat switch, and remove the pins securing the seat base to the frame of the machine.
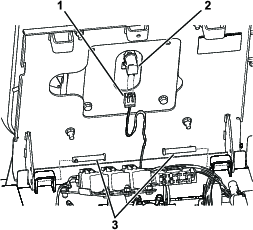
-
Disconnect the hydraulic lines going to the tank.
-
Remove the top hydraulic tank bracket from the machine frame and loosen the 2 brackets on the side of the frame (Figure 11). Remove and retain the tank and the hardware.
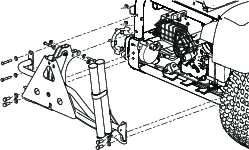
Removing the Rear Hitch Tube and the Lift System
Remove the rear hitch assembly as shown in Figure 12.
Retain the hitch assembly and all the hardware for later installation.
Installing the Fittings to the Hydraulic Tank
Parts needed for this procedure:
| Small 90-degree tee with barb | 1 |
| Large 90-degree elbow (threaded both ends) | 1 |
| Strainer | 1 |
| Valve-block return hose | 1 |
Note: Make sure that all O-rings are lubricated and properly positioned on all fittings before installation.
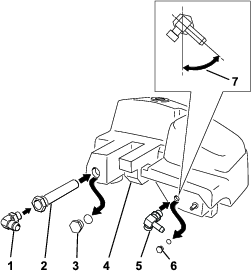
Note: Install the fittings at the angles shown in the figures. Use a backup wrench on all tank fittings.
-
Remove the 2 hydraulic tank plugs from the side of the tank.
-
Install the strainer into the hydraulic tank where the large plug was removed.
-
Install the large 90-degree elbow into the strainer.
-
Install the small 90-degree tee with barb where the small plug was removed (Figure 13).
-
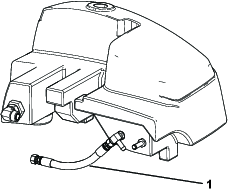
Connect the valve-block return hose to the tee fitting installed on the hydraulic tank.
Installing the Hydraulic Pump
Parts needed for this procedure:
| Hydraulic pump | 1 |
| 90-degree fitting (male ends) | 1 |
| Hub assembly | 1 |
| Square key (1/4 x 1 inch) | 1 |
| Setscrew (5/16 x 3/4 inch) | 4 |
| Pump bracket | 1 |
| Bolt (with thread-locking compound) (5/16 x 3/4 inch) | 2 |
| Washer (3/8 inch) | 2 |
| Large 90-degree elbow (with hose barbed end) | 1 |
-
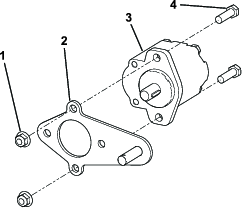
Install the torque arm to the hydraulic pump (Figure 15).
-
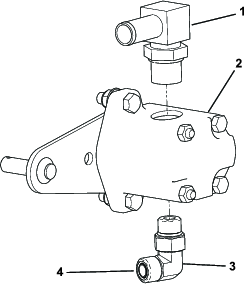
Install the square 90-degree elbow to the top of the hydraulic pump.
-
Install the 90-degree elbow to the bottom of the hydraulic pump (Figure 16).
-
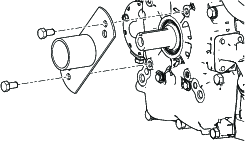
Remove the existing cover over the engine PTO (power takeoff); refer to Figure 17.
-
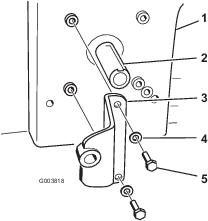
Install the pump bracket to the engine with 2 bolts (5/16 x 3/4 inch) and 2 washers (3/8 inch). Refer to Figure 18 for the correct position to install the pump bracket.
-
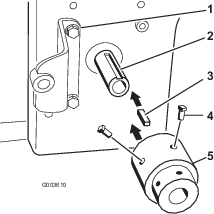
Apply anti-seize compound to the engine PTO (power takeoff) shaft and the hydraulic motor shaft.
-
Install the square key (1/4 x 1 inch) into the slot in the engine PTO shaft (Figure 19).
-
Align the hub assembly with the square key and install it onto the engine PTO (power takeoff) shaft (Figure 19).
Note: Make sure that the hub assembly is totally bottomed out on the shaft.
-
Apply removable thread-locking compound to the 2 setscrews (5/16 x 3/4 inch) and install them into the hub assembly to secure it to the PTO shaft (Figure 19).
-
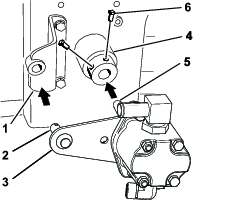
Install the pump plate stud into the pump bracket while installing the hydraulic pump shaft into the hub assembly.
Note: The hydraulic pump shaft will touch the end of the engine PTO shaft (Figure 20).
-
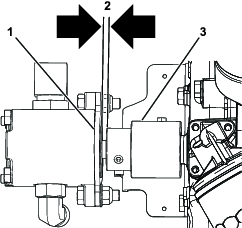
Verify that there is a gap between the pump plate and the hub assembly. If there is no gap, then the hub assembly is not installed correctly and needs to be seated correctly (Figure 21).
Important: The hub assembly needs to be totally seated on the shaft.
-
Apply removable thread-locking compound to the 2 setscrews (5/16 x 3/4 inch) and install them into the hub assembly to secure the hydraulic pump shaft (Figure 20).
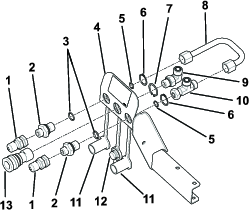
Installing the Front Hydraulic Fittings
Parts needed for this procedure:
| U-fitting (hard line) | 1 |
| 90-degree elbow | 1 |
| Tee fitting | 1 |
| Cap | 2 |
| Plug | 1 |
| Female fitting | 1 |
| Large retaining ring | 1 |
| Small retaining ring | 1 |
| Small O-ring | 2 |
| Large O-ring | 2 |
| Straight fitting | 2 |
| Male fitting | 2 |
-
Install the fittings to the bracket (Figure 22).
-
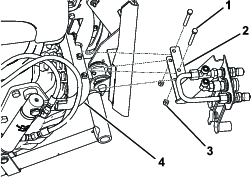
Install the bracket to the front lift frame.
Installing the Front Hydraulic Hoses
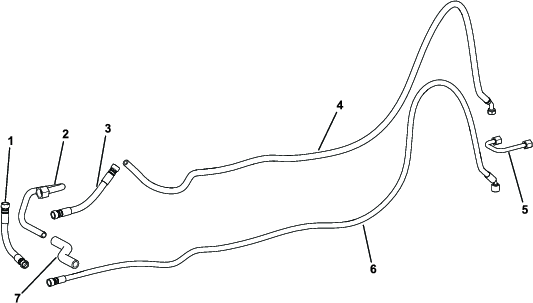
Parts needed for this procedure:
| Front supply hose | 1 |
| Front return hose | 1 |
| Pump supply tube (hard line) | 1 |
| Valve-block return hose | 1 |
| Pump supply hose | 1 |
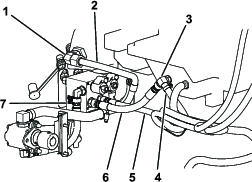
Use Figure 24 and Figure 25 for identifying the correct hydraulic lines and hoses.
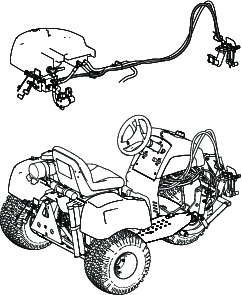
-
Install the existing hose back onto front right corner of the hydraulic tank.
-
Install the hydraulic tank to the frame and secure it with the 3 brackets previously removed and loosened (Figure 26).
-
Install the front supply hose to the elbow fitting in the middle of the bracket (Figure 27).
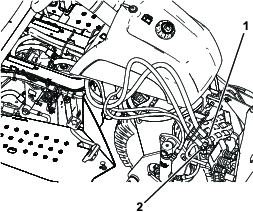
-
Install the front return hose to the tee fitting on the left side of the bracket (Figure 27).
-
Route the front hoses as shown in Figure 28.
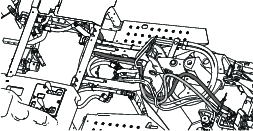
-
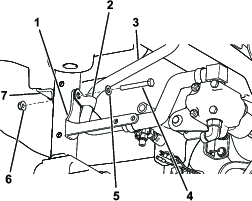
Remove and discard the nut and bolt securing the tank bracket to the machine frame. Retain the tank bracket (Figure 29).
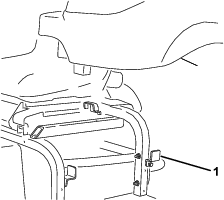
-
Position the pump supply tube (hard line) and the pump supply hose onto the machine as shown in Figure 30.
-
Loosely install the P-clamp, the pump supply tube, the tank bracket, and the frame bracket to the machine frame with a bolt, washer, and nut as shown in Figure 30.
-
Loosely install the pump supply tube (hard line) to the large 90-degree elbow installed to the strainer in the hydraulic tank (Figure 31).
Installing the Valve Block
Parts needed for this procedure:
| Valve block | 1 |
| Frame bracket | 1 |
| Screw (5/16 x 3/4 inch) | 2 |
| Tube bracket | 1 |
| Valve-block plate | 1 |
| Bolt (5/16 x 2 inches) | 2 |
| Washer (5/16 inch) | 2 |
| Female coupler | 1 |
| Male coupler | 2 |
| Plug | 1 |
| Cap | 2 |
| Tube bracket | 1 |
| Valve-block supply hose | 1 |
-
Connect the loose end of the front supply hose to the fitting installed in port M1 of the valve block (Figure 31).
-
Connect the loose end of the front return hose to the barbed end of the tee fitting installed on the hydraulic-fluid tank.
-
Connect the loose end of the valve-block return hose to the fitting installed in port T of the valve block.
-
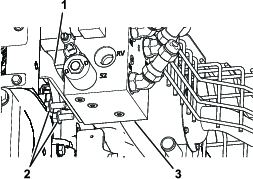
Loosely install the valve block to the frame bracket with 2 screws (Figure 32).
-
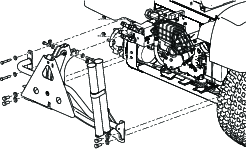
Install the rear hitch frame with the original hardware (Figure 33).
-
Align the valve-block plate and the tube bracket to the tube of the rear hitch frame and secure them to the hitch frame and the valve block with 2 screws (Figure 34).
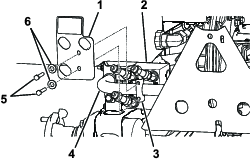
-
Install the couplers onto the ends of the hydraulic fittings (Figure 35).
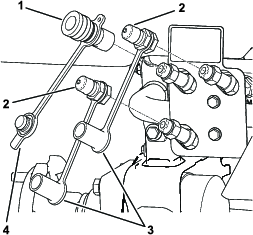
-
Install the plug onto the female coupler and a cap onto each male coupler.
-
Install the valve-block supply hose to the fitting on the bottom of the pump (Figure 36).
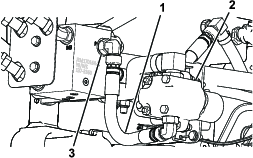
-
Install the other end of the valve-block supply hose to port P on the valve block (Figure 36).
-
Tighten all the fasteners.
Tightening All Connections
Important: Make sure that the hoses and hydraulic lines are routed away from and to do not rub against any sharp, hot, or moving components.Ensure that the valve block does not contact the hydraulic tank or any hoses
When all hydraulic lines and hoses are installed, tighten all of the connections.
Note: Use a backup wrench on all fittings.
Installing the Switch, the Relay, and the Harness
Parts needed for this procedure:
| Control panel | 1 |
| Harness | 1 |
| Switch | 1 |
| PTO switch | 1 |
| Fuse | 1 |
| Relay bracket — Model 08705 only, not included | 2 |
| Relay | 1 |
| Flange-head bolt (5/16 x 3/4 inch) — Model 08705 only, not included | 2 |
| Bolt (1/4 x 5/8 inch) — Model 08705 only, not included | 1 |
| Locknut (1/4 inch) | 1 |
Note: If you are installing this kit on Sand Pro Model 08705, you will also need to order the parts not included with this kit; refer to the addendum included with this kit.
-
Disconnect the battery; refer to the traction unit Operator’s Manual.
-
Remove the control panel from the machine (Figure 37).
Retain the cap screws and washers for later installation.
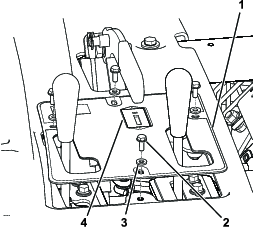
-
Remove the hour meter from the existing control panel.
-
Install the hour meter, the PTO switch, and the attachment switch to the new panel (Figure 40).
-
Route the harness from the switch, along the seat hinge as shown in Figure 38.
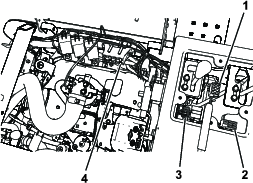
-
Remove the jumper wire from the main harness under the control panel (Figure 39).
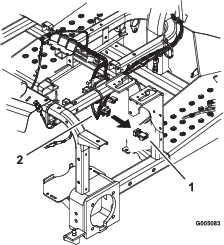
-
Install the harness to the switch in the control panel (Figure 40).
-
Install the main harness connector to the main harness (Figure 40).
-
Plug the connectors on the kit harness to the corresponding connectors; plug the main connector into the main machine harness, the PTO connector into the PTO switch, the switch connector into the selector switch.
Plug the existing hour-meter connector into the hour meter.
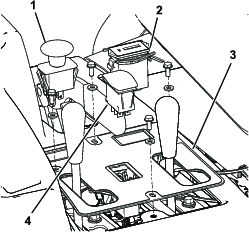
-
Install the control panel to the machine. Use the original cap screws and washers.
-
Install the fuse into the right slot in the fuse block (Figure 38).
-
If you are installing this kit on Sand Pro Model 08705, install the relay and relay bracket to the machine frame (Figure 41).
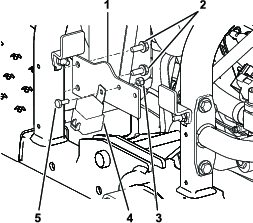
-
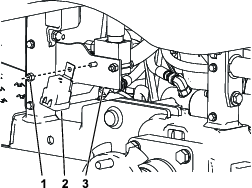
If you are installing this kit on Sand Pro Model 08745, install the relay to the existing relay bracket (Figure 42).
-
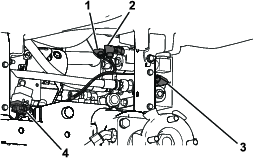
Connect the square connector to the relay (Figure 43).
-
Connect the 3 small connectors to the 3 valves (Figure 43).
-
Connect the battery; refer to the traction unit Operator’s Manual
Installing the Hydraulic Fluid and Checking for Leaks
Parts needed for this procedure:
| Dipstick — Model 08705 only, not included | 1 |
| Hydraulic fluid—6.6 L (7 US qt) — Model 08705 only, not included | – |
The hydraulic system capacity is now 26.5 L (28 US qt).
Refer to the Operator's Manual for the correct fluid to use.
-
If you are installing this kit on Model 08705, complete the following:
-
Remove the old dipstick from the hydraulic tank and discard it.
-
Slowly pour approximately 80% of the specified fluid into the tank.
-
Add 6.6 L (7 US qt) of the specified hydraulic fluid.
-
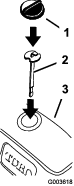
Insert the new dipstick (not included).
-
-
Remove the dipstick and check the level of the hydraulic fluid (Figure 44).
-
If the fluid is low, slowly add additional fluid to bring it to the Full mark.
-
Start the machine and let it run for 5 minutes, then check for any leaks in the system with a piece of cardboard.
-
Shut off the machine and make any necessary corrections.
-
Install the console shroud and the seat (Figure 8).
Important: Install the P-clamp to ensure that the fuel hose is secure (Figure 9).
-
Install the console.
-
Install the left front screen to the frame.
-
Install the front shroud to the frame with 4 flange-head screws.
-
Install the 4 flange-head screws securing the left wheel shroud to the frame (Figure 45).
-
Install the left rear tire (Figure 45).
-
Lower the machine onto the ground.
-
Install the rear hitch shield (Figure 6).
Schematics
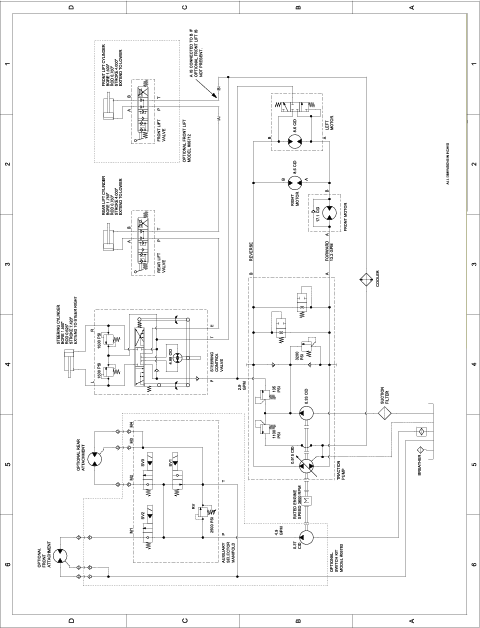
Hydraulic schematic 137-3385