This product complies with all relevant European directives. For details, please see the Declaration of Incorporation (DOI) at the back of this publication.
Safety
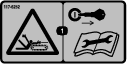
Safety and Instructional Decals
 |
Safety decals and instructions are easily visible to the operator and are located near any area of potential danger. Replace any decal that is damaged or missing. |
Installation
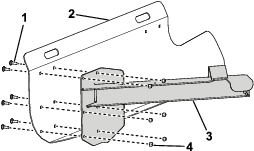
Installing the Rear Mounting Bracket
Parts needed for this procedure:
| Blade | 1 |
| Rear mounting bracket | 1 |
| Carriage bolt | 6 |
| Locknut | 6 |
Install the rear mounting bracket onto the blade using 6 carriage bolts and locknuts (Figure 1).
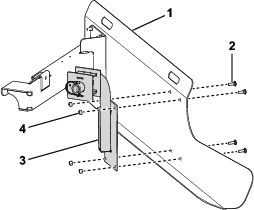
Installing the Front Mounting Bracket
Parts needed for this procedure:
| Front mounting bracket | 1 |
| Carriage bolt | 4 |
| Locknut | 4 |
Install the front mounting bracket onto the blade using 4 carriage bolts and locknuts (Figure 2).
Operation
Note: Determine the left and right sides of the machine from the normal operating position.
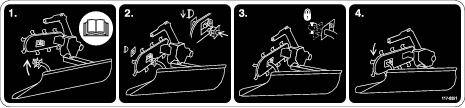
Installing the Blade on the Trencher
Danger
If you attempt to install or remove the blade with the trencher motor running, someone could accidentally start the chain, which could severely injure or kill you.
Always shut off the engine and remove the ignition key before attempting to install or remove the blade.
-
Raise the boom, shut off the engine, and remove the ignition key.
-
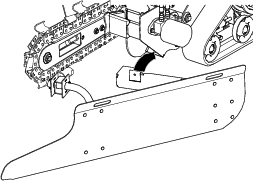
Slide the rear mounting bracket of the blade into the opening on the trencher to the left of the boom, seating it on the crossbar (Figure 3).
-
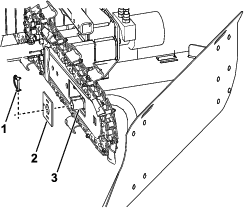
Remove the lynch pin and mounting plate from the front mounting bracket (Figure 4).
-
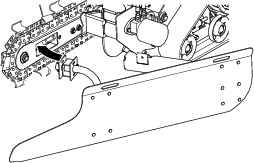
Swing the blade to the right, inserting the front mounting bracket into the opening in the boom (Figure 5).
-
Slide the mounting plate onto the front mounting bracket, securing it with the attached lynch pin (Figure 4).
Backfilling a Trench
-
Drive the trencher with the blade attached to the end of the trench, orienting the blade just behind the spoils pile so that the left end of the blade overlaps the right side of the trench (Figure 6).

-
Lower the boom until the blade touches the ground, but do not dig the blade down into the ground.
Note: If you are backfilling over sod that you do not want torn up, lower the blade until it is just touching the top of the grass. That way it will push most of the soil into the trench without digging into the sod. You can then rake in the remaining soil after backfilling.
-
Drive the trencher forward, pushing the spoils soil into the trench.
Removing the Blade
Danger
If you attempt to install or remove the blade with the trencher motor running, someone could accidentally start the chain, which could severely injure or kill you.
Always shut off the engine and remove the ignition key before attempting to install or remove the blade.
-
Raise the boom to lift the blade off of the ground.
-
Stop the engine and remove the ignition key.
-
Remove the lynch pin and mounting plate from the front mounting bracket (Figure 4).
-
Pull the front mounting bracket out of the boom and lift the blade off of the trencher.
-
Install the mounting plate and lynch pin back on the front mounting bracket for storage.
Loading the Blade on a Trailer
Remove the blade before loading the trencher on a trailer. Store and secure it separately from the trencher.
Important: If you attempt to load the trencher with the blade attached onto the Toro TRX trailer, you may damage the trailer or the blade. Always remove the blade before loading it on the trailer.