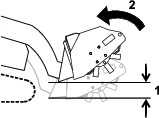
Maintenance
Determine the left and right sides of the machine from the normal operating position.
Recommended Maintenance Schedule(s)
| Maintenance Service Interval | Maintenance Procedure |
|---|---|
| After the first 5 hours |
|
| Before each use or daily |
|
| Every 25 hours |
|
| Before storage |
|
Caution
If you leave the key in the switch, someone could accidently start the engine and seriously injure you or other bystanders.
Remove the key from the switch before you perform any maintenance.
Greasing the Tiller
| Maintenance Service Interval | Maintenance Procedure |
|---|---|
| Every 25 hours |
|
| Before storage |
|
Grease Type: General-purpose grease
-
Park the machine on a level surface and disengage the auxiliary hydraulics.
-
Shut off the engine, remove the key, and wait for all moving parts to stop before leaving the operating position.
-
Clean the grease fittings with a rag.
-
Connect a grease gun to each fitting.
-
Pump grease into the fittings until grease begins to ooze out of the bearings.
-
Wipe up any excess grease.
Lubricating the Drive Chain
| Maintenance Service Interval | Maintenance Procedure |
|---|---|
| After the first 5 hours |
|
| Every 25 hours |
|
| Before storage |
|
Lubricant Type: Commercial chain lube
-
Park the machine on a level surface and disengage the auxiliary hydraulics.
-
Shut off the engine, remove the key, and wait for all moving parts to stop before leaving the operating position.
-
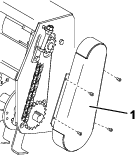
Remove the drive chain cover.
-
Apply a commercial chain lube onto the chain spans.
-
Install the drive chain cover.
Adjusting the Drive Chain Tension
| Maintenance Service Interval | Maintenance Procedure |
|---|---|
| After the first 5 hours |
|
| Every 25 hours |
|
| Before storage |
|
Note: There should be 1 to 2 cm (1/2 to 3/4 inch) slack in the chain, measured midway between the sprockets.
-
Park the machine on a level surface and disengage the auxiliary hydraulics.
-
Shut off the engine, remove the key, and wait for all moving parts to stop before leaving the operating position.
-
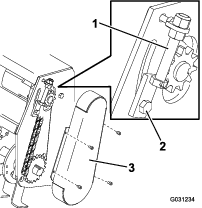
Remove the drive chain cover (Figure 6).
-
Loosen the 2 hydraulic motor, mount-plate bolts (Figure 6).
-
Using the adjuster bolt, move the hydraulic motor upward to tighten the drive chain (Figure 6).
-
After you have set the chain to the proper tension, tighten the adjuster bolt and hydraulic motor mount-plate bolts (Figure 6).
Note: When you can no longer set the chain to the proper tension using the adjuster bolt or if chain failures repeatedly occur, replace the chain.
-
Install the drive chain cover.
Replacing the Tiller Tines
| Maintenance Service Interval | Maintenance Procedure |
|---|---|
| Before each use or daily |
|
Note: Worn or dull tines degrade the performance of the tiller.
-
Park the machine on a level surface and disengage the auxiliary hydraulics.
-
Shut off the engine, remove the key, and wait for all moving parts to stop before leaving the operating position.
-
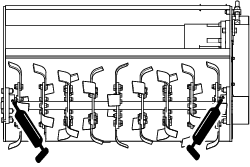
Install tines so that there are 2 left tines and 2 right tines on each hub (Figure 7).

Note: The cutting edges of the tines should face toward the rear of the tiller.
-
Torque the tine-mounting bolts to 85 to 104 N-m (63 to 77 ft-lb).
Checking the Hydraulic Lines
| Maintenance Service Interval | Maintenance Procedure |
|---|---|
| Before each use or daily |
|
Warning
Hydraulic fluid escaping under pressure can penetrate skin and cause injury. Fluid injected into the skin must be surgically removed within a few hours by a doctor familiar with this form of injury; otherwise, gangrene may result.
-
Keep your body and hands away from pinhole leaks or nozzles that eject high-pressure hydraulic fluid.
-
Use cardboard or paper to find hydraulic leaks; never use your hands.

 , which means Caution, Warning,
or Danger—personal safety instruction. Failure to comply with
these instructions may result in personal injury or death.


