Maintenance
Determine the left and right sides of the machine from the normal operating position.
Caution
If you leave the key in the switch, someone could accidently start the engine and seriously injure you or other bystanders.
Remove the key from the switch before you perform any maintenance.
Recommended Maintenance Schedule(s)
| Maintenance Service Interval | Maintenance Procedure |
|---|---|
| After the first 5 hours |
|
| After each use |
|
| Every 25 hours |
|
| Every 200 hours |
|
| Before storage |
|
Greasing the Cultivator
| Maintenance Service Interval | Maintenance Procedure |
|---|---|
| Every 25 hours |
|
| Before storage |
|
Grease the 2 fittings on the ends of the roller and 1 fitting on the 4-bolt flange on the left side of the main housing.
Grease Type: General-purpose grease
Important: Grease immediately after every washing
-
Park the machine on a level surface, lower the attachment, and engage the parking brake (if equipped).
-
Shut off the engine and remove the key
-
Clean the grease fittings with a rag.
-
Connect a grease gun to each fitting.
-
Pump grease into the fittings until grease begins to ooze out of the bearings.
-
Wipe up any excess grease.
Changing the Drive-Chain Oil
| Maintenance Service Interval | Maintenance Procedure |
|---|---|
| Every 200 hours |
|
Check the gear lubrication oil level in the gear case every 25 operating hours and change it every 200 operating hours or once a year, whichever comes first.
Oil Type: 85 W 140
-
Park the machine on a level surface, engage the parking brake (if equipped), and ensure that the drive-chain cover is perpendicular to the ground.
-
Raise the attachment high enough to place a pan under the drive-chain case and support the attachment with jack stands.
Warning
Mechanical or hydraulic jacks or the lift arms may fail to support the cultivator and cause a serious injury; use jack stands to support the cultivator.
Do not use the lift arms alone or hydraulic jacks.
-
Shut off the engine and remove the key
-
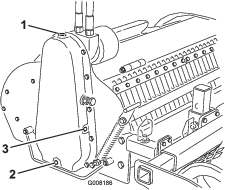
Open the oil-fill hole on top of the drive-chain case (Figure 11).
-
Place a large drip pan under the drive-chain case.
-
Remove the drain plug (Figure 11).
-
When all of the oil has drained from the case, replace and tighten the drain plug.
-
Remove the side plug (Figure 11).
-
Pour oil into the fill hole slowly until oil runs out the side-plug hole.
-
Replace the side plug and oil-fill hole plug and tighten them.
-
Wipe up any spilled oil.
Adjusting the Drive-Chain Tension
| Maintenance Service Interval | Maintenance Procedure |
|---|---|
| After the first 5 hours |
|
| Every 25 hours |
|
-
Park the machine on a level surface, lower the attachment, and engage the parking brake (if equipped).
-
Shut off the engine and remove the key
-
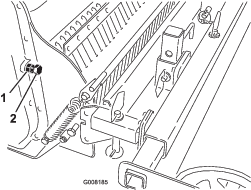
Loosen the jam nut on the chain-adjusting screw (Figure 12).
-
Turn the screw by hand until you feel resistance (Figure 12).
-
Mark the screw with a pencil and then unscrew it 1 turn.
-
Tighten the jam nut.
Replacing Tines
Check and replace tines when they become worn or dull. Worn or dull tines degrade the performance of the cultivator
-
Park the machine on a level surface, lower the attachment, and engage the parking brake (if equipped).
-
Shut off the engine and remove the key
-
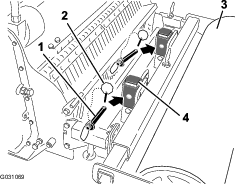
Remove the roller assembly from the cultivator.
-
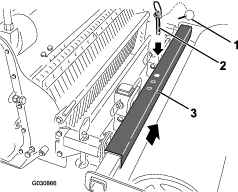
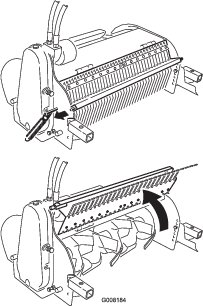
Lift up and release the spring catch on the side of the cultivator (Figure 13).
-
Open the tine cover (Figure 13).
-
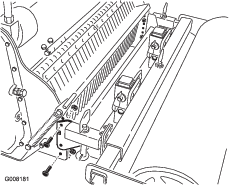
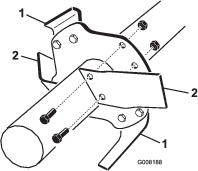
Remove old tines, 1 at a time, and install the new tines (Figure 14).
Note: Each center hub has 4 tines (2 right-hand and 2 left-hand). The left and right tines are alternated on the hub. Ensure that you replace each tine with the same type of tine that was installed previously.
-
Torque the tine-mounting bolts to 86 to 104 N∙m (63 to 77 ft-lb).
-
Close the tine cover and secure it with the spring latch.
-
Install the roller assembly.

 , which means Caution, Warning,
or Danger—personal safety instruction. Failure to comply with
these instructions may result in personal injury or death.


