Installation
Preparing the Machine
-
Park the machine on a level surface.
-
Engage the parking brake.
-
Lower the cutting units.
-
Shut off the engine, remove the key, and wait for all moving parts to stop.
-
Allow the engine to cool.
Installing the Kit
Parts needed for this procedure:
| Hydraulic hose assembly (Part No. 114-0633) | 5 |
| Hydraulic hose assembly (Part No. 98-4590) | 2 |
| Hydraulic hose assembly (Part No. 117-5188) | 4 |
| Hydraulic hose assembly (Part No. 106-3680) | 2 |
| Hydraulic hose assembly (Part No. 117-5190) | 1 |
| Hydraulic hose assembly (Part No. 140-7456) | 1 |
| Cable tie | 15 |
| Medium O-ring (ORFS-8) | 10 |
| Small O-ring (ORFS-4) | 10 |
| Large O-ring (ORFS-10) | 10 |
Danger
Hydraulic fluid escaping under pressure can penetrate the skin and cause injury.
-
Ensure that all hydraulic fluid hoses and lines are in good condition and that all hydraulic connections and fittings are tight before applying pressure to the hydraulic system.
-
Keep your body and hands away from pinhole leaks or nozzles that eject high-pressure hydraulic fluid.
-
Use cardboard or paper to find hydraulic leaks.
-
Safely relieve all pressure in the hydraulic system before performing any work on the hydraulic system.
-
Get immediate medical help if fluid is injected into the skin.
-
Locate and remember how the hoses are routed through the components in the machine.
-
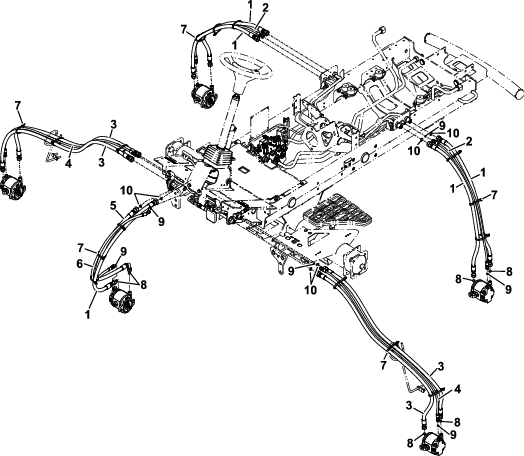
Remove the hoses to be replaced as shown in Figure 1.
-
Replace the old hoses and O-rings with the appropriate new hoses and O-rings. The part number of each new hose is shown in Figure 1.
Important: Before installing any hydraulic hoses, ensure that the correct O-rings are in position and lubricated with hydraulic fluid.
-
Install the cable ties as shown.