Safety
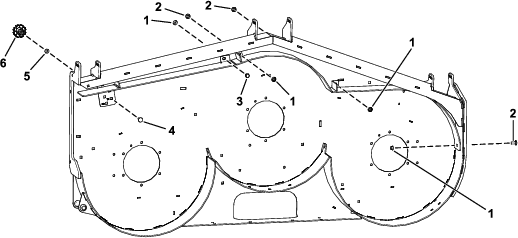
Safety and Instructional Decals
 |
Safety decals and instructions are easily visible to the operator and are located near any area of potential danger. Replace any decal that is damaged or missing. |
Installation
Preparing the Machine
Warning
The machine could fall onto someone and cause serious injury or death.
-
Always shut off the engine, engage the parking brake, and remove the key before performing any maintenance on the mower.
-
Use extreme caution when the machine is raised and supported on its back. The blades and moving parts are exposed and could cause injury.
-
Use this position only for cleaning, removing blades or baffles, and maintenance.
You can raise the front of the mower and support it using jack stands to access underneath the machine.
-
Disengage the PTO, move the motion-control levers to the NEUTRAL-LOCK position, and engage the parking brake.
-
Shut off the engine, remove the key, and wait for all moving parts to stop before leaving the operating position.
-
Raise the front of the machine and support it with jack stands.
-
Repair all bent or damaged areas of mower deck and replace any missing parts.
-
Clean the machine of any debris on the deck to ease installation.
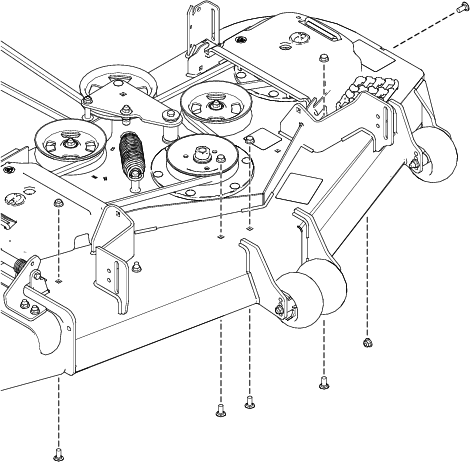
Removing the Existing Deck Fasteners
48-inch Mower Decks
Note: Keep the fasteners in case you choose to remove the baffles in the future.
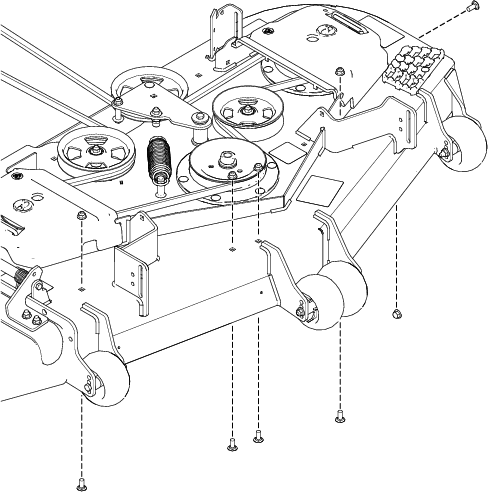
52-inch Mower Decks
Note: Keep the fasteners in case you choose to remove the baffles in the future.
60-inch Mower Decks
Note: Keep the fasteners in case you choose to remove the baffles in the future.

72-inch Mower Decks
Note: Keep the fasteners in case you choose to remove the baffles in the future.
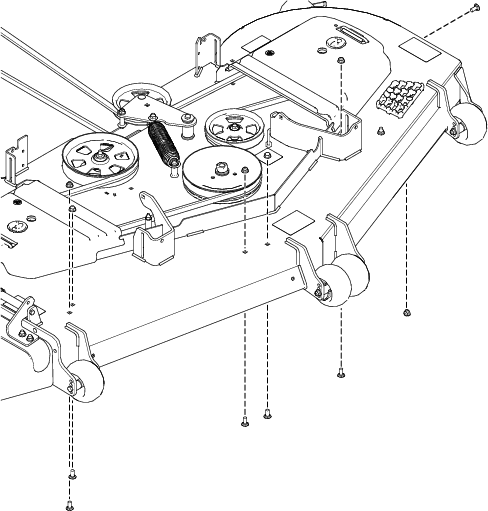
Installing the Baffles and Knob
Parts needed for this procedure:
| Straight baffle assembly | 1 |
| Curved baffle assembly | 1 |
| Carriage bolt (3/8 x 7/8 inch) | 3 |
| Shoulder bolt | 1 |
| Locknut (3/8 inch) | 4 |
| Knob | 1 |
| Carriage bolt (3/8 x 1-1/4 inches) | 1 |
| Washer | 1 |
48-inch Mower Decks
-
Loosely secure the straight baffle assembly and curved baffle assembly to the mower deck using 3 carriage bolts (3/8 x 7/8 inch), 1 shoulder bolt, and 4 locknuts (3/8 inch).
-
Secure the knob using 1 washer and 1 carriage bolt (3/8 x 1-1/4 inches).
52-inch Mower Decks
-
Loosely secure the straight baffle assembly and curved baffle assembly to the mower deck using 3 carriage bolts (3/8 x 7/8 inch), 1 shoulder bolt, and 4 locknuts (3/8 inch).
-
Secure the knob using 1 washer and 1 carriage bolt (3/8 x 1-1/4 inches).
60-inch Mower Decks
-
Loosely secure the straight baffle assembly and curved baffle assembly to the mower deck using 3 carriage bolts (3/8 x 7/8 inch), 1 shoulder bolt, and 4 locknuts (3/8 inch).
-
Secure the knob using 1 washer and 1 carriage bolt (3/8 x 1-1/4 inches).
72-inch Mower Decks
-
Loosely secure the straight baffle assembly and curved baffle assembly to the mower deck using 3 carriage bolts (3/8 x 7/8 inch), 1 shoulder bolt, and 4 locknuts (3/8 inch).
-
Secure the knob using 1 washer and 1 carriage bolt (3/8 x 1-1/4 inches).
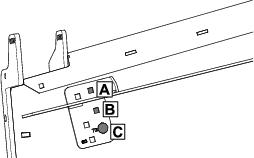
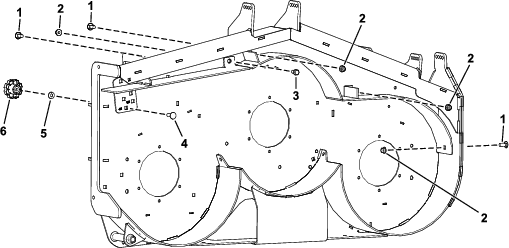
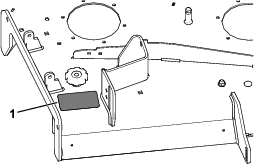
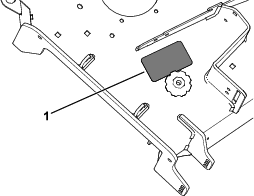
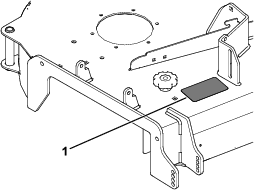
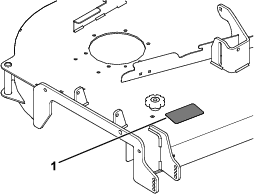
Applying the Decal
Parts needed for this procedure:
| Decal 145-8411 | 1 |
48-inch Mower Decks
Apply the decal near the knob.
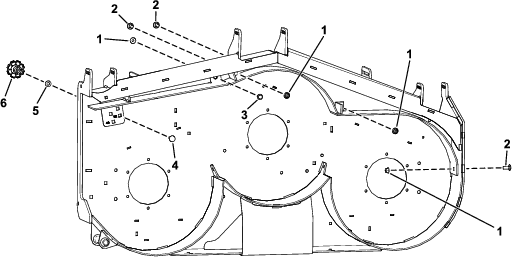
52-inch Mower Decks
Apply the decal near the knob.
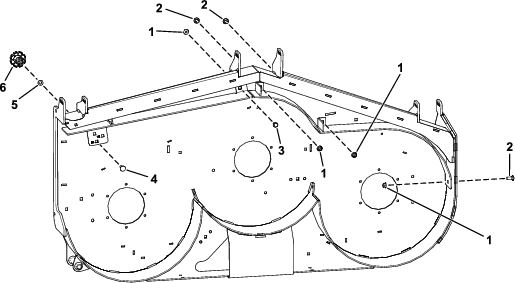
60-inch Mower Decks
Apply the decal near the knob.
72-inch Mower Decks
Apply the decal near the knob.
Tightening the Fasteners
Tighten all the nuts and bolts that you loosely installed in procedure Installing the Baffles and Knob.
Operation
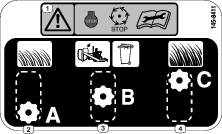
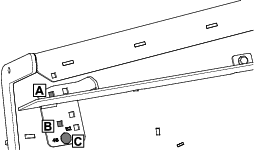
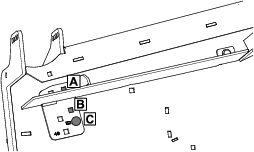
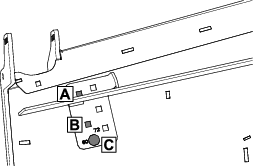
Positioning the Flow Baffle
The following figures are recommendations only. Adjustments vary by grass type, moisture content, and the height of the grass.
Note: If the engine power draws down and the mower ground speed is the same, open the baffle.
The suggested uses for the positions are as follows:
Position A:
-
Short, light grass mowing conditions
-
Dry conditions
-
Smaller grass clippings
-
Propels grass clippings farther away from the mower
Position B:
Use this position when bagging. Always align it with the blower opening.
Position C:
-
Tall, dense grass mowing conditions
-
Wet conditions
-
Lowers the engine-power consumption
-
Allows increased ground speed in heavy conditions
Refer to the following figures for the position location.
48-inch mower decks:
52-inch mower decks:
60-inch mower decks:
72-inch mower decks: