| Maintenance Service Interval | Maintenance Procedure |
|---|---|
| Before each use or daily |
|
Introduction
This rotary-blade, riding lawn mower is intended to be used by homeowners in residential applications. It is designed primarily for cutting grass on well-maintained lawns. Using this product for purposes other than its intended use could prove dangerous to you and bystanders.
Read this information carefully to learn how to operate and maintain your product properly and to avoid injury and product damage. You are responsible for operating the product properly and safely.
Visit www.Toro.com for product safety and operation training materials, accessory information, help finding a dealer, or to register your product.
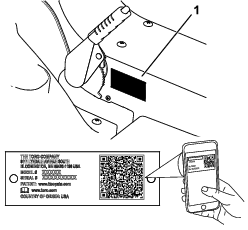
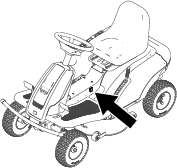
Whenever you need service, genuine Toro parts, or additional information, contact an Authorized Service Dealer or Toro Customer Service and have the model and serial numbers of your product ready. Figure 1 identifies the location of the model and serial numbers on the product. Write the numbers in the space provided.
Important: With your mobile device, you can scan the QR code on the serial number decal (if equipped) to access warranty, parts, and other product information.
Write the product model and serial numbers in the space below:
This manual uses 2 words to highlight information. Important calls attention to special mechanical information and Note emphasizes general information worthy of special attention.
The safety-alert symbol (Figure 2) appears both in this manual and on the machine to identify important safety messages that you must follow to avoid accidents. This symbol will appear with the word Danger, Warning, or Caution.
-
Danger indicates an imminently hazardous situation which, if not avoided, will result in death or serious injury.
-
Warning indicates a potentially hazardous situation which, if not avoided, could result in death or serious injury.
-
Caution indicates a potentially hazardous situation which, if not avoided, may result in minor or moderate injury.

Safety
General Power Tool Safety Warnings
Warning
Read all safety warnings, instructions, illustrations and specifications provided with this power tool.
Failure to follow the warnings and instructions may result in electric shock, fire and/or serious injury.
The term “power tool” in all of the warnings listed below refers to your mains-operated (corded) power tool or battery-operated (cordless) power tool.
-
Work area safety
-
Keep work area clean and well lit. Cluttered or dark areas invite accidents.
-
Do not operate power tools in explosive atmospheres, such as in the presence of flammable liquids, gasses, or dust.Power tools create sparks which may ignite the dust or fumes.
-
Keep children and bystanders away while operating a power tool.Distractions can cause you to lose control.
-
-
Electrical safety
-
Power tool plugs must match the outlet. Never modify the plug in any way. Do not use any adapter plugs with earthed (grounded) power tools.Unmodified plugs and matching outlets will reduce risk of electric shock.
-
Avoid body contact with earthed or grounded surfaces, such as pipes, radiators, ranges, and refrigerators.There is an increased risk of electric shock if your body is earthed or grounded.
-
Do not expose power tools to rain or wet conditions. Water entering a power tool will increase the risk of electric shock.
-
Do not abuse the cord. Never use the cord for carrying, pulling or unplugging the power tool. Keep cord away from heat, oil, sharp edges, or moving parts.Damaged or entangled cords increase the risk of electric shock.
-
When operating a power tool outdoors, use an extension cord suitable for outdoor use.Use of a cord suitable for outdoor use reduces the risk of electric shock.
-
If operating a power tool in a damp location is unavoidable, use a residual current device (RCD) protected supply.Use of an RCD reduces the risk of electric shock.
-
-
Personal safety
-
Stay alert, watch what you are doing, and use common sense when operating a power tool. Do not use a power tool while you are tired or under the influence of drugs, alcohol, or medication.A moment of inattention while operating power tools may result in serious personal injury.
-
Use personal protective equipment.Always wear eye protection. Protective equipment such as a dust mask, non-skid safety shoes, or hearing protection used for appropriate conditions will reduce personal injuries.
-
Prevent unintentional starting. Ensure the switch is in the off-position before connecting to power source and/or battery pack, picking up or carrying the tool. Carrying power tools with your finger on the switch or energising power tools that have the switch on invites accidents.
-
Remove any adjusting key or wrench before turning the power tool on.A wrench or a key left attached to a rotating part of the power tool may result in personal injury.
-
Do not overreach. Keep proper footing and balance at all times.This enables better control of the power tool in unexpected situations.
-
Dress properly. Do not wear loose clothing or jewelry. Keep your hair and clothing away from moving parts.Loose clothes, jewelry or long hair can be caught in moving parts.
-
If devices are provided for the connection of dust extraction and collection facilities, ensure these are connected and properly used.Use of dust collection can reduce dust-related hazards.
-
Do not let familiarity gained from frequent use of tools allow you to become complacent and ignore tool safety principles.A careless action can cause severe injury within a fraction of a second.
-
-
Power tool use and care
-
Do not force the power tool. Use the correct power tool for your application.The correct power tool will do the job better and safer at the rate for which it was designed.
-
Do not use the power tool if the switch does not turn it on and off.Any power tool that cannot be controlled with the switch is dangerous and must be repaired.
-
Disconnect the plug from the power source and/or remove the battery pack, if detachable, from the power tool before making any adjustments, changing accessories, or storing power tools.Such preventive safety measures reduce the risk of starting the power tool accidentally.
-
Store idle power tools out of the reach of children and do not allow persons unfamiliar with the power tool or these instructions to operate the power tool.Power tools are dangerous in the hands of untrained users.
-
Maintain power tools and accessories. Check for misalignment or binding of moving parts, breakage of parts and any other condition that may affect the power tool’s operation. If damaged, have the power tool repaired before use.Many accidents are caused by poorly maintained power tools.
-
Keep cutting tools sharp and clean.Properly maintained cutting tools with sharp cutting edges are less likely to bind and are easier to control.
-
Use the power tool, accessories, and tool bits etc., in accordance with these instructions, taking into account the working conditions and the work to be performed.Use of the power tool for operations different from those intended could result in a hazardous situation.
-
Keep handles and grasping surfaces dry, clean and free from oil and grease.Slippery handles and grasping surfaces do not allow for safe handling and control of the tool in unexpected situations.
-
-
Battery tool use and care
-
Recharge only with the charger specified by a manufacturer.A charger that is suitable for one type of battery pack may create a risk of fire when used with another battery pack.
-
Use power tools only with specifically designated batteries.Use of any other batteries may create a risk of injury and fire.
-
When battery pack is not in use, keep it away from other metal objects, like paper clips, coins, keys, nails, screws or other small metal objects, that can make a connection from one terminal to another.Shorting the battery terminals together may cause burns or a fire.
-
Under abusive conditions, liquid may be ejected from the battery; avoid contact. If contact accidentally occurs, flush with water.If liquid contacts eyes, additionally seek medical help. Liquid ejected from the battery may cause irritation or burns.
-
Do not use a battery pack or tool that is damaged or modified. Damaged or modified batteries may exhibit unpredictable behavior resulting in fire, explosion or risk or injury.
-
Do not expose a battery pack or tool to fire or excessive temperature. Exposure to fire temperature above 130°C may cause an explosion.
-
Follow all charging instructions and do not charge the battery pack or tool outside the temperature range specified in the instructions.Changing improperly or at temperatures outside the specified range may damage the battery and increase the risk of fire.
-
-
Service
-
Have your power tool serviced by a qualified repair person using only identical replacement parts.This will ensure that the safety of the power tool is maintained.
-
Never service damaged battery packs. Service of battery packs should be performed only by the manufacturer or authorized service providers.
-
Lawn Mower Safety Warnings
-
Do not use the lawn mower in bad weather conditions, especially when there is a risk of lightning. This decreases the risk of being struck by lightning.
-
Thoroughly inspect the area for wildlife where you will use the lawn mower. Wildlife may be injured by the lawn mower during operation.
-
Thoroughly inspect the area where you will use the lawn mower and remove all stones, sticks, wires, bones, and other foreign objects. Thrown objects can cause personal injury.
-
Before using the lawn mower, always visually inspect to see that the blade and the blade assembly are not worn or damaged. Worn or damaged parts increase the risk of injury.
-
Keep guards in place. Guards must be in working order and be properly mounted. A guard that is loose, damaged, or is not functioning correctly may result in personal injury.
-
Keep all cooling air inlets clear of debris. Blocked air inlets and debris may result in overheating or risk of fire.
-
Do not operate the lawn mower on steep slopes. This reduces the risk of loss of control, slipping, and falling, which may result in personal injury.
-
While operating the lawn mower, always wear long trousers. Exposed skin increases the likelihood of injury from thrown objects.
-
Always work up or down the face of slopes, never across, and exercise extreme caution when changing direction. This reduces the risk of loss of control, slipping and falling which may result in personal injury.
-
Do not touch blades and other hazardous moving parts while they are still in motion. This reduces the risk of injury from moving parts.
-
Before clearing jammed material or cleaning the lawn mower, turn off all power switches and remove the key. Unexpected operation of the lawn mower may result in serious personal injury.
-
If the machine strikes an object or starts to vibrate, immediately turn off the lawn mower, remove the key (if equipped), and wait for all moving parts to stop before examining the machine for damage. Make all necessary repairs before resuming operation.
-
Before storing the lawn mower, clean grass and debris from the cutting unit, drives, grass catcher, and motor to help prevent fires.
-
To ensure optimum performance, use only genuine Toro replacement parts and accessories. Replacement parts and accessories made by other manufacturers could be dangerous, and such use could void the product warranty.
-
Replace worn or damaged blades and bolts in sets to preserve balance.
-
On multi-bladed machines, take care as rotating one blade can cause other blades to rotate.
-
Do not put your hands or feet near moving components of the machine.
-
Shut off the lawn mower, remove the key, and wait for all moving parts to stop before you leave the operator’s position. Allow the machine to cool before adjusting, servicing, cleaning, or storing it.
-
Avoid mowing on wet grass or in the rain. Doing so may increase the risk of electric shock.
Additional Toro Safety
General Safety
This product is capable of amputating hands and feet and of throwing objects. Always follow all safety instructions to avoid serious personal injury.
-
Do not allow children or untrained people to operate or service the machine. Allow only people who are responsible, trained, familiar with the instructions, and physically capable to operate or service the machine. Local regulations may restrict the age of the operator.
-
Do not operate the machine near drop-offs, ditches, embankments, water, or other hazards, or on slopes greater than 12°.
Before Operation Safety
-
Become familiar with the safe operation of the equipment, operator controls, and safety signs.
-
Check that operator-presence controls, safety switches, and guards are attached and working properly. Do not operate the machine unless they are functioning properly.
-
Before mowing, inspect the machine to ensure that the cutting assemblies are working properly.
-
Evaluate the terrain to determine the appropriate equipment and any attachments or accessories required to operate the machine properly and safely.
-
Do not carry passengers on the machine.
During Operation Safety
-
The owner/operator can prevent and is responsible for accidents that may cause personal injury or property damage.
-
Keep your hands and feet away from the cutting units. Keep clear of the discharge opening.
-
Do not mow with the discharge deflector raised, removed, or altered unless there is a grass-collection system or mulch kit in place and working properly.
-
Always look down and behind you before moving the machine in reverse.
-
Use extreme care when approaching blind corners, shrubs, trees, or other objects that may block your view.
-
Stop the blades whenever you are not mowing.
-
Slow down and use caution when making turns and crossing roads and sidewalks with the machine. Always yield the right-of-way.
-
Before you leave the operating position, do the following:
-
Park the machine on a level surface.
-
Disengage the power takeoff.
-
Engage the parking brake.
-
Shut off the machine and remove the key.
-
Wait for all moving parts to stop.
-
-
Never leave a running machine unattended.
-
Be aware of the mower discharge path and direct the discharge away from others. Avoid discharging material against a wall or obstruction because the material may ricochet back toward you.
-
Stop the blades, slow down the machine, and use caution when crossing surfaces other than grass or when transporting the machine to and from the operating area.
-
Children are often attracted to the machine and the mowing activity. Never assume that children will remain where you last saw them.
-
Keep children out of the operating area and under the watchful care of a responsible adult other than the operator.
-
Be alert and shut off the machine if children enter the operating area.
-
Before backing up or turning the machine, look down and all around for small children.
-
Do not carry children on the machine, even when the blades are not moving. Children could fall off and be seriously injured or prevent you from safely operating the machine. Children who have been given rides in the past could appear in the operating area without warning and be run over or backed over by the machine.
-
Use extra care with attachments. They can change the stability of the machine.
-
Do not attempt to stabilize the machine by putting your foot on the ground.
Slope Safety
-
Slopes are a major factor related to loss of control and rollover accidents, which can result in severe injury or death. The operator is responsible for safe slope operation. Operating the machine on any slope requires extra caution. Before using the machine on a slope, do the following:
-
Review and understand the slope instructions in the manual and on the machine.
-
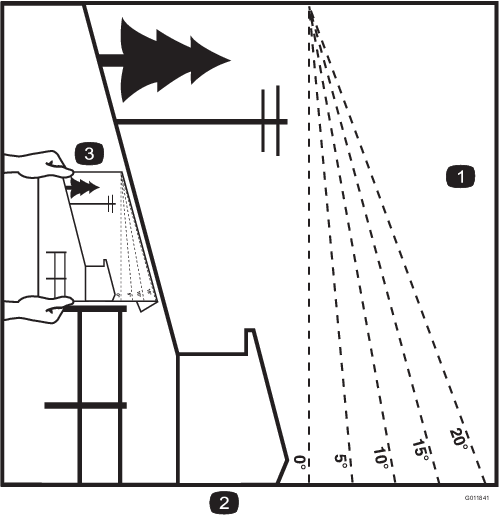
Use an angle indicator to determine the approximate slope angle of the area.
-
Never operate the lawn mower on slopes greater than 12°.
-
Evaluate the site conditions of the day to determine if the slope is safe for machine operation. Use common sense and good judgment when performing this evaluation. Changes in the terrain, such as moisture, can quickly affect the operation of the machine on a slope.
-
-
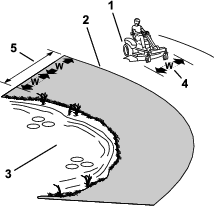
Identify hazards at the base of the slope. Do not operate the machine near drop-offs, ditches, embankments, water, or other hazards. The machine could suddenly roll over if a wheel goes over the edge or the edge collapses. Keep a safe distance (twice the width of the machine) between the machine and any hazard. Use a walk-behind machine or a hand trimmer to mow the grass in these areas.
-
Drive up and down slopes, not across. Exercise extreme caution when changing direction on slopes.
-
Avoid starting, stopping, or turning the machine on slopes. Avoid making sudden changes in speed or direction; turn slowly and gradually.
-
If the machine stops going uphill, stop the blades and back down slowly.
-
Do not operate a machine under any conditions where traction, steering, or stability is in question. Be aware that operating the machine on wet grass, across slopes, or downhill may cause the machine to lose traction. Loss of traction to the drive wheels may result in sliding and a loss of braking and steering. The machine can slide even if the drive wheels are stopped.
-
Remove or mark obstacles such as ditches, holes, ruts, bumps, rocks, or other hidden hazards. Tall grass can hide obstacles. Uneven terrain could overturn the machine.
-
If possible, keep the deck lowered to the ground while operating on slopes. Raising the deck while operating on slopes can cause the machine to become unstable.
After Operation Safety
Remove the key before storing or transporting the machine.
Battery and Charger Safety
General
-
Use only the supplied power cord for battery charging.
-
Confirm the voltage that is available in your country before using the charger.
-
For connection to a supply not in the US, use an attachment plug adapter of the proper configuration for the power outlet, if needed.
-
Do not charge the machine in rain or wet conditions.
-
A risk of fire, electric shock, or injury may result from using an accessory not recommended or sold by Toro.
-
To reduce risk of a battery explosion, follow these instructions and the instructions for any equipment that you intend to use near the charger.
-
Do not open batteries.
-
In the event that a battery leaks, avoid contact with the liquid. If you accidentally come into contact with the liquid, flush with water and seek medical help. Liquid ejected from the battery may cause irritation or burns.
-
Refer to an authorized Toro distributor to service or replace a battery.
Training
Never allow children or untrained people to operate or charge the machine. Local regulations may restrict the age of the operator. The owner is responsible for training all operators and mechanics.
Preparation
-
Keep bystanders and children away while charging.
-
Shut off the machine and wait until the machine has completely powered down before charging. Failure to do this may cause arcing.
-
Read and follow all precautions for charging.
-
Use only a power cord approved by Toro.
Operation
-
Read and understand the charging instructions before charging the batteries. Also, take the following precautions when charging the batteries:
-
Turn off the machine before connecting the charger to a power source.
-
Use only the battery charger supplied with the machine to charge the batteries.
-
Charge the battery in an open, well-ventilated area, away from sparks and flames. Unplug the charger before connecting or disconnecting the battery. Wear protective clothing and use insulated tools.
-
Do not charge a damaged or frozen battery.
-
Always unplug the power cord from the power outlet before unplugging it from the machine charging receptacle to avoid sparks.
-
If a battery gets hot while charging, begins emitting large amounts of gasses, or spews electrolyte, immediately disconnect the charger power cord from the power outlet. Have the machine serviced by an Authorized Service Dealer before using it again.
-
-
Do not abuse the power supply cord or yank on it to disconnect the charger from the receptacle. Keep the cord from heat, oil, and sharp edges.
-
Connect the charger directly to a grounding receptacle. Do not charge on an ungrounded outlet, even with an adaptor.
-
Do not alter the provided power cord or plug.
-
Use an appropriate extension cord.
-
If the power supply cord is damaged while it is plugged in, disconnect the cord from the wall receptacle and contact an authorized Toro distributor for a replacement.
-
Unplug the charger from the electrical outlet when not in use, before moving it to another location, or prior to servicing it.
Maintenance and Storage
-
Unplug the power cord from the outlet before starting any maintenance or cleaning to reduce risk of electric shock.
-
Do not charge the batteries while servicing the machine.
-
When removing or installing the batteries, do not allow the battery terminals to touch any metal parts of the machine.
-
Always keep the battery retainers in place to protect and secure the batteries.
-
If the charger or power cord is damaged, do not use it; take it to an authorized Toro distributor.
-
To reduce the potential for fire, keep the batteries and motor area free of excessive grease, grass, leaves, and accumulation of dirt.
-
Do not charge with a damaged cord or plug. Replace a damaged cord or plug immediately.
-
Maintain or replace safety and instruction labels as needed.
-
Store the machine indoors in a dry, secure place that is out of the reach of unauthorized users.
Maintenance Safety
-
If you leave the key in the switch, someone could accidently start the machine and seriously injure you or other bystanders. Remove the key from the switch before you perform any maintenance.
-
Before you leave the operator’s position, do the following:
-
Park the machine on a level surface.
-
Disengage the drives.
-
Engage the parking brake.
-
Shut off the machine and remove the key.
-
Allow machine components to cool before performing maintenance.
-
-
Do not allow untrained personnel to service the machine.
-
Carefully release pressure from components with stored energy.
-
Check the parking brake operation frequently. Adjust and service it as required.
-
Never tamper with safety devices. Check their proper operation regularly.
-
Do not rely on hydraulic or mechanical jacks to support the machine; support the machine with jack stands whenever you raise the machine.
-
Keep all parts in good working condition and all hardware tightened, especially the blade-attachment hardware. Replace all worn or damaged decals.
-
Disconnect the battery before repairing the machine. Disconnect the negative terminal first and the positive last. Connect the positive terminal first and the negative last.
-
Inspect the blades periodically for wear or damage.
-
Use care when checking the blades. Wrap the blades or wear gloves, and use caution when servicing the blades. Only replace or sharpen the blades; never straighten or weld them.
Storage Safety
-
Shut off the machine, remove the key, and wait for all moving parts to stop before you leave the operator’s position. Allow the machine to cool before adjusting, servicing, cleaning, or storing it.
-
Do not store the machine where there is an open flame, spark, or pilot light, such as on a water heater or on other appliances.
Save all warnings and instructions for future reference.
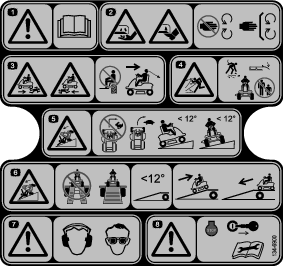
Slope Indicator
Safety and Instructional Decals
 |
Safety decals and instructions are easily visible to the operator and are located near any area of potential danger. Replace any decal that is damaged or missing. |


Setup
Charging the Batteries
Refer to Charging the Batteries.
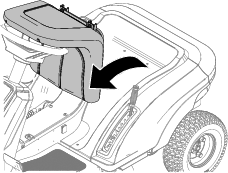
Installing the Grass Deflector
Product Overview
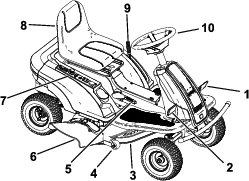
Become familiar with all the controls before you start and operate the machine.
Control Panel
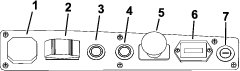
Key Switch
The key switch has 2 positions: ON and OFF. Use the key switch to start or shut off the machine.
Blade-Control Switch (Power Takeoff)
The blade-control switch, represented by a power-takeoff (PTO) symbol, engages and disengages power to the mower blades.
Brake Pedal
Use the brake pedal to stop or slow the machine.
Parking-Brake Lever
Whenever you shut off the machine, engage the parking brake to prevent accidental movement of the machine.
-
To engage the parking brake, pull the parking-brake lever up.
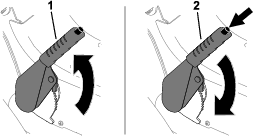
-
To disengage the parking brake, press the button on the parking-brake lever and then push the parking-brake lever forward
Traction-Control Pedal
Use the traction-control pedal to vary the ground speed of the machine. The farther you press the pedal, the faster the machine moves.
Drive-Mode Switch
The drive-mode switch has 3 positions: FORWARD, NEUTRAL, and REVERSE. The drive-mode switch must be in the FORWARD position before engaging the mower blades.
Note: An audible alarm sounds when the drive-mode switch is in the REVERSE position. The machine moves in reverse at half the forward speed.
Reverse-Mowing Operation (
Use the reverse-mowing operation (RMO) button to operate the mower blades while driving the machine in reverse.
Engage the reverse-mowing mode in the following ways:
-
Before engaging the blades
-
Press the reverse-mowing button, engage the mower blades, then move the drive-mode switch to the REVERSE position.
-
Engage the mower blades, press the reverse-mowing button, then move the drive-mode switch to the REVERSE position.
-
-
While mowing in the forward direction
-
Press the reverse-mowing button, then move the drive-mode switch to the REVERSE position.
-
Move the drive-mode switch to the REVERSE position, disengage the mower blades, press the reverse-mowing button, then engage the mower blades.
-
Cruise-Control Operation (
Use the cruise-control (CCO) button to maintain the traction speed without your foot on the pedal.
Press the traction-control pedal to the desired speed, hold the cruise-control button approximately 3 seconds, then release your foot from the pedal.
Press the traction-control pedal or brake pedal to disengage the cruise control.
Battery-Discharge Indicator
The battery-discharge indicator displays the remaining charge in the batteries. When the batteries are fully charged, 10 indicator bars light up and disappear as you use the charge. When the battery charge is low, the indicator lights display in red and the mower blades automatically disengage; charge the batteries when this occurs.
Note: The battery-discharge indicator does not display unless the operator is sitting in the operator’s seat.
Height-of-Cut Lever
Use the height-of-cut lever to lower and raise the deck from the seated position. Moving the lever toward you raises the deck from the ground and moving the lever away from you lowers the deck toward the ground. Adjust the height-of-cut only while the machine is not moving.
Note: Specifications and design are subject to change without notice.
| Cutting width | 76 cm (30 inches) |
| Width without deflector | 80 cm (31 inches) |
| Length | 148 cm (58 inches) |
| Weight | 188 kg (414 lb) |
| Height | 106 cm (42 inches) |
| Charging time | 11 hours |
Attachments/Accessories
A selection of Toro approved attachments and accessories is available for use with the machine to enhance and expand its capabilities. Contact your Authorized Service Dealer or authorized Toro distributor or go to www.Toro.com for a list of all approved attachments and accessories.
To ensure optimum performance and continued safety certification of the machine, use only genuine Toro replacement parts and accessories. Replacement parts and accessories made by other manufacturers could be dangerous, and such use could void the product warranty.
Operation
Note: Determine the left and right sides of the machine from the normal operating position.
Before Operation
Performing Daily Maintenance
Before starting the machine each day, perform the Each Use/Daily procedures listed in .
Using the Safety-Interlock System
Warning
If the safety-interlock switches are disconnected or damaged, the machine could operate unexpectedly, causing personal injury.
-
Do not tamper with the interlock switches.
-
Check the operation of the interlock switches daily and replace any damaged switches before operating the machine.
Understanding the Safety-Interlock System
The safety-interlock system is designed to prevent the machine from starting unless:
-
The blade-control switch (PTO) is disengaged.
-
The parking brake is disengaged.
-
You are seated in the operator's seat.
-
The drive-mode switch is in the FORWARD or NEUTRAL position.
The safety-interlock system also is designed to prevent the mower blades from engaging unless the drive-mode switch is in the FORWARD position.
Testing the Safety-Interlock System
Test the safety-interlock system before you use the machine each time. If the safety system does not operate as described below, have an Authorized Service Dealer repair the safety system immediately.
-
Sit on the seat, engage the parking brake, move the drive-mode switch to the FORWARD position, and move the blade-control switch to the OFF position. Turn the key switch to the ON position, and the machine will beep once. Press the traction pedal; the machine should not move forward. Turn the key switch to the OFF position.
-
Sit on the seat, disengage the parking brake, move the drive-mode switch to the FORWARD position, and move the blade-control switch to the ON position. Turn the key switch to the ON position, and the machine will beep 5 times. Press the traction pedal; the machine should not move forward. Turn the key switch to the OFF position.
-
Sit on the seat, disengage the parking brake, move the drive-mode switch to the REVERSE position, and move the blade-control switch to the OFF position. Turn the key switch to the ON position, and the machine will beep once. Press the traction pedal; the machine should not move forward. Turn the key switch to the OFF position.
-
Sit on the seat, disengage the parking brake, move the drive-mode switch to the NEUTRAL position, and move the blade-control switch to the OFF position. Turn the key switch to the ON position, and the machine will beep once. Move the drive-mode switch to the FORWARD position. Press the traction pedal, and the machine should drive forward. While driving forward, rise slightly from the seat; the machine should stop moving and beep 5 times. Turn the key switch to the OFF position.
-
Sit on the seat, disengage the parking brake, move the drive-mode switch to the NEUTRAL position, and move the blade-control switch to the OFF position. Turn the key switch to the ON position, and the machine will beep once. Engage the mower blades and rise slightly from the seat; the mower blades should shut off and the machine should beep 5 times. Turn the key switch to the OFF position.
-
Sit on the seat, disengage the parking brake, move the drive-mode switch to the NEUTRAL position, and move the blade-control switch to the OFF position. Turn the key switch to the ON position, and the machine will beep one. Move the drive-mode switch to the FORWARD position and engage the mower blades. Move the drive-mode switch to the REVERSE position; the mower blades should shut off. Turn the key switch to the OFF position.
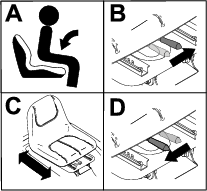
Positioning the Seat
The seat can move forward and backward. Position the seat where you have the best control of the machine and are most comfortable.
Converting the Mower to Side-Discharging or Mulching
Danger
Without a grass deflector, discharge cover, or a complete grass-catcher assembly mounted in place, you and others are exposed to blade contact and thrown debris. Contact with rotating mower blade(s) and thrown debris will cause injury or death.
-
Never remove the grass deflector from the mower deck because the grass deflector routes material down toward the turf. If the grass deflector is ever damaged, replace it immediately.
-
Never put your hands or feet under the mower deck.
-
Never try to clear the discharge area or mower blades unless you move the blade-control switch (PTO) to the OFF position, rotate the key switch to the OFF position, and remove the key from the key switch.
-
Make sure that the grass deflector is in the down position.
-
Park the machine on a level surface, disengage the blade-control switch, and engage the parking brake.
-
Shut off the machine and remove the key.
-
Convert the mower deck to side discharging or mulching.
-
To convert the mower deck to side discharging:
-
Press the lever on the mulching cover to open it.
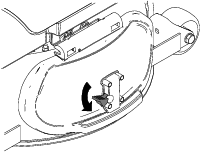
-
Install the discharge deflector under the cover so that the deflector is secured by the mulching cover pegs.
-
-
To convert the mower deck to mulching, remove the deflector and close the mulching cover.
Note: The cover locks automatically when it is closed fully.
-
During Operation
Starting the Machine
-
Sit on the operator’s seat.
-
Release the parking brake.
-
Ensure that the blade-control switch (PTO) is disengaged.
-
Move the drive-mode switch to the NEUTRAL position.
-
Turn the key switch to the ON position.
Driving the Machine
Note: Always use caution when backing up and turning.
-
Disengage the parking brake.
-
Move the drive-mode switch to the FORWARD or REVERSE position.
-
Place your foot on the traction-control pedal and slowly press it to start driving.
Note: The farther you press the pedal, the faster the machine moves.
-
Release the traction-control pedal and slowly press the brake pedal to stop or slow the machine.
Note: Stop the machine before changing direction to forward or reverse.
Shutting Off the Machine
-
Park the machine on a level surface.
-
Disengage the mower blades.
-
Engage the parking brake.
-
Turn the key switch to the OFF position and remove the key.
Operating the Mower Blade-Control Switch (PTO)
The blade-control switch (PTO) starts and stops the mower blades.
Engaging the Blade-Control Switch (PTO)
Ensure that the drive-mode switch is in the FORWARD position before engaging the mower blades. Refer to Reverse-Mowing Operation (RMO) Button for mowing in reverse.
Disengaging the Blade-Control Switch (PTO)
Note: The mower blades automatically disengage when operating the machine in reverse (when not using the reverse-mowing button) or when the operator rises from the seat.
Adjusting the Height of Cut
You can adjust the height of cut from 25 to 104.7 mm (1 to 4.1 inches). Pull the lever to the right, move it to the desired height, and release the lever into the slot. Refer to the table for the height-of-cut positions.
| Height-of-Cut Position | Height |
| 1 | 25.0 mm (1.0 inch) |
| 2 | 31.8 mm (1.3 inches) |
| 3 | 40.7 mm (1.6 inches) |
| 4 | 51.2 mm (2.0 inches) |
| 5 | 62.4 mm (2.5 inches) |
| 6 | 73.4 mm (2.9 inches) |
| 7 | 83.4 mm (3.3 inches) |
| 8 | 91.9 mm (3.6 inches) |
| 9 | 99.0 mm (3.9 inches) |
| 10 | 104.7 mm (4.1 inches) |
Operating Tips
Cutting a Lawn for the First Time
Cut grass slightly longer than normal to ensure that the cutting height of the mower deck does not scalp any uneven ground. However, the cutting height used in the past is generally the best one to use. When cutting grass longer than 15 cm (6 inches) tall, you may want to cut the lawn twice to ensure an acceptable quality of cut.
Cutting a Third of the Grass Blade
It is best to cut only about a third of the grass blade or no more than 2.5 cm (1 inch) off the height. Cutting more than that is not recommended unless grass is sparse, or it is late autumn when grass grows more slowly.
Alternating the Mowing Direction
Alternate the mowing direction to keep the grass standing straight. This also helps disperse clippings, which enhances decomposition and fertilization.
Mowing at Correct Intervals
Grass grows at different rates at different times of the year. To maintain the same cutting height, mow more often in early spring. As the grass growth rate slows in mid summer, mow less frequently. If you cannot mow for an extended period, first mow at a high cutting height, then mow again 2 days later at a lower height setting.
Using a Slower Cutting Speed
To improve cut quality, use a slower ground speed in certain conditions.
Avoiding Cutting Too Low
When mowing uneven turf, raise the cutting height to avoid scalping the turf.
Stopping the Machine
If you must stop the forward motion of the machine while mowing, a clump of grass clippings may drop onto your lawn. To avoid this, move onto a previously cut area with the blades engaged or you can disengage the mower deck while moving forward.
Keeping the Underside of the Mower Deck Clean
Clean clippings and dirt from the underside of the mower deck after each use. If grass and dirt build up inside the mower deck, cutting quality will eventually become unsatisfactory.
Maintaining the Blade(s)
Maintain a sharp blade throughout the cutting season because a sharp blade cuts cleanly without tearing or shredding the grass blades. Tearing and shredding turns grass brown at the edges, which slows growth and increases the chance of disease. Check the mower blades after each use for sharpness, and for any wear or damage. File down any nicks and sharpen the blades as necessary. If a blade is damaged or worn, replace it immediately with a genuine Toro replacement blade.
After Operation
Transporting the Machine
Use a heavy-duty trailer or truck to transport the machine. Use a full-width ramp. Ensure that the trailer or truck has all the necessary brakes, lighting, and marking as required by law. Please carefully read all the safety instructions. Knowing this information could help you or bystanders avoid injury. Refer to your local ordinances for trailer and tie-down requirements.
Warning
Driving on the street or roadway without turn signals, lights, reflective markings, or a slow-moving-vehicle emblem is dangerous and can lead to accidents, causing personal injury.
Do not drive the machine on a public street or roadway.
Selecting a Trailer
Warning
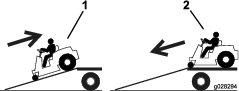
Loading a machine onto a trailer or truck increases the possibility of tip-over and could cause serious injury or death (Figure 14).
-
Use only a full-width ramp; do not use individual ramps for each side of the machine.
-
Do not exceed a 12-degree angle between the ramp and the ground or between the ramp and the trailer or truck.
-
Ensure that the length of the ramp is at least 4 times as long as the height of the trailer or truck bed to the ground. This ensures that the ramp angle does not exceed 12 degrees on flat ground.
Loading the Machine
Warning
Loading a machine onto a trailer or truck increases the possibility of tip-over and could cause serious injury or death.
-
Use extreme caution when operating a machine on a ramp.
-
Back the machine up the ramp and drive it forward down the ramp.
-
Avoid sudden acceleration or deceleration while driving the machine on a ramp as this could cause a loss of control or a tip-over situation.
-
If using a trailer, connect it to the towing vehicle and connect the safety chains.
-
If applicable, connect the trailer brakes and lights.
-
Lower the ramp, ensuring that the angle between the ramp and the ground does not exceed 12 degrees (Figure 14).
-
Back the machine up the ramp.
-
Shut off the machine, remove the key, and engage the parking brake.
-
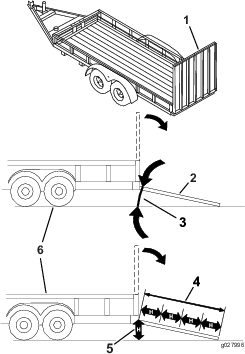
Tie down the machine at the front and rear axles with straps, chains, cable, or ropes. Refer to local regulations for tie-down requirements.
Moving a Non-Functioning Machine
The machine alerts you when the battery charge is low so that you have enough power to return it to the charging location; refer to Battery-Discharge Indicator.
If you need to tow the machine, disengage the parking brake and tow the machine at a walking speed.
Maintenance
Note: Determine the left and right sides of the machine from the normal operating position.
Recommended Maintenance Schedule(s)
| Maintenance Service Interval | Maintenance Procedure |
|---|---|
| Before each use or daily |
|
| After each use |
|
| Every 25 hours |
|
| Before storage |
|
| Monthly |
|
Caution
If you leave the key in the switch, someone could accidently start the machine and seriously injure you or other bystanders.
Shut off the machine and remove the key from the switch before you perform any maintenance.
Pre-Maintenance Procedures
Accessing the Batteries
-
Park the machine on a level surface, disengage the blade-control switch, and engage the parking brake.
-
Shut off the machine and remove the key.
-
Tilt the seat forward.
-
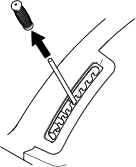
Move the height-of-cut lever to the middle position and remove the handle.
-
Insert the wire harness connectors into the control panel hole.
-
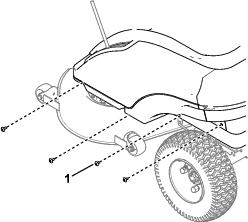
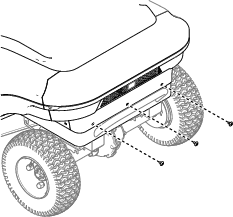
Remove the 4 screws securing the cover to the left side of the machine. Repeat for the right side.
-
Remove the 3 rear screws from the cover.
-
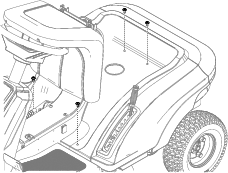
Remove the 4 top screws from the cover.
-
Carefully lift the cover and set it down next to the machine.
Note: You do not need to disconnect the wire harness from the controls.
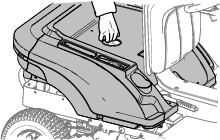
-
Reverse the procedure to install the cover.
Important: After maintenance, ensure that there are no open circuits or loose wiring.
Lubrication
Greasing the Front Wheel Bearings
| Maintenance Service Interval | Maintenance Procedure |
|---|---|
| Every 25 hours |
|
Grease type: General-purpose grease
-
Park the machine on a level surface, disengage the blade-control switch, and engage the parking brake.
-
Shut off the machine and remove the key.
-
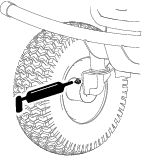
Clean the grease fittings with a rag.
Note: Make sure to scrape any paint off the front of the fitting(s).
-
Connect a grease gun to the fitting.
-
Pump grease into the fittings until grease begins to ooze out of the bearings.
-
Wipe up any excess grease.
Electrical System Maintenance
Maintaining the Batteries
| Maintenance Service Interval | Maintenance Procedure |
|---|---|
| Monthly |
|
Note: The original batteries are maintenance-free and do not require service.
Warning
Battery terminals or metal tools could short against metal components causing sparks. Sparks can cause the battery gases to explode, resulting in personal injury.
-
When removing or installing the battery, do not allow the battery terminals to touch any metal parts of the machine.
-
Do not allow metal tools to short between the battery terminals and metal parts of the machine.
-
Use insulated tools when maintaining the batteries.
-
Always keep the battery retainers in place to protect and secure the batteries.
Danger
Do not touch any electrical components or contacts on the motor.
Touching any of these components or contacts could seriously injure you or cause death.
Cleaning the Batteries
| Maintenance Service Interval | Maintenance Procedure |
|---|---|
| Every 25 hours |
|
-
Ensure that all the battery caps are tight.
-
Use a paper towel to clean the batteries.
-
If the battery terminals are corroded, clean them with a solution of 4 parts water and 1 part baking soda. Also, clean the posts and cable clamps with a post and clamp cleaner.
Note: The posts and clamps should have a bright, metallic shine.
-
Apply a light coating of Toro battery-terminal protector.
Charging the Batteries
| Maintenance Service Interval | Maintenance Procedure |
|---|---|
| Before each use or daily |
|
For maximum battery life, drain the batteries as low as possible before each charge. Charge the batteries immediately after depleting a substantial amount of power. The batteries will produce more efficient electrical production after you charge and deplete them a number of cycles.
Note: Normal charge time is approximately 11 hours.
Important: Charge the batteries between 0 to 40°C (32 to 104°F).
Warning
Charging the battery produces gases that can explode.
Never smoke near the batteries and keep sparks and flames away from them.
-
Park the machine on a level surface, in a well-ventilated area near a suitable power outlet.
-
Disengage the blade-control switch and engage the parking brake.
-
Shut off the machine, remove the key, and wait for all moving parts to stop before leaving the operating position.
-
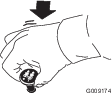
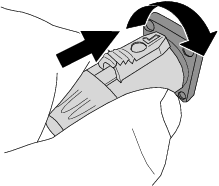
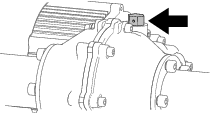
Connect the charger to the charging receptacle and rotate the plug clockwise to secure it (Figure 24).
Note: The charge plug only fits on the machine 1 way.
Note: Ensure that the charger-voltage setting matches the voltage at the power outlet being used.
Note: If the battery charger is too hot, it may not charge properly. In cold temperatures, it may take a longer for the batteries to charge.
-
Plug the charger power cord into the power outlet.
Note: The charger light will illuminate red to indicate a connection between the battery and charger.
-
Allow the battery to charge.
Note: The battery is fully charged only when the charger light illuminates green.
-
After charging, disconnect the cord from the power outlet.
-
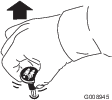
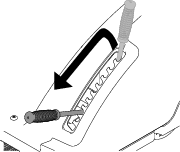
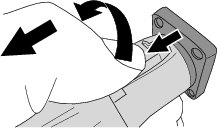
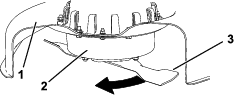
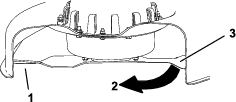
Slide back the button on the plug, turn the plug counterclockwise, and pull the plug out of the socket (Figure 25).
Replacing the Batteries
Contact your Authorized Service Dealer for replacing the batteries.
Drive System Maintenance
Checking the Tire Pressure
| Maintenance Service Interval | Maintenance Procedure |
|---|---|
| Every 25 hours |
|
Maintain the air pressure in the front and rear tires as specified. Uneven tire pressure can cause an uneven cut. Check the pressure at the valve stem when the tires are cold to get the most accurate pressure reading.
Inflate the tires to 138 kPa (20 psi).
Adding Gear Oil
Oil Type: SAE 90 gear oil
Gearbox Capacity: 200 ml (6.8 fl oz)
The rear axle gearbox requires no maintenance. However, additional oil may be added if oil loss occurs.
-
Park the machine on a level surface, disengage the blade-control switch, and engage the parking brake.
-
Shut off the machine and remove the key.
-
Remove the plug from the gearbox.
-
Fill the gearbox with oil.
-
Install the plug.
Mower Maintenance
Servicing the Cutting Blades
To ensure a superior quality of cut, keep the blades sharp. For convenient sharpening and replacement, keep extra blades on hand.
Before Inspecting or Servicing the Blades
-
Park the machine on a level surface, disengage the blade-control switch, and engage the parking brake.
-
Shut off the machine and remove the key.
-
Raise the machine off the ground so that you can access beneath it. Support the machine using jackstands.
Warning
Mechanical or hydraulic jacks may fail to support the machine and cause serious injury.
Use jack stands when supporting the machine.
Inspecting the Blades
| Maintenance Service Interval | Maintenance Procedure |
|---|---|
| Before each use or daily |
|
-
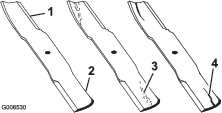
Inspect the cutting edges (Figure 28).
-
If the edges are not sharp or have nicks, remove and sharpen the blade; refer to Sharpening the Blades.
-
Inspect the blades, especially in the curved area.
-
If you notice any cracks, wear, or a slot forming in this area, immediately install a new blade (Figure 28).
Checking for Bent Blades
Note: The machine must be on a level surface for the following procedure.
-
Raise the mower deck to the highest height-of-cut position.
-
While wearing thickly padded gloves, or other adequate hand protection, slowly rotate the blade into a position that allows you to measure the distance between the cutting edge and the level surface the machine is on (Figure 29).
-
Measure from the tip of the blade to the flat surface (Figure 30).

-
Rotate the same blade 180 degrees so that the opposing cutting edge is now in the same position (Figure 31).
-
Measure from the tip of the blade to the flat surface (Figure 32).
Note: The variance should be no more than 3 mm (1/8 inch).
-
If the difference between A and B is greater than 3 mm (1/8 inch), replace the blade with a new blade; refer to Removing the Blades and Installing the Blades.
Note: If a bent blade is replaced with a new blade, and the dimension obtained continues to exceed 3 mm (1/8 inch), the blade spindle could be bent. Contact an Authorized Service Dealer for service.
-
If the variance is within constraints, move to the next blade.
-
-
Repeat this procedure on each blade.
Removing the Blades
Replace the blades if they hit a solid object, or if the blade is out of balance or bent.
-
Place a woodblock between the blade and mower housing to prevent the blade from turning.
-
Hold the blade end using a rag or thickly padded glove.
-
Remove the blade.
Sharpening the Blades
-
Use a file to sharpen the cutting edge at both ends of the blade (Figure 34).
Note: Maintain the original angle.
Note: The blade retains its balance if the same amount of material is removed from both cutting edges.

-
Check the balance of the blade by putting it on a blade balancer (Figure 35).
Note: If the blade stays in a horizontal position, the blade is balanced and can be used.
Note: If the blade is not balanced, file some metal off the end of the sail area only (Figure 34).
-
Repeat this procedure until the blade is balanced.
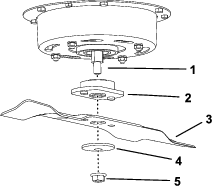
Installing the Blades
-
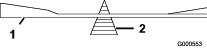
Install the blade and adapter onto the spindle shaft (Figure 36).
Important: The curved part of the blade must be pointing upward toward the inside of the mower to ensure proper cutting.
-
Install the curved washer (cupped side toward the blade) and the nut.
-
Torque the nut to 35 N∙m (26 ft-lb).
Cleaning
Cleaning the Underside of the Mower Deck
| Maintenance Service Interval | Maintenance Procedure |
|---|---|
| After each use |
|
Clean the underside of the mower deck after each use to prevent grass buildup for improved mulch action and clipping dispersal.
Important: Do not use water to clean the mower deck, otherwise you could damage the electric motors.
-
Park the machine on a level surface, disengage the blade-control switch (PTO), and engage the parking brake.
-
Shut off the machine, remove the key, and wait for all moving parts to stop before leaving the operating position.
-
Raise the machine off the ground so that you can access beneath it. Support the machine using jackstands.
Warning
Mechanical or hydraulic jacks may fail to support the machine and cause serious injury.
Use jack stands when supporting the machine.
-
Scrape buildup of grass and other debris from the mower deck, finished surfaces, and wheels.
Disposing of Waste
Engine oil, batteries, hydraulic fluid, and engine coolant are pollutants to the environment. Dispose of these according to your state and local regulations.
Storage
Cleaning and Storage
-
Park the machine on a level surface, disengage the blade-control switch (PTO), and engage the parking brake
-
Shut off the machine, remove the key, and wait for all moving parts to stop before leaving the operating position.
-
Remove grass clippings, dirt, and grime from the external parts of the entire machine, especially the motor.
-
Check the parking brake operation; refer to Parking-Brake Lever.
-
Grease the machine; refer to Lubrication.
-
Check the tire pressure; refer to Checking the Tire Pressure.
-
Charge the batteries; refer to Charging the Batteries.
-
Scrape any heavy buildup of grass and dirt from the underside of the mower.
-
Check the condition of the blades; refer to Servicing the Cutting Blades.
-
Check and tighten all fasteners. Repair or replace any part that is damaged.
-
Paint all scratched or bare metal surfaces. Paint is available from your Authorized Service Dealer.
-
Store the machine in a clean, dry garage or storage area. Remove the key from the switch and keep it out of reach of children or other unauthorized users. Cover the machine to protect it and keep it clean.
Battery Storage
| Maintenance Service Interval | Maintenance Procedure |
|---|
Important: Store the batteries between -10 to 40°C (14 to 122°F).
-
Charge the batteries fully before placing the machine into storage; refer to Charging the Batteries. Disconnect the charger when the batteries are fully charged.
-
Charge the battery every 60 days at a minimum.
Important: Do not leave the charger connected to the machine while in storage.
Troubleshooting
| Problem | Possible Cause | Corrective Action |
|---|---|---|
| The drive motor does not start. |
|
|
| The blade motor does not start. |
|
|
| The machine does not start. |
|
|
| The machine vibrates abnormally. |
|
|
| The cutting height is uneven. |
|
|
| The machine does not discharge or it discharges improperly. |
|
|
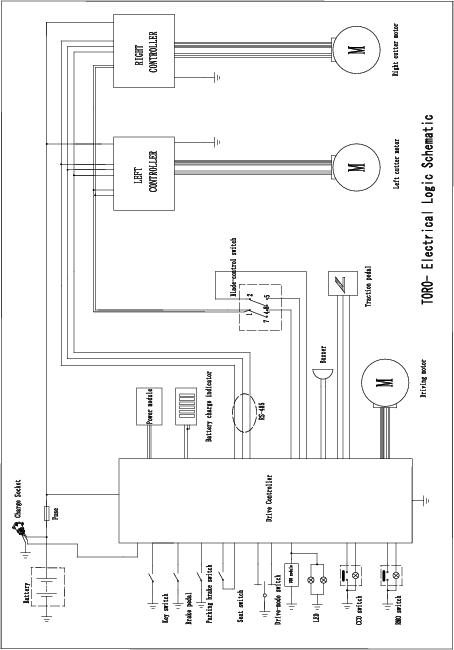
Schematics
Electrical Schematic