Installation
Preparing the Machine
-
Park the machine on a level surface.
-
Engage the parking brake.
-
Shut off the machine and remove the key.
Removing the Canopy Support Bracket
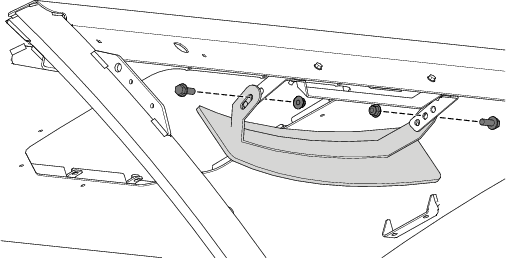
Remove the canopy support bracket as shown in Figure 1.
Note: Retain the support bracket and hardware for later installation.
Installing the Kit
Parts needed for this procedure:
| Mirror mount | 1 |
| Wide-angle mirror | 1 |
| Flange nut (1/4 inch) | 2 |
| Machine bolt (1/4 x 3/4 inch) | 2 |
| Locknut (3/8 inch) | 2 |
| Flange-head bolt (3/8 x 1 inch) | 2 |
-
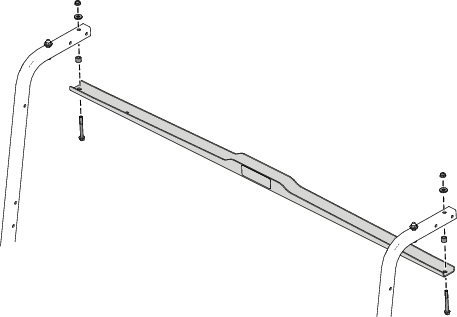
Secure the mirror mount to the canopy support bracket using the 2 machine bolts (1/4 x 3/4 inch) and 2 flange nuts (1/4 inch) as shown in A of Figure 2.
-
Secure the wide-angle mirror to the mirror mount using the 2 flange-head bolts (3/8 x 1 inch) and 2 locknuts (3/8 inch) as shown in B of Figure 2.
Note: You can install the mirror to your desired height and angle using any of the 3 hole locations.
-
Install the canopy support bracket using the previously removed hardware (Figure 1).
Installing the Kit
Parts needed for this procedure:
| Mirror mount | 1 |
| Wide-angle mirror | 1 |
| Flange nut (3/8 inch) | 2 |
| Flange-head bolt (3/8 x 1 inch) | 2 |
| Locknut (1/4 inch) | 2 |
| Hex-washer head bolt (1/4 x 3/4 inch) | 2 |
| Flange-head bolt (1/4 x 1-1/2 inches)—2-person canopy (Model 07140) or 4-person canopy (Model 07141) only | 2 |
Important: If you are installing the kit on a cab (Model 07142), discard the 2 hex-washer head bolts (1/4 x 3/4 inch) and 2 locknuts (1/4 inch), and use the existing hardware.
Important: If you are installing the kit on a canopy frame with a square cross tube, install the mirror mount using the 2 flange-head bolts (1/4 x 1-1/2 inches).
-
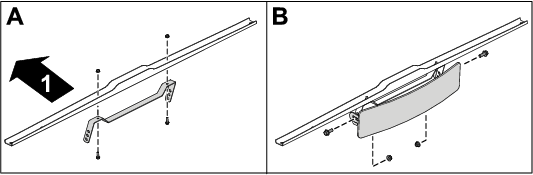
Install the mirror mount using the 2 hex-washer head bolts (1/4 x 3/4 inch) and 2 locknuts (1/4 inch) as shown in A of Figure 3.
-
Install the wide-angle mirror using the 2 flange-head bolts (3/8 x 1 inch) and 2 flange nuts (3/8 inch) as shown in B of Figure 3.
Note: You can install the mirror to your desired height and angle using any of the 3 hole locations.
Installing the Kit
Parts needed for this procedure:
| Mirror mount | 1 |
| Wide-angle mirror | 1 |
| Locknut (3/8 inch) | 2 |
| Flange-head bolt (3/8 x 1 inch) | 2 |
| Locknut (1/4 inch) | 2 |
| Hex-washer head bolt (1/4 x 3/4 inch) | 2 |
-
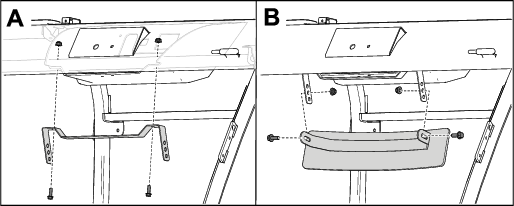
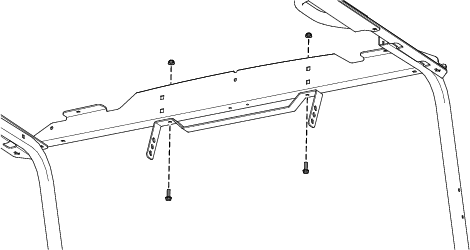
Secure the mirror mount to the front support bracket using 2 hex-washer head bolts (1/4 x 3/4 inch) and 2 locknuts (1/4 inch) as shown in Figure 4.
-
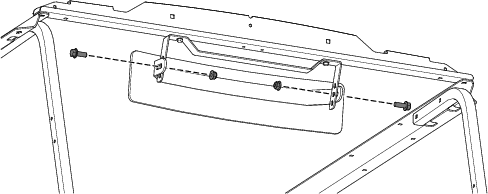
Secure the wide-angle mirror to the mount using 2 flange-head bolts (3/8 x 1 inch) and 2 locknuts (3/8 inch) as shown in Figure 5.
Note: You can install the mirror to your desired height and angle using any of the 3 hole locations.
Installing the Kit
Parts needed for this procedure:
| Black mirror mount | 1 |
| Primed mirror mount | |
| Wide-angle mirror | 1 |
| Locknut (3/8 inch) | 2 |
| Flange-head bolt (3/8 x 1 inch) | 2 |
| Locknut (1/4 inch) | 4 |
| Hex-washer head bolt (1/4 x 3/4 inch) | 4 |
-
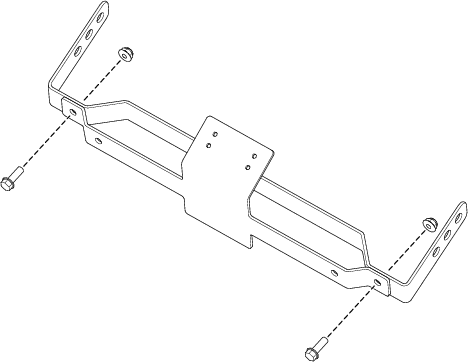
Secure the primed mirror mount to the black mirror mount using 2 hex-washer head bolts (1/4 x 3/4 inch) and 2 locknuts (1/4 inch) as shown in Figure 6.
-
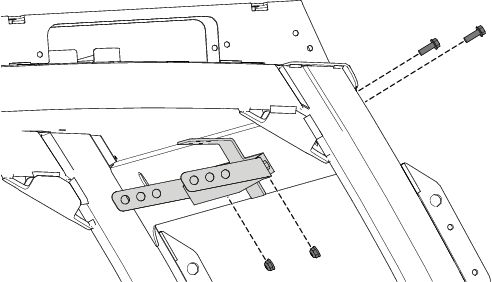
Secure the mirror-mount assembly to the canopy using 2 hex-washer head bolts (1/4 x 3/4 inch) and 2 locknuts (1/4 inch) as shown in Figure 7.
-
Secure the wide-angle mirror to the mirror-mount assembly using 2 flange-head bolts (3/8 x 1 inch) and 2 locknuts (3/8 inch) as shown in Figure 8.
Note: You can install the mirror to your desired height and angle using any of the 3 hole locations.