Installation
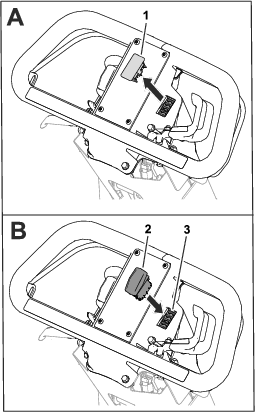
If you install this kit to a Model 04860 or 04861 traction unit, ensure that the part number for the kit wire harness is 122-2178.
If you have an older wire harness (Part Number 122-1418), replace it with the new wire harness (Part Number 122-2178); refer to your authorized Toro distributor for the new wire harness.
Preparing the Machine
-
Park the machine on a level surface.
-
Engage the parking brake.
-
Shut off the engine.
-
Remove the spark-plug wire from the spark plug; refer to your machine Operator’s Manual.
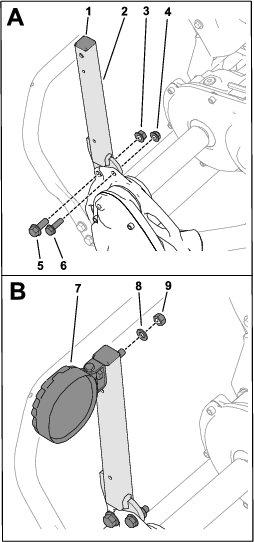
Installing the Lights
Parts needed for this procedure:
| LED light | 2 |
| Light mount | 2 |
| Mount cap | 2 |
| Bolt (3/8 inch) | 2 |
| Bolt (5/16 inch) | 2 |
| Nut (3/8 inch) | 2 |
| Nut (5/16 inch) | 2 |
Installing the Wire Harness
Parts needed for this procedure:
| Wire harness | 1 |
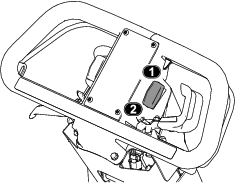
Refer to Figure 2 for this procedure.
-
Connect the wire-harness end labeled P02 to the light on the left side of the machine.
-
Connect the wire-harness end labeled P01 to the light on the right side of the machine.
-
Perform the appropriate step for your machine as follows:
For machines not equipped with the Wireless Hour Meter (WHM) Kit:
-
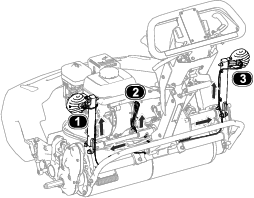
Connect the kit-wire-harness end labeled J02 to the white end of the machine wire harness labeled J4.
-
Connect the kit-wire-harness end labeled J01 to the female connection of the engine wire harness.
For machines equipped with the Wireless Hour Meter (WHM) Kit:
-
Connect the WHM wire-harness end labeled J01 to the white end of the engine wire harness.
-
Connect the WHM wire-harness end labeled J02 to the black end of the light-kit wire harness labeled J02.
-
Connect the WHM wire-harness end labeled J03 to engine mounting bolt as a ground.
-
Connect the WHM wire-harness end labeled J04 to the white end of the main wire harness.
-
Connect the WHM wire-harness end labeled J05 to the green end of the engine wire harness.
-
Connect the white end of the light-kit wire harness (labeled J01) to the green end of the main wire harness.
-