Installation
Preparing the Machine
-
Park the machine on a level surface.
-
Raise the coring head.
-
Shut off the engine.
-
Engage the parking brake.
-
Remove the key and wait for all moving parts to stop.
Installing the Side Plate
Parts needed for this procedure:
| Side plate | 2 |
| Hex-head bolt (3/8 inch) | 4 |
| Nylock nut (3/8 inch) | 4 |
-
Secure the coring head service latch.
-
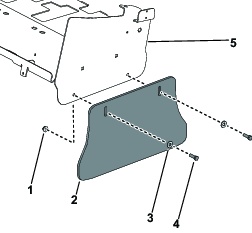
From the left side of the machine, remove and retain the 2 hex-head bolts (3/8 inch), 2 washers, and 2 flange nuts (3/8 inch) securing the side shield to the corning head. Remove the side shield from the corning head. Repeat on the right side of the machine.
-
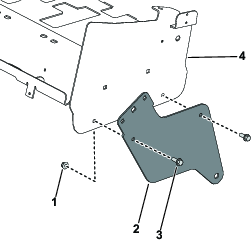
From the left side of the machine, install the side plate to the corning head; secure it with 2 hex-head bolts (3/8 inch) and 2 nylock nuts (3/8 inch). Repeat on the right side of the machine.
Installing the Roller Assembly to the Roller Arms
Parts needed for this procedure:
| Roller assembly | 1 |
| Spring washer | 2 |
| Roller arm | 2 |
| Hardened washer | 1 |
| Roller shaft screw | 2 |
| Grease fitting (if not previously assembled) | 2 |
| Roller scraper | 1 |
| Scraper arms | 2 |
| Carriage screw (3/8 inch) | 4 |
| Nylock nut (3/8 inch) | 4 |
-
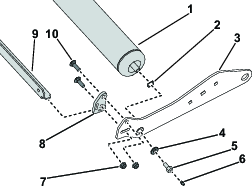
Insert the spring washer onto each end of the roller shaft (Figure 3).
-
Insert a roller arm onto each end of the roller shaft (Figure 3).
-
Secure the roller arm to the 2 roller shafts with the hardened washer (right side only) and 2 roller shaft screws. Thread the 2 grease fittings onto the 2 roller shaft screws if not previously assembled (Figure 3).
-
Insert the roller-scraper mounting tabs into the slots in each of the scraper arms (Figure 3).
-
Install the scraper arms to the roller arms (Figure 3).
-
On the left side of the roller arm, secure the scraper arm to the roller arm with 2 carriage screws (3/8 inch) and 2 nylock nuts (3/8 inch) (Figure 3). Repeat on the right roller arm.
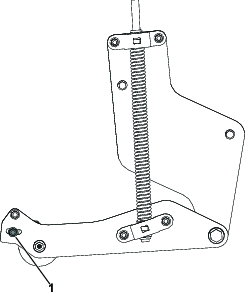
Installing the Roller Assembly to the Side Plate
Parts needed for this procedure:
| Flange bushing | 2 |
| Flat washer | 2 |
| Hex-head bolt (5/8 inch) | 2 |
| Nylock nut (5/8 inch) | 2 |
-
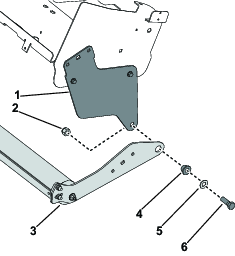
Align the 2 roller-arm mounting holes with the 2 side plate mounting holes.
-
Secure the roller assembly to the side plate with the 2 flange bushings, 2 flat washers, 2 hex-head bolts (5/8 inch), and 2 nylock nuts (5/8 inch).
Note: The roller contacts the turf a few inches behind the tines and turf hold downs.
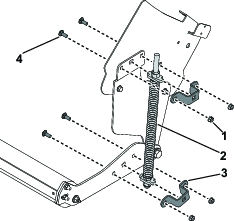
Installing the Spring Assembly to the Spring Plate
Parts needed for this procedure:
| Spring assembly | 2 |
| Spring bracket | 4 |
| Nylock nut (3/8 inch) | 8 |
| Carriage bolt (3/8 inch) | 8 |
-
From the left side of the machine, secure the spring assembly to the side plate and the roller arm with the 2 spring brackets, 2 carriage bolts (3/8 inch), and 2 nylock nuts (3/8 inch). Repeat on the right side of the machine.
-
Grease each roller fitting with a number 2 lithium-based grease, approximately 15 ml (1/2 fl oz) per end.
-
Loosen the 2 lower nylock nuts (3/8 inch) securing the scraper arms to the roller arms. Adjust the roller scraper until there is approximately 0.15 cm (0.060 inch) clearance between the roller and the scraper. Tighten the nylock nut.
-
Tighten all the fasteners.
Note: The spring is pre-adjusted at the factory, but to ensure proper down-pressure on the roller, verify that the compressed spring length is 38.1 cm (15 inches). Adjust as required.Shortening the spring adjustment does not increase the operating down pressure. It will raise the transport height and delay the contact with the ground when engaging the coring head.