
Maintenance
Greasing the Hub Assembly
| Maintenance Service Interval | Maintenance Procedure |
|---|---|
| Every 100 hours |
|
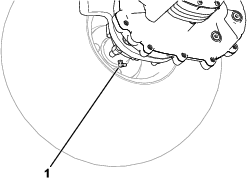
Use No. 2 lithium grease to lubricate the hub assembly. Refer to Figure 6 for the location of the hub-assembly grease fitting.
Park the machine on a level surface.
Engage the parking brake.
Lower the cutting units.
Shut off the machine and remove the key.
Disconnect the main-power connectors; refer to your machine Operator’s Manual.
Raise the machine; refer to the pre-maintenance section of your machine Operator’s Manual.
Remove the 4 lugnuts (Figure 1) that secure the wheel to the wheel-hub assembly.
Remove the wheel from the machine.
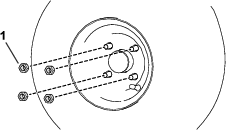
Remove the dust cap from the hub assembly (Figure 2).

Remove the snap ring and twist the hub assembly off the shaft in a counterclockwise (forward) direction.
Parts needed for this procedure:
| Hub assembly | 1 |
| Dust cap | 1 |
| O-ring | 1 |
| Snap ring | 1 |
| Thrust washer | 2 |
| Bearing | 1 |
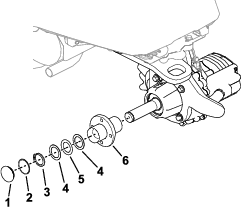
Install the hub assembly, thrust washers, bearing, snap ring, and dust cap with O-ring on the axle shaft (Figure 3).
When you install the snap ring, compress the wave washer in the hub assembly.
Grease the hub assembly; refer to Greasing the Hub Assembly.
Lower the machine to the ground.
Connect the main-power connectors; refer to your machine Operator’s Manual.
| Maintenance Service Interval | Maintenance Procedure |
|---|---|
| Every 100 hours |
|
Use No. 2 lithium grease to lubricate the hub assembly. Refer to Figure 6 for the location of the hub-assembly grease fitting.