Installation
Preparing the Machine
Gas-Powered Machines
-
Park the machine on a level surface.
-
Move the shift lever to the NEUTRAL position.
-
Engage the parking brake.
-
Shut off the machine and remove the key.
-
Disconnect the battery; refer to your machine Operator's Manual.
Electric Machines
-
Park the machine on a level surface.
-
Ensure that the parking brake is engaged.
Note: The parking brake automatically engages once the vehicle is stopped.
-
Shut off the machine and remove the key.
-
Turn the service-disconnect switch to the OFF position.
Installing the Beacon Light
Parts needed for this procedure:
| Beacon light | 1 |
| Beacon gasket | 1 |
| Screw (#10 x 1 inch) | 3 |
| Locknut (#10) | 3 |
-
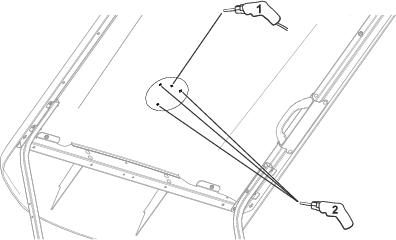
Locate the indents on the underside of the canopy.
-
Drill holes in the canopy indents as shown in Figure 1.
Warning
Using a drill without proper eye protection may allow debris to enter the eye, causing injury.
When drilling, always wear eye protection.
-
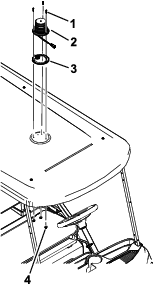
Place the gasket on top of the canopy (Figure 2).
-
Route the beacon light connector through the 22 mm (7/8 inch) hole and secure the beacon light to the canopy with 3 screws (#10 x 1 inch) and 3 locknuts (#10); refer to Figure 2.
Note: Tighten the screws until the gasket begins to bulge.
Installing the Beacon Wire Harness and Switch
Parts needed for this procedure:
| Beacon wire harness | 1 |
| Beacon switch | 1 |
| Push-in fastener | 2 |
| Edge clip | 1 |
-
Remove the front hood.
-
Remove any hardware that is attached to the right front canopy support. This allows you to route the harness through the support.
Note: If needed, you can remove the canopy support to help routing the wire harness.
-
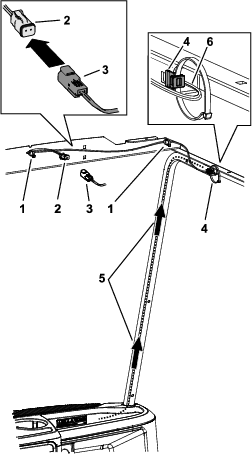
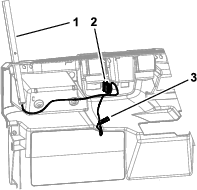
Starting at the bottom of the canopy support, route the small connector of the beacon wire harness up though the front right canopy support, towards the right side of the canopy; refer to Figure 3.
-
Route the harness to the front of the canopy along the outside of the tube to the front canopy support bracket (Figure 3).
-
Connect the harness to the beacon light connector (Figure 3).
-
Using the color tape on the harness for fastening locations, install the harness to the push-in fasteners and edge clip (Figure 3).
-
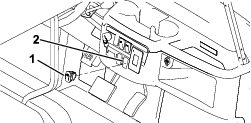
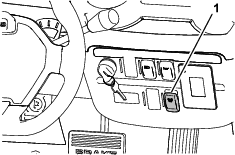
Remove the switch plug from the dash as shown in Figure 4.
-
Insert the beacon switch into the dash (Figure 4).
-
Plug in the 2-pin connector of the beacon wire harness to the 2-plug connector of the machine wire harness (Figure 5).
-
Connect the 8-socket connector of the beacon wire harness to the beacon switch (Figure 5).
Connecting the Battery
Gas-Powered Machines
Connect the battery; refer to your machine Operator’s Manual.
Electric Machines
Turn the service-disconnect switch to the ON position.
Operation
Using the Beacon
-
To illuminate the beacon, press on the upper part of the beacon switch (Figure 6).
-
To shut off the beacon, press on the bottom part of the beacon switch.