Installation
Note: Determine the left and right sides of the machine from the normal operating position.
Preparing the Machine
-
Park the machine on a level surface.
-
Disengage the blade-control switch.
-
Move the motion-control levers outward to the NEUTRAL-LOCK position.
-
Engage the parking brake.
-
Shut off the engine and remove the key.
-
Allow the machine to cool before adjusting, servicing, cleaning, or storing it.
-
Disconnect the negative battery cable; refer to the Operator’s Manual.
Removing the Seat Assembly
-
Slide the seat fully forward, then rotate the seat upward.
-
Disconnect the seat wire harness from the main machine wire harness.
-
Remove the cable tie securing the seat wire harness to the seat-mount frame.
-
Lower the seat.
-
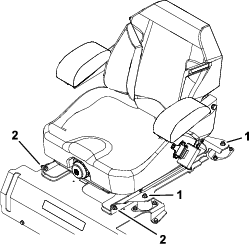
Remove the 4 seat-isolator nuts and remove the seat from the frame (Figure 1).
Retain the fasteners.
-
Remove the fasteners securing the seat assembly to the seat-support plate and disconnect the prop rod.
Retain the fasteners.
-
Remove the seat assembly from the seat-support plate.
Installing the Kit
Parts needed for this procedure:
| Heat shield | 1 |
| Thread-forming screw (5/16 x 3/4 inch) | 4 |
| Flat washer (5/16 inch) | 4 |
-
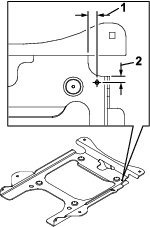
With seat-support plate facing upward, measure and mark the location of the hole shown in Figure 2.
-
Drill one 7 mm or 9/32 inch diameter hole at the marked location.
Warning
Using a drill without wearing eye protection may allow debris to enter the eye, causing personal injury.
When drilling, always wear eye protection.
-
Turn the seat-support plate over, so that the bottom side is facing upward.
-
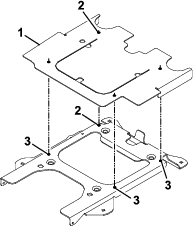
Ensure that the heat shield is oriented correctly (Figure 3), then place the heat shield on top of the seat-support plate and align it with the drilled hole.
-
Mark the three remaining hole locations on the heat shield onto the seat-support plate.
-
Remove the heat shield.
-
Drill the three holes (7 mm or 9/32 inch) into the seat-support plate.
-
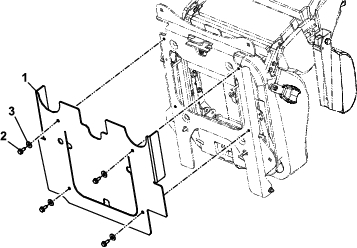
Secure the heat shield to the seat-support plate using the 4 thread-forming screws (5/16 x 3/4 inch) and 4 flat washers (5/16 inch) as shown in Figure 4.
-
Install the previously removed seat assembly to the seat-support plate, then secure the assembly to the machine.
-
Connect the seat wire harness to the main machine wire harness, and secure the harness using cable ties away from any moving parts.
-
Connect the negative battery cable.