Installation
-
Set the parking brake, turn off the engine, remove the key, and wait for all moving parts to stop before leaving the operating position.
-
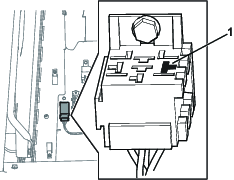
Locate and remove the timed relay by pulling up on the relay housing.
-
Using a volt/ohm meter, identify the location of the relay coil ground by checking continuity between the battery negative terminal and the relay receptacle in the position noted .
Note: The polarity must be correct for the time delay relay to function properly.
If the test reveals that the continuity is to the battery negative terminal, the polarity is correct and the time relay can be installed. Go to step 13.
If testing does not reveal continuity to the battery negative terminal, the power and ground terminals need to be exchanged. Go to step 4.
-
Disconnect the machine’s negative battery terminal.
-
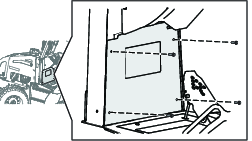
Remove the mounting hardware for the relay receptacle to access the wiring connectors.
-
Push upward from the bottom of the relay receptacle on the wire you intend to remove.
-
Using a small screwdriver or pick, push down from the top of the receptacle on the narrow side of the opening.
Note: The terminal locking tab will compress allowing the terminal and wire to be removed from the bottom of the receptacle.
-
Repeat for the opposite side terminal.
-
Verify continuity from the battery negative cable to the terminal noted on Figure .
-
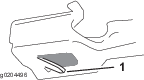
Verify that the locking tab is protruding from the female connector (refer to Figure 3) to assure a positive lock into the relay receptacle. Bend the tab out if necessary.
-
Push the wire connector into the relay receptacle until you feel a small click and gently pull back on the wire to assure a good lock on the receptacle. Repeat for the other terminal.
-
Attach the relay receptacle to the machine
-
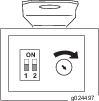
Verify that switches 1 and 2 are both in the on position (Figure 4).
-
Using a small screw driver, rotate the adjustment dial, located on the top of the relay, clockwise as far as it will go (refer to Figure 4).
-
Install the relay onto the machine.
-
Connect battery negative terminal.
-
Start the machine, move the transport lever so that the machine is not in neutral, and raise off of the seat to verify that the engine stops after approximately 2.5 seconds.
If the machine does not stop, check that the relay settings are correct. If the settings are correct, contact customer service for further assistance.
-
Install decal cover on the relay switches.