Read this information carefully to learn how to operate the InfoCenter control on your product. You are responsible for operating the product properly and safely.
Visit www.Toro.com for product safety and operation training materials, accessory information, help finding a dealer, or to register your product.
Introduction
The Software Guide for the Groundsmaster 5900 or 5910 rotary mower provides information for using the system information and control the system functions.
Product Overview
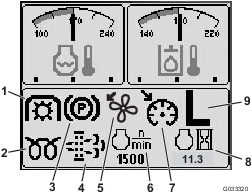
InfoCenter Startup Screen
When you start the machine, the startup screen appears, displaying the corresponding icons that apply (i.e., the parking brake is applied, the PTO is in the ON position, and the cruise control is in the ON position).
Note: The following figure is an example screen; this screen is meant to show all the potential icons that could appear on the screen while operating.
Refer to the following graphic for all of the icon meanings (Figure 1).
Operation
InfoCenter Control
Screen Functions
Press the corresponding button to view screen 1 or screen 2, to stop the audible alarm, to view the fault screen, or to exit (Figure 2).
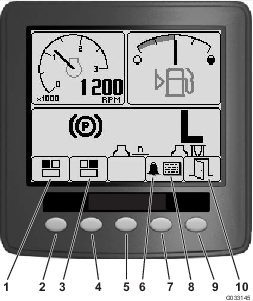
Press buttons 1 to 4 to access the pop-up menu bar on the bottom of the screen (Figure 2).
After the startup screen appears, you can select what you would like displayed in both the top, left corner and top, right corner of the display screen by pressing button 1 or button 2 on the InfoCenter control (Figure 2).
Note: When you shut off the machine, the top 2 screens remain at the previous setting before the machine was shut off.
You can toggle between the following screens by pressing button 1 and button 2:
-
Tachometer—top, left screen (Figure 3)
-
Fuel-level indicator—top, right screen (Figure 3)

-
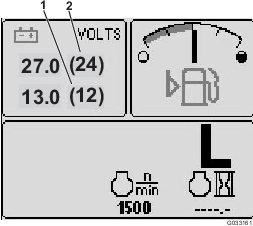
12 V battery-voltage indicator—top, left screen (Figure 4)
-
24 V battery-voltage indicator—top, left screen (Figure 4)
-
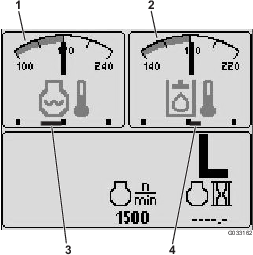
Hydraulic-fluid-temperature and fan indicator—top, right screen (Figure 5)
Note: In the following example, the hydraulic-fluid-cooling fans are running at 25% speed in the forward direction.
-
Engine-coolant-temperature and fan indicator—top, left screen (Figure 5)
Note: In example Figure 5, the engine-coolant fans are running at 50% speed in the reverse direction.
This display (Figure 1) indicates fan speed and direction. The fan speed is controlled by the hydraulic-fluid temperature or the engine-coolant temperature, and automatically reverses as needed. A reverse cycle automatically initiates to help blow debris off the respective hood screen, when either the temperature of the engine coolant or the hydraulic fluid reaches a certain point. Additionally, the radiator fans perform a reverse cycle every 21 minutes regardless of the coolant temperature.
Fan direction is also indicated on the engine-coolant-temperature screen and the hydraulic-fluid-temperature screen. If the bar is to the right of the midpoint hash mark, the fans are running in the forward direction. If the bar is to the left of the midpoint hash mark, the fans are running in the reverse direction (Figure 5).
If a fault appears on the screen, press any key to view the active fault advisory (Figure 2).
Note: Contact your supervisor or mechanic to relay the fault advisory and determine the course of action.
Press the arrow keys to navigate the fault screen.
Press any key to reveal the information keys on the screen.
Diesel-Particulate-Filter (DPF) Maintenance Indicator
If the diesel-particulate-filter (DPF) maintenance indicator (Figure 1) appears on the screen, immediately contact your Toro distributor for service.
Fuel-Level Indicator
This display indicates the level of fuel in the tank (Figure 3).
PTO Indicator
This display indicates (Figure 1) when the PTO is engaged.
Parking-Brake Indicator
This display indicates that the parking brake is engaged (Figure 1).
Cruise-Control Indicator
This display (Figure 1) indicates when the cruise control is set.
H/L (High/Low Range) Speed-Range Indicator
This display indicates the selected transmission speed range (Figure 1).
Glow-Plug Indicator
This display indicates when the engine is preheating (Figure 1).
Engine-Hours Indicator
This display shows the total hours that the engine has been operated (Figure 1).
Tachometer
This display shows the engine-operating speed in rpm (Figure 3).
Hydraulic-Fluid-Temperature Indicator and Cooling-Fan-Status Indicator
This display indicates the hydraulic-fluid temperature and the status of the cooling fan (Figure 5).
Engine-Coolant-Temperature Indicator and Cooling-Fan-Status Indicator
This display indicates the engine-coolant temperature and the status of the cooling fan (Figure 5).
Battery Voltage
This display shows both the 12 V and 24 V battery voltage (Figure 4).
Service-Due Indicator
This display indicates the time until the next regular service interval.
Note: After you service the machine, reset the indicator.
-
Press and hold the far, right button on the InfoCenter.
Note: The Main Menu screen appears.
-
Select Service using the 2 buttons on the left; press the button below the right arrow to continue.
-
Select Hours and press the button below the right arrow.
-
Press the button below Reset Hours.
-
Select the Hours for the appropriate next service time and press the button below the right arrow.
Note: A check mark appears once the indicator has been reset.
-
When you are finished, press the button below the exit icon (picture of an open door) to return to the main screen, or press cancel to exit.
Audible Alarm (InfoCenter)
The alarm sounds during the following scenarios:
Lowering the deck
-
The engine is not running
-
Any deck is being lowered
Deck is out of float
-
The PTO is requested and qualified
-
Any deck is below the limit, but not floating
Machine sends a request to the InfoCenter
-
The engine sends a red, stop lamp message
Note: If the alarm stops or if the operator acknowledges the alarm by pressing any button on the InfoCenter, then the alarm should stop.
-
Regeneration requested by the engine
-
Any engine fault
-
Any advisory; refer to InfoCenter Advisories
-
The engine sends an amber warning message
-
The fuel level is below 2.2%
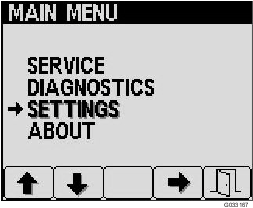
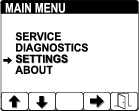
Main Menu
Press and hold the fifth button (far right) on the InfoCenter to access the main menu.
From the main menu screen, you can access the Service screen, Diagnostics screen, Settings screen, or the About screen (Figure 6).
Service Screen
If you have an issue that requires use of the Service screen (i.e., calibrating the traction pedal), contact your Toro distributor for assistance.
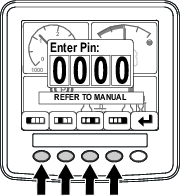
Accessing the Protected Menus
Note: The factory default PIN code for you machine is either 0000 or 1234.If you changed the PIN code and forgot the code, contact your authorized Toro distributor for assistance.
-
5900
-
1234
-
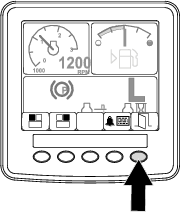
From the HOME SCREEN, press buttons either buttons 1, 2, 3, or 4 to access the pop-up menu bar at the bottom of the screen (Figure 7).

-
Press and hold button 5 to access the MAIN MENU (Figure 8).
If the menus are protected, the ENTER PIN screen displays.
-
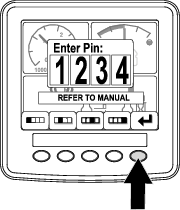
Press buttons 1 through 4 to enter your PIN code (Figure 9).
-
When you complete entering the PIN, press button 5 (Figure 10).
The InfoCenter displays the MAIN MENU.
Note: When you shutoff the engine and then move the ignition switch to the RUN position, PIN code protection is applied to the MAIN MENU.
Changing the InfoCenter PIN
-
From the startup screen, press and hold button 5 until the Main Menu appears (Figure 11).
-
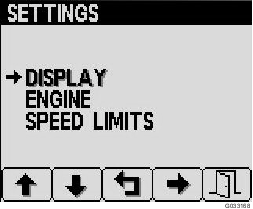
Press button 2 until you reach Settings on the Main Menu screen and press button 4 to select Settings (Figure 11).
-
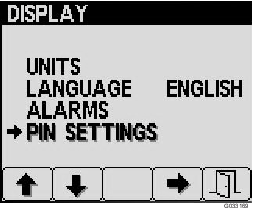
From the Settings screen, press button 4 to select Display (Figure 12).
-
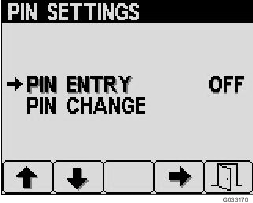
Press button 2 until you reach PIN Settings on the Display screen and press button 4 to select PIN Settings (Figure 13).
-
Press button 2 until you reach PIN Change on the PIN Settings screen and press button 4 to select PIN Change (Figure 14).
-
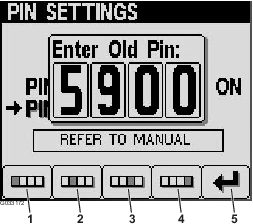
Enter your old PIN using buttons 1 to 4 and press button 5 when you complete the PIN (Figure 15).
Note: The default PIN when you initially set up your PIN is 5900.
-
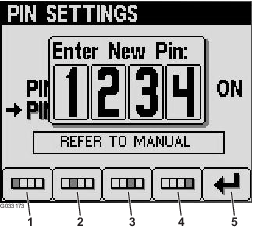
Enter your new PIN using buttons 1 to 4 and press button 5 when you complete your new PIN (Figure 16).
-
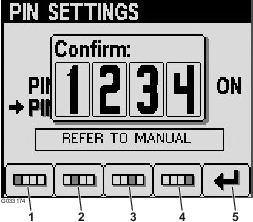
Confirm your new PIN using buttons 1 to 4 and press button 5 when you complete the PIN (Figure 17).
Setting the Service Due Timer
-
After you complete entering the PIN number for the protected menus, press button 5.
-
Scroll up or down to SERVICE in the main menu (Figure 18).
-
Press the side arrow button.
-
Scroll up or down to HOURS.
-
In the HOURS menu select the middle button to select RESET HOURS.
-
Scroll up or down to select the correct hours.
-
Press the side arrow button.
-
Exit the menu by selecting the EXIT (door) button (Figure 18 or Figure 19).
Changing the InfoCenter Display Brightness/Contrast
-
From the startup screen, press button 5 to access the brightness/contrast pop-up-menu bar (Figure 19).
-
Press button 1 to decrease brightness, button 2 to increase brightness, button 3 to decrease contrast, and button 4 to increase contrast (Figure 19).
-
When you have set your brightness/contrast, press button 5 to exit (Figure 19).
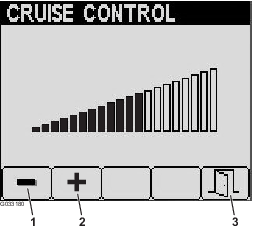
Setting the Cruise-Control Speed
The cruise-control switch sets your desired speed of the machine.
-
Move the cruise-control switch to the center position to turn the cruise control to the ON position.
-
Press the switch forward to set the speed.
-
From the Cruise Control screen, press button 1 to decrease the cruise control speed or button 2 to increase the cruise control speed (Figure 20).
-
When you have set your desired cruise control speed, press button 5 to exit (Figure 20).
-
Press the cruise-control switch rearward to disengage the cruise control.
Note: Foot pedal movement also disengages the cruise control.
InfoCenter Advisories
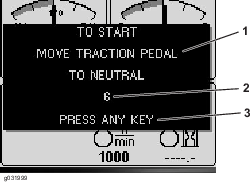
Operator advisories automatically display on the InfoCenter screen when a machine function requires additional action. For example, if you attempt to start the engine while pressing the traction pedal, an advisory displays, indicating that the traction pedal must be in the NEUTRAL position.
For each advisory that occurs, there is a condition (e.g., start denied, PTO denied, cruise control denied), an advisory code (number), a qualifier (the cause of the advisory displayed), and a display text (what the advisory displays as text on the screen) as shown in Figure 21.
Note: Advisories do not log into the fault log.
Note: You can clear an advisory from the display screen by pressing any of the InfoCenter keys.
Refer to the following table for all the InfoCenter advisories:
| Condition | Code | Qualifier | Display Text |
| Start Denied | 4 | Teach engaged | N/A |
| Start Denied | 5 | PTO engaged | To start, disengage PTO |
| Start Denied | 6 | Not in NEUTRAL | To start, move traction pedal to NEUTRAL |
| Start Denied | 7 | Neither in seat nor parking brake applied | To start, must be seated or set parking brake |
| Start Denied | 8 | Deck switch engaged | To start, disengage deck switch |
| Start Denied | 9 | Recycle power | To start, turn key switch off, then on |
| PTO Denied | 102 | In high range (only cut in low) | To engage PTO, must be in low range |
| PTO Denied | 106 | Out of seat | To engage PTO, operator must be seated |
| PTO Denied | 107 | No decks floating (hit a down key) | To engage PTO, lower decks |
| PTO Denied | 108 | Engine hot | To engage PTO, let engine cool |
| PTO Denied | 109 | Loss of CAN bus (service required) | To engage PTO, requires service |
| PTO Denied | 110 | Hydraulic fluid too cold | To engage PTO, let hydraulic fluid warm up |
| Cruise Control Denied | 202 | Too slow to capture cruise control | Increase ground speed |
| Deck Lower Denied | 302 | Can’t lower in transport | To lower deck, return traction pedal to NEUTRAL |
| Deck Lower Denied | 303 | Out of seat | To lower deck, operator must be seated |
| Deck Lower Denied | 304 | Service required | To lower deck, requires service |
| Deck Not Floating (on engine start) | 402 | Advise operator to press down switches | To float, lower decks |
| Range Hi Denied | 502 | Left deck not up | To set high range, lift left deck |
| Range Hi Denied | 503 | Center deck not up | To set high range, lift center deck |
| Range Hi Denied | 504 | Right deck not up | To set high range, lift right deck |
| Range Hi Denied | 505 | Left deck floating | To set high range, lift left deck fully |
| Range Hi Denied | 506 | Center deck floating | To set high range, lift center deck fully |
| Range Hi Denied | 507 | Right deck floating | To set high range, lift right deck fully |
| Range Hi Denied | 508 | PTO switch engaged | To set high range, disengage PTO |
| Range Hi Denied | 509 | Cruise control engaged | To set high range, disengage cruise |
| Range Hi Denied | 510 | Speed too high | To set high range, reduce ground speed |
| Range Hi Denied | 511 | Loss of CAN bus (service required) | To set high range, requires service |
| Range Hi Denied | 512 | Hydraulic fluid too cold | To set high range, let hydraulic fluid warm up |
| Range Lo Denied | 602 | Cruise control engaged | To set low range, disengage cruise |
| Range Lo Denied | 603 | Speed too high | To set low range, reduce ground speed |
| Range Lo Denied | 604 | Loss of CAN bus (service required) | To set low range, requires service |
| Traction Disabled | 804 | Parking brake ON | For traction, release parking brake |
| Traction Disabled | 805 | Not in NEUTRAL | For traction, move traction pedal to NEUTRAL |
| Traction Disabled | 806 | Out of seat | For traction, operator must be seated |
| Engine Advisory | 1205 | Starter has been active for 30 seconds | Engine 30 second starter time out |
| Engine Advisory | 1206 | Replace engine air filter | Check the air filter |
| Engine Advisory | 1207 | Service due | Engine service due approaching |
| Engine Advisory | 1208 | Service past due | Engine service past due |
| Engine Advisory | 1209 | DPF service required | Regeneration required within 30 minutes |
| Engine Advisory | 1210 | Engine derate due to high temperature | Let engine cool |
| Engine Advisory | 1211 | Engine speed restricted: hydraulic fluid too cold | Hydraulic fluid is less than 4°C (40°F), so derate the engine speed to 1,650 rpm |
| Fuel Level | 1302 | Fuel level is low | Add fuel |
| TP Not Calibrated | 1402 | Traction pedal is out of calibration | Calibrate the traction pedal |
| Teach | 1500 | Entered teach mode | Entered traction pedal teach—please wait |
| Teach | 1502 | Traction pedal is out of NEUTRAL | Return traction pedal to NEUTRAL |
| Teach | 1503 | Slowly move the traction pedal forward | Slowly move the traction pedal forward |
| Teach | 1504 | Neutral forward capture passed | Neutral forward capture passed |
| Teach | 1505 | Neutral forward capture failed—too fast | Neutral forward capture failed—movement too fast; try again |
| Teach | 1506 | Neutral forward capture failed (out of range)—voltage captured was out of specification | Restart teach mode |
| Teach | 1507 | Move traction pedal to MAX FORWARD and hold | Move traction pedal to MAX FORWARD and hold |
| Teach | 1508 | Max forward capture passed | Max forward capture passed |
| Teach | 1509 | Max forward capture failed (out of range)—voltage captured was out of specification | Restart teach mode |
| Teach | 1510 | Slowly move the traction pedal in REVERSE | Slowly move the traction pedal in REVERSE |
| Teach | 1511 | Neutral rev capture passed | Neutral rev capture passed |
| Teach | 1512 | Neutral rev capture failed—too fast | Neutral rev capture failed—movement too fast; try again |
| Teach | 1513 | Neutral rev capture failed (out of range)—voltage captured was out of specification | Restart teach mode |
| Teach | 1514 | Move traction pedal to MAX REVERSE and hold | Move traction pedal to MAX REVERSE and hold |
| Teach | 1515 | Max reverse capture passed | Max reverse capture passed |
| Teach | 1516 | Max reverse capture failed (out of range)—voltage captured was out of specification | Restart teach mode |
| Teach | 1517 | TP teach done/values stored | Exit teach |
| Teach | 1518 | TP teach was unsuccessful | Exit teach and try again |
| Deck Raise Denied | 1602 | Out of seat | Operator must be seated |
| Deck Raise Denied | 1603 | Parking brake not set | Set parking brake |
| Deck Raise Denied | 1604 | Not in NEUTRAL | Return traction pedal to NEUTRAL |
| Deck Raise Denied | 1605 | Service required | Contract your Toro distributor |
| Deck Raise Denied | 1606 | All decks not raising together | Increase the engine speed to 2,000 rpm, and the decks will raise one at a time when all 3 switches are held down simultaneously |