Important: You must have the Multi-Tool Attachment (Model No. 08854) installed prior to installing the Weeder Tine Toolbar.
Note: The procedures for installing this kit require that you work from under the machine.
Warning
CALIFORNIA
Proposition 65 Warning
Use of this product may cause exposure to chemicals known to the State of California to cause cancer, birth defects, or other reproductive harm.
Safety
Safety and Instructional Decals
 |
Safety decals and instructions are easily visible to the operator and are located near any area of potential danger. Replace any decal that is damaged or missing. |

Installation
Preparing the Machine
-
Park the machine on a level surface or move the machine to a machine lift.
-
Engage the parking brake.
-
Raise the mid-mount attachment.
-
Shut off the engine and remove the key.
-
Wait for all moving parts to stop and machine components to cool.
-
Insert the depth control pin into the position to keep the multi-tool attachment raised.
-
Move the hydraulic controls forward and backward to relieve hydraulic pressure; refer to your Operator’s Manual.
-
Chock the wheels or raise the machine with a machine lift.
-
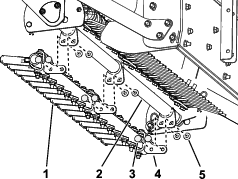
Remove the hard tine toolbar from bottom of the multi-tool arm as shown in Figure 1.
Installing the Weeder Tine Toolbar
Parts needed for this procedure:
| Weeder tine toolbar assembly | 1 |
| Bolt (3/8 x 3-1/4 inches) | 3 |
| Washer | 6 |
| Tine mount bracket | 3 |
| Weeder tine | 3 |
| Locknut (3/8 inch) | 3 |
-
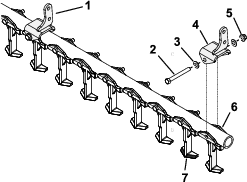
Install the weeder tine and weeder tine mounts to the toolbar as shown in Figure 2.
-
Tighten the locknuts securing the weeder tine mounts to 71.8 to 104.4 N⋅m (53 to 77 ft-lbs).
-
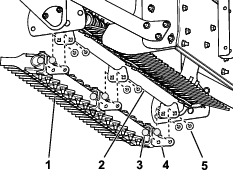
Install the weeder tine toolbar in place with the 6 carriage bolts and locknuts removed from the multi-tool arm as shown in Figure 3.
Note: The weeder tine toolbar should be installed with the point facing the front of the machine.