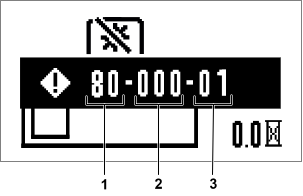
eTimeCutter® 42in or 54in Riding Mower
Disclaimers and Regulatory Information
 
CALIFORNIA
 
Proposition 65
 
The engine exhaust from this product contains chemicals known to the State of California to cause cancer, birth defects, or other reproductive harm.
 
Use of this product may cause exposure to chemicals known to the State of California to cause cancer, birth defects, or other reproductive harm.


Introduction
 

Intended Use

This rotary-blade, riding lawn mower is intended to be used by homeowners in residential applications. It is designed primarily for cutting grass on well-maintained lawns. Using this product for purposes other than its intended use could prove dangerous to you and bystanders.
Read this information carefully to learn how to operate and maintain your product properly and to avoid injury and product damage. You are responsible for operating the product properly and safely.

Getting Help

Graphic
G444734
Visit www.Toro.com for product safety and operation training materials, accessory information, help finding a dealer, or to register your product.
Whenever you need service, genuine Toro parts, or additional information, contact an Authorized Service Dealer or Toro Customer Service and have the model and serial numbers of your product ready. These numbers are located on the serial plate on your product . Write the numbers in the space provided.
Important  
With your mobile device, you can scan the QR code on the serial number decal (if equipped) to access warranty, parts, and other product information.
 
Model Number:
Serial Number:


Safety
 

General Machine Safety Warnings

Image WARNINGRead all safety warnings, instructions, illustrations and specifications provided with this machine.
Failure to follow the warnings and instructions may result in electric shock, fire and/or serious injury.
The term machinein all of the warnings listed below refers to your mains-operated (corded) machine or battery-operated (cordless) machine.
  1. Work area safety
    1. A. Keep work area clean and well lit. Cluttered or dark areas invite accidents.
    2. B. Do not operate the machine in explosive atmospheres, such as in the presence of flammable liquids, gasses, or dust. The machine creates sparks, which may ignite the dust or fumes.
    3. C. Keep children and bystanders away while operating the machine. Distractions can cause you to lose control.
  2. Electrical safety
    1. A. Machine plugs must match the outlet. Never modify the plug in any way. Do not use any adapter plugs with an earthed (grounded) machine. Unmodified plugs and matching outlets will reduce risk of electric shock.
    2. B. Avoid body contact with earthed or grounded surfaces, such as pipes, radiators, ranges, and refrigerators. There is an increased risk of electric shock if your body is earthed or grounded.
    3. C. Do not expose the machine to rain or wet conditions. Water entering a machine will increase the risk of electric shock.
    4. D. Do not abuse the cord. Never use the cord for carrying, pulling or unplugging the machine. Keep cord away from heat, oil, sharp edges, or moving parts. Damaged or entangled cords increase the risk of electric shock.
    5. E. When operating the machine outdoors, use an extension cord suitable for outdoor use. Use of a cord suitable for outdoor use reduces the risk of electric shock.
    6. F. If operating the machine in a damp location is unavoidable, use a residual current device (RCD) protected supply. Use of an RCD reduces the risk of electric shock.
  3. Personal safety
    1. A. Stay alert, watch what you are doing, and use common sense when operating the machine. Do not use the machine while you are tired or under the influence of drugs, alcohol, or medication. A moment of inattention while operating the machine may result in serious personal injury.
    2. B. Use personal protective equipment. Always wear eye protection. Protective equipment such as a dust mask, non-skid safety shoes, or hearing protection used for appropriate conditions will reduce personal injuries.
    3. C. Prevent unintentional starting. Ensure the switch is in the off-position before connecting to power source and/or battery pack. Energising a machine that has the switch on invites accidents.
    4. D. Remove any adjusting key or wrench before turning the machine on. A wrench or a key left attached to a rotating part of the machine may result in personal injury.
    5. E. Do not overreach. Keep proper footing and balance at all times. This enables better control of the machine in unexpected situations.
    6. F. Dress properly. Do not wear loose clothing or jewelry. Keep your hair and clothing away from moving parts. Loose clothes, jewelry or long hair can be caught in moving parts.
    7. G. If devices are provided for the connection of dust extraction and collection facilities, ensure these are connected and properly used. Use of dust collection can reduce dust-related hazards.
    8. H. Do not let familiarity gained from frequent use of the machine allow you to become complacent and ignore machine safety principles. A careless action can cause severe injury within a fraction of a second.
  4. Machine use and care
    1. A. Do not force the machine. Use the correct machine for your application. The correct machine will do the job better and safer at the rate for which it was designed.
    2. B. Do not use the machine if the switch does not turn it on and off. Any machine that cannot be controlled with the switch is dangerous and must be repaired.
    3. C. Disconnect the plug from the power source and/or remove the battery pack, if detachable, from the machine before making any adjustments, changing accessories, or storing the machine. Such preventive safety measures reduce the risk of starting the machine accidentally.
    4. D. Store an idle machine out of the reach of children and do not allow persons unfamiliar with the machine or these instructions to operate the machine. A machine is dangerous in the hands of untrained users.
    5. E. Maintain the machine and accessories. Check for misalignment or binding of moving parts, breakage of parts and any other condition that may affect the operation of the machine. If damaged, have the machine repaired before use. Many accidents are caused by a poorly maintained machine.
    6. F. Keep cutting tools sharp and clean. Properly maintained cutting tools with sharp cutting edges are less likely to bind and are easier to control.
    7. G. Use the machine, accessories, and tool bits etc., in accordance with these instructions, taking into account the working conditions and the work to be performed. Use of the machine for operations different from those intended could result in a hazardous situation.
    8. H. Keep handles and grasping surfaces dry, clean and free from oil and grease. Slippery handles and grasping surfaces do not allow for safe handling and control of the machine in unexpected situations.
  5. Battery machine use and care
    1. A. Recharge only with the charger specified by a manufacturer. A charger that is suitable for one type of battery pack may create a risk of fire when used with another battery pack.
    2. B. Use the machine only with specifically designated batteries. Use of any other batteries may create a risk of injury and fire.
    3. C. When battery pack is not in use, keep it away from other metal objects, like paper clips, coins, keys, nails, screws or other small metal objects, that can make a connection from one terminal to another. Shorting the battery terminals together may cause burns or a fire.
    4. D. Under abusive conditions, liquid may be ejected from the battery; avoid contact. If contact accidentally occurs, flush with water. If liquid contacts eyes, additionally seek medical help. Liquid ejected from the battery may cause irritation or burns.
    5. E. Do not use a battery pack or machine that is damaged or modified. Damaged or modified batteries may exhibit unpredictable behavior resulting in fire, explosion or risk or injury.
    6. F. Do not expose a battery pack or machine to fire or excessive temperature. Exposure to fire temperature above 130°C (265°F) may cause an explosion.
    7. G. Follow all charging instructions and do not charge the battery pack or machine outside the temperature range specified in the instructions. Charging improperly or at temperatures outside the specified range may damage the battery and increase the risk of fire.
  6. Service
    1. A. Have your machine serviced by a qualified repair person using only identical replacement parts. This will ensure that the safety of the machine is maintained.
    2. B. Never service damaged battery packs. Service of battery packs should be performed only by the manufacturer or authorized service providers.

Lawn Mower Safety Warnings

  1. Do not use the lawnmower in bad weather conditions, especially when there is a risk of lightning. This decreases the risk of being struck by lightning.
  2. Thoroughly inspect the area for wildlife where the lawnmower is to be used. Wildlife may be injured by the lawnmower during operation.
  3. Thoroughly inspect the area where the lawnmower is to be used and remove all stones, sticks, wires, bones, and other foreign objects. Thrown objects can cause personal injury.
  4. Before using the lawnmower, always visually inspect to see that the blade and the blade assembly are not worn or damaged. Worn or damaged parts increase the risk of injury.
  5. Keep guards in place. Guards must be in working order and be properly mounted. A guard that is loose, damaged, or is not functioning correctly may result in personal injury.
  6. Keep all cooling air inlets clear of debris. Blocked air inlets and debris may result in overheating or risk of fire.
  7. While operating the lawnmower, always wear non-slip and protective footwear. Do not operate the lawnmower when barefoot or wearing open sandals. This reduces the chance of injury to the feet from contact with the moving blade.
  8. While operating the lawnmower, always wear long trousers. Exposed skin increases the likelihood of injury from thrown objects.
  9. Do not operate the lawnmower on slopes greater than 15°. This reduces the risk of loss of control, slipping, and rollover which may result in personal injury.
  10. Exercise extreme caution when working on slopes. This reduces the risk of loss of control, slipping, and rollover which may result in personal injury.
  11. Use extreme caution when reversing the lawnmower. Always be aware of your surroundings.
  12. Do not touch blades and other hazardous moving parts while they are still in motion. This reduces the risk of injury from moving parts.
  13. When clearing jammed material or cleaning the lawn mower, make sure all power switches are off, and remove the key. Unexpected operation of the lawn mower may result in serious personal injury.
Save all warnings and instructions for future reference.

Additional Safety Messages

Safety-Alert Symbol
The safety-alert symbol shown in this manual and on the machine identifies important safety messages that you must follow to prevent accidents.
Graphic
G405934
DANGER indicates an imminently hazardous situation which, if not avoided, will result in death or serious injury.
WARNING indicates a potentially hazardous situation which, if not avoided, could result in death or serious injury.
CAUTION indicates a potentially hazardous situation which, if not avoided, may result in minor or moderate injury.
This manual uses 2 other words to highlight information. Important calls attention to special mechanical information and Note emphasizes general information worthy of special attention.
General Safety
This product is capable of amputating hands and feet and of throwing objects. Always follow all safety instructions to avoid serious personal injury or death.
  • Keep clear of the discharge opening.
  • Allow only responsible and physically capable people to operate the machine.
  • Shut off the machine, remove the key, and wait for all moving parts to stop before leaving the operator's position. Allow the machine to cool before servicing, adjusting, or cleaning it.

Slope Indicator

You may copy this page for personal use.
Graphic
G011841s
  1. The maximum slope you can operate the machine on is 15 degrees. Use the slope chart to determine the degree of slope of hills before operating. Do not operate this machine on a slope greater than 15 degrees. Fold along the appropriate line to match the recommended slope.
  2. Align this edge with a vertical surface, a tree, building, fence pole, etc.
  3. Example of how to compare slope with folded edge

Safety and Instructional Decals

Image
Safety decals and instructions are easily visible to the operator and are located near any area of potential danger. Replace any decal that is damaged or missing.
Decal Part: 130-0731
Graphic
s_decal130-0731
  1.  Warningthrown object hazard; keep the deflector in place.
  2.  Cutting hazard of hand or foot, mower bladekeep away from moving parts.
Decal Part: 133-8061
Graphic
s_decal133-8061
Decal Part: 137-8127
Graphic
s_decal137-8127
  1.  Attentiondo not spray with high-pressure water.
Decal Part: 139-1271
Graphic
s_decal139-1271
  1.  Parking brakeEngage
  2.  Parking brakeDisengage
Decal Part: 139-2397
MyRIDE models only
Graphic
s_decal139-2397
Decal Part: 145-3802
Graphic
s_decal145-3802
  1. The battery pack is charging.
  2. The battery pack is fully charged.
  3. The battery pack charging is on standby while other batteries charge (charging mode dependent).
  4. The battery pack is over or under the appropriate temperature range.
  5. Battery pack charging fault.
Decal Part: 145-8263
Graphic
decal145-8263
  1.  Read the Operators Manual.
  2.  Recycle the battery.
  3.  Do not dispose improperly.
  4.  Keep away from open fire or flames.
  5.  Do not expose to rain.
Decal Part: 145-8265
Graphic
decal145-8265
  1.  Battery charging status
Decal Part: 145-8275
Graphic
s_decal145-8275
  1.  Serial charging modeone battery charges fully at a time (other batteries remain on standby).
  2.  Parallel charging modeall batteries are charged to the same level.
Decal Part: 147-0290
Graphic
decal147-0290
  1.  Warninglight is bright; do not look directly into the light.
Decal Part: 147-7614
Graphic
decal147-7614
  1.  Blade controlfast
  2.  Traction drivefast
  3.  Blade controlslow
  4.  Traction driveslow
  5.  Off
  6.  On
Decal Part: 147-7615
Graphic
decal147-7615
  1.  Thrown object hazardkeep bystanders away.
  2.  Thrown object hazard, mowerdo not operate without the deflector, discharge cover, or grass collection system in place.
  3.  Cutting/dismemberment hazard of hand or foot, mower bladekeep away from moving parts.
Decal Part: 147-7616
MyRIDE models only
Graphic
decal147-7616
Note: This machine complies with the industry standard stability test in the static lateral and longitudinal tests with the maximum recommended slope indicated on the decal. Review the instructions for operating the machine on slopes in the Operators Manual as well as the conditions in which you would operate the machine to determine whether you can operate the machine in the conditions on that day and at that site. Changes in the terrain can result in a change in slope operation for the machine.
  1. Warningread the Operators Manual.
  2. Warningbefore performing maintenance, engage the parking brake and remove the key.
  3. Cutting/dismemberment hazard of handkeep away from moving parts; keep all guards and shields in place.
  4. Thrown object hazardkeep bystanders away; pick up debris; keep the deflector in place.
  5. Tipping hazarddo not use dual ramps when loading onto a trailer; use 1 ramp wide enough for the machine; use a ramp with an incline less than 15°; back up the ramp when loading the machine and drive forward off the ramp when unloading.
  6. Runover hazarddo not carry passengers; look down and behind you when moving in reverse.
  7. Tipping hazarddo not use the machine near drop-offs with slopes greater than 15°; only operate across slopes less than 15°.
Decal Part: 147-7617
Non-MyRIDE models only
Graphic
s_decal147-7617
Note: This machine complies with the industry standard stability test in the static lateral and longitudinal tests with the maximum recommended slope indicated on the decal. Review the instructions for operating the machine on slopes in the Operators Manual as well as the conditions in which you would operate the machine to determine whether you can operate the machine in the conditions on that day and at that site. Changes in the terrain can result in a change in slope operation for the machine.
  1. Warningread the Operators Manual.
  2. Warningbefore performing maintenance, engage the parking brake and remove the key.
  3. Cutting/dismemberment hazard of handkeep away from moving parts; keep all guards and shields in place.
  4. Thrown object hazardkeep bystanders away; pick up debris; keep the deflector in place.
  5. Tipping hazarddo not use dual ramps when loading onto a trailer; use 1 ramp wide enough for the machine; use a ramp with an incline less than 15°; back up the ramp when loading the machine and drive forward off the ramp when unloading.
  6. Runover hazarddo not carry passengers; look down and behind you when moving in reverse.
  7. Tipping hazarddo not use the machine near drop-offs with slopes greater than 15°; only operate across slopes less than 15°.
Decal Part: 147-7619
Graphic
decal147-7619
  1.  Fast
  2.  Slow
  3.  Neutral
  4.  Reverse
  5.  Traction controls
Decal Part: 147-7620
Graphic
decal147-7620
  1.  Fast
  2.  Slow
  3.  Neutral
  4.  Reverse
  5.  Traction controls
Decal Part: 147-7621
Graphic
decal147-7621
  1.  Read the Operators Manual.
  2.  Full function
  3.  Limited function
  4.  No function/extremely limited function


Product Overview
 
Graphic
G427499
  1.  MyRide® suspension adjustment lever
  2.  Battery box
  3.  Motion-control lever
  4.  Parking brake
  5.  Caster wheel
  6.  Anti-scalp roller
  7.  Height-of-cut lever
  8.  Grass deflector
  9.  Control panel
Graphic
G448680
  1.  Battery charger
  2.  Battery pack (4 included)
Control Panel
Become familiar with all the controls before you start and operate the machine.
Graphic
G427498
  1.  Blade-speed switch
  2.  Traction-speed switch
  3.  Information display
  4.  Blade-control switch (power takeoff)
  5.  Key switch
Key Switch
Graphic
G444702
Use the key switch to power the machine On or Off . Turn the key past the On position to start the machine.
Traction-Speed Switch
Graphic
G428592
Use the traction-speed switch to select a faster or slower ground speed.
Blade-Speed Switch
Graphic
G428591
Use the blade-speed switch to select a faster or slower blade speed.
Note: Use the Fast position for best cutting performance; use the Slow position for less energy consumption.
Blade-Control (PTO) Switch
Graphic
G428617
The blade-control switch, represented by a power-takeoff (PTO) symbol, engages and disengages power to the mower blades.
Information Display
The information display shows messages and the status of the machine (e.g., operating hours, battery charge, component positions).
Graphic
G427630
  1.  Interlock indicators
  2.  Motor status (displays only during active faults)
  3.  Battery status/charge
  4.  Operating hours
Display Icon
Image
The operator is not in the seat.
Image
The battery temperature is too high.
Image
The blade-control switch (PTO) is engaged.
Image
The battery load is too high.
Image
The blade-control switch (PTO) is engaged but the machine is preventing the blades from running. Check the interlocks or active machine faults.
Image
Limp mode is active.
Image
The parking brake is engaged.
When this flashes, release the parking brake before driving the machine.
Image
The motor temperature is too high.
Image
The motion-control levers are in the Neutral-lock position.
When this flashes, move the levers inward before driving the machine.
Image
The motor load is too high.
Image
Hour meter
Image
Fault code
Image
Engage the parking brake.

Parking Brake

Whenever you shut off the machine, engage the parking brake to prevent accidental movement of the machine.
You can use the parking brake to stop the machine in emergency situations or when a machine fault disables the traction controls.
Graphic
G428514

Motion-Control Levers

Use the motion-control levers to drive the machine forward, reverse, and turn either direction.

MyRide® Suspension Adjustment Lever

For Machines with the MyRide Suspension System
Use the adjustment lever to adjust the seat suspension for a smooth and comfortable ride.
Graphic
G292102s
  1.  Adjustment lever
  2.  Softer suspension
  3.  Firmer suspension
Specifications
Note: Specifications and design are subject to change without notice.
Machine
Model
75841
75851
Cutting width
107 cm (42 inches)
137 cm (54 inches)
Width with deflector down
136 cm (53-1/2 inches)
166 cm (65-1/2 inches)
Width with deflector up
116 cm (45-1/2 inches)
140 cm (55 inches)
Length
185 cm (73 inches)
185 cm (73 inches)
Height
104 cm (41 inches)
117 cm (46 inches)
Weight
224 kg (494 lb)
284 kg (626 lb)
Included Battery Packs
Model
66810
88640
Quantity included with machine:
Machine model 75841
4
0
Machine model 75851
5
1
Battery pack capacity
10.0 Ah
4.0 Ah
600 Wh
216 Wh
Battery manufacturer rating = 60V maximum and 54V nominal. Actual voltage varies with load.
Compatible Battery Packs
Model
88620
88625
88640
88650
88660
88675
68810
Battery pack capacity
2.0 Ah
2.5 Ah
4.0 Ah
5.0 Ah
6.0 Ah
7.5 Ah
10.0 Ah
108 Wh
135 Wh
216 Wh
270 Wh
324 Wh
405 Wh
540 Wh
Battery manufacturer rating = 60V maximum and 54V nominal. Actual voltage varies with load.
Included Battery Charger
Model
66550
Type
Flex-Force Power System 60V Pro 6-Pod Battery Charger
Input
220 to 240V AC ~5.0A, 50/60Hz
Output
60V DC Image 12.0A MAX
Compatible Battery Chargers
Model
88602
88605
88610
Type
60V MAX Lithium-Ion Battery Charger
60V MAX Lithium-Ion Battery Rapid Charger
Adapter 60V MAX Lithium-Ion Battery Charger
Input
120V AC ~2.0A, 60Hz
120V AC ~5.0A, 60Hz
120V AC ~2.0A, 60Hz
Output
60V DC Image 2.0A MAX
60V DC Image 5.5A MAX
60V DC Image 1.0A MAX
Appropriate Temperature Ranges
Battery charging/storage
5°C (41°F) to 40°C (104°F)*
Machine storage
-40°C (-40°F) to 50°C (122°F)*
Battery operation
-30°C (-22°F) to 49°C (120°F)
Machine operation
5°C (41°F) to 40°C (104°F)
*Charging time will increase if you do not charge the battery pack within this range.
Store the machine, battery pack, and battery charger in an enclosed clean, dry area.
Attachments/Accessories
A selection of Toro approved attachments and accessories is available for use with the machine to enhance and expand its capabilities. Contact your Authorized Service Dealer or authorized Toro distributor or go to www.Toro.com for a list of all approved attachments and accessories.
To ensure optimum performance and continued safety certification of the machine, use only genuine Toro replacement parts and accessories.


Operation
 

Before Operation

Before Operation Safety
  • Do not operate the machine unless all safety switches and other devices are in place and working properly.
  • Before leaving the operator's position for any reason, do the following:
    • Park the machine on a level surface.
    • Disengage the drives and the power take-off.
    • Engage the parking brake.
    • Shut off the machine and remove the key.
    • Wait for all moving parts to stop.
  • Before mowing, always inspect the machine to ensure that the blades, blade bolts, and cutting assemblies are in good working condition.
  • This product generates an electromagnetic field. If you wear an implantable electronic medical device, consult your health care professional before using this product.
  • Use only accessories and attachments approved by Toro.
  • Do not carry passengers on the machine and keep bystanders and pets away from the machine during operation.
  • This machine may produce a sound power level that exceeds 85 dBA at the operator's ear when accessories are installed. This can cause hearing loss through extended periods of exposure. Wear hearing protection when operating this machine with accessories installed.
  • Before operating the machine, ensure that the operator presence controls and either the discharge deflector or the entire grass collection system are in place and working properly. Otherwise, do not operate the machine.
  • When you shut off the machine, the blades should stop. If not, stop using the machine immediately and contact an Authorized Service Dealer.
  • Shut off the machine and attachment(s) if anyone enters the area.
Installing the Battery Packs
Any Flex-Force Power System® battery can be used with the machine.
Install at least 3 fully charged batteries, with 4 Ah or higher, for best mowing performance; 2 or fewer batteries, or batteries with lower amperage, may only provide enough power to drive the machine. Install more batteries and/or batteries with higher amperage to increase machine runtime.
Important  
Use the battery packs only in temperatures that are within the appropriate range; refer to Specifications.
 
  1. Make sure that the vents on the batteries are clear of any dust and debris.
  2. Graphic
    G445491
  3. Lift up the battery-compartment lid.
  4. Align the cavity in the battery pack with the tongue on the machine and slide the battery pack into the compartment until it locks into place with an audible click.
  5. Turn the key switch to the On position and ensure that the LED light next to each battery pack illuminates.
    Note: If a light does not illuminate for a battery pack, refer to Troubleshooting.
  6. Close the battery-compartment lid.
    Note: If the battery-compartment lid does not close completely, the batteries are not fully installed.
Performing Daily Maintenance
Before starting the machine each day, perform the Each Use/Daily procedures listed in the Maintenance Schedule.
Safety-Interlock System
The safety-interlock system is designed to prevent the machine from driving or engaging the blades unless the parking brake is disengaged:
It also is designed to shut off the blades whenever you rise from the seat.
Warning
If the safety-interlock switches are disconnected or damaged, the machine could operate unexpectedly, causing personal injury.
  • Do not tamper with the interlock switches.
  • Check the operation of the interlock switches daily and replace any damaged switches before operating the machine.
 
Testing the Safety-Interlock System
Test the safety-interlock system before you use the machine each time. If the safety system does not operate as described below, have an Authorized Service Dealer repair the safety system immediately.
  1. Sit on the seat, start the machine, and disengage the parking brake.
  2. Engage the blade-control switch (PTO), and rise slightly from the seat.
    The mower blades should shut off, and the information display should show the following icons.
    Graphic
    G447273
  3. Sit on the seat and disengage the blade-control switch.
  4. Slowly move the motion-control levers forward and rise slightly from the seat.
    The machine should stop moving and display the following icon.
    Graphic
    G427900
  5. Sit on the seat, engage the parking brake and engage the blade-control switch.
    The mower blades should not engage, and the information display should show the following icons.
    Graphic
    G447274
  6. Disengage the blade-control switch.
  7. Ensure that the parking brake is engaged and slowly move the motion-control levers forward.
    The machine should not move, and the information display should show the following icon.
    Graphic
    G427902
  8. Shut off the machine and remove the key.
Positioning the Seat
Machines with MyRide Suspension
Graphic
G451798
Machines without MyRide Suspension
Graphic
G459819
Adjusting the Motion-Control Lever Height
Adjust the motion-control levers higher or lower for your comfort.
Graphic
G441093
Adjusting the Motion-Control Lever Tilt
Adjust the motion-control levers forward or rearward for your comfort.
    Graphic
    G333846s
  1. Loosen the upper bolt.
  2. Loosen the lower bolt enough to pivot the control lever forward or rearward.
  3. Tighten both bolts.
  4. Repeat the adjustment for the other control lever.

During Operation

During Operation Safety
  • Before you start the machine, ensure that all drives are in neutral.
  • Keep away from holes, ruts, bumps, rocks, and other hidden hazards. Use care when approaching blind corners, shrubs, trees, tall grass or other objects that may hide obstacles or obscure vision. Uneven terrain could overturn the machine.
  • Shut off the machine and disengage the drive to the cutting unit after striking a foreign object or if an abnormal vibration occurs. Inspect the cutting unit for damage and make repairs before starting and operating the machine.
  • Be alert, slow down, and use caution when making turns and crossing roads and sidewalks with the machine. Always yield the right-of-way.
  • Do not use the machine as a towing vehicle.
  • Be aware of the mower discharge path and direct discharge away from others. Avoid discharging material against a wall or obstruction as the material may ricochet back toward the operator. Stop the blades, slow down, and use caution when crossing surfaces other than grass and when transporting the mower.
  • Do not leave a running machine unattended.
  • Be alert and shut off the machine if children enter the area.
Slope Safety
  • Slopes are a major factor related to loss of control and rollover accidents, which can result in severe injury or death. The operator is responsible for safe slope operation. Operating the machine on any slope requires extra caution. Before using the machine on a slope, do the following:
    • Review and understand the slope instructions in the manual and on the machine.
    • Use an angle indicator to determine the approximate slope angle of the area.
    • Never operate on slopes greater than 15°.
    • Evaluate the site conditions of the day to determine if the slope is safe for machine operation. Use common sense and good judgment when performing this evaluation. Changes in the terrain, such as moisture, can quickly affect the operation of the machine on a slope.
  • Identify hazards at the base of the slope. Do not operate the machine near drop-offs, ditches, embankments, water, or other hazards. The machine could suddenly roll over if a wheel goes over the edge or the edge collapses. Keep a safe distance (twice the width of the machine) between the machine and any hazard. Use a walk-behind machine or a hand trimmer to mow the grass in these areas.
    Graphic
    G229111s
    1.  Safe Zoneuse the machine here on slopes less than 15° or flat areas.
    2.  Danger Zoneuse a walk-behind mower and/or a hand trimmer on slopes greater than 15° and near drop-offs or water.
    3.  Water
    4.  W = Width of the machine
    5.  Keep a safe distance (twice the width of the machine) between the machine and any hazard.
  • Avoid starting, stopping, or turning the machine on slopes. Avoid making sudden changes in speed or direction; turn slowly and gradually.
  • Do not operate a machine under any conditions where traction, steering, or stability is in question. Be aware that operating the machine on wet grass, across slopes, or downhill may cause the machine to lose traction. Loss of traction to the drive wheels may result in sliding and a loss of braking and steering. The machine can slide even if the drive wheels are stopped.
  • Remove or mark obstacles such as ditches, holes, ruts, bumps, rocks, or other hidden hazards. Tall grass can hide obstacles. Uneven terrain could overturn the machine.
  • Use extra care while operating with accessories or attachments, such as grass-collection systems. These can change the stability of the machine and cause a loss of control. Follow directions for counterweights.
  • If possible, keep the deck lowered to the ground while operating on slopes. Raising the deck while operating on slopes can cause the machine to become unstable.
Starting the Machine
  1. Sit on the seat.
  2. Turn the key switch past the On position and release it.
  3. Wait for the splash screen to disappear from the information display before operating the machine (approximately 3 to 5 seconds).
Shutting Off the Machine
Caution
Children or bystanders may be injured if they move or attempt to operate the machine while it is unattended.
Always remove the key and engage the parking brake when leaving the machine unattended.
 
  1. Park the machine on a level surface.
  2. Disengage the blade-control switch (PTO).
  3. Move the motion-control levers outward to the Neutral-lock position.
  4. Engage the parking brake.
  5. Turn the key switch to the Off position and remove the key.
  6. Wait for all moving parts to stop before leaving the operating position.
Operating the Parking Brake
  1. Whenever you shut off the machine, engage the parking brake to prevent accidental movement of the machine.
    • To engage the parking brake, use your foot to push down the parking-brake pedal and move it left into the detent.
    • To disengage the parking brake, use your foot to push down the pedal, move the parking-brake pedal to the right out of the detent, and slowly release it.
    You can use the parking brake to stop the machine in emergency situations or when a machine fault disables the traction controls.
    Graphic
    G428514
Driving the Machine
Caution
Positioning one lever too far in front of the other causes the machine to spin very rapidly. As a result, you may lose control of the machine, causing personal injury to you and damage to the machine.
Slow down the machine before making sharp turns.
 
The drive wheels turn independently, powered by motors on each axle. You can turn 1 side in reverse while you turn the other forward, causing the machine to spin rather than turn. This greatly improves the machine maneuverability but may require some time for you to adapt to how it moves.
  1. Move the motion-control levers down to the center, unlocked position.
    Graphic
    G426843s
    1.  Motion-control leversNeutral-lock position
    2.  Center, unlocked position
    3.  Forward
    4.  Reverse
    5.  Front of the machine
  2. Graphic
    G397314s
  3. Slowly push the motion-control levers forward or rearward. Move 1 lever farther than the other lever to turn.
    Note: The farther you move the motion-control levers, the faster the machine moves in that direction.
  4. To stop, pull the motion-control levers back to the Neutral position.
    Note: You can use the parking brake to stop the machine in emergency situations or when a machine fault disables the traction controls.
Operating the Mower Blade-Control Switch (PTO)
Danger
The rotating blades under the mower deck are dangerous. Blade contact will cause serious injury or death.
Do not put your hands or feet under the mower or mower deck when the blades are engaged.
 
Danger
An uncovered discharge opening allows objects to be thrown toward you or bystanders. Also, contact with the blade could occur. Thrown objects or blade contact will cause serious injury or death.
Do not operate the mower with the discharge deflector raised, removed, or altered unless a grass collection system or mulch kit is in place and working properly.
 
  1. Engage the blade-control switch (PTO).
    Graphic
    G428133
  2. Mow as desired.
  3. Disengage the blade-control switch.
    Graphic
    G428132
Side Discharge
The hinged grass deflector disperses clippings to the side and down toward the turf.
Danger
Without the grass deflector, discharge cover, or complete grass catcher assembly mounted in place, you and bystanders are exposed to blade contact and thrown debris. Contact with rotating mower blade(s) and thrown debris will cause injury or death.
  • Do not remove the grass deflector from the machine, because the grass deflector routes material down toward the turf. If the grass deflector is ever damaged, replace it immediately.
  • Never put your hands or feet under the mower.
  • Never try to clear the discharge area or mower blades unless the power takeoff (PTO) is off. Rotate the key to the Off position and remove the key.
 
Adjusting the Height of Cut
  1. Use the height-of-cut lever to the right of the operating position to adjust the height of cut from 38 to 114 mm (1-1/2 to 4-1/2 inches) in 13 mm (1/2 inch) increments.
    Note: The transport position is the highest height-of-cut position.
    Graphic
    G441492
Adjusting the Anti-Scalp Rollers
Whenever you change the height of cut, adjust the height of the anti-scalp rollers.
  1. Park the machine on a level surface, disengage the blade-control switch (PTO), and engage the parking brake.
  2. Shut off the machine, remove the key, and wait for all moving parts to stop before leaving the operating position.
  3. Adjust the anti-scalp rollers to match the closest height-of-cut position.
    Note: Adjust the anti-scalp rollers so that the rollers do not touch the ground in normal, flat mowing areas.
    Graphic
    G444946
Operating Tips
Maximize Air Circulation
For best mowing and maximum air circulation, operate the machine with the blade-control switch (PTO) in the Fast position. Air circulation is required to thoroughly cut grass clippings, so do not set the height-of-cut so low as to totally surround the mower deck in uncut grass. Always try to have 1 side of the mower deck free from uncut grass, which allows air to be drawn into the mower deck.
Avoid Cutting Too Low
When mowing uneven ground, raise the cutting height to slightly higher than normal to avoid scalping the turf. However, the cutting height used in the past is generally the best one to use. When cutting grass longer than 15 cm (6 inches) tall, you may want to cut the lawn twice to ensure an acceptable quality of cut.
Cut a Third of the Grass Blade
It is best to cut only about a third of the grass blade. Cutting more than that is not recommended unless grass is sparse, or it is late fall when grass grows more slowly.
Alternate the Mowing Direction
Alternate the mowing direction to keep the grass standing straight. This also helps disperse clippings, which enhances decomposition and fertilization.
Mowing Frequency
Grass grows at different rates at different times of the year. To maintain the same cutting height, mow more often in early spring. As the grass growth rate slows in mid summer, mow less frequently. If you cannot mow for an extended period, first mow at a high cutting height, then mow again 2 days later at a lower height setting.
Mow at Slower Ground Speeds
In certain conditions, mowing at a slower ground speed can improve cut quality.
Avoid Grass Clumps
If you must stop driving forward while mowing, a clump of grass clippings may drop onto your lawn. To avoid this, move onto a previously cut area with the blades engaged or disengage the mower deck while moving forward.
Keep the Underside of the Mower Deck Clean
Clean clippings and dirt from the underside of the mower deck after each use. Grass and dirt build-up will eventually decrease the cutting quality.
Maintain the Blades
Maintain a sharp blade throughout the cutting season because a sharp blade cuts cleanly without tearing or shredding the grass blades. Tearing and shredding turns grass brown at the edges, which slows growth and increases the chance of disease. Check the mower blades after each use for sharpness, and for any wear or damage. File down any nicks and sharpen the blades as necessary. If a blade is damaged or worn, replace it.

After Operation

After Operation Safety
  • Disengage the PTO whenever you are transporting or not using the machine.
  • Use full-width ramps for loading the machine into a trailer or truck.
  • Tie the machine down securely using straps, chains, cable, or ropes. Both front and rear straps should be directed down and outward from the machine.
  • Replace all worn, damaged, or missing parts and decals. Keep all fasteners tight to ensure that the machine is working properly.
Charging the Battery Packs
Important  
The battery pack is not fully charged when you purchase it. Before using the machine for the first time, place the battery pack in the charger and charge it until the LED display indicates the battery pack is fully charged. Read all safety precautions.
 
Important
Charge the battery pack only in temperatures that are within the appropriate range; refer to Specifications.
 
Note: At any time, press the battery-charge-indicator button on the battery pack to display the current charge (LED indicators).
  1. Ensure that the vents on the battery pack and charger are clear of any dust and debris.
    Graphic
    G448708
    1.  Battery pack cavity
    2.  Battery pack venting areas
    3.  Battery pack terminals
    4.  Battery-charge-indicator button
    5.  LED indicators (current charge)
    6.  Handle
    7.  Charger
  2. Line up the cavity in the battery pack with the tongue on the charger.
  3. Slide the battery pack into the charger until it is fully seated
  4. Wait for the battery pack(s) to charge. Refer to the following table to interpret the LED indicator light on the battery charger.
    Indicator light
    Indicates
    Off
    No battery pack inserted
    Yellow
    Battery pack is on standby while other battery pack(s) are charging
    Green blinking
    Battery pack is charging
    Green
    Battery pack is charged
    Red
    Battery pack and/or battery charger is over or under the appropriate temperature range
    Red blinking
    Battery pack charging fault; refer to Troubleshooting
    If multiple battery packs are connected to the charger, you can switch between 2 charging modes by pressing the A/B button on the side of the charger.
    • Serial charging (Mode A): Fully charges 1 battery pack at a time; once fully charged, the next battery starts charging. This results in individual fully-charged batteries faster.
    • Parallel charging (Mode B): All connected battery packs are sequentially charged to the same level. This results in all connected batteries being evenly charged.
    Important  
    The battery can be left on the charger for short periods between uses.
    If the battery will not be used for longer periods, remove the battery from the charger.
     
  5. To remove the battery pack, slide the battery pack out of the charger.
Hauling the Machine
Use a heavy-duty trailer or truck to haul the machine. Use a full-width ramp. Ensure that the trailer or truck has all the necessary brakes, lighting, and marking as required by law. Please carefully read all the safety instructions. Knowing this information could help you or bystanders avoid injury. Refer to your local ordinances for trailer and tie-down requirements.
Warning
Driving on the street or roadway without turn signals, lights, reflective markings, or a slow-moving-vehicle emblem is dangerous and can lead to accidents causing personal injury.
Do not drive the machine on a public street or roadway.
 
Trailer Requirements
Warning
Loading a machine onto a trailer or truck increases the possibility of tip-over and could cause serious injury or death.
  • Use only a full-width ramp; do not use individual ramps for each side of the machine.
  • Do not exceed a 15-degree angle between the ramp and the ground or between the ramp and the trailer or truck.
  • Ensure that the length of ramp is at least 4 times as long as the height of the trailer or truck bed to the ground.
 
Graphic
G027996s
  1.  Full-width ramp(s) in stowed position
  2.  Side view of full-width ramp in loading position
  3.  Not greater than 15 degrees
  4.  Ramp is at least 4 times as long as the height of the trailer or truck bed to the ground
  5.  H = height of the trailer or truck bed to the ground
  6.  Trailer
Loading the Machine
Warning
Loading a machine onto a trailer or truck increases the possibility of tip-over and could cause serious injury or death.
  • Use extreme caution when operating a machine on a ramp.
  • Back the machine up the ramp and drive it forward down the ramp.
  • Avoid sudden acceleration or deceleration while driving the machine on a ramp as this could cause a loss of control or a tip-over situation.
 
  1. If using a trailer, connect it to the towing vehicle and connect the safety chains.
  2. If applicable, connect the trailer brakes.
  3. Lower the ramp, ensuring that the angle between the ramp and the ground does not exceed 15 degrees.
  4. Graphic
    G414592
  5. Back the machine up the ramp.
  6. Shut off the machine, remove the key, and engage the parking brake.
  7. Graphic
    G027708s
  8. Tie down the machine using straps, chains, cable, or ropes. Refer to local regulations for tie-down requirements.
    Note: Ensure to tie down the battery box so that it does not open during transport.
Unloading the Machine
    Graphic
    G414593
  1. Lower the ramp, ensuring that the angle between the ramp and the ground does not exceed 15 degrees.
  2. Drive the machine forward down the ramp.


Maintenance
 

Maintenance Safety

Warning
Modifying the original machine, parts, and/or accessories may alter the warranty, controllability, and safety of the machine. Making unauthorized modifications to the original machine and/or not using genuine Toro parts could lead to serious injury or death.
  • Do not make unauthorized modifications to the machine, parts, and/or accessories.
  • Use only genuine Toro parts.
 
Recommended Maintenance Schedule
Maintenance
Service Interval
Maintenance Procedure
After the first 50 hours
Before each use or daily
Inspect the grass deflector for damage.
After each use
Every 25 hours
Check the battery box filter; replace as needed.
Yearly
Before storage
Perform all maintenance procedures listed above before storage.
Paint any chipped surfaces.
 

Pre-Maintenance Procedures

Moving a Non-Functioning Machine
  1. Park the machine on a level surface and disengage the blade-control switch (PTO).
  2. Shut off the machine and remove the key.
  3. Remove the battery packs from the machine.
  4. Ensure that the parking brake is disengaged.
    Warning
    The machine could unintentionally move while the parking brake is disengaged and injure you or bystanders.
    Engage the parking brake after moving the machine.
     
  5. Push the machine as required.
    Important  
    Always push the machine at a slow walking speed; do not tow. Moving the machine at a faster speed may damage it.
    If the display powers on while you push the machine, move the machine at a slower speed.
     
  6. Engage the parking brake.
Raising the Machine
  1. Use jackstands to support the machine when you raise it.
    Warning
    Supporting the machine on the transaxle or motor may damage them and cause the machine to fall, injuring you or bystanders.
    Do not use the transaxle or motor to lift or support the machine.
     
    Graphic
    G454948

Electrical System Maintenance

Preparing the Battery Pack for Recycling
Important  
Upon removal, cover the terminals of the battery pack with heavy-duty adhesive tape. Do not attempt to destroy or disassemble the battery pack or remove any of its components.
 
Image
Lithium-ion battery packs labeled with the Call2Recycle seal can be recycled at any participating retailer or battery recycling facility in the Call2Recycle program (US and Canada only). To locate a participating retailer or facility closest to you, please call 1-800-822-8837 or visit www.call2recycle.org. If you cannot locate a participating retailer or facility nearby, or if your rechargeable battery is not labeled with the Call2Recycle seal, please contact your local municipality for more information on how to responsibly recycle the battery. If you are located outside of the US and Canada, please contact your Authorized Service Dealer.
Checking the Battery-Box Filter
  1. Park the machine on a level surface, disengage the blade-control switch (PTO), and engage the parking brake.
  2. Shut off the machine and remove the key.
  3. Graphic
    G455145
  4. Open the battery box filter cover behind the seat.
  5. Clean the filter by tapping it gently to remove dust.
    Note: If it is very dirty or damaged, replace the filter with a new one.
  6. Install the filter.
  7. Install the filter cover.

Drive System Maintenance

Checking the Tire Pressure
Maintain the air pressure in the front and rear tires as specified. Uneven tire pressure can cause an uneven cut. Check the pressure at the valve stem when the tires are cold to get the most accurate pressure reading.
    Graphic
    G441539
  1. Inflate the front caster wheel tires to 206 kPa (30 psi) or the pressure indicated on the sidewall, whichever is lower.
  2. Inflate the rear drive-wheel tires to 90 kPa (13 psi).
Checking the Wheel Lug Nuts
  1. Check and torque the wheel lug nuts to 108 Nm (80 ft-lb).
Adjusting the Tracking
When driving the machine forward full speed across a flat, level surface, if the machine pulls to 1 side, adjust the tracking.
Note: You can adjust the tracking only for driving forward.
  1. Park the machine on a level surface, disengage the blade-control switch (PTO), and engage the parking brake.
  2. Shut off the machine, remove the key, and wait for all moving parts to stop before leaving the operating position.
  3. Raise the seat.
  4. Rotate the tracking-adjustment bolt near the lever that needs adjusting.
    Note: This decreases the speed for that wheel. Rotate the bolt a small amount to make minor adjustments.
    Graphic
    G447992
  5. Lower the seat.
  6. Start the machine and drive it forward across a flat, level surface with both motion-control levers fully forward to verify that the machine tracks straight. Repeat the procedure as needed.

Mower-Deck Maintenance

Blade Service
To ensure a superior quality of cut, keep the blades sharp. For convenient sharpening and replacement, keep extra blades on hand.
Replace the blades if they hit a solid object, or if the blade is out of balance or bent.
Before Inspecting or Servicing the Blades
  1. Park the machine on a level surface, disengage the blade-control switch (PTO), and engage the parking brake.
  2. Shut off the machine, remove the key, and wait for all moving parts to stop before leaving the operating position.
  3. Remove the battery packs from the machine.
Checking for Bent Blades
The machine must be on a level surface for this procedure.
  1. Raise the mower deck to the highest height-of-cut position.
  2. While wearing thickly padded gloves, or other adequate hand protection, slowly rotate the blade into a position that allows you to measure the distance between the cutting edge and the level surface.
    Graphic
    G447262
  3. Measure from the tip of the blade to the level surface.
    Graphic
    G447260
    1.  Blade (in position for measuring)
    2.  Level surface
    3.  Measured distance between blade and the surface (A)
  4. Rotate the same blade 180 degrees so that the opposite blade edge is now in the same position.
    Graphic
    G447261
    1.  Blade edge previous measured
    2.  Opposite blade edge
  5. Measure from the tip of the blade to the level surface.
    Graphic
    G447260
    1.  Blade (in position for measuring)
    2.  Level surface
    3.  Measured distance between blade and the surface (B)
  6. If the difference between A and B is greater than 3 mm (1/8 inch), replace the blade.
    Note: If you replace the blade and the difference continues to exceed 3 mm (1/8 inch), the blade motor shaft could be bent. Contact an Authorized Service Dealer for service.
  7. Repeat this procedure each blade.
Removing the Blades
Replace the blades if they hit a solid object, or if the blade is out of balance or bent.
    Graphic
    G448104
  1. Hold the blade end using a rag or thickly padded glove.
  2. Remove the blade as shown.
Sharpening the Blades
    Graphic
    G000552s
  1. Use a file to sharpen the cutting edge at both ends of the blade. Ensure to maintain the original angle .
    Note: Remove the same amount of material from both cutting edges so that the blade retains its balance.
  2. Graphic
    G000553s
  3. Check the balance of the blade by putting it on a blade balancer .
    Note: If the blade stays in a horizontal position, the blade is balanced and can be used.
    If the blade is not balanced, file some metal off the end of the sail area only.
  4. Repeat this procedure until the blade is balanced.
Installing the Blades
Warning
Operating a machine after incorrectly installing the blade assembly and/or not using genuine Toro blade and blade hardware could allow a blade or blade component to be thrown out from under the deck, resulting in serious injury or death.
Always install genuine Toro blades and blade hardware according to the instructions.
 
    Graphic
    G448104
  1. Install the blade as shown.
    Note: The curved part of the blade must be pointing upward toward the inside of the mower to ensure proper cutting.
  2. Torque the blade bolt to 81 to 108 N·m (60 to 80 ft-lb).
Leveling the Mower Deck
Ensure that the mower deck is level any time you install the mower deck or when you see an uneven cut on your lawn.
Preparing to Level the Mower Deck
  1. Park the machine on a level surface, disengage the blade-control switch (PTO), and engage the parking brake.
  2. Shut off the machine, remove the key, and wait for all moving parts to stop before leaving the operating position.
  3. Remove the battery packs from the machine.
  4. Ensure that the tires are inflated to the correct specifications and the caster wheels are facing straight forward.
  5. Check the mower deck for bent blades; remove and replace any bent blades.
  6. Raise the mower deck to the 76 mm (3 inch) height-of-cut setting.
Checking the Mower-Deck Level
    Graphic
    G414698
  1. Position the blades side-to-side.
  2. Measure at locations and from a level surface to the cutting edge of the blade tips .
    The difference between the measurements should be no more than 5 mm (3/16 inch). If the measurement is larger, adjust the side-to-side level.
  3. Graphic
    G414700
  4. Position 1 blade front-to-rear.
  5. Measure at locations and from a level surface to the cutting edge of the blade tips .
    The front blade tip should be 1.6 to 7.9 mm (1/16 to 5/16 inch) lower than the rear blade tip. If the measurement is not correct, adjust the front-to-rear level.
Leveling the Mower Deck
  1. Set the anti-scalp rollers to the top holes or remove them completely for this procedure.
  2. Set the height-of-cut lever to the 76 mm (3 inch) position.
  3. Place 2 blocks, each having a thickness of 6.6 cm (2-5/8 inches), under each side of the front edge of the deck.
    Important  
    Do not place the blocks under the anti-scalp roller brackets.
     
    Graphic
    G455311
    1. Block6.6 cm (2-5/8 inches)
    2. Block7.3 cm (2-7/8 inches)
  4. Place 2 blocks, each having a thickness of 7.3 cm (2-7/8 inches), under each side of the rear edge of the cutting deck skirt.
  5. Adjust the side-to-side level as necessary:
    1. Remove the hairpin cotter and washer from the left lower lift-arm pin.
      Graphic
      G448684
    2. Rotate the height-of-cut plate to a different hole so that it supports the weight of the mower deck after you install the plate.
      Graphic
      G448681
    3. Install the washer and hairpin cotter.
    4. Repeat the adjustment for the other side of the machine.
    5. Check the side-to-side level and adjust it again until the measurements are correct.
  6. Adjust the front-to-rear level as necessary:
    1. Rotate the adjustment nut in the front of the mower deck.
      To raise the front of the deck, tighten the adjustment nut; lower the front of the deck, loosen the adjustment nut.
      Graphic
      G448683
    2. Check the front-to-rear level and adjust it again until the measurements are correct.
  7. Verify that the deck is level and make further adjustments as needed.

Brake Maintenance

Testing the Parking Brake
  1. Start the machine.
  2. Slowly drive the machine forward on level ground and engage the parking brake while moving.
  3. Graphic
    G427902
  4. Verify that the machine stops moving and the parking brake icon appears on the information display, then move the levers to neutral.
  5. Slowly attempt to drive the machine forward or rearward.
  6. Verify that the parking brake icon remains on the information display and that the machine does not move.
    If the icon does not display or the machine moves while the parking brake is engaged, contact an Authorized Service Dealer.

Cleaning

Cleaning Under the Mower Deck
Clean the underside of the mower deck after each use to prevent grass buildup for improved mulch action and clipping dispersal.
Important  
Do not use water to clean the mower deck, otherwise you could damage the electric motors.
 
Warning
Using compressed air improperly to clean the machine could result in serious injury.
  • Wear appropriate personal protective equipment, such as eye protection, hearing protection, and a dust mask.
  • Do not aim compressed air at any part of your body or at anyone else.
  • Refer to the manufacturers instructions for the air compressor for operating and safety information.
 
  1. Park the machine on a level surface, disengage the blade-control switch (PTO), and engage the parking brake.
  2. Shut off the machine and remove the key.
  3. Remove the battery packs from the machine.
  4. Raise the front of the machine and use jack stands to support the mower.
  5. Scrape debris from the machine or remove it using compressed air.


Storage
 

Storing the Machine

Store the machine, battery pack, and charger only in temperatures that are within the appropriate range; refer to Specifications.
  1. Park the machine on a level surface, disengage the blade-control switch (PTO), and engage the parking brake.
  2. Shut off the machine, remove the key, and wait for all moving parts to stop before leaving the operating position.
  3. Remove the battery packs from the machine.
  4. Remove grass clippings, dirt, and grime from the external parts of the entire machine, especially the traction and blade motors, battery compartment, and underside of the machine.
  5. Check the parking brake operation.
  6. Check the tire pressure.
  7. Charge the batteries.
    Important  
    If you are storing the battery packs for the off-season, charge them until 2 or 3 LED indicators turn green on the batteries. Do not store a fully charged or fully depleted battery. When you are ready to use the machine again, charge the battery packs until the left indicator light turns green on the charger or all 4 LED indicators turn green on the batteries.
     
  8. Scrape any heavy buildup of grass and dirt from the underside of the mower.
  9. Check the condition of the blades.
  10. Check and tighten all fasteners. Repair or replace any part that is damaged.
  11. Paint all scratched or bare metal surfaces. Paint is available from your Authorized Service Dealer.
  12. Store the machine in a clean, dry garage or storage area. Remove the key from the switch and keep it out of reach of children or other unauthorized users. Cover the machine to protect it and keep it clean.


Troubleshooting
 

Machine Troubleshooting

The machine vibrates abnormally
Possible Cause
Corrective Action
The cutting blade(s) is/are bent or unbalanced.
  1. Install new cutting blade(s).
The blade mounting bolt is loose.
  1. Tighten the blade mounting bolt.
The blade spindle is bent.
  1. Contact an Authorized Service Dealer.
A motor mount is loose or worn.
  1. Contact an Authorized Service Dealer.
The cutting height is uneven.
Possible Cause
Corrective Action
The blade(s) is not sharp.
  1. Sharpen the blade(s).
A cutting blade(s) is/are bent.
  1. Install a new cutting blade(s).
The mower is not level.
  1. Level the mower from side-to-side and front-to-rear.
An anti-scalp roller (if applicable) is not set correctly.
  1. Adjust the anti-scalp wheel height.
The underside of the mower deck is dirty.
  1. Clean the underside of the mower deck.
The tire pressure is incorrect.
  1. Adjust the tire pressure.
A blade spindle is bent.
  1. Contact an Authorized Service Dealer.
A blade motor is not functioning properly.
  1. Contact an Authorized Service Dealer.
The blades do not rotate.
Possible Cause
Corrective Action
The blade-control switch is faulty.
  1. Contact an Authorized Service Dealer.

Battery and Charger Troubleshooting

The battery system loses charge quickly.
Possible Cause
Corrective Action
The battery system is over or under the appropriate temperature range.
  1. Move the machine to a location where it is dry and the temperature is within the range indicated in Specifications.
The battery system is not using all installed battery packs.
  1. When the machine is on, check the LED light next to each battery pack to ensure it is active. For any inactive battery packs, ensure they are seated properly and all batteries have the same charge level.
A battery LED light on the machine does not illuminate.
Possible Cause
Corrective Action
The battery pack is not seated correctly in the battery box.
  1. Ensure the battery pack is seated properly.
The battery pack is at a lower charge level than the active battery packs.
  1. Charge the battery pack to the same level as the active batteries.
    Note: The machine uses all battery packs simultaneously only if they have the same charge level; otherwise, it uses the battery packs with the highest charge until they reach the same charge level as other battery packs.
The battery charger is not working.
Possible Cause
Corrective Action
The battery charger is over or under the appropriate temperature range.
  1. Unplug the battery charger and move it to a location where it is dry and the temperature is within the range indicated in Specifications.
The outlet that the battery charger is plugged into does not have power.
  1. Contact your licensed electrician to repair the outlet.
The LED indicator light on the battery charger is red.
Possible Cause
Corrective Action
The battery charger and/or battery pack is over or under the appropriate temperature range.
  1. Unplug the battery charger and move the battery charger and battery pack to a location where it is dry and the temperature is within the range indicated in Specifications.
The LED indicator light on the battery charger is blinking red.
Possible Cause
Corrective Action
There is an error in the communication between the battery pack and the charger.
  1. Remove the battery pack from the battery charger, unplug the battery charger from the outlet, and wait 10 seconds.
  2. Plug the battery charger into the outlet again and place the battery pack on the battery charger. If the LED indicator light on the battery charger is still blinking red, repeat this procedure again. If the LED indicator light on the battery charger is still blinking red after 2 attempts and the battery is within the warranty period, contact an Authorized Service Dealer. Otherwise, properly dispose of the battery pack at a battery recycling facility.
The battery pack is weak.
  1. If the battery is within the warranty period, contact an Authorized Service Dealer. Otherwise, properly dispose of the battery pack at a battery recycling facility.
The tool does not run or does not run continuously.
Possible Cause
Corrective Action
There is moisture on the leads of the battery pack.
  1. Allow the battery pack to dry or wipe it dry.
The battery is not fully installed into the tool.
  1. Remove and then replace the battery into the tool making sure that it is fully installed and latched.

Display Error and Fault Code Troubleshooting

Before diagnosing an error, shut off the machine, remove the key, and remove the batteries.
Error Icons
Icon
Description
Corrective Action
Image
The battery temperature is too high.
  1. Shut off the machine, remove the battery, and wait for the battery to cool.
  2. Operate the machine in the appropriate temperature range.
Image
The battery load is too high.
Reduce the load on the machine.
Image
The motor temperature is too high.
  1. Shut off the machine and allow it to cool before starting it again.
  2. Operate the machine in the appropriate temperature range.
Image
The motor load is too high.
Reduce the load on the machine.
Image
Fault code
Refer to the following tables.
Fault codes appear on the information display as shown.
Graphic
G460280
  1.  System
  2.  Last 3 digits of the controller serial number
  3.  Fault code
Identify the system of the fault using the first 2 digits of the code and the first table, then identify the fault using the last 2 digits of the code and the table of the appropriate system. The middle 3 digits correspond to the last 3 digits of the controller serial number, which may help determine which motor is sending the fault.
Note: The serial number does not display for PMU faults and shows 000 instead.
System for Fault
First 2 Digits of Code
System
60
Power management unit (PMU)battery box
80
Primary controller
81
Left traction motor
82
Right traction motor
83, 84, or 85
Blade motor
Power Management Unit (PMU) Faults
Last 2 Digits of Code
Fault Description
Corrective Action
60-XXX-66
There is a PMU precharge failure.
Restart the machine; if issues persist, contact an Authorized Service Dealer.
60-XXX-69
There is a PMU failure.
Restart the machine; if issues persist, contact an Authorized Service Dealer.
60-XXX-71
Battery 1 has indicated a relay failure.
  1. Ensure that the battery is installed properly.
  2. Remove and charge the battery. Install the battery.
  3. If issues persist, replace the battery or contact an Authorized Service Dealer.
60-XXX-72
Battery 2 has indicated a relay failure.
  1. Ensure that the battery is installed properly.
  2. Remove and charge the battery. Install the battery.
  3. If issues persist, replace the battery or contact an Authorized Service Dealer.
60-XXX-73
Battery 3 has indicated a relay failure.
  1. Ensure that the battery is installed properly.
  2. Remove and charge the battery. Install the battery.
  3. If issues persist, replace the battery or contact an Authorized Service Dealer.
60-XXX-74
Battery 4 has indicated a relay failure.
  1. Ensure that the battery is installed properly.
  2. Remove and charge the battery. Install the battery.
  3. If issues persist, replace the battery or contact an Authorized Service Dealer.
60-XXX-75
Battery 5 has indicated a relay failure.
  1. Ensure that the battery is installed properly.
  2. Remove and charge the battery. Install the battery.
  3. If issues persist, replace the battery or contact an Authorized Service Dealer.
60-XXX-76
Battery 6 has indicated a relay failure.
  1. Ensure that the battery is installed properly.
  2. Remove and charge the battery. Install the battery.
  3. If issues persist, replace the battery or contact an Authorized Service Dealer.
60-XXX-77
There is a positive metal-oxide-semiconductor (MOS) failure in the PMU.
Contact an Authorized Service Dealer.
60-XXX-79
A motor braking component is too hot.
  1. Shut off the machine and allow it to cool before starting it again.
  2. Operate the machine in the appropriate temperature range.
60-XXX-92
There is a PMU failure.
Ensure that the battery is fully seated in the slot; if issues persist, contact an Authorized Service Dealer.
60-XXX-93
There is a PMU failure.
Ensure that the battery is fully seated in the slot; if issues persist, contact an Authorized Service Dealer.
60-XXX-94
The PMU system is too hot.
  1. Shut off the machine and allow it to cool before starting it again.
  2. Operate the machine in the appropriate temperature range.
60-XXX-95
The PMU communication timed out.
Ensure that the battery is fully seated in the slot; if issues persist, contact an Authorized Service Dealer.
Primary Controller Faults
Code
Fault Description
Corrective Action
80-XXX-01
There is no controller area network (CAN) signal for the left traction controller.
Check for loose connections; if issues persist, contact an Authorized Service Dealer.
80-XXX-02
There is no CAN signal for the right traction controller.
Check for loose connections; if issues persist, contact an Authorized Service Dealer.
80-XXX-07
A fault occurred in the left motion-control sensor.
Check for loose connections; if issues persist, contact an Authorized Service Dealer.
80-XXX-08
A fault occurred in the right motion-control sensor.
Check for loose connections; if issues persist, contact an Authorized Service Dealer.
80-XXX-10
There is no CAN signal for the blade controller (refer to the serial number to identify location).
Check for loose connections; if issues persist, contact an Authorized Service Dealer.
80-XXX-11
There is no CAN signal for the blade controller (refer to the serial number to identify location).
Check for loose connections; if issues persist, contact an Authorized Service Dealer.
80-XXX-12
There is an issue with the firmware version compatibility.
Contact an Authorized Service Dealer for a software update.
80-XXX-19
A fault occurred in the DC-DC power converter.
Contact an Authorized Service Dealer.
80-XXX-26
There is no CAN signal for the blade controller (refer to the serial number to identify location).
Check for loose connections; if issues persist, contact an Authorized Service Dealer.
80-XXX-27
There is a microcontroller unit (MCU) hardware error.
Contact an Authorized Service Dealer.
80-XXX-28
There is an MCU flash data validation error.
Contact an Authorized Service Dealer.
80-XXX-29
There is an MCU non-maskable interrupt error.
Contact an Authorized Service Dealer.
80-XXX-30
There is an MCU error.
Contact an Authorized Service Dealer.
80-XXX-31
There is a voltage reference error.
Contact an Authorized Service Dealer.
Traction/Blade Motor Controller Faults
Code
Fault Description
Corrective Action
81-XXX-00
82-XXX-00
83-XXX-00
84-XXX-00
85-XXX-00
There is a hall signal error.
Contact an Authorized Service Dealer.
81-XXX-01
82-XXX-01
83-XXX-01
84-XXX-01
85-XXX-01
The hall signal sequence is abnormal.
Contact an Authorized Service Dealer.
81-XXX-02
82-XXX-02
83-XXX-02
84-XXX-02
85-XXX-02
The controller started abnormally.
Contact an Authorized Service Dealer.
81-XXX-07
82-XXX-07
83-XXX-07
84-XXX-07
85-XXX-07
The motor rotor is locked.
Clear any obstructions; if issues persist, contact an Authorized Service Dealer.
81-XXX-10
82-XXX-10
83-XXX-10
84-XXX-10
85-XXX-10
The motor rotor operates too fast.
Contact an Authorized Service Dealer.
81-XXX-11
82-XXX-11
83-XXX-11
84-XXX-11
85-XXX-11
There is an MCU signal error.
Contact an Authorized Service Dealer.
81-XXX-12
82-XXX-12
83-XXX-12
84-XXX-12
85-XXX-12
The motor current is too high.
Restart the machine and reduce the load; if issues persist, contact an Authorized Service Dealer.
81-XXX-17
82-XXX-17
83-XXX-17
84-XXX-17
85-XXX-17
There is a current overload.
Restart the machine and reduce the load; if issues persist, contact an Authorized Service Dealer.
81-XXX-19
82-XXX-19
83-XXX-19
84-XXX-19
85-XXX-19
There is a current short in the circuit.
Contact an Authorized Service Dealer.
81-XXX-20
82-XXX-20
83-XXX-20
84-XXX-20
85-XXX-20
There is a gate driver integrated circuit (IC) component error.
Contact an Authorized Service Dealer.
81-XXX-21
82-XXX-21
83-XXX-21
84-XXX-21
85-XXX-21
The connector on the motor phase is disconnected.
Check for loose connections; if issues persist, contact an Authorized Service Dealer.
81-XXX-23
82-XXX-23
83-XXX-23
84-XXX-23
85-XXX-23
There is a gate driver IC initialize error.
Restart the machine; if issues persist, contact an Authorized Service Dealer.
81-XXX-25
82-XXX-25
83-XXX-25
84-XXX-25
85-XXX-25
The current ADC signal is abnormal.
Contact an Authorized Service Dealer.
81-XXX-26
82-XXX-26
83-XXX-26
84-XXX-26
85-XXX-26
The CAN signal is disconnected.
Check for loose connections; if issues persist, contact an Authorized Service Dealer.
81-XXX-27
82-XXX-27
83-XXX-27
84-XXX-27
85-XXX-27
There is an MCU hardware error.
Contact an Authorized Service Dealer.
81-XXX-28
82-XXX-28
83-XXX-28
84-XXX-28
85-XXX-28
There is a flash data validation error.
Contact an Authorized Service Dealer.
81-XXX-29
82-XXX-29
83-XXX-29
84-XXX-29
85-XXX-29
There is an MCU non-maskable interrupt error.
Contact an Authorized Service Dealer.
81-XXX-30
82-XXX-30
83-XXX-30
84-XXX-30
85-XXX-30
There is an MCU error.
Contact an Authorized Service Dealer.
81-XXX-31
82-XXX-31
83-XXX-31
84-XXX-31
85-XXX-31
There is a voltage reference error.
Contact an Authorized Service Dealer.


Schematic: Electrical Diagram
 
Machines with 2 Blades
Graphic
G465696
Machines with 3 Blades
Graphic
G465734