Heavy Duty Spring Kit
TimeCutter® MyRide® Riding Mower
Installation Instructions
Preparing the Machine
Gas Models Only
-
Park the machine on a level surface.
-
Disengage the blade-control switch.
-
Move the motion-control levers outward to the park position.
-
Shut off the machine and remove the key.
-
Wait for all moving parts to stop.
-
Allow machine components to cool.
-
Disconnect the spark-plug.
Preparing the Machine
Electric Models Only
-
Park the machine on a level surface.
-
Disengage the blade-control switch.
-
Move the motion-control levers outward to the neutral position.
-
Engage the parking brake.
-
Shut off the machine and remove the key.
-
Wait for all moving parts to stop.
-
Allow machine components to cool.
-
Remove the battery packs from the machine.
Removing the Existing Front Spring
-
Place a 38 x 89 mm (2 x 4 inches) board under the foot rest to block the front of the platform.
-
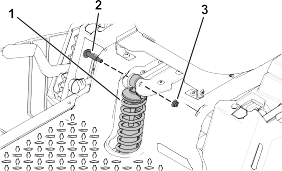
Remove the 2 shoulder bolts and 2 locknuts (3/8 inch) securing the existing front spring. Retain the hardware.
-
Remove the existing front spring.
G464485
-
Front spring
-
Shoulder bolt
-
Locknut (3/8 inch)
Installing the New Heavy-Duty Spring
-
Install the new spring using the previously removed 2 shoulder bolts and 2 locknuts.
Installing the Spring Spacers
-
Raise the seat.
-
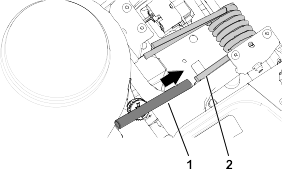
Place the spring-lift tube onto the end of the torsion spring.
Note: Ensure that the spring-lift tube is securely seated on the end of the torsion spring.
G464488
-
Spring-lift tube
-
Torsion spring
-
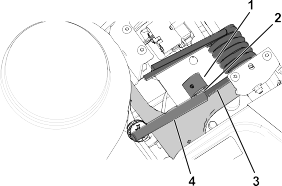
Slide the spring spacer onto the swing-arm post.
-
Use one hand to lift the end of the torsion spring off the swing-arm post and slide the spacer between the torsion spring
and swing-arm post.
G464499
-
Spring spacer
-
Swing-arm post
-
Torsion spring
-
Spring-lift tube
-
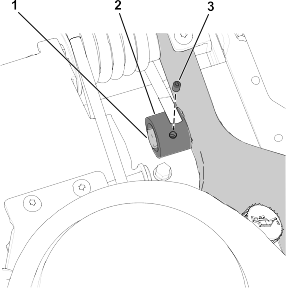
Secure the spring spacer to the swing-arm post using the set screw.
G464500
-
Swing-arm post
-
Spring spacer
-
Set screw
-
Repeat this procedure on the other side.
-
Lower the seat.


