| Maintenance Service Interval | Maintenance Procedure |
|---|---|
| Every 100 hours |
|
Introduction
This attachment creates holes and disperses seed to revitalize existing turf and establish new turf. It is intended to be used by professional, hired operators in commercial applications. It is designed primarily for working large areas on well-maintained lawns in parks, golf courses, sports fields, and on commercial grounds. Using this product for purposes other than its intended use could prove dangerous to you and bystanders.
Read this information carefully to learn how to operate and maintain your product properly and to avoid injury and product damage. You are responsible for operating the product properly and safely.
Visit www.Toro.com/Bullseye for product safety and operation training materials, accessory information, help finding a dealer, or to register your product.
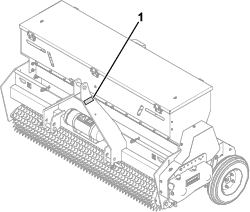
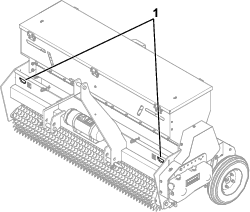
Whenever you need service, genuine Bullseye parts, or additional information, contact an Authorized Service Dealer or Bullseye Customer Service and have the model and serial numbers of your product ready. Figure 1 identifies the location of the model and serial numbers on the product. Write the numbers in the space provided.
This manual identifies potential hazards and has safety messages identified by the safety-alert symbol (Figure 2), which signals a hazard that may cause serious injury or death if you do not follow the recommended precautions.

This manual uses 2 words to highlight information. Important calls attention to special mechanical information and Note emphasizes general information worthy of special attention.
Warning
CALIFORNIA
Proposition 65 Warning
Use of this product may cause exposure to chemicals known to the State of California to cause cancer, birth defects, or other reproductive harm.
Safety
General Safety
This product is capable of injuring hands and feet and of throwing objects. Always follow all safety instructions to avoid serious personal injury.
-
Read and understand the contents of this Operator’s Manual before starting the engine.
-
Do not put your hands or feet near moving components of the machine.
-
Do not operate the machine without all guards and other safety protective devices in place and working on the machine.
-
Keep children and bystanders out of the operating area. Never allow children to operate the machine.
-
Stop the machine and shut off the engine before servicing, fueling, or unclogging the machine.
Improperly using or maintaining this machine can result in injury. To reduce the potential for injury, comply with these safety instructions and always pay attention to the safety-alert symbol (Figure 2), which means Caution, Warning, or Danger—personal safety instruction. Failure to comply with these instructions may result in personal injury or death.
Safety and Instructional Decals
|
Safety decals and instructions are easily visible to the operator and are located near any area of potential danger. Replace any decal that is damaged or missing. |


Setup
Inspecting the Machine
Checking the Traction Unit Requirements
Use the following list as a reference:
-
Refer to Specifications for the minimum horse power and minimum lifting capacity for the traction unit.
-
The traction unit must have a category 1 or 2 three-point hitch.
-
Adequate front-end weight (ballast) to offset the weight of the machine.
-
Check the tire air pressure of the traction unit.
Adjust the tire air pressure as needed.
Important: Do not exceed the maximum or minimum tire inflation pressures as recommended by tire manufacturer.
Checking the Ballast Requirements
Warning
Mounting the machine to the rear of the traction unit decreases the weight on its front axle.
Failure to add required ballast may result in an accident and severe injury or death.
-
To ensure adequate steering control and stability, you may need to add ballast to the front of the traction unit.
-
Refer to the traction unit operator's manual for ballast requirements.
Product Overview
Seeding-Rate Gauge
Use the gauge (Figure 3) to control the amount of seeds emitted from the machine during operation.
Loosen the top knobs, then turn the side knob to change the seeding rate. The rate (1 through 11) is listed on the decal.
Seed-Size Gauge
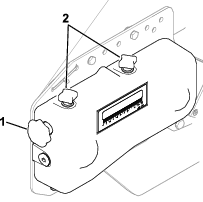
Use the gauge (Figure 4) to adjust the valve opening.
Loosen the knob and move it to the appropriate area.
-
For fine (very small) seeds: The valve must be completely closed. Move the gauge knob to the position marked with a 0.
-
For large seeds: The valve must be opened. Move the gauge knob to the position marked with a 1, 2, or 3.
| Model 46435 | Model 46440 | |
| Minimum lifting capacity | 450 kg (992 lb) | 550 kg (1,213 lb) |
| Minimum output-power rating | 14.9 kW (20 hp) | 22.4 kW (30 hp) |
| Tow system | 3-point hitch, category 1 or 2 | 3-point hitch, category 1 or 2 |
| Model 46435 | Model 46440 | |
| Width | 152.4 cm (60 inches) | 193 cm (76 inches) |
| Length | 88.9 cm (35 inches) | 88.9 cm (35 inches) |
| Height | 101.6 cm (40 inches) | 101.6 cm (40 inches) |
| Working width | 109.2 cm (43 inches) | 1.49.8 cm (59 inches) |
| Working depth | 5 to 20 mm (0.19 to 0.78 inch) | 5 to 20 mm (0.19 to 0.78 inch) |
| Maximum working speed | 12 km/h (7.5 mph) | 12 km/h (7.5 mph) |
| Sowing speed | Maximum of 12 km/h (7.5 mph) | Maximum of 12 km/h (7.5 mph) |
| Weight | 380 kg (836 lbs) | 468 kg (1,030 lb) |
| Effective dimple spacing | 3.04 cm (1.2 inches) | Square 30 mm (1.18 inches) |
| Number of holes per m3 using a single spiked roller | 990 m2 (87 f2) | 990 m2 (87 f2) |
| Seed container capacity | 168 L (6 ft3) | 225 L (8 ft3) |
| Standard components | Rear roller including a scraper | |
| Infinitely adjustable gearbox to set seeding rate | ||
| Cylinder for the manual | ||
| Fully sealed seed hopper with windows | ||
| Terrain-following seed dispensing wheel | ||
Operation
Before Operation
Note: Determine the left and right sides of the machine from the normal operating position.
Before Operation Safety
Before Operation Safety
-
Never allow children or untrained people to operate or service the machine. Local regulations may restrict the age of the operator. The owner is responsible for training all operators and mechanics.
-
Become familiar with the safe operation of the equipment, operator controls, and safety signs.
-
Know how to stop the machine and shut off the engine of the traction unit quickly.
-
Ensure that the guards and shields are properly installed and maintained. Replace missing, damaged, or worn guards and shields before using the machine.
-
Inspect the area where you will use the machine and remove all objects that the machine could strike.
-
Ensure that your traction unit is suitable for use with an implement of this weight by checking with your traction unit supplier or manufacturer.
-
Shut off the machine, shut off the engine and remove the key of the traction unit, and wait for all moving parts to stop before making any adjustments to the machine.
Understanding the Traction Unit Controls
Familiarize yourself with the operation of the following traction unit controls before operating the machine:
-
Three-point hitch (raise/lower)
-
Clutch
-
Throttle
-
Gear selection
-
Parking brake
Important: Refer to the traction unit Operator's Manual for operating instructions.
Connecting to a 3-Point Hitch
Connecting the Lower Link Arms
-
Ensure that the attachment is positioned on a level surface.
-
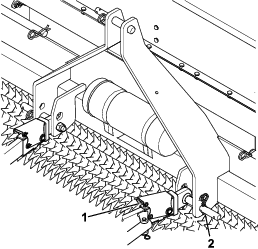
Remove the hairpin cotters from the hitch pins (Figure 5).
-
Back the traction unit squarely up to the attachment so that you can attach the lower connecting arms to the frame.
-
Engage the parking brake, shut off the engine, and remove the key from the ignition. Wait for the engine and all moving parts to stop before leaving the operator's seat.
Note: For maximum ground clearance, install the hitch pins in the lower mounting holes of the hitch plate for the attachment.
-
Insert the right and left lower link arms onto the hitch pins (Figure 6).
-
Secure the lower link arms to the hitch pins using the hairpin cotters.
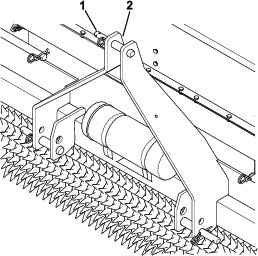
Connecting the Upper Link Arm
-
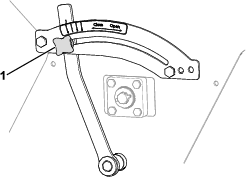
Connect the upper link arm to the bracket and secure it with the link pin and the hairpin cotter (Figure 7).
-
Grease the threaded steel upper link arm tubes.
-
Rotate the upper link arm to tighten or loosen the link as needed..
-
Tighten the jam nut to secure the upper link arm into position.
-
Start the traction unit and lift the attachment off the ground.
Adjusting the Seed Gauges
Adjust the seed-size gauge and seeding-rate gauge per your seeding requirements. Refer to Controls for instructions to adjust these gauges.
Filling the Seed Hopper
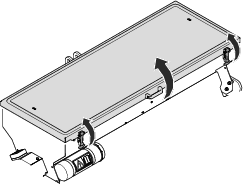
Open the seed cover and add seeds to the hopper on the top of the attachment.
Ensure that the hopper is not damp. Dampness can cause the seeds to stick to each other.
-
To open the seed cover, release the rubber latches and use the lid handle to raise the cover (Figure 8).
-
To close the seed cover, lower the cover and use the rubber latches to secure the cover in-place.
Testing the Seed Distribution
Adjust the quantity of seeds for the correct operation of the attachment. See the Sowing Table for a starting point based on your desired seeding rate.
You will need the following accessories for adjusting the quantity of seeds:
-
Scale
-
Tray for weighing the seeds
-
Enough seeds for filling at least 30% of the hopper
Perform the following steps for the seed distribution test:
-
Set the seed-size gauge to 0.
-
Fill the hopper with seeds and make sure that these are evenly spread throughout the hopper.
-
Lift the attachment off the ground so that you can rotate the wheel.
-
Slide a piece of plastic, cardboard, or other material under the seeder to catch the seeds.
-
Turn the wheel 13 rotations counter-clockwise.
-
Weigh the seeds in kilograms and multiply the outcome by the following number for your model:
-
RapidSeed 430: 551
-
RapidSeed 590: 404
-
The resulting outcome is the amount of seeds in kilograms that should be spread per hectare. To obtain the outcome in pounds per acre, multiply the resulting outcome by 0.89.
If the calibration setting is in a high position, it may result in too many seeds for the tray to collect. If so, then divide the 13 rotations into several smaller steps
Sowing Table
| Seeding-Rate Gauge Setting (with a seed-size gauge setting of 0) | Amount of Emitted Grass Seed | ||
| Ryegrass: Kg/ha (Pound/Acre) | Bluegrass: Kg/ha (Pound/Acre) | Red Fescue grass: Kg/ha (Pound/Acre) | |
| 0 | 0 | 0 | 0 |
| 1 | 12.7 (11.4) | 18.7 (16.7) | 11.3 (10.1) |
| 2 | 39.8 (35.5) | 79.5 (70.9) | 36.2 (32.3) |
| 3 | 67.6 (60.3) | 121 (108) | 62.7 (56) |
| 4 | 100.2 (89.4) | 172.4 (153.8) | 87.3 (77.9) |
| 5 | 131.1 (117) | 235.5 (210.1) | 120.9 (107.8) |
| 6 | 167.7 (149.6) | 301.2 (268.7) | 153.2 (136.7) |
| 7 | 209.1 (186.6) | 376.9 (336.3) | 190.1 (169.6) |
| 8 | 257.5 (229.7) | 482.6 (430.6) | 236.7 (211.2) |
| 9 | 315.6 (281.6) | 578.7 (516.3) | 287.3 (256.3) |
| 10 | 376.6 (336) | 680.8 (607.4) | 353.3 (315.2) |
| 11 | 476.7 (425.3) | 873.9 (779.7) | 437.3 (390.1) |
Adding Weight to the Attachment
If the ground is too hard, you can add weight to the attachment; refer to the Weight Kit Installation Instructions.
Preparing to Operate the Attachment
-
Fill the seed hopper at least 30% full; refer to Filling the Seed Hopper.
-
Set the seeding gauges; refer to Controls.
-
Perform the following checks:
-
Check the dimpling discs for damage and repair them, if necessary.
-
Check whether the passageway to the sowing elements is not blocked (e.g., funnels or sowing pipes).
-
Check whether the machine is not wet or damp, predominantly in the sowing system.
-
Check the effectiveness of the sowing system by rotating the runner once (counter-clockwise).
-
Check whether the drive runs smoothly.
-
Transporting the Machine
-
Raise the attachment before transporting the machine.
-
To avoid loss of control, move across steep inclines slowly, approach rough areas at reduced speed, and cross severe undulations carefully.
Important: Do not exceed transport speeds of 20 km/h (12.4 mph).
Practicing the Operating Procedures
Before using the attachment, find a clear area and practice operating the traction unit with the attachment installed.
Important: If there are sprinkler heads, electrical or communication lines, or other obstructions in the area, mark these locations to ensure that these items are not damaged during operation.
-
Operate the traction unit using the recommended gear settings and become thoroughly familiar with the traction unit handling with the attachment.
-
Practice stopping and starting, raising the attachment, lowering the attachment, and aligning the attachment with previous passes.
Practice sessions helps you gain confidence in the performance of the attachment and helps ensure that you are using it properly.
Warning
Adjusting or maintaining the attachment while the traction unit is running may result in an accident and severe injury or death.
-
Before leaving the operator’s seat, engage the parking brake, shut off the engine, remove the key, and wait for all moving parts to stop.
-
Lower the attachment onto the storage stands or appropriate blocking or jacks repairing the attachment.
-
Ensure that all safety devices are secured in proper place before resuming operation.
During Operation
During Operation Safety
-
The owner/operator can prevent and is responsible for accidents that may cause personal injury or property damage.
-
Wear appropriate clothing, including eye protection; long pants; substantial, slip-resistant footwear; and hearing protection. Tie back long hair and do not wear loose clothing or loose jewelry.
-
Use your full attention while operating the machine. Do not engage in any activity that causes distractions; otherwise, injury or property damage may occur.
-
Do not operate the machine when tired, ill, or under the influence of alcohol or drugs.
-
Never carry passengers on the machine and keep bystanders and pets away from the machine during operation.
-
Operate the machine only in good visibility to avoid holes or hidden hazards.
-
Keep your hands and feet away from moving parts.
-
Look behind and down before backing up to be sure of a clear path.
-
Use care when approaching blind corners, shrubs, trees, or other objects that may obscure your vision.
-
Stop the attachment whenever you are not using it.
-
Stop the machine, shut off the engine, remove the key, wait for all moving parts to stop, and inspect the machine after striking an object or if there is an abnormal vibration in the machine. Make all necessary repairs before resuming operation.
-
Slow down and use caution when making turns and crossing sidewalks with the machine. Always yield the right-of-way.
-
Reduce speed on rough surfaces.
-
When the attachment is connected to a traction unit and in the raised position, the weight of it affects stability, braking, and steering. Exercise caution when transporting between working areas.
-
Never leave a running machine unattended.
-
Before leaving the operating position, do the following:
-
Park the machine on a level surface.
-
Engage the parking brake.
-
Lower the attachment.
-
Shut off the engine and remove the key.
-
Wait for all moving parts to stop before leaving the machine.
-
-
Do not operate the machine when there is the risk of lightning.
-
Use Bullseye accessories, attachments, and replacement parts only.
Slope Safety
-
Review the traction unit specifications to ensure that you do not exceed its slope capabilities.
-
Slopes are a major factor related to loss of control and rollover accidents, which can result in severe injury or death. You are responsible for safe slope operation. Operating the machine on any slope requires extra caution.
-
Review and understand the slope instructions in the manual and on the traction unit.
-
Evaluate the site conditions to determine if the slope is safe for machine operation, including surveying the site. Always use common sense and good judgment when performing this survey.
-
Review the slope instructions listed below for operating the machine on slopes and to determine whether you can operate the machine in the conditions on that day and at that site. Changes in the terrain can result in a change in slope operation for the machine.
-
Avoid starting, stopping, or turning the machine on slopes. Avoid making sudden changes in speed or direction. Make turns slowly and gradually.
-
Do not operate a machine under any conditions where traction, steering, or stability are in question.
-
Remove or mark obstructions such as ditches, holes, ruts, bumps, rocks, or other hidden hazards. Tall grass can hide obstructions. Uneven terrain could overturn the machine.
-
Be aware that operating the machine on wet grass, across slopes, or downhill may cause the machine to lose traction. Loss of traction to the drive wheels may result in sliding and a loss of braking and steering.
-
Use extreme caution when operating the machine near drop-offs, ditches, embankments, water hazards, or other hazards. The machine could suddenly roll over if a wheel goes over the edge or the edge caves in. Establish a safety area between the machine and any hazard.
-
Identify hazards at the base of the slope. If there are hazards, mow the slope with a power walk-behind mower.
-
If possible, keep the attachment lowered to the ground while operating on slopes. Raising the attachment while operating on slopes can cause the machine to become unstable.
-
Use extreme caution with other attachments. These can change the stability of the machine and cause a loss of control. Always keep the machine in gear when going down slopes. Do not coast downhill (applicable only to gear-drive units).
Operating the Attachment
Danger
The rotating dimpling discs on the attachment are dangerous. Blade contact can cause serious injury or death.
Do not put your hands or feet under the attachment.
Danger
When the attachment is in operation, contact with rotating or moving parts will severely injure hands and feet.
-
Before adjusting, cleaning, inspecting, troubleshooting, or repairing the attachment, shut off the traction-unit engine and wait for all moving parts to stop.
-
Keep your face, hands, feet, and any other part of your body or clothing away from concealed, moving, or rotating parts.
Important: It is important to perform the following steps. If the machine is put into the ground in a non-operating position, serious damage to the machine might occur.Do not drive in reverse when the machine stands on the ground.
-
Drive to the sowing location.
-
Start at a speed of approximately 3 km/h (1.9 mph).
-
Lower the attachment gently to the ground until the sowing elements cut into the ground.
-
Increase your speed until you reach the appropriate speed per your seeding situation.
Important: The maximum sowing speed is 12 km/h (7.5 mph)
Operating Tips
Overseeding
-
A field can be treated two or three times in different directions in order to obtain a higher sowing density.
-
Do not drive in sharp curves. Drive in straight lines to prevent damage to the machine and the ground.
-
If a hard object in the ground is hit, the dimpling discs can get damaged. If the discs become damaged, try to file the burrs or replace them.
-
Ensure that the dimpling discs do not get damp. Postpone sowing in wet conditions.
-
If the dimpling discs get damp, seeds can stick to each other and accumulate on the discs.
-
Never drive in reverse when the machine is on the ground.
Important: Do not put down more seed than recommended by the seed company. Overseeding can cause the grass to be too thick and cause it to be susceptible to fungus.
After Operation
After Operation Safety
-
Park the traction unit on a level surface; engage the parking brake of the traction unit; shut off the engine; remove the key; and wait for all movement to stop before leaving the operator’s position.
-
Allow the machine to cool before storing the machine in any enclosure.
-
Keep all parts of the machine in good working condition and all hardware tightened.
-
Replace all worn, damaged, or missing decals.
Hauling the Machine
Tie-down points for hauling the attachment are shown in Figure 9.
Removing the Attachment
-
Park the machine on a level surface, engage the parking brake, lower the attachment to the ground, shut off the engine, and remove the key from the traction unit.
-
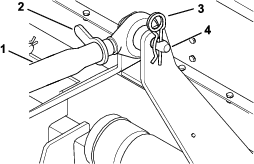
Loosen the upper link jam nut and rotate the upper link (Figure 10).
-
Remove the upper link arm.
-
Remove the lower link arms (Figure 11).
Important: Ensure that the attachment does not slide off the traction unit and cannot roll away.
-
Start the traction unit and drive it away from the attachment.
-
Install the hairpin cotters to the hitch pins (Figure 12).
Maintenance
Recommended Maintenance Schedule(s)
| Maintenance Service Interval | Maintenance Procedure |
|---|---|
| After the first 20 hours |
|
| Before each use or daily |
|
| Every 100 hours |
|
| Yearly or before storage |
|
Caution
If you leave the key in the traction-unit switch, someone could accidently start the engine and seriously injure you or other bystanders.
Remove the key from the switch before you perform any maintenance.
Maintenance Safety
-
Before adjusting, cleaning, servicing, or leaving the machine, do the following:
-
Position the machine on a level surface.
-
Move the throttle switch to the low-idle position.
-
Disengage the PTO (if applicable).
-
Ensure that the traction is in neutral.
-
Engage the parking brake.
-
Shut off the engine of the traction unit and remove the key.
-
Wait for all moving parts to stop.
-
Allow machine components to cool before performing maintenance.
-
-
Perform only those maintenance instructions described in this manual. If major repairs are ever needed or assistance is desired, contact an authorized Bullseye distributor.
-
Ensure that the machine is in safe operating condition by keeping nuts, bolts, and screws tight.
-
If possible, do not perform maintenance while the engine is running. Keep away from moving parts.
-
Carefully release pressure from components with stored energy.
-
Support the machine with blocks or storage stands when working beneath it. Never rely on the hydraulic system to support the machine.
-
Never crawl under the attachment. If necessary, tilt the attachment.
-
Ensure that all guards are installed and secured after maintaining or adjusting the machine.
-
To ensure safe, optimal performance of the machine, use only genuine Bullseye replacement parts. Replacement parts made by other manufacturers could be dangerous, and such use could void the product warranty.
Greasing the Bearings
| Maintenance Service Interval | Maintenance Procedure |
|---|---|
| After the first 20 hours |
|
| Every 100 hours |
|
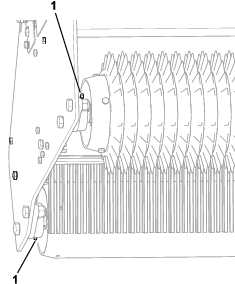
Add Number 2 lithium grease to the roller bearings on each side of the attachment (right side shown in Figure 8). Wipe away any excess grease.
Checking the Grease Level in the Gearbox
| Maintenance Service Interval | Maintenance Procedure |
|---|---|
| Every 100 hours |
|
Grease specification: 80W-90
-
Remove the fill plug (Figure 14) from the side of the gearbox.
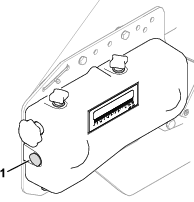
-
Check the grease level in the gearbox.
If the grease level does not reach the fill-plug level, add more of the specified grease until it reaches the fill-plug level.
-
Install the fill plug to the gearbox.
Checking the Tire Pressure
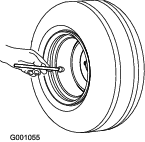
Tire pressure specification: 1 to 2 bar (14.5 to 29 psi)
Check the air pressure in the tire (Figure 15). Add or remove air as needed to set the air pressure in the tire to the tire-pressure specification.
Washing the Attachment
| Maintenance Service Interval | Maintenance Procedure |
|---|---|
| Before each use or daily |
|
| Every 100 hours |
|
Wash the attachment as needed using compressed air, if possible. Use water as little as possible to clean the attachment. You may use a rag when washing the attachment.
Important: Do not use brackish or reclaimed water to clean the attachment.
Important: Do not use power-washing equipment to wash the attachment. Power-washing equipment may loosen important decals or wash away necessary grease at friction points.
Storage
Storage Safety
-
Park the machine on a level surface, shut off the engine, wait for all moving parts to stop, engage the parking brake, and allow the machine to cool before storing it.
-
Do not store the machine or fuel near flames or drain the fuel indoors.
Storing the Machine
| Maintenance Service Interval | Maintenance Procedure |
|---|---|
| After the first 20 hours |
|
| Before each use or daily |
|
| Every 100 hours |
|
-
Wash the machine; refer to Washing the Attachment.
-
Check and tighten all bolts, nuts, and screws. Repair or replace any part that is damaged.
-
Paint all scratched or bare metal surfaces with paint from an authorized Bullseye distributor.
-
Store the machine on a level surface in a clean, dry garage or storage area.
-
Cover the machine to protect it and keep it clean.
Troubleshooting
| Problem | Possible Cause | Corrective Action |
|---|---|---|
| No seeds come out of the machine. |
|
|
| The seeds do not reach the correct depth. |
|
|
| Too many seeds come out of the machine. |
|
|
| The tractor does not have sufficient traction. |
|
|