Installation
Preparing the Machine
Gas Models Only
-
Park the machine on a level surface.
-
Disengage the blade-control switch.
-
Move the motion-control levers outward to the PARK position.
-
If equipped, engage the parking brake.
-
Shut off the machine and remove the key.
-
Wait for all moving parts to stop.
-
Allow machine components to cool.
Electric Models Only
-
Park the machine on a level surface.
-
Disengage the blade-control switch.
-
Move the motion-control levers outward to the NEUTRAL position.
-
Engage the parking brake.
-
Shut off the machine and remove the key.
-
Wait for all moving parts to stop.
-
Allow machine components to cool.
-
Remove the battery packs from the machine.
Installing the LED Light Kit
Parts needed for this procedure:
| Light bracket | 1 |
| Hex-washer-head thread forming screw (5/16 x 3/4 inch) | 2 |
| LED light | 1 |
| Hex-washer-head screw | 2 |
| Wire harness | 1 |
| Cable tie | 1 |
Note: For installation assistance, contact an Authorized Service Dealer.
-
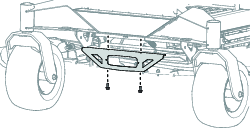
Install the light bracket onto the front of the machine using the 2 hex-washer-head thread forming screws (5/16 x 3/4 inch).
-
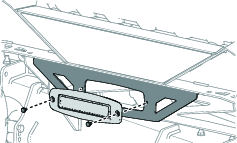
Install the light to the light bracket using the 2 hex-washer-head screws.
-
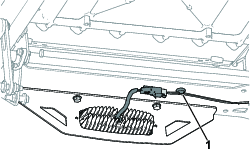
Connect the wire harness to the back of the lights and secure the harness to the front frame rail using the harness clip.
-
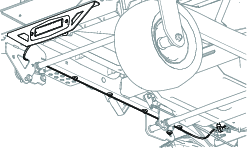
Route the wire harness along the right frame rail, while securing the harness clips to the rail.
-
Cut the cable tie securing the auxiliary connector off the main harness and remove the auxiliary end plug.
-
Connect the light harness to the auxiliary connector.
-
Secure the kit wire harness to the machine wire harness using the cable tie.
-
Electric machines only: install the batteries.